第七章、Spring AOP
一、AOP与OOP
AOP:Aspect Oriented Programming 面向切面的编程
OOP:Object Oriented Programming 面向对象的编程
二者编程模式不同,编程思想不同
OOP是面向对象编程,核心思想是将客观存在的不同事物抽象成相互独立的类,然后把与事物相关的属性和行为封装到类里,并通过继承和多态来定义类彼此间的关系,最后通过操作类的实例来完成实际业务逻辑的功能需求。
AOP是面向切面编程,核心思想是将业务逻辑中与类不相关的通用功能切面式的提取分离出来,让多个类共享一个行为,一旦这个行为发生改变,不必修改类,而只需要修改这个行为即可。
OOP与AOP的区别:
1、面向目标不同:简单来说OOP是面向名词领域,AOP面向动词领域。
2、思想结构不同:OOP是纵向结构,AOP是横向结构。
3、注重方面不同:OOP注重业务逻辑单元的划分,AOP偏重业务处理过程的某个步骤或阶段。
OOP与AOP联系:
两者之间是一个相互补充和完善的关系。
AOP的优点:
利用AOP可以对业务逻辑的各个部分进行隔离,从而使得业务逻辑各部分之间的耦合度降低,提高程序的可重用性,同时提高了开发的效率。
Spring AOP应用;
用AOP声明性事务代替EJB的企业服务
用AOP做日志处理
用AOP做权限控制,如Spring Security
二、AOP中的专业术语
切点Pointcut
定位到方法的条件
每个程序类都拥有多个连接点,如一个拥有两个方法的类,这两个方法都是连接点。但在这为数从多的连接点中,如何定位到某个感兴趣的连接点上?AOP通过“切点”定位特定连接点。
类比:
通过数据库查询的概念来理解切点和连接点的关系再适合不过了:连接点相当于数据库中的记录,而切点相当于查询条件。切点和连接点不是一对一的关系,一个切点可以匹配多个连接点。
在Spring中,切点通过PointCut接口进行描述,它使用类和方法作为连接点的查询条件。
增强Advice
增强是织入到目标类连接点上的一段程序代码。增强既包含了用于添加到目标连接点上的一段执行逻辑,又包含了用于定位连接点的方位信息,所以SPRING所提供的增强接口都是带方位名的:BeforeAdviceAfterReturningAdivce,throwsAdvice等等。
目标对象Target
增强逻辑的织入的目标类(被代理的目标类)
引介Introduction
引介是一种特殊的增强,它为类添加一些属性和方法。这样,即使一个业务类原本没有实现某个接口。通过AOP的引介功能,我们可以动态地为该业务类添加接口的实例逻辑,让业务类成为这个接口的实现类。
织入Weaving
织入是将增强添加对目标类具体连接点上的过程。根据不同的实现技术,AOP有三种织入方式:
- 编译期织入,这要求使用特殊的JAVA编译器
- 类装载期织入,这要求使用特殊的类加载器;
- 动态代理织入,在运行期为目标类添加增强生成的方式。
代理Proxy
一个类被AOP增强后,就产出了一个结果类,它是整合了原类和增强逻辑的代理类。根据不同的代理方式,代理类既可能是和原类具有相同接口的类,也可能就是原类的子类。所以我们可以采用调用原类相同的方式调用代理类。
切面Aspect
切面由切点和增强(引介)组成,它既包括了横切逻辑的定义,也包括了连接点的定义,SPRINGAOP就是负责实施切面的框架,它将切面所定义的横切逻辑到切面所指定的连接点中。
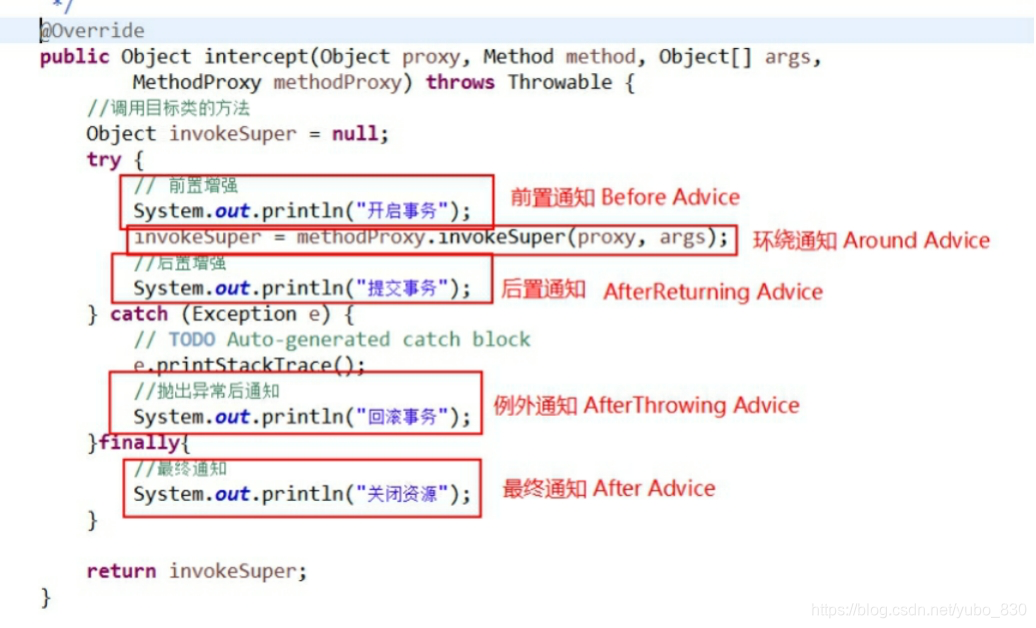
三、通知的类型(5种)
before:前置通知(应用:各种校验)
在方法执行前执行,如果通知抛出异常,阻止方法运行
afterReturning:后置通知(应用:常规数据处理)
方法正常返回后执行,如果方法中抛出异常,通知无法执行
必须在方法执行后才执行,所以可以获得方法的返回值。
around:环绕通知(应用:十分强大,可以做任何事情)
方法执行前后分别执行,可以阻止方法的执行
必须手动执行目标方法
afterThrowing:抛出异常通知(应用:包装异常信息)
方法抛出异常后执行,如果方法没有抛出异常,无法执行
after:最终通知(应用:清理现场)
方法执行完毕后执行,无论方法中是否出现异常
四、基于注解的AOP
@AspectJ是一种风格样式,可以把普通的java类声明为一个切面
(一)使用@Aspect,需要以下几步
-
引入aspectj的maven依赖
-
autoproxying配置
java类的配置模式:
@Configuration
@EnableAspectJAutoProxy
public class AppConfig{}
XML配置模式:
aop命名空间
<aop:aspectj-autoproxy/> -
声明Ascpect
@Componet
@Aspect
public class DbProxy{}
(二)AOP编程
(1)添加AOP命名空间
(2)启动@Aspect注解的支持
<aop:aspectj-autoproxy/>
(3)启动注解扫描机制
<context:component-scan base-package="com.tjetc"/>
(4)添加aspectjweaver的maven依赖
<dependency>
 		<groupId>org.aspectj</groupId>
 		<artifactId>aspectjweaver</artifactId>
 		<version>1.9.5</version>
 	</dependency>
(5)写切面类
@Component
@Aspect//切面类=切点+增强
public class TransactionPrint {


    //切点
	@Pointcut("execution(* com.tjetc.service..*.*(..))") //定位到连接点的条件
	private void anyMethod(){

    } //方法签名,返回值void

	//下面内容是增强部分
	@Before("anyMethod()")
	public void before() {


		System.out.println("前置增强");
	}
	@AfterReturning("anyMethod()")
	public void afterReturning() {


		System.out.println("后置增强");
	}
	@After("anyMethod()")
	public void after() {


		System.out.println("后置增强");
	}
	@AfterThrowing("anyMethod()")
	public void afterThrowing() {


		System.out.println("例外增强");
	}

	@Around("anyMethod()")
	public Object around(ProceedingJoinPoint pjp) throws Throwable{


		System.out.println("环绕通知开始");
		Object proceed = pjp.proceed();
		System.out.println("环绕通知结束");
		return proceed;
	}
}
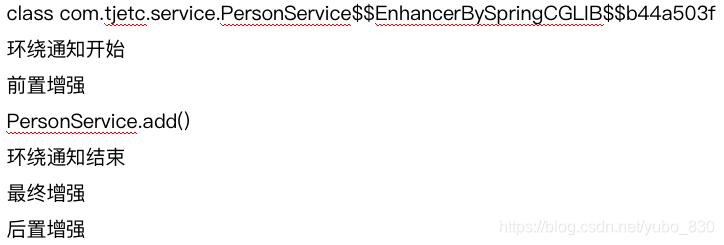
(6)业务类(被代理的目标类)
@Service
public class PersonService {


	public void add() {


		System.out.println("PersonService.add()");
	}

	public void update() {


		System.out.println("PersonService.update()");
	}

	public void del() {


		System.out.println("PersonService.del()");
	}
}
(7)测试类
public static void main(String[] args) {


		// 实例化容器
		ClassPathXmlApplicationContext context = new 				ClassPathXmlApplicationContext("applicationContext.xml");
		//从容器得到bean
		PersonService personService = context.getBean(PersonService.class);
		//personService是什么对象?
		System.out.println(personService.getClass());
		//调用personService的方法
		personService.add();
	}
(8)异常
@Service
public class PersonService {


	public void add() {


		System.out.println("PersonService.add()");
		System.out.println(1/0);
	}

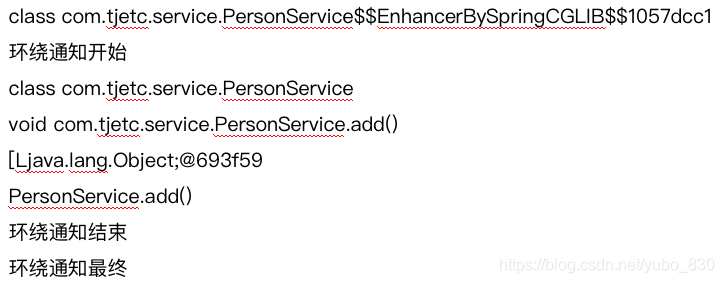
(三)环绕增强
@Component
@Aspect//切面类=切点+增强
public class TransactionPrint {


    //切点
	@Pointcut("execution(* com.tjetc.service..*.*(..))") //定位到连接点的条件
	private void anyMethod(){

    } //方法签名,返回值void


	@Around("anyMethod()")
	public Object around(ProceedingJoinPoint pjp) throws Throwable{


		Object proceed = null;
		try {


			System.out.println("环绕通知开始");
			System.out.println(pjp.getTarget().getClass());
			System.out.println(pjp.getSignature());
			System.out.println(pjp.getArgs());
			proceed = pjp.proceed();
			System.out.println("环绕通知结束");
		} catch (Exception e) {


			// TODO Auto-generated catch block
			e.printStackTrace();
			System.out.println("环绕通知例外");
		}finally{


			System.out.println("环绕通知最终");
		}
		return proceed;
	}
}
(四)pointcut表达式
在一个切面类中可以声明多个切点表达式,把几个切点签名用&& || !连起来使用
1.在切面类写切点表达式,使用切入点签名连接
		@Pointcut("execution(* com.tjetc.service..*.*(..))")
		public void anyMethod1(){

    }
		@Pointcut("execution(* com.tjetc.dao..*.*(..))")
		public void anyMethod2(){

    }
		@Pointcut("anyMethod1() || anyMethod2()")
		public void anyMethod(){

    }
2.使用切入点表达式连接
@Pointcut("execution(* com.tjetc.service..*.*(..)) || execution(* com.tjetc.dao..*.*(..))")
public void anyMethod(){

    }
(五)声明Advice
1、使用切入点方法签名
本类的方法直接写方法名()
	@Before("anyMethod()")
	public void before() {


		System.out.println("前置增强");
	}
非本类的方法写类的全路径名.方法名() (确保方法签名是public能访问的;否则报错)
@Component
@Aspect
public class Transcation2 {


	@Before("com.tjetc.aspect.TransactionPrint.anyMethod()")
	public void before() {


		System.out.println("前置增强2");
	}
}
2、使用切入点表达式
本类或者非本类都可以使用,不推荐
	@Before("execution(* com.tjetc.service..*.*(..)) || execution(* com.tjetc.dao..*.*(..))")
	public void before() {


		System.out.println("前置增强");
	}
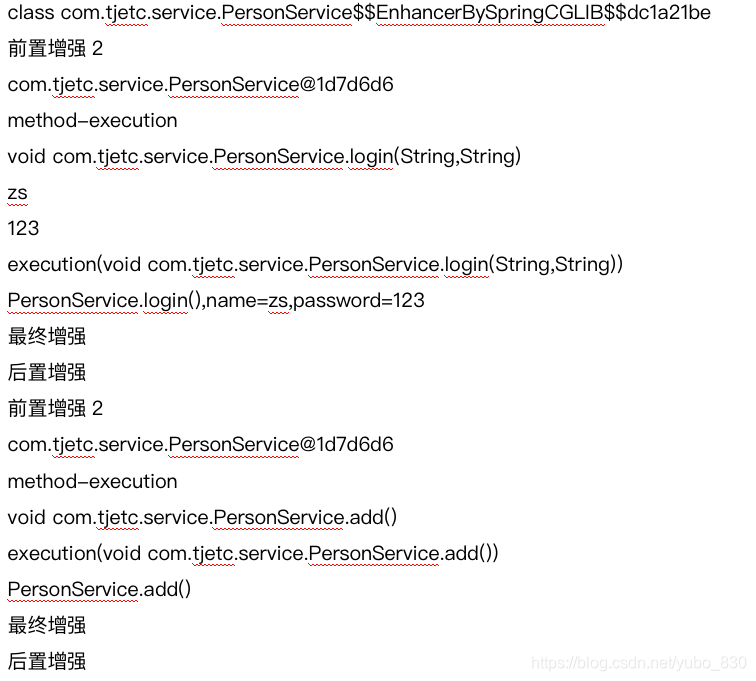
(六)JoinPoint
在通知方法里添加JoinPoint类型的参数
JoinPoint中的方法:
getArgs():返回代理对象的方法参数
getTarget():返回目标对象
getSignature():返回被通知方法的信息
toString():打印被通知方法的有用信息
环绕通知ProceedingJointPoint的方法:
java.lang.Object proceed() throws java.lang.Throwable:通过反射执行目标对象的连接点处的方法;
java.lang.Object proceed(java.lang.Object[] args) throws java.lang.Throwable:通过反射执行目标对象连接点处的方法,不过使用新的参数替换原来的参数
@Before("execution(* com.tjetc.service..*.*(..))  || execution(* com.tjetc.dao..*.*(..))")
	public void before(JoinPoint jp) {


		System.out.println("前置增强2");
		System.out.println(jp.getTarget());
		System.out.println(jp.getKind());
		System.out.println(jp.getSignature());
		if (jp.getArgs()!=null && jp.getArgs().length==2) {


			System.out.println(jp.getArgs()[0]);
			System.out.println(jp.getArgs()[1]);
		}
		System.out.println(jp);
	}
public static void main(String[] args) {


		// 实例化容器
		ClassPathXmlApplicationContext context = new ClassPathXmlApplicationContext("applicationContext.xml");
		//从容器得到bean
		PersonService personService = context.getBean(PersonService.class);
		//personService是什么对象?
		System.out.println(personService.getClass());
		//调用personService的方法
		personService.login("zs","123");
		personService.add();
}
(七)@AfterReturning返回值
被代理的目标对象的方法执行完之后执行,在增强如何得到目标对象方法执行后的返回值.
实现步骤:
第一步:在@AfterReturning添加returning属性retruning=”方法参数的名称”
第二步:在方法里写一个参数,名称是returning属性的值,接收返回值
@Service
public class PersonService {


	public String sayHello(String name) {


		return "Hello " + name;
	}
}
@Component
@Aspect
public class PersonAspect {


  @Pointcut("execution(* com.tjetc.service..*.*(..))")
  public void anyMethod(){

    }

  @Before("anyMethod()")
  public  void before(){


	  System.out.println("前置增强");
  }
  @AfterReturning(value="anyMethod()",returning="result")
  public void afterReturning(Object result){


	  System.out.println("后置增强,返回值="+result);
  }
}
(八)@AfterThrowing异常@AfterThrowing异常
当异常发生时异常通知如何得到异常信息?
实现步骤:
第一步:在@AfterThrowing添加属性throwing=”方法参数的名称”
第二步:在方法里写一个参数,名称是throwing属性的值,接收异常对象
@AfterThrowing(value="anyMethod()",throwing="ex")
	public void afterThrowing(Exception ex) {


		System.out.println("异常通知,ex="+ex);
	}
(九)在增强里接收参数
1、使用JoinPoint接口的getArgs()接收参数
@Before("anyMethod()")
	public void before(JoinPoint jp) {


		Object[] args = jp.getArgs();
		for (Object object : args) {


			System.out.println("参数:"+object);
		}
		System.out.println("前置增强");
	}
2、使用args
实现步骤:
第一步:在value =”切点 && args(参数名)” argNames=”参数名”
第二步:方法写参数
@Before(value="anyMethod() && args(name)",argNames="name")
//@Before(value="execution(* com.tjetc.service..*.*(..)) && args(name)",argNames="name")
	public void before(JoinPoint jp,String name) {


		System.out.println("参数:name="+name);
		System.out.println("前置增强");
	}
五、基于 XML的AOP
(一)添加依赖
<dependency>
  		<groupId>org.springframework</groupId>
  		<artifactId>spring-context</artifactId>
  		<version>5.0.15.RELEASE</version>
  	</dependency>
  	<dependency>
  		<groupId>org.aspectj</groupId>
  		<artifactId>aspectjweaver</artifactId>
  		<version>1.9.5</version>
  	</dependency>
(二)业务类
public class PersonService {


   public void add(){


	   System.out.println("PersonService.add()...");
   }
   public void update(){


	   System.out.println("PersonService.update()...");
   }
   public String sayHello(String name){


	   System.out.println("PersonService.sayHello()...");
	   return "Hello "+name;
   }
}
(三)切面类
public class PersonAspect {


	public void before() {


		System.out.println("前置通知");
	}
	public void afterReturning() {


		System.out.println("后置通知");
	}
	public void after() {


		System.out.println("最终通知");
	}
	public void afterThrowing() {


		System.out.println("例外通知");
	}

	public Object around(ProceedingJoinPoint pjp) {


		Object proceed = null;
		try {


			System.out.println("环绕开始");
			proceed = pjp.proceed();
System.out.println("环绕结束");
		} catch (Throwable e) {


			// TODO Auto-generated catch block
			e.printStackTrace();
			System.out.println("环绕异常通知");
		}finally{


			System.out.println("环绕最终通知");
		}

		return proceed;
	}
}
(四)applicationContext.xml配置bean和切面
<!--目标类  -->
     <bean id="personService" class="com.tjetc.service.PersonService"></bean>
       <!-- 切面普通类 -->
     <bean id="personAspect" class="com.tjetc.aspect.PersonAspect"></bean>
     <!-- aop配置 -->
     <aop:config>
          <!--配置切面  -->
          <aop:aspect id="myaspect" ref="personAspect">
             <!-- 切点 -->
             <aop:pointcut expression="execution(* com.tjetc.service..*.*(..))" id="mycut"/>
             <!-- 增强 -->
             <aop:before method="before" pointcut-ref="mycut"/>
             <aop:after-returning method="afterReturning" pointcut-ref="mycut"/>
             <aop:after method="after" pointcut-ref="mycut"/>
             <aop:after-throwing method="afterThrowing" pointcut-ref="mycut"/>
          </aop:aspect>
     </aop:config>
(五)配置切面
- 切面的普通类
<bean id="personAspect" class="com.tjetc.aspect.PersonAspect"> <aop:config>子节点<aop:aspect id==”myaspect” ref=”personAspect”>启动和增强</aop:aspect>
(六)配置切点
- 切点配置的位置
a) aop:config下,aop:config下所有的切面都能使用该切面
b) aop:aspect下,只能是该切面能使用该切点 <aop:pointcut expression=”execution(* com.tjetc.service..*.*(..))” id=”mycut”>
(七)配置增强
- 前置增强
<aop:before method=”before” pointcut-ref=”mycut”> - 后置增强
<aop:after-returning method=”afterReturning” pointcut-ref=”mycut”> - 例外增强
<aop:after-throwing method=”afterThrowing” pointcut-ref=”mycut”> - 最终增强
<aop:after method=”after” pointcut-ref=”mycut”> - 环绕增强
<aop:around method=”around” pointcut-ref=”mycut”>
(八)advisor通知器
<aop:config>
  <!-- 切点 -->
             <aop:pointcut expression="execution(* com.tjetc.service..*.*(..))" id="mycut"/>
          <!--配置advisor  -->
      <aop:advisor pointcut-ref=”mycut”  advice-ref=”tx-advice”>
</aop:config>
<tx:advice id=”tx-advice”>
   <tx:attributes>
  <tx:method name=”add*” propagation=”REQUIRED”>
  <tx:method name=”update*” propagation=”REQUIRED”>
  <tx:method name=”*”  readonly=”true”>
</tx:attributes>
</tx:advice>
(九)后置增强的返回值
第一步:在配置文件的aop:after-returning添加属性returning=”变量名”
第二步:在切面类的afterReturning(Object 变量名)方法添加参数Object 变量名
第三步:测试调用有返回值的方法
<aop:after-returning method="afterReturning" pointcut-ref="mycut" returning="res"/>
public void afterReturning(JoinPoint jp,Object res) {


		System.out.println("后置通知:res="+res);
	}
(十)在增强里接收参数
1、使用JoinPoint接口的getArgs()接收参数
第一步:直接在切面类的增强方法里写JoinPoint jp参数
第二步:在方法体写jp.getArgs();得到数组,遍历数组得到每一个参数的值输出.
2、使用args
第一步:在配置文件添加节点
<aop:pointcut expression=”execution(* com.tjetc.service..*.*(..)) and args(name)” id=”mycut1”>
第二步:以下2种都可以
1.在<aop:before method=”before” pointcut-ref=”mycut1”>
2.在<aop:before method=”before” pointcut=”execution(* com.tjetc.service..*.*(..)) and args(name)”>
第三步:切面类的before(String name)接收参数,输出显示
public void before(JoinPoint jp,String name) {


		System.out.println("前置通知:name="+name);
	}
(十一)写多个切面类配置多个切面
第一步:创建多个切面类
第二步:配置多个切面,共享同一个切点
第三步:测试
结论:
1.多个切面可以同时协同工作,共同起作用
2.默认按照配置的顺序执行:前面配置的切面先起作用,后面配置的切面后期作用
3.如果设置order属性,会按照order的值的顺序执行:值越小越先起作用
public class MyAspect {


	public void before(JoinPoint jp) {


		System.out.println("MyAspect前置通知");
//		System.out.println(1/0);
	}
	public void afterReturning(JoinPoint jp) {


		System.out.println("MyAspect后置通知:");
	}
	public void after() {


		System.out.println("MyAspect最终通知");
	}
	public void afterThrowing() {


		System.out.println("MyAspect例外通知");
	}
}
public class PersonAspect {


	public void before(JoinPoint jp,String name) {


		/*Object[] args = jp.getArgs();
		for (Object object : args) {
			System.out.println("接收参数:"+object);
		}*/
		System.out.println("前置通知:name="+name);
//		System.out.println(1/0);
	}
	public void afterReturning(JoinPoint jp,Object res) {


		System.out.println("后置通知:res="+res);
	}
	public void after() {


		System.out.println("最终通知");
	}
	public void afterThrowing(Exception ex) {


		System.out.println("例外通知:ex="+ex);
	}

	public Object around(ProceedingJoinPoint pjp) {


		Object proceed = null;
		try {


			System.out.println("环绕开始");
			proceed = pjp.proceed();
			System.out.println("环绕结束");
		} catch (Throwable e) {


			// TODO Auto-generated catch block
			e.printStackTrace();
			System.out.println("环绕异常通知");
		}finally{


			System.out.println("环绕最终通知");
		}
		return proceed;
	}
}
<!--目标类  -->
     <bean id="personService" class="com.tjetc.service.PersonService"></bean>
       <!-- 切面普通类 -->
     <bean id="personAspect" class="com.tjetc.aspect.PersonAspect"></bean>
     <bean id="myAspect" class="com.tjetc.aspect.MyAspect"></bean>
     <!-- aop配置 -->
     <aop:config>
             <!-- 切点 -->
             <!-- <aop:pointcut expression="execution(* com.tjetc.service..*.*(..)) and args(name)" id="mycut1"/> -->
             <aop:pointcut expression="execution(* com.tjetc.service..*.*(..))" id="mycut"/>
          <!--配置切面  -->
          <aop:aspect id="personAspect" ref="personAspect" order="2">
             <!-- 增强 -->
             <aop:before method="before" pointcut="execution(* com.tjetc.service..*.*(..)) and args(name)"/>
             <aop:after-returning method="afterReturning" pointcut-ref="mycut" returning="res"/>
             <aop:after method="after" pointcut-ref="mycut"/>
             <aop:after-throwing method="afterThrowing" pointcut-ref="mycut" throwing="ex"/>
             <!-- <aop:around method="around" pointcut-ref="mycut"/> -->
          </aop:aspect>
          <aop:aspect id="myAspect" ref="myAspect" order="1">
              <aop:before method="before" pointcut-ref="mycut"/>
             <aop:after-returning method="afterReturning" pointcut-ref="mycut"/>
             <aop:after method="after" pointcut-ref="mycut"/>
             <aop:after-throwing method="afterThrowing" pointcut-ref="mycut"/>
          </aop:aspect>
     </aop:config>
public static void main(String[] args) {


		ClassPathXmlApplicationContext context = new ClassPathXmlApplicationContext(
				"applicationContext.xml");
		PersonService personService = context.getBean(PersonService.class);
		System.out.println(personService.getClass());
		String sayHello = personService.sayHello("赵六");
		System.out.println(sayHello);
}
