多数据源系列
1、spring boot2.0 +Mybatis + druid搭建一个最简单的多数据源
2、利用Spring的AbstractRoutingDataSource做多数据源动态切换
3、使用dynamic-datasource-spring-boot-starter做多数据源及源码分析
简介
在大部分情况下,搭建单数据源就能够满足需求了,但是特殊情况下也需要使用多数据源,这里就写了一个demo搭建多数据源,注意这里没有使用AbstractRoutingDataSource 来实现动态切换
实操
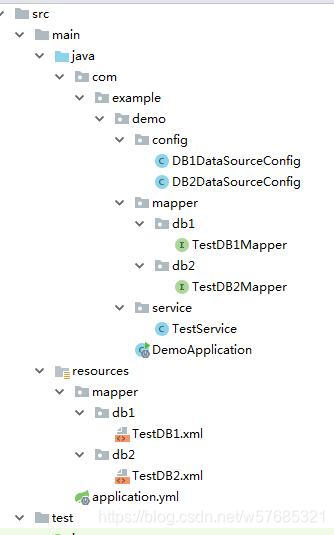
文件结构,最好每个数据源的mapper对应每个目录,分开来做
先上pom,这里只截取了关键的依赖
	<parent>
		<groupId>org.springframework.boot</groupId>
		<artifactId>spring-boot-starter-parent</artifactId>
		<version>2.0.4.RELEASE</version>
		<relativePath/> <!-- lookup parent from repository -->
	</parent>
	......
	<dependencies>
		<dependency>
			<groupId>org.mybatis.spring.boot</groupId>
			<artifactId>mybatis-spring-boot-starter</artifactId>
			<version>1.3.2</version>
		</dependency>
		<!-- druid -->
		<dependency>
			<groupId>com.alibaba</groupId>
			<artifactId>druid</artifactId>
			<version>1.0.18</version>
		</dependency>
		<dependency>
			<groupId>com.ibm.db2.jcc</groupId>
			<artifactId>db2jcc</artifactId>
			<version>9.7</version>
		</dependency>
	</dependencies>
下面是springboot的主配置,application.yml
logging: #打印sql
  level:
    com.example.demo.mapper.db1: debug
    com.example.demo.mapper.db2: debug
spring:
  datasource: #数据源配置
    type: com.alibaba.druid.pool.DruidDataSource
    db1:
      type: com.alibaba.druid.pool.DruidDataSource
      driverClassName: com.ibm.db2.jcc.DB2Driver
      initialize: true #指定初始化数据源,是否用data.sql来初始化,默认: true
      name: db1
      # 本地开发环境配置db2
      url: jdbc:db2://10.101.167.28:56000/QCD
      username: db2
      password: 123456
    db2:
      type: com.alibaba.druid.pool.DruidDataSource
      driverClassName: com.ibm.db2.jcc.DB2Driver
      initialize: true #指定初始化数据源,是否用data.sql来初始化,默认: true
      name: db2
      # 本地开发环境配置db2
      url: jdbc:db2://10.101.167.28:56000/SAMPLE
      username: db2
      password: 123456
下面是DB1的配置
package com.example.demo.config;

import com.alibaba.druid.pool.DruidDataSource;
import org.apache.ibatis.session.SqlSessionFactory;
import org.mybatis.spring.SqlSessionFactoryBean;
import org.mybatis.spring.SqlSessionTemplate;
import org.mybatis.spring.annotation.MapperScan;
import org.springframework.beans.factory.annotation.Qualifier;
import org.springframework.boot.context.properties.ConfigurationProperties;
import org.springframework.context.annotation.Bean;
import org.springframework.context.annotation.Configuration;
import org.springframework.context.annotation.Primary;
import org.springframework.core.io.support.PathMatchingResourcePatternResolver;
import org.springframework.jdbc.datasource.DataSourceTransactionManager;

import javax.sql.DataSource;

@Configuration
// 扫描mapper接口包路径
@MapperScan(basePackages = "com.example.demo.mapper.db1", sqlSessionTemplateRef = "db1SqlSessionTemplate")
public class DB1DataSourceConfig {


    // 配置连接池,这里直接new一个Druid连接池,
    // 也可以new其他的连接池,比如spring boot默认的hikari连接池
    @Bean(name = "db1DataSource")
    @ConfigurationProperties(prefix = "spring.datasource.db1")
    @Primary
    public DataSource setDataSource() {


        return new DruidDataSource();
    }

    // 事务配置
    @Bean(name = "db1TransactionManager")
    @Primary
    public DataSourceTransactionManager setTransactionManager(@Qualifier("db1DataSource") DataSource dataSource) {


        return new DataSourceTransactionManager(new DruidDataSource());
    }

    // 配置sessionFactory,这里的多数据源就是每个数据源对应一个sessionFactory
    // 下面getResources的就是mapper.xml文件
    @Bean(name = "db1SqlSessionFactory")
    @Primary
    public SqlSessionFactory setSqlSessionFactory(@Qualifier("db1DataSource") DataSource dataSource) throws Exception {


        SqlSessionFactoryBean bean = new SqlSessionFactoryBean();
        bean.setDataSource(dataSource);
        bean.setMapperLocations(new PathMatchingResourcePatternResolver().getResources("classpath:mapper/db1/*.xml"));
        return bean.getObject();
    }

    // 配置SqlSessionTemplate
    @Bean(name = "db1SqlSessionTemplate")
    @Primary
    public SqlSessionTemplate setSqlSessionTemplate(@Qualifier("db1SqlSessionFactory") SqlSessionFactory sqlSessionFactory) throws Exception {


        return new SqlSessionTemplate(sqlSessionFactory);
    }
}
这里为每个数据源都配置了连接池和sessionFactory,然后需要注意的是这里使用的@ConfigurationProperties注解来自动读取配置到DruidDataSource中,当然也可以@Value读取配置,然后手工在DruidDataSource对象中把值一个个set进去。
上面的yml配置中驱动名称应该写为driverClassName,而不是driver-class-name,不然会报找不到driver错误。
@MapperScan中配置扫描该数据库的mapper接口文件,这就把不同数据库的sql分开了,这样写了之后在Application主入口文件就不需要再去@MapperScan了。
同理第二个配置文件也是类似的
@Configuration
@MapperScan(basePackages = "com.example.demo.mapper.db2", sqlSessionTemplateRef = "db2SqlSessionTemplate")
public class DB2DataSourceConfig {


    @Bean(name = "db2DataSource")
    @ConfigurationProperties(prefix = "spring.datasource.db2")
    public DataSource setDataSource() {


        return new DruidDataSource();
    }

    @Bean(name = "db2TransactionManager")
    public DataSourceTransactionManager setTransactionManager(@Qualifier("db2DataSource") DataSource dataSource) {


        return new DataSourceTransactionManager(new DruidDataSource());
    }

    @Bean(name = "db2SqlSessionFactory")
    public SqlSessionFactory setSqlSessionFactory(@Qualifier("db2DataSource") DataSource dataSource) throws Exception {


        SqlSessionFactoryBean bean = new SqlSessionFactoryBean();
        bean.setDataSource(dataSource);
        bean.setMapperLocations(new PathMatchingResourcePatternResolver().getResources("classpath:mapper/db2/*.xml"));
        return bean.getObject();
    }

    @Bean(name = "db2SqlSessionTemplate")
    public SqlSessionTemplate setSqlSessionTemplate(@Qualifier("db2SqlSessionFactory") SqlSessionFactory sqlSessionFactory) throws Exception {


        return new SqlSessionTemplate(sqlSessionFactory);
    }
}
service文件写了两个测试方法
这里需要注意的是,这里配置的Bean没有跟第一个配置一样加上@Primary,所以默认的
DataSourceTransactionManager是属于DB1的,如果要开启DB2(另一个数据库)事务,需要手工指定一下这个manager,不然用的都是第一个db的事务管理器,导致事务不生效
在调用到这个数据源的方法上加上这个即可
@Transactional(transactionManager = "db2TransactionManager")
@Service
public class TestService {


    @Autowired
    private TestDB1Mapper testDB1Mapper;

    @Autowired
    private TestDB2Mapper testDB2Mapper;

    public List<Map<String, Object>> testDB1() {


        return testDB1Mapper.selectDB1();
    }

    public List<Map<String, Object>> testDB2() {


        return testDB2Mapper.selectDB2();
    }
}
运行结果
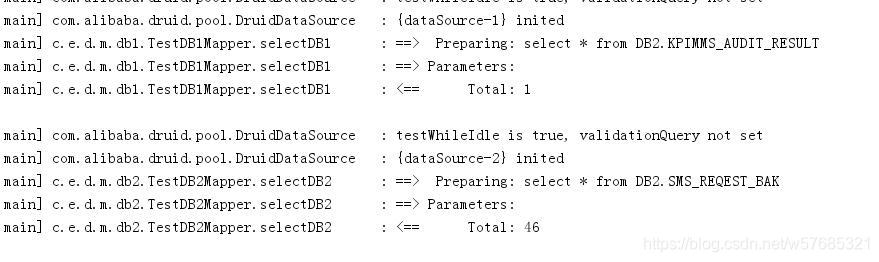
发现它初始化了两个连接池对象,然后开始执行sql语句。
这里初始化连接池还是有点慢,是个比较重量级的操作,如果需要连接许多数据库,比如根据某张表的配置信息,去连接某某数据库,这个时候采用动态数据源的方式比较好,这个在后面两篇博客会介绍到。