jQuery续集
六 标签操作之文本内容操作
html()
html()是获取选中标签元素中所有的内容
html(val)设置值:设置该元素的所有内容 会替换掉 标签中原来的内容
$('ul').html('<a href="#">百度一下</a>')
    //可以使用函数来设置所有匹配元素的内容
$('ul').html(function(){


    return '哈哈哈'
})
text()
text()获取所有匹配元素包含的文本内容
text(字符内容) 设置该所有匹配元素的文本内容
注意:值为标签的时候 不会被渲染为标签元素 只会被当做值渲染到浏览器中
val
用途:val()用于操作input的value值
示范一:
<input type="radio" name="sex" value="male">
<input type="radio" name="sex" value="female">
<input type="radio" name="sex" value="none">
$('input[type=radio]').val(['male',])
示范二:
<input type="checkbox" name="hobbies" value="111">
<input type="checkbox" name="hobbies" value="222">
<input type="checkbox" name="hobbies" value="333">
$('input[type=checkbox]').val(['111','222'])
七 标签操作之属性操作
-
用于ID等或自定义属性:
$(筛选).attr(属性名);// 返回第一个匹配元素的属性值
$('.box2 img').attr('title','美女');// 为所有匹配元素设置一个属性值
$(筛选).attr({'title': '美女', 'alt':'图片被狗吃了'});// 为所有匹配元素设置多个属性值
$(筛选).removeAttr('title');// 从每一个匹配的元素中删除一个属性 -
用于
checkbox和radio
.prop('value');// 获取value属性的值
.prop('checked',true);// 设置属性checked为选中状态
.removeProp('value');// 移除value属性
- 注意:
在1.x及2.x版本的jQuery中使用attr对checkbox进行赋值操作时会出bug,在3.x版本的jQuery中则没有这个问题。为了兼容性,我们在处理checkbox和radio的时候尽量使用特定的prop(),不要使用attr(“checked”, “checked”)。
简单示例
<h3>爱好</h3>
<input type="checkbox" name="hobbies" value="basketball">篮球
<input type="checkbox" name="hobbies" value="football">足球
<input type="checkbox" name="hobbies" value="coding">编程

<h3>性别</h3>
<input type="radio" name="sex" value="male">
<input type="radio" name="sex" value="female">
<input type="radio" name="sex" value="none">

<script>
    $(':checkbox[value=football]').prop('checked',true);
    $(':radio[value=male]').prop('checked',true);
</script>
示例:全选、反选、取消
<!doctype html>
<html lang="en">
<head>
    <meta charset="UTF-8">
    <title>Document</title>
</head>
<body>
<h3>菜单</h3>
<input type="button" value="全选" id="all">
<input type="button" value="反选" id="reverse">
<input type="button" value="取消" id="cancel">
<p>
    蒸羊羔<input type="checkbox" name="menu">

</p>
<p>
    蒸鹿茸<input type="checkbox" name="menu">

</p>
<p>
    蒸熊掌<input type="checkbox" name="menu">

</p>
<p>
    烧花鸭<input type="checkbox" name="menu">

</p>
<p>
    烧雏鸡<input type="checkbox" name="menu">

</p>
<p>
    烧子鹅<input type="checkbox" name="menu">

</p>

<script src="jquery-3.3.1.min.js"></script>
<script>
    $('#all').click(function () {


        $('p input').prop('checked', true);
    });

    $('#reverse').click(function () {


        $('p input').each(function () {


            $(this).prop('checked', !$(this).prop('checked'));
        })
    });
    $('#cancel').click(function () {


        $('p input').prop('checked', false);
    });
</script>
</body>
</html>
八 标签操作之文档处理
内部
$(A).appendTo(B); // 把A追加到B内部的最后面
$(A).prependTo(B); // 把A前置到B内部的最前面
外部
$(A).insertAfter(B); // 把A放到B外部的后面
$(A).insertBefore(B); // 把A放到B外部的前面
了解即可的,反向操作
//内部
$(A).append(B)  // 把B追加到A内部的最后
$(A).prepend(B) // 把B前置到A内部的最前面

//外部
$(A).after(B)    // 把B放到A外部的后面
$(A).before(B)  // 把B放到A外部的前面
移除和清空元素
$('.p1').remove(); // 从DOM中删除所有匹配的元素。>把元素本身删掉
$('.p1').empty(); // 删除匹配的元素集合中所有的子节点》把元素的子元素都删掉(包含文本内容)
表格内容增删改
<!doctype html>
<html lang="en">
<head>
    <meta charset="UTF-8">
    <title>Document</title>
    <style>
        * {


            margin: 0;
            padding: 0;
        }

        .cover {


            position: absolute;
            left: 0;
            right: 0;
            top: 0;
            bottom: 0;
            background-color: rgba(150, 150, 150, 0.3);
        }

        .modal {


            position: absolute;
            width: 500px;
            height: 300px;
            left: 50%;
            top: 200px;
            margin-left: -250px;
            background-color: white;
        }

        .hide {


            display: none;
        }
    </style>
</head>
<body>
<input type="button" value="新增" id="add">
<table border="1px" cellspacing="0px">
    <thead>
    <tr>
        <th>#</th>
        <th>姓名</th>
        <th>年龄</th>
        <th>操作</th>
    </tr>
    </thead>
    <tbody>
    <tr>
        <td>1</td>
        <td>Egon</td>
        <td>18</td>
        <td>
            <input type="button" value="编辑" class="edit">
            <input type="button" value="删除" class="del">
        </td>
    </tr>
    </tbody>
</table>
<div class="cover hide"></div>
<div class="modal hide">
    <label for="name">姓名</label><input type="text" id="name">
    <label for="age">年龄</label><input type="text" id="age">
    <input type="button" value="提交" id="submit">
    <input type="button" value="取消" id="cancel">
</div>


<script src="jquery-3.3.1.min.js"></script>
<script>
    // 显示模态框
    function show() {


        $('.cover').removeClass('hide');
        $('.modal').removeClass('hide');
    }

    // 隐藏模态框
    function hide() {


        $('.cover').addClass('hide');
        $('.modal').addClass('hide');
    }

    // 清除输入框内容
    function clear() {


        $('#name,#age').val('');
    }

    let current_obj='';
    function bind() {


        // 点击编辑按钮,修改全局变量submit_tag='edit',提交时则执行编辑内容的功能;
        $('.edit').click(function () {


            submit_tag = 'edit';
            current_obj=this;
            show();
            let name=$(this).parent().siblings()[1].innerHTML;
            let age=$(this).parent().siblings()[2].innerHTML;

            $('#name').val(name);
            $('#age').val(age);
        });

        $('.del').click(function () {


            let tdList = $(this).parent().parent().nextAll();
            for (let i = 0; i < tdList.length; i++) {


                let num = $(tdList[i]).children()[0].innerHTML;
                $(tdList[i]).children()[0].innerHTML = num - 1;
            }
            $(this).parent().parent().remove();
        });
    }

    // 为现有的编辑和删除按钮绑定事件
    bind();

    let submit_tag = '';
    // 点击新增按钮,修改全局变量submit_tag='add',提交时则执行添加新内容的功能;
    $('#add').click(function () {


        submit_tag = 'add';
        show();
    });

    // 点击提交按钮,根据全局变量submit_tag的值,来执行不同的功能;
    $('#submit').click(function () {


        if (submit_tag == 'add') {


            //添加新内容的功能
            let tr = document.createElement('tr');
            let td1 = document.createElement('td');
            let td2 = document.createElement('td');
            let td3 = document.createElement('td');
            let td4 = document.createElement('td');

            td1.innerHTML = $('tbody tr').length + 1;
            td2.innerHTML = $('#name').val();
            td3.innerHTML = $('#age').val();
            td4.innerHTML = '<input type="button" value="编辑" class="edit">\n' + '<input type="button" value="删除" class="del">';

            $(td1).appendTo(tr);
            $(td2).appendTo(tr);
            $(td3).appendTo(tr);
            $(td4).appendTo(tr);
            $(tr).appendTo($('tbody'));

            bind();
            hide();
            clear()
        } else if (submit_tag == 'edit') {


            //编辑已经存在内容的功能
            let tdL=$(current_obj).parent().siblings();
            tdL[1].innerHTML=$('#name').val();
            tdL[2].innerHTML=$('#age').val();
            hide();
            clear();
        }
    });

    $('#cancel').click(function () {


        clear();
        hide();
    });

</script>
</body>
</html>
替换
replaceWith(); 替换者在后,被替换者在前
replaceAll(); 替换者在前,被替换者在后
克隆
clone()
clone方法不加参数true,克隆标签但不克隆标签带的事件
clone方法加参数true,克隆标签并且克隆标签带的事件
案例:点击复制
<!DOCTYPE html>
<html lang="zh-CN">
<head>
  <meta charset="UTF-8">
  <title>克隆</title>
  <style>
    #b1 {


      background-color: deeppink;
      padding: 5px;
      color: white;
      margin: 5px;
    }
    #b2 {


      background-color: dodgerblue;
      padding: 5px;
      color: white;
      margin: 5px;
    }
  </style>
</head>
<body>

<button id="b1">屠龙宝刀,点击就送</button>
<hr>
<button id="b2">屠龙宝刀,点击就送</button>

<script src="jquery-3.3.1.min.js"></script>
<script>
  // clone方法不加参数true,克隆标签但不克隆标签带的事件
  $("#b1").on("click", function () {


    $(this).clone().insertAfter(this);
  });
  // clone方法加参数true,克隆标签并且克隆标签带的事件
  $("#b2").on("click", function () {


    $(this).clone(true).insertAfter(this);
  });
</script>
</body>
</html>
八 事件介绍
什么是事件?
-
什么是事件???
鼠标点击click、页面滚动onscroll、鼠标悬停mouseover等对元素的操作称之为事件,对HTML元素产生的事件可以被绑定上具体的操作,称之为事件绑定,比如在点击某一个元素时触发某个功能的执行 -
注意:
首先我们要知道,浏览器中的各种操作不是因为我们绑定事件之后才存在,即便是我们不对任何元素绑定任何事件,我们仍然可以对元素进行各种如click、mouseover等等操作
只不过没有为元素绑定事件时,触发click或mouseover等操作将不会执行任何动作
总结下来,我们之所以绑定事件,就是因为想要在触发某个操作时去执行一些动作/函数而非无所事事
什么是事件流?
由于html是一个树形嵌套结构,如下
html
    |
    |___body
             |
             |___div.box1
                        |
                        |____div.box2
以点击事件为例,当我们点击div.box2时,由于div.box2在div.box1里,所以我们同时也在点击div.box1,同理,我们同时也在点击body、同时也在点击html
如果我们为div.box2、div.box1、body、html同时绑定点击事件,那在点击div.box2时,该元素他爹、爷爷、祖爷爷…的点击事件都会触发,具体是谁先触发,按照何种顺序,我们必须了解一下js的事件流
事件流描述的是从页面中接收事件的顺序,js事件流分为三个阶段
① 事件捕获阶段;
② 处于目标阶段;
③ 事件冒泡阶段
强调:jQuery只有②③ 阶段以点击事件为例作出比喻:整个屏幕相当于一片草地,点击一下屏幕中的某个位置,相当于在屏幕中埋了一颗地雷事件捕获就是扫雷的过程:从外向里扫雷处于目标阶段就是找到了雷,然后嘣的一声,雷爆炸了事件冒泡阶段就是雷爆炸了向外产生的冲击波:从内向外扩散,以雷为中心方圆几十里地都给丫的炸死

可以通过向文档或者文档中的元素添加“事件侦听器”(addEventListener)来验证上述流程,
addEventListener这个方法接收3个参数:要处理的事件名、事件触发时执行的函数、一个布尔值。
布尔值参数如果是true,表示在捕获阶段执行函数;如果是false,表示在冒泡阶段执行函数
侦听测试案例:
<!DOCTYPE html>
<html lang="en">
<head>
    <meta charset="UTF-8">
    <title>事件流</title>
    <script>

        window.onload = function () {


            // 1、事件捕获阶段:

            document.addEventListener('click', function () {

     // document代表的是整个html页面;
                console.log('document处于事件捕获阶段');
            }, true);

            document.documentElement.addEventListener('click', function () {

     // document.documentElement代表的是<html>标签;
                console.log('html处于事件捕获阶段');
            }, true);

            document.body.addEventListener('click', function () {

     // document.body代表的是<body>标签;
                console.log('body处于事件捕获阶段');
            }, true);


            var oBtn = document.getElementById('btn');
            oBtn.addEventListener('click', function () {

     // btn标签
                console.log('btn处于事件捕获阶段');
            }, true);

            // 2、处于目标阶段

            // 3、事件冒泡阶段
            document.addEventListener('click', function () {

     // document代表的是整个html页面;
                console.log('document处于事件冒泡阶段');
            }, false);

            document.documentElement.addEventListener('click', function () {

     // // document.documentElement代表的是<html>标签;
                console.log('html处于事件冒泡阶段');
            }, false);

            document.body.addEventListener('click', function () {

     // document.body代表的是<body>标签;
                console.log('body处于事件冒泡阶段');
            }, false);

            oBtn.addEventListener('click', function () {

     // btn
                console.log('btn处于事件冒泡阶段');
            }, false);
        };

    </script>
</head>
<body>
<!--
href="javascript:;"代表阻止默认事件
-->
<a href="javascript:;" id="btn">按钮</a>
</body>
</html>
当我们点击这个btn的时候,看看页面都输出了什么:
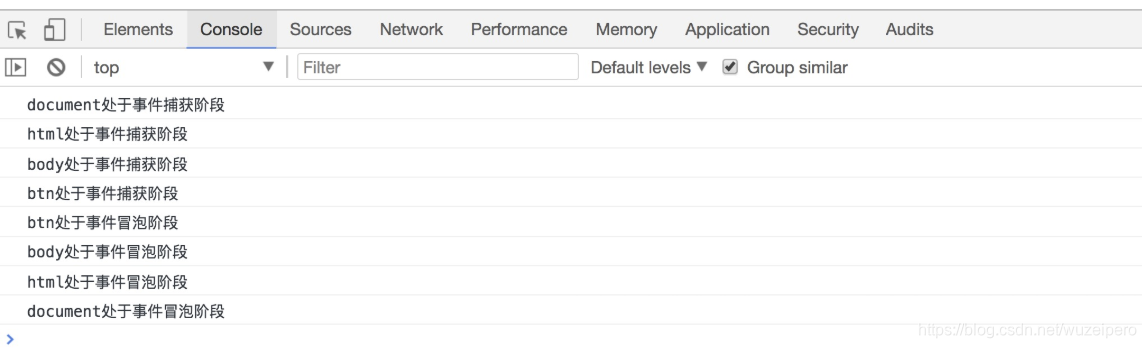
总结事件捕获与事件冒泡
- 事件捕获指的是从document到触发事件的那个元素:自上而下的去触发事件
- 事件冒泡指的是从触发事件的那个元素到document:自下而上的去触发事件
九 事件操作
1、常见事件
2、事件绑定与解除绑定的方法
<!doctype html>
<html lang="en">
<head>
    <meta charset="UTF-8">
    <title>Document</title>
    <style>
        * {


            margin: 0;
            padding: 0;
        }

        .box1 {


            width: 500px;
            height: 500px;
            background-color: gray;
        }
    </style>
</head>
<body>
<div class="box1">
    div1
</div>
<script src="jquery-3.3.1.min.js"></script>
<script>
    // 绑定方式一:
    $('.box1').click(function () {


        alert('绑定方式一')
    });

    // 绑定方式二:
    $('.box1').bind('click', function () {


        alert('绑定方式二')
    });

    $('.box1').bind('mouseover mouseout', function () {

     // 绑定多个事件做同一件事
        console.log('绑定多个事件做同一件事')
    });
    $('.box1').bind({


        'mouseup': function () {


            console.log('mouseover');
        },
        'mousedown': function () {


            console.log('mouseout');
        }
    });

    // 移除事件,unbind没有参数则代表移除所有事件
    setTimeout(function () {


        alert('3s啦。。。mouseover失效');
        $('.box1').unbind('mouseover');
    }, 3000);

    setTimeout(function () {


        alert('10s啦。。。所有事件移除');
        $('.box1').unbind();
    }, 10000)
</script>
</body>
</html>
3、事件对象
<!doctype html>
<html lang="en">
<head>
    <meta charset="UTF-8">
    <title>Document</title>
    <style>
        * {


            margin: 0;
            padding: 0;
        }

        .box1 {


            width: 500px;
            height: 500px;
            background-color: gray;
        }
        .box2 {


            width: 200px;
            height: 200px;
            background-color: red;
        }
    </style>
</head>
<body>
<div class="box1">
    div1
    <div class="box2">div2</div>
</div>
<script src="jquery-3.3.1.min.js"></script>
<script>

    // this和event.target
    // 相同之处:
    //     1、this和event.target都是js dom对象
    // 不同之处:
    //     1、js中事件是会冒泡的,所以this是会变化的,但event.target不会变化,它永远是直接接受事件的目标js DOM元素,这一点区别将在后续的事件委托的知识点中体现;
    $('.box2').bind('click',function (event) {


        console.log(event.type); // event.type事件的类型为:click
        console.log(event.target); // event.target指的是点击的那个元素
        console.log(event.pageX); // 点击事件/点击位置相对于窗口的X轴位置
        console.log(event.pageY);
    })

    // 常用的事件方法:1 阻止事件冒泡 2.阻止默认事件
    // ev.preventDefault() 阻止默认事件
    // ev.stopPropagation()阻止事件冒泡

    // return false 既阻止默认事件又阻止事件冒泡 (常用这个)

</script>
</body>
</html>
4、绑定事件示例
<!doctype html>
<html lang="en">
<head>
<meta charset="UTF-8">
<title>Document</title>
<style>
* {
margin: 0;
padding: 0;
}
.box1 {
width: 800px;
height: 800px;
background-color: gray;
}
.box2 {
width: 300px;
height: 300px;
background-color: red;
}
</style>
</head>
<body>
<div class="box1">
div1
<div class="box2">div2
<input type="text" id="inp">
<br>
男<input type="radio" name="sex" value="male">
女<input type="radio" name="sex" value="female">
未解之谜<input type="radio" name="sex" value="none">
<select name="city" id="select">
<option value="bj">北京</option>
<option value="sh">上海</option>
</select>
<br>
<input type="text" id="inp1" value="我就是我,一个忧郁的美男子">
<br>
<textarea name="" id="inp2" cols="5" rows="5">
你选中我,我就是触发了
</textarea>
<form action="https://www.baidu.com" id="form">
用户名:<input type="text" name="user">
<br>
密码:<input type="text" name="pwd">
<br>
<input type="submit" value="提交" id="submit">
</form>
</div>
</div>
<script src="jquery-3.3.1.min.js"></script>
<script>
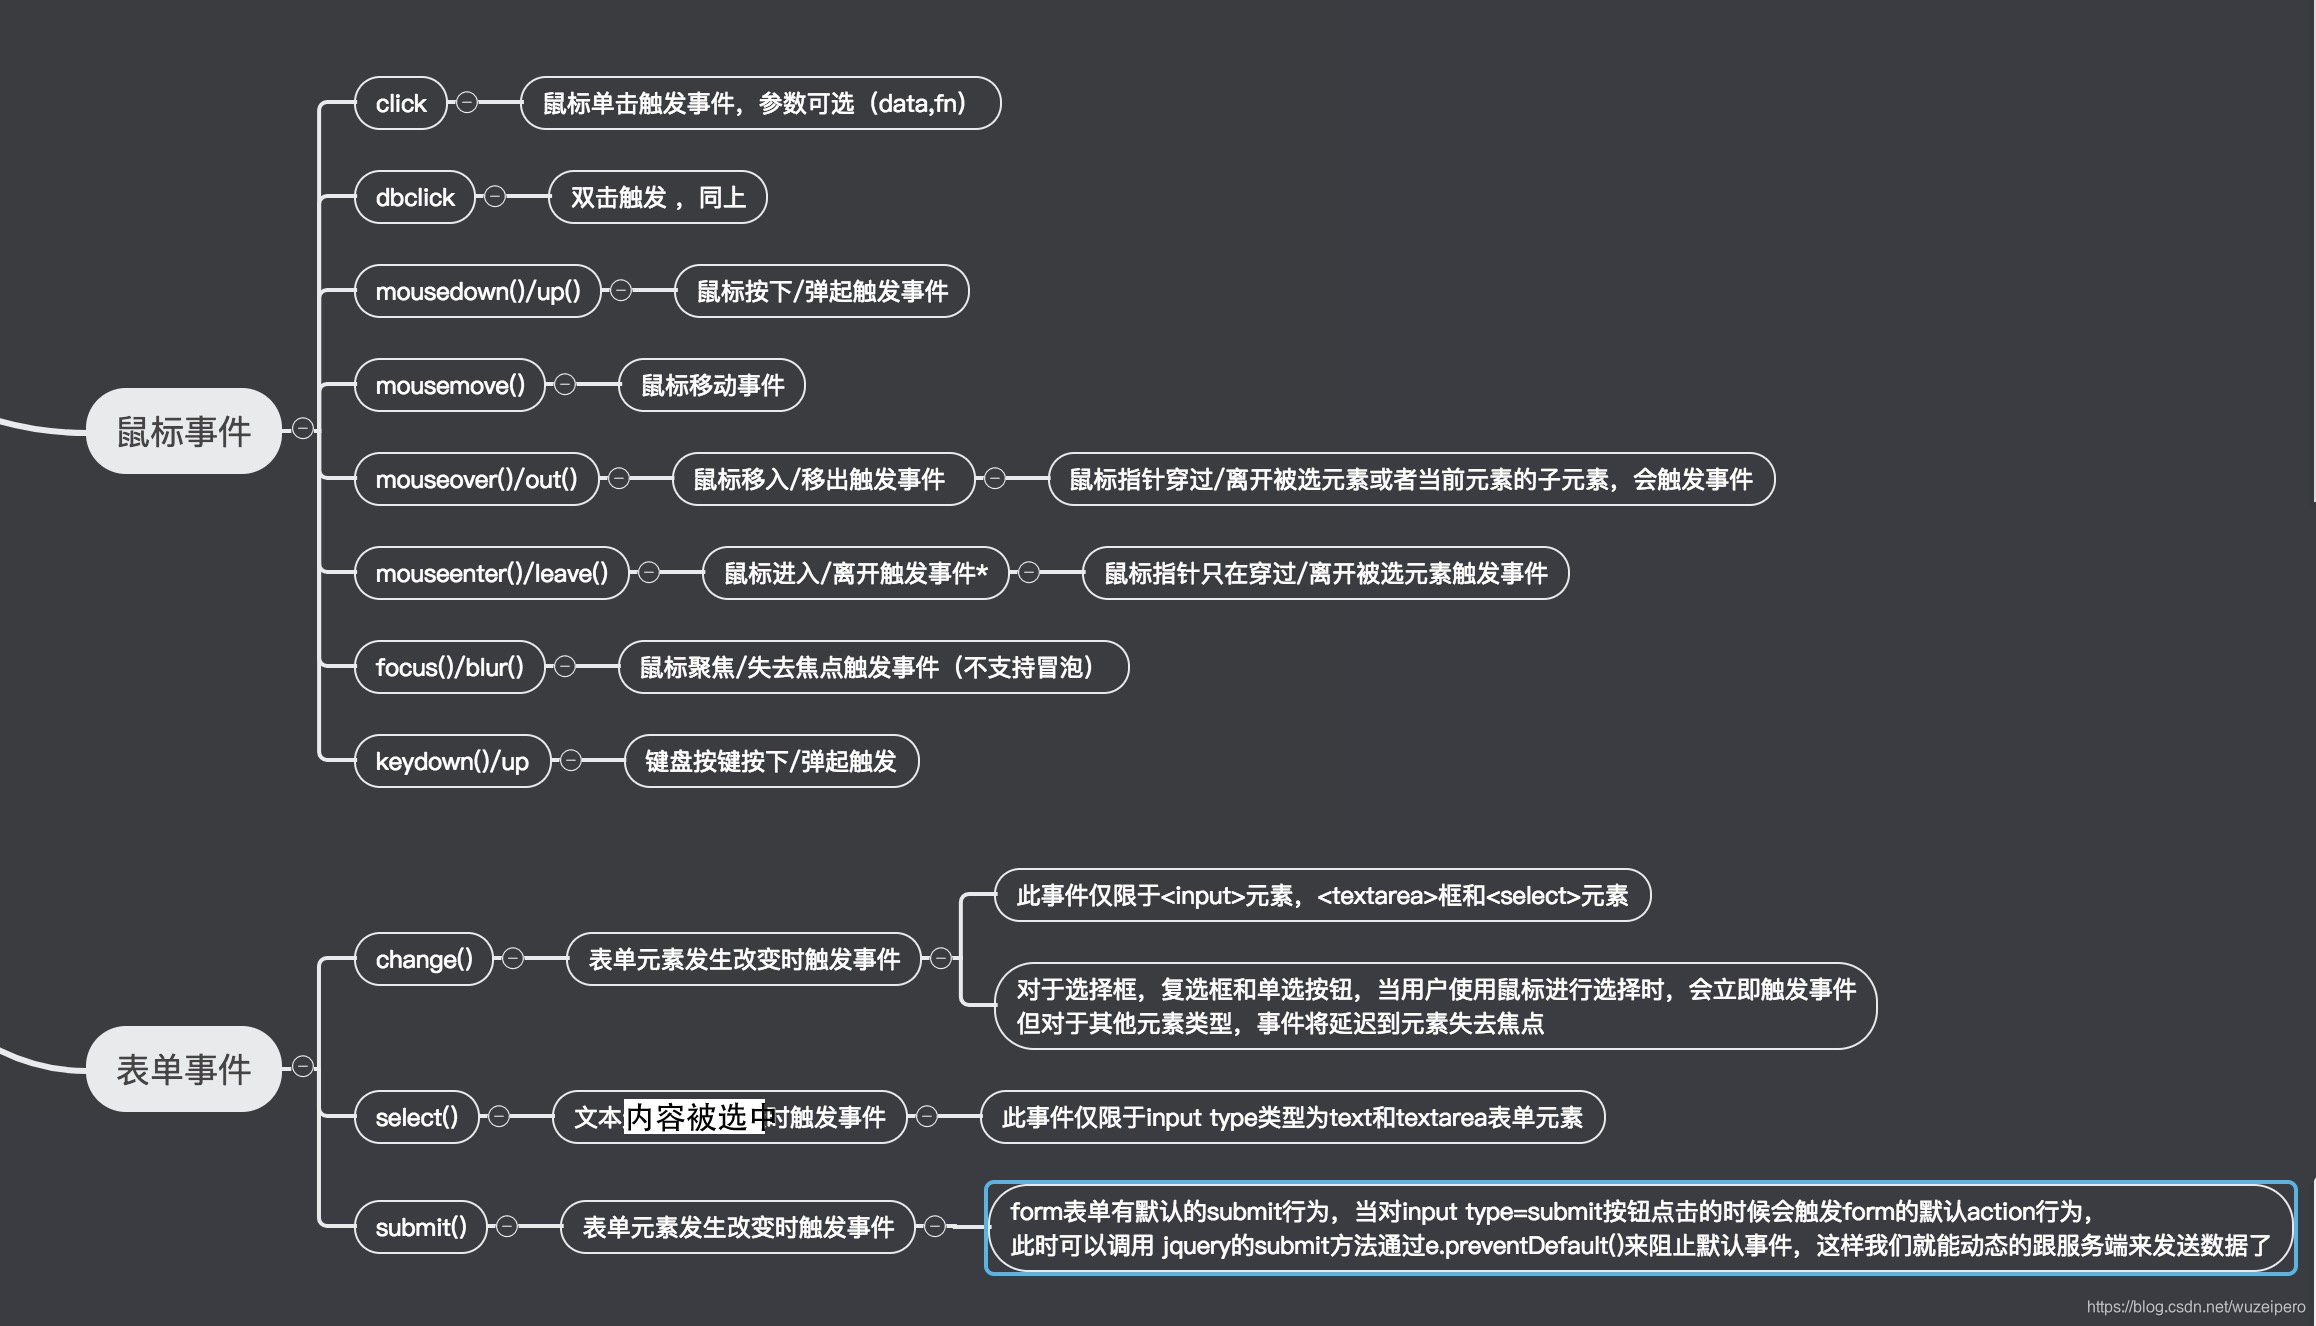
// 鼠标事件
// click与dblclick只应该存在一个,大多数都是单击事件,同时存在时双击也算两次单击
// 这里的event参数叫啥都行,但约定俗成都写event,方便理解
$('.box1').click(function (event) {
// console.log(event.type); // event.type事件的类型为:click
console.log(event.target); // event.target指的是点击的那个元素
})
$('.box1').dblclick(function (event) {
console.log(event.target); // event.target指的是点击的那个元素
})
$('.box1').mousedown(function (event) {
console.log('按照鼠标左键不松手');
});
$('.box1').mouseup(function (event) {
console.log('按照鼠标左键松手');
});
$('.box1').mousemove(function (event) {
console.log('移动鼠标', event.pageX, event.pageY);
});
$('.box1').mouseover(function (event) {
console.log('元素以及该元素的子元素在鼠标移入时都会触发,当前的div是:', event.target.innerText);
});
$('.box1').mouseout(function (event) {
console.log('元素以及该元素的子元素在鼠标离开时都会触发,当前的div是:', event.target.innerText);
});
$('.box1').mouseenter(function (event) {
console.log('元素以在鼠标移入时都会触发(与子元素无关),当前的div是:', event.target.innerText);
});
$('.box1').mouseleave(function (event) {
console.log('元素以在鼠标移入时都会触发(与子元素无关),当前的div是:', event.target.innerText);
});
$('#inp').focus(function (event) {
console.log('鼠标聚焦');
});
$('#inp').blur(function (event) {
console.log('鼠标失去焦点');
});
// 往输入框内输入内容时,键盘的任意键按下则触发=》即先触发,再出内容
$('#inp').keydown(function (event) {
console.log('键盘按键按下');
});
// 往输入框内输入内容时,键盘的任意键抬起则触发=》即先出内容,再触发
$('#inp').keyup(function (event) {
console.log('键盘按键弹起');
});
//表单事件change:当输入框的内容改变,并且失去焦点时,就会触发,应用场景:网站注册账号
$('#inp').change(function () {
console.log(this.value);
});
$('input[name=sex]').change(function (event) {
console.log(this.value);
});
$('#select').change(function () {
console.log(this.value);
});
//表单事件select:当输入框的文本内容被框选中时就触发
$('#inp1').select(function () {
console.log(this.value);
});
$('#inp2').select(function () {
console.log(this.value);
});
//通过表单事件submit来操作
$('#form').submit(function (event) {
console.log($('input[name=user]').val());
console.log($('input[name=pwd]').val());
event.preventDefault();
});
</script>
</body>
</html>
5、事件冒泡的应用之事件委托
添加的事件不能用于未来动,例如之前我们在做表格的增删改时,每新增一行内容都需要重新绑定事件,基于事件委托就可以解决该问题
事件委托是通过事件冒泡的原理,利用父标签去捕获子标签的事件
<!DOCTYPE html>
<html lang="en">
<head>
    <meta charset="UTF-8">
    <title>Title</title>
    <style>
        ul>li{


            list-style: none;
            width: 600px;
            height: 50px;
            border: 1px solid black;

        }
    </style>
</head>
<body>
<ul>
    <li>aaaa</li>
    <li>bbb</li>
    <li>ccc</li>
    <li>ddd</li>
    <li>eeee</li>
</ul>

<button id="btn">点击新增</button>

<script src="https://cdn.bootcss.com/jquery/3.3.1/jquery.js"></script>
<script>
    /* 这种笨比办法首先麻烦,其次无法给之后新建的li绑定事件
    $("#btn").click(function () {
        var li=document.createElement("li")
        li.innerText="666"
        $(li).appendTo($("ul"))
    })

     $("li").mouseover(function () {
        // console.log(this.innerText)
        $(this).css('background-color',"red").siblings().css('background-color',"white")
    })
     */

    $("ul").on("mouseover","li",function () {


        // 这里的this,等同于,给函数传参event后的event.target,是点击的触发事件那边的元素
        // (复习)正常的this在这里应该是指遍历到的每一个ul
        $(this).css('background-color',"red").siblings().css('background-color',"white")
    })

    $("#btn").click(function () {


        var li=document.createElement("li")
        li.innerText="666"
        $(li).appendTo($("ul"))
    })
</script>
</body>
</html>
6、综合案例
键盘事件:按shift进行批量操作
<!doctype html>
<html lang="en">
<head>
    <meta charset="UTF-8">
    <meta name="viewport"
          content="width=device-width, user-scalable=no, initial-scale=1.0, maximum-scale=1.0, minimum-scale=1.0">
    <meta http-equiv="X-UA-Compatible" content="ie=edge">
    <title>Document</title>
</head>
<body>
<table border="1">
    <thead>
    <tr>
        <th>#</th>
        <th>姓名</th>
        <th>操作</th>
    </tr>
    </thead>
    <tbody>
        <tr>
            <td>
                <input type="checkbox" name="member">
            </td>
            <td>EGON</td>
            <td>
                <select name="state">
                    <option value="online">上线</option>
                    <option value="downline">下线</option>
                    <option value="out">离职</option>
                </select>
            </td>
        </tr>

        <tr>
            <td>
                <input type="checkbox" name="member">
            </td>
            <td>Lxx</td>
            <td>
                <select name="state">
                    <option value="online">上线</option>
                    <option value="downline">下线</option>
                    <option value="out">离职</option>
                </select>
            </td>
        </tr>
        <tr>
            <td>
                <input type="checkbox" name="member">
            </td>
            <td>Alex</td>
            <td>
                <select name="state">
                    <option value="online">上线</option>
                    <option value="downline">下线</option>
                    <option value="out">离职</option>
                </select>
            </td>
        </tr>
        <tr>
            <td>
                <input type="checkbox" name="member">
            </td>
            <td>Wxx</td>
            <td>
                <select name="state">
                    <option value="online">上线</option>
                    <option value="downline">下线</option>
                    <option value="out">离职</option>
                </select>
            </td>
        </tr>
        <tr>
            <td>
                <input type="checkbox" name="member">
            </td>
            <td>Yxx</td>
            <td>
                <select name="state">
                    <option value="online">上线</option>
                    <option value="downline">下线</option>
                    <option value="out">离职</option>
                </select>
            </td>
        </tr>
    </tbody>
</table>
<input type="button" value="全选" id="btn1">
<input type="button" value="反选" id="btn2">
<input type="button" value="取消" id="btn3">
<script src="jquery-3.3.1.min.js"></script>
<script>
    $('#btn1').click(function () {


        $('input[name=member]').prop('checked',true);
    });
    $('#btn2').click(function () {


        $('input[name=member]').each(function () {


           $(this).prop('checked',!$(this).prop('checked'));
        });
    });
    $('#btn3').click(function () {


        $('input[name=member]').prop('checked',false);
    });

    // 按住shift键,批量操作
    let tag=false;
    $(window).keydown(function (event) {


        if(event.keyCode == 16){


            // 如果按下shift键,则开启批量模式
            tag=true;
        }
    });
    $(window).keyup(function (event) {


        if(event.keyCode == 16){


            // 如果松开shift键,则关闭批量模式
            tag=true;
        }
    });

    $('table select').change(function () {


        if (tag){

     // 如果开启了批量模式,则批量修改已经选中的input标签关于操作一栏的状态
            $('input:checked').parent().parent().find('select').val($(this).val());
        }
    });
</script>
</body>
</html
hover事件
<!doctype html>
<html lang="en">
<head>
    <meta charset="UTF-8">
    <title>Document</title>
    <style>
        * {


            margin: 0;
            padding: 0;
        }
        .header {


            height: 50px;
            background-color: #3d3d3d;
        }
        ul li{


            list-style: none;
            width: 70px;
            height: 50px;
            line-height: 50px;
            text-align: center;
            margin-right: 10px;
            float: left;
            font-size: 15px;
            color: #b0b0b0;
        }
        ul li:hover {


            background-color: #242424;
        }
        ul li p {


            width: 700px;
            height: 70px;
            background-color: #242424;
            overflow: auto;
            color: #b0b0b0;
            line-height: 70px;
            position: absolute;
            left: 0;
        }
        .hide {


            display: none;
        }

        .active .son {


            display: block;
        }
    </style>
</head>
<body>
<div class="header">
    <ul>
        <li>
            登录
            <p class="hide son">怒髪冲冠,凭栏处、潇潇雨歇</p>
        </li>
        <li>
            注册
            <p class="hide son">抬望眼,仰天长啸,壮怀激烈。</p>
        </li>
        <li>购物车
            <p class="hide son">三十功名尘与,八千里路云和月。</p>
        </li>
        <li>
            我的订单
            <p class="hide son">莫等闲、白了少年头,空悲切。</p>
        </li>
    </ul>
</div>
<script src="jquery-3.3.1.min.js"></script>
<script>
    $('ul li').hover(
        function () {


            $(this).addClass('active');
        },
        function () {


            $(this).removeClass('active');
        }
    );
</script>
</body>
</html>
实时监听input输入值变化
<!DOCTYPE html>
<html lang="en">
<head>
  <meta charset="UTF-8">
  <meta http-equiv="x-ua-compatible" content="IE=edge">
  <meta name="viewport" content="width=device-width, initial-scale=1">
  <title>实时监听input输入值变化</title>
</head>
<body>
<input type="text" id="i1">

<script src="jquery-3.3.1.min.js"></script>
<script>
  /*
  * on input是HTML5的标准事件
  * 能够检测textarea,input:text,input:password和input:search这几个元素的内容变化,
  * 在内容修改后立即被触发,不像on change事件需要失去焦点才触发
  * on input事件在IE9以下版本不支持,需要使用IE特有的on propertychange事件替代
  * 使用jQuery库的话直接使用on同时绑定这两个事件即可。
  * */
  $("#i1").on("input propertychange", function () {


    alert($(this).val());
  })
</script>
</body>
</html>
登录校验示例
<!DOCTYPE html>
<html lang="zh-CN">
<head>
    <meta charset="UTF-8">
    <meta http-equiv="x-ua-compatible" content="IE=edge">
    <meta name="viewport" content="width=device-width, initial-scale=1">
    <title>登录注册示例</title>
    <style>
        .error {


            color: red;
        }
    </style>
</head>
<body>

<form id="myForm" action="https://www.baidu.com">

    <label for="name">姓名</label><input type="text" id="name" name="username">
    <span class="error"></span>

    <label for="passwd">密码</label><input type="password" id="passwd" name="password">
    <span class="error"></span>

    <input type="submit" id="modal-submit" value="登录">
</form>

<script src="jquery-3.3.1.min.js"></script>
<!--插件:http://www.runoob.com/jquery/jquery-plugin-validate.html-->
<script>
    function myValidation() {


        // 多次用到的jQuery对象存储到一个变量,避免重复查询文档树
        var $myForm = $("#myForm");
        $myForm.find(":submit").on("click", function () {


            // 定义一个标志位,记录表单填写是否正常
            var flag = true;
            $myForm.find(":text, :password").each(function () {


                if ($(this).val().length <= 0) {


                    var labelName = $(this).prev("label").text();
                    $(this).next("span").text(labelName + "不能为空");
                    flag = false;
                }
            });
            // 表单填写有误就会返回false,阻止submit按钮默认的提交表单事件
            return flag;
        });
        // input输入框获取焦点后移除之前的错误提示信息
        $myForm.find("input[type!='submit']").on("focus", function () {


            $(this).next(".error").text("");
        })
    }

    // 文档树就绪后执行
    $(document).ready(function () {


        myValidation();
    });
</script>
</body>
</html>