PowerBuilder作为开发数据库应用的工具,因为使用其开发方便、快捷并且实现的系统功能强大而深得程序员们的喜爱,我们可以看到越来越多优秀的数据库系统里出现它的身影。但是,随着用户界面设计的重要性被认可程度的加深,PowerBuilder在界面设计方面的缺憾就显现出来了,这也是令很多程序员伤脑筋的地方,不可否认的是规划应用图形界面是开发初期费时费力又不得不做的事情,尤其重要的是按钮的制作,笔者在开发很多的应用都面临着这种情况,经过研究,在这方面有所收获,现将这些经验整理出来,希望对同行们有所帮助。
为了实现PowerBuilder系统中按钮功能,自制按钮一般有四种方法。
一、纯文字按钮
特点:按钮的背景、按钮文字的颜色都可以变换,设计时所见即所得,占用系统资源较少。
制作过程:
1 创建用户对象。
单击PowerBuilder工具栏上的User Object图标,在Select User Object对话框中单击New按钮,在New User Object对话框中单击Visual组的Standard图标,单击OK。
在Select Standard Visual Type对话框中单击列表框中的statictext项,单击Ok。
出现自定义对象设计环境,设置好背景颜色和对象的Icon后,单击保存为uo_vo_textbutton。
2 声明外部函数(Local External Function):
Function Long SetCapture( Long hwnd) Library "user32"
Function Long ReleaseCapture() Library "user32"
Function ulong CreateRoundRectRgn(ulong X1,ulong Y1,ulong X2,ulong Y2,ulong X3,ulong Y3) LIBRARY "gdi32.dll"
Function ulong SetWindowRgn(ulong hWnd,ulong hRgn,boolean bRedraw) LIBRARY "user32.dll"
3 声明实例变量(Instance Variables):
boolean changed=false
4 声明自定义事件:(如下图)
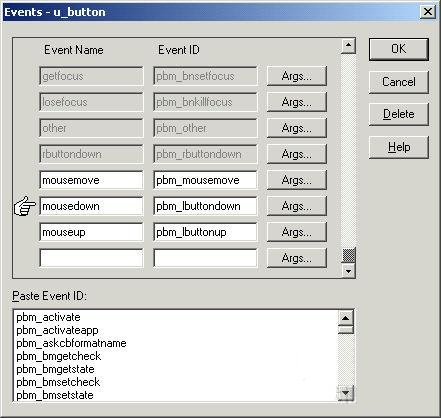
三个自定义事件及键值为:
mousemove pbm_mousemove
mousedown pbm_lbuttondown
mouseup pbm_lbuttonup
5 在contructor事件中编写如下脚本:
//本按钮为圆角按钮
long l1
long x1,y1,w1,h1
x1=UnitsToPixels(this.x,XUnitsToPixels!)
y1=UnitsToPixels(this.y,yUnitsToPixels!)
w1=UnitsToPixels(this.width,XUnitsToPixels!)
h1=UnitsToPixels(this.height,yUnitsToPixels!)
l1= CreateRoundRectRgn(1,1,w1,h1,4,4)
setwindowRgn(handle(this),lrgn,true)
6 在mousedown事件下编写如下脚本:
//按钮显示下陷
this.borderstyle=StyleLowered!
7 在Mouseover事件下编写如下脚本:
long hand
hand=handle(this)
if xpos>=0 and xpos<=this.width and ypos>=0 and ypos<=this.height then
if not changed then
//鼠标移过时按钮文字变红,变粗
//也可以改变背景颜色,这里没有改变
this.weight=700
this.textcolor=rgb(255,0,0)
changed=true
end if
SetCapture(hand)
Else
//鼠标移出按钮时按钮文字恢复原来状态
this.weight=400
this.textcolor=rgb(0,64,128)
this.borderstyle=StyleRaised!
changed=false
ReleaseCapture()
end if
7 在mouseup事件中编写如下脚本:
//按钮恢复正常状态
this.weight=400
this.textcolor=rgb(0,64,128)
this.borderstyle=StyleRaised!
changed=false
ReleaseCapture()
具体应用:使用时只要在窗口设计中选择User Object 然后点选uo_vo_textbutton将它放置到窗口中即可(在程序中超级链接的文本也是依据这个原理制作而成的)。
二、纯图片按钮
特点:可以根据需要配置图片的个数,如Enabled状态和Disable状态,鼠标移过、鼠标左键按下,弹起, 缺点是当应用时必须为每个按钮都绘制图片,并且编译时要编写资源文件。
制作过程:
1 同一,只是点选对象变为Picture,保存为uo_vo_picbutton。
2 声明外部函数:同一
3 声明实例变量:
boolean changed=false
string s_normal //正常状态下的图片路径和文件名称
string s_over //鼠标滑过下的图片路径和文件名称
string s_down //鼠标按下下的图片路径和文件名称
string s_disable //不能状态下的图片路径和文件名称
string s_info //鼠标移过的提示信息
4 声明自定义事件:同一
5 在contructor事件中编写如下脚本:
//本按钮为圆角按钮
//这里的脚本同上,为了省篇幅这里省略
……
this.border=false
this.picturename=s_normal
6 在mousedown事件下编写如下脚本:
this.picturename=s_down
7 在Mouseover事件下编写如下脚本:
long hand
hand=handle(this)
if xpos>=0 and xpos<=this.width and ypos>=0 and ypos<=this.height then
if not changed then
this.picturename=s_over
changed=true
end if
SetCapture(hand)
else
this.picturename=s_normal
changed=false
ReleaseCapture()
end if
8 在mouseup事件中编写如下脚本:
this.picturename=s_normal
changed=false
具体应用:使用时只要在窗口设计中选择User Object 然后点选uo_vo_picbutton将它放置到窗口,为它起个名字如p_uclose,然后在窗口的open事件中加入如下脚本:
p_uclose.s_normal="G:\pb\wymis\pic\exitnormal.bmp"
p_uclose.s_over="G:\pb\wymis\pic\exitfocus.bmp"
p_uclose.s_down="G:\pb\wymis\pic\exitdown.bmp"
p_uclose.s_disable="G:\pb\wymis\pic\exitdisable.bmp"
p_uclose.s_info="关闭窗口"
p_uclose.triggerevent(constructor!)
三、以数据窗口为基础的按钮
1 建立一个标准的、可视的数据窗口用户对象,并保存为u_vo_dwbutton,(操作过程同一),注意datawindow object name选择一个以外部数据源为基础的数据窗口即可(只有一个字段,建立数据窗口后删除这个字段)。
2 声明外部函数(Local External Function):(同一)
3 声明实例变量(Instance Variables)
boolean changed=false
string SbuttonName //按钮名称
long w1,h1 //按钮的宽度和高度,以像素为单位
4声明自定义事件:(同一)
5在contructor事件中编写如下脚本
//按钮形状
w1=UnitsToPixels(this.width,XUnitsToPixels!)
h1=UnitsToPixels(this.height,yUnitsToPixels!)
(其他同一)
integer i_for
long j_1
string s_name,s_create
//形成上黑下白的渐变
for i_for=0 to h1
s_name="line_"+string(i_for)
j_1=rgb(i_for*255/h1,i_for*255/h1,i_for*255/h1)
s_create="create line(band=background x1='0'"
s_create=s_create+" y1='"+string(i_for)+"' x2='"+string(w1)+"'"
s_create=s_create+" y2='"+string(i_for)+"' name=line_"+string(i_for)+ " pen.color='"+string(j_1)+"' pen.width='1') "
this.Modify(s_create)
next
s_create="create text(band=background alignment='0' text=' "+SButtonName+"' border='0' color='16777215' name=psp x='0' y='0' height='19' width='89' font.face='Arial' font.height='-12' font.weight='400' font.family='2' font.pitch='2' font.charset='0' background.mode='1' background.color='553648127')"
this.Modify(s_create)
6在Mouseover事件下编写如下脚本:
long hand
hand=handle(this)
//形成上白下黑的渐变
if xpos>=0 and xpos<=this.width and ypos>=0 and ypos<=this.height then
if not changed then
integer i_for
long j_1
string s_name,s_create
for i_for=0 to h1
s_name="line_"+string(i_for)
j_1=rgb((h1 - i_for)*255/h1,(h1 - i_for)*255/h1,(h1 - i_for)*255/h1)
s_create=s_name+".pen.color='"+string(j_1)+"'"
this.Modify(s_create)
next
this.Modify("psp.color='16711680'")
end if
changed=true
SetCapture(hand)
else
this.triggerevent("mouseup")
changed=false
ReleaseCapture()
end if
7在mouseup事件中编写如下脚本:
integer i_for
long j_1
string s_name,s_create
//形成上黑下白的渐变
for i_for=0 to h1
s_name="line_"+string(i_for)
j_1=rgb(i_for*255/h1,i_for*255/h1,i_for*255/h1)
s_create=s_name+".pen.color='"+string(j_1)+"'"
this.Modify(s_create)
next
this.Modify("psp.color='16777215'")
changed=false
具体应用:使用时只要在窗口设计中选择User Object 然后点选u_vo_dwbutton将它放置到窗口,为它起个名字如p_uclose,然后在窗口的open事件中加入如下脚本:
p_close.SButtonName="关闭"
p_close.postevent(constructor!)
四 、自绘控件
这种方法是借助一个标鉴控件,在上面画出想要的按钮。
1建立一个标准的、可视的标签用户对象,保存为u_vo_stbutton。
2声明外部函数:
Function long DeleteObject ( long hobject ) library "gdi32"
Function uLong SelectObject(uLong hdc,uLong hObject) LIBRARY "gdi32.dll"
Function uLong GetDC(uLong hwnd) LIBRARY "user32.dll"
FUNCTION ulong CreateRoundRectRgn(ulong X1,ulong Y1,ulong X2,ulong Y2,ulong X3,ulong Y3) LIBRARY "gdi32.dll"
FUNCTION ulong SetWindowRgn(ulong hWnd,ulong hRgn,boolean bRedraw) LIBRARY "user32.dll"
FUNCTION boolean MoveToEx(ulong hwnd,long wx, long wy,ref us_point prepos2) LIBRARY "Gdi32.dll"
FUNCTION boolean LineTo(ulong hwnd,long wx, long wy) LIBRARY "Gdi32.dll"
Function ulong SetTextColor (ulong hDC, ulong crColor) Library "GDI32.DLL"
FUNCTION ulong CreatePen(ulong nPenStyle,ulong nWidth,ulong crColor) LIBRARY "gdi32.dll"
Function long ReleaseDC( long hWnd, long hDC ) Library "user32"
Function boolean TextOut (ulong hdcr, integer stx, integer sty, ref string lpString, long nCount) Library "GDI32.DLL" Alias for "TextOutA"
Function int SetBkMode (ulong hdcr, integer mode) Library "GDI32.DLL"
3 声明实例变量
string SbuttonName //保存按钮名称
4 声明自定义事件:(同一)
另外必须声明一个用于画图的u_paint事件,对应的PB事件ID是pbm_paint.
5 声明结构us_point如下:
x long
y long
6 在contructor事件中编写如下脚本
//按钮形状
(同一)
SButtonName=this.text
this.postevent("u_paint")
this.text=""
7 在u_paint事件中有如下的程序:
ulong l_handle, l_device,uPen,uOldPen
long lwidth,lheight,lColor
integer iFor
us_point previouspos
l_device = GetDC(handle(this))
lwidth=UnitsToPixels(this.width,XUnitsToPixels!)
lheight=UnitsToPixels(this.height,yUnitsToPixels!)
for iFor=0 to lheight
lColor=rgb(iFor*100/lheight+150,iFor*100/lheight+150,iFor*100/lheight+150)
uPen=createpen(0,1,lColor)
uOldPen=selectobject(l_device,uPen)
MoveToEx(l_device,0,iFor,previouspos)
LineTo(l_device,lwidth,iFor)
selectobject(l_device,uOldPen)
deleteobject(uPen)
//写上按钮名称,字符输出的背景为透明
SetBkMode (l_device, 1)
SetTextColor (l_device, RGB( 0,0,255 ))
TextOut (l_device, 12, 3, SButtonName, len( SButtonName ))
next
ReleaseDC( handle(this), l_device )
8 这里在mouseover和mousedown、mouseup上为了节省篇幅,没有程序,你可以按照你的想法写上你的程序。
具体应用:使用时只要在窗口设计中选择User Object 然后点选u_vo_stbutton将它放置到窗口,在name栏上写上按钮名称即可。
以上给出了在PB应用程序中的按钮设计方法,我认为最为理想的是第四种,在绘制按钮时可以在上面绘制图标,PB中的图标是很丰富的,这样按钮既美观大方,又很省事.