这次我们讲解的是一个例题:
题目:两个线程操作一个变量,实现两个线程对同一个资源一个进行加1操作,另外一个进行减1操作,且需要交替实现,变量的初始值为0。即两个线程对同一个资源进行加一减一交替操作。
话不多说,开干
首先我们先定义操作的资源,并且定义方法。
//资源类
class Resource {
    private int number = 0;

    public synchronized void up() throws InterruptedException {
        //1.判断
        if(number != 0) {
            this.wait();
        }
        //2.干活
        number++;
        System.out.println(Thread.currentThread().getName() + "\t" + number);
        this.notifyAll();
    }

    public synchronized void down() throws InterruptedException {
        if(number == 0) {
            this.wait();
        }
        number--;
        System.out.println(Thread.currentThread().getName() + "\t" + number);
        this.notifyAll();
    }
}
接着我们写我们的两个线程:
public class ThreadWaitNotifyDemo {
    public static void main(String[] args) {
        Resource resource = new Resource();
        new Thread(() -> {
            for (int i = 0; i < 10; i++) {
                try {
                    resource.up();
                } catch (InterruptedException e) {
                    e.printStackTrace();
                }
            }

        }, "A").start();
        new Thread(() -> {
            for (int i = 0; i < 10; i++) {
                try {
                    resource.down();
                } catch (InterruptedException e) {
                    e.printStackTrace();
                }
            }
        }, "B").start();
    }
}
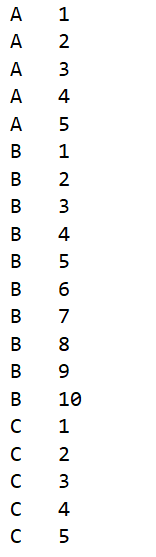
结果如下图:
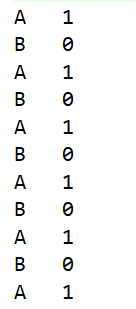
这里我们通过Lambda表达式来通过匿名内部类来创建线程并启动,可以看到一个线程up方法,另外一个线程进行down方法,
首先比如线程A先判断是否为0,不为0,那么此时进行加1操作,同一时刻的B线程此时判断的是number等于0,那么就进行等待操作,这个时候A线程加完了,然后通过notifyAll()方法来唤醒其他的线程,所以就完成了减的操作,这里for0~10是为了保证能够交替进行10次。
这里扩展一个知识点,wait 方法和notify方法时Thread的方法吗?
答案:错错错 。
查看API我们可以见到这两个方法属于Object的方法,wait 和 notify 必须要配合synchronized 关键字使用。


这就完了吗??
不不不,此时需求改动了!这个时候项目经理过来说,小王,我不要两个线程操作了,我要四个线程同时操作,两个进行相加,两个进行相减,还是交替到时必须是0,1相互的交替。
这个时候心想,简单呀,我再多加两个线程!
于是,多加了两个线程。
代码如下,Resource不变。
public class ThreadWaitNotifyDemo {
    public static void main(String[] args) {
        Resource resource = new Resource();
        new Thread(() -> {
            for (int i = 0; i < 10; i++) {
                try {
                    resource.up();
                } catch (InterruptedException e) {
                    e.printStackTrace();
                }
            }

        }, "A").start();
        new Thread(() -> {
            for (int i = 0; i < 10; i++) {
                try {
                    resource.down();
                } catch (InterruptedException e) {
                    e.printStackTrace();
                }
            }
        }, "B").start();
        new Thread(() -> {
            for (int i = 0; i < 10; i++) {
                try {
                    resource.up();
                } catch (InterruptedException e) {
                    e.printStackTrace();
                }
            }
        }, "C").start();
        new Thread(() -> {
            for (int i = 0; i < 10; i++) {
                try {
                    resource.down();
                } catch (InterruptedException e) {
                    e.printStackTrace();
                }
            }
        }, "D").start();
    }
}
和之前的一样,多加了两个线程,一个进行加,一个进行减操作。
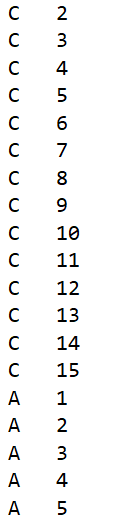
然后run一下,结果如下图:
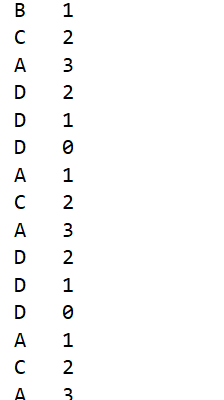
这里我们就看到,有的为3了,这是什么情况???
分析:举个例子,A,C线程是进行加操作,B,D是进行减操作,此时如果是0,那么B,和D线程是被wait了的对吧,A和C因为up方法被加了锁,所以只有一个方法进行加,如果此时A进行完操作,然后再notifyall,那么此时C线程也会进行up操作,因为C线程在if(number!=0){this.wait();}这里被唤醒后继续进行其他的操作了,没有继续判断number的情况,同理B,D线程也是如此,所以就会出现上图的情况!
那么这种情况怎么解决呢??
因为我们是没有重新进行判断,那么,我们让其重新进行判断就是i了!
修改资源类代码如下:
class Resource {
    private int number = 0;

    public synchronized void up() throws InterruptedException {
        //1.判断
        while (number != 0) {
            this.wait();
        }
        //2.干活
        number++;
        System.out.println(Thread.currentThread().getName() + "\t" + number);
        this.notifyAll();
    }

    public synchronized void down() throws InterruptedException {
        while (number == 0) {
            this.wait();
        }
        number--;
        System.out.println(Thread.currentThread().getName() + "\t" + number);
        this.notifyAll();
    }
}
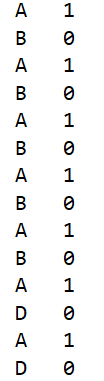
四个线程的操作资源的代码不变,结果如下:

既然我们标题上写的是JUC,那我们自然用JUC来解决这个问题:
先阅读API:
Lock接口:


 Condition接口:
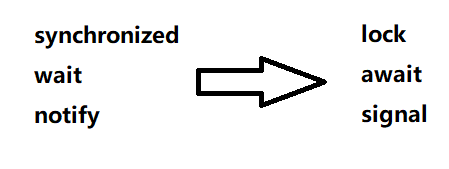
即就是原先我们使用synchronized ,wait,notify,现在使用JUC的lock(ReentrantLock),condition,condition.await(), condition.signalAll();
代码如下:
class Resource {
    private int number = 0;
    private Lock lock = new ReentrantLock();  //可重入锁
    private Condition condition = lock.newCondition();

    public void up() throws InterruptedException{
        lock.lock();
        try {
            while (number != 0) {
                condition.await(); //相当于wait
            }
            number++;
            System.out.println(Thread.currentThread().getName()+"\t"+number);
            condition.signalAll(); //相当于notifyAll
        } catch (Exception e) {
            e.printStackTrace();
        } finally {
            lock.unlock();
        }
    }

    public void down() throws InterruptedException{
        lock.lock();
        try {
            while (number == 0) {
                condition.await();
            }
            number--;
            System.out.println(Thread.currentThread().getName()+"\t"+number);
            condition.signalAll();
        } catch (Exception e) {
            e.printStackTrace();
        } finally {
            lock.unlock();
        }
    }
}
结果如下:
那么问题来了,为什么我们要用JUC的方式来替代呢?
新技术的产生会替代就技术解决不了的事情!
notify唤醒三个里面任意一个,notify唤醒全部。
接着看看JUC的优势。
这次我们的题目升级:
多个线程之间的调用顺序,实现A->B->C:
三个线程的启动顺序如下:
AA打印5次,BB打印10次,CC打印15次,…持续10轮。
代码如下:
主方法:
public class ThreadOrderAccess {
    public static void main(String[] args) {
        ShareResource resource = new ShareResource();
        new Thread(() -> {
            for (int i = 0; i < 10; i++) {
                resource.printf5();
            }
        }, "A").start();
        new Thread(() -> {
            for (int i = 0; i < 10; i++) {
                resource.printf10();
            }
        }, "B").start();
        new Thread(() -> {
            for (int i = 0; i < 10; i++) {
                resource.printf15();
            }
        }, "C").start();
    }
}
资源类:
class ShareResource {
    private int number = 1;// 1:A  2:B  3:C
    private Lock lock = new ReentrantLock();
    private Condition condition1 = lock.newCondition();
    private Condition condition2 = lock.newCondition();
    private Condition condition3 = lock.newCondition();

    //注意标志位的修改和定位
    //A
    public void printf5() {
        lock.lock();
        try {
            //判断
            while (number != 1) {
                condition1.await();
            }
            //干活
            for (int i = 1; i <= 5; i++) {
                System.out.println(Thread.currentThread().getName() + "\t" + i);
            }
            //通知
            number = 2; //此时B、C一直在wait状态中
            condition2.signal(); //精确打击 唤醒B
        } catch (Exception e) {
            e.printStackTrace();
        } finally {
            lock.unlock();
        }
    }

    //B
    public void printf10() {
        lock.lock();
        try {
            while (number != 2) {
                condition2.await();
            }
            for (int i = 1; i <= 10; i++) {
                System.out.println(Thread.currentThread().getName() + "\t" + i);
            }
            number = 3;
            condition3.signal();
        } catch (Exception e) {
            e.printStackTrace();
        } finally {
            lock.unlock();
        }
    }

    //C
    public void printf15() {
        lock.lock();
        try {
            while (number != 3) {
                condition3.await();
            }
            for (int i = 1; i <= 15; i++) {
                System.out.println(Thread.currentThread().getName() + "\t" + i);
            }
            number = 1;
            condition1.signal();
        } catch (Exception e) {
            e.printStackTrace();
        } finally {
            lock.unlock();
        }
    }

}
注意这里之后的wait等方法都换成JUC的不然后报错java.lang.IllegalMonitorStateException
部分结果如下:
所以这就是对老技术的优化,精准通知,精准唤醒,通过对指定的condition唤醒来达到对指定的线程的唤醒。
这就是本次的讲解,如果有需要改进的地方,欢迎在下方留言!