大家好,我是
方圆
目录
1. 概述
1.1 翻译翻译?什么叫NIO?
NIO:我认为翻译成Non-Blocking,更加的通俗直白,相比于BIO,也有一个对比,叫他非阻塞IO最好不过了
- 它和BIO有以下的区别
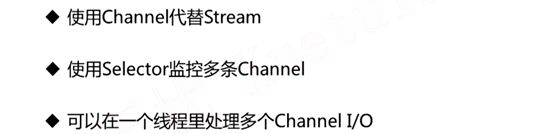
- Channel是
双向的,即可以读又可以写,相比于Stream,它并不区分出输入流和输出流,而且Channel可以完成非阻塞的读写,也可以完成阻塞的读写
1.2 Buffer简介

- Channel的读写是离不开Buffer的,Buffer实际上内存上一块用来读写的区域。
1.2.1 写模式

- 其中三个指针我们要了解一下,
position为当前指针位置,limit用于读模式,用它来标记可读的最大范围,capacity是最大的可写范围阈值
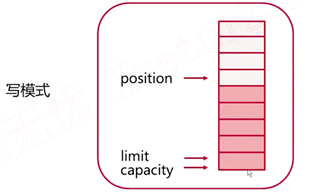
当我们写数据写了四个格子时,我们执行flip()方法,即可转变为读模式,limit指针就直接变到了我们刚刚写数据的极限位置,position指针回到初始位置,这样我们就可以将数据读出来了
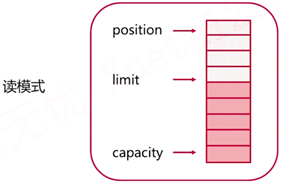
1.2.2 读模式到写模式的两种切换
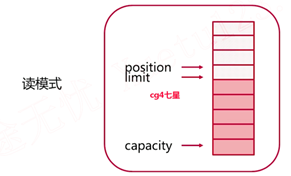
- 当我们将数据全部读完时,切换到写模式
调用clear()方法,它会使position指针回到初始位置,limit回到最远端,这样就可以重新开始数据了,虽然clear意为清除,但是其实它只是将指针的位置移动了,并没有将数据清除,而是会覆盖原来的位置

- 只读了部分数据,我想将未读的部分保留,而现在我又要开始先进行写模式的操作了,这样可以执行
compact()方法
这个方法会将没有读到的数据保存到初始位置,而position指针的位置将会移动到这些数据的后面位置,从未读的数据后开始进行写数据

之后再读数据的时候,我们就能将上次没有读到的数据读出来了
1.3 Channel简介
Channel间的数据交换,都需要依赖Buffer

1.3.1 几个重要的Channel

扫描二维码关注公众号,回复:
11824648 查看本文章

- FileChannel:用于文件传输
- ServerSocketChannel和SocketChannel:用于网络编程的传输
2. 文件拷贝实战
- 一个字节一个字节的拷贝实在是慢的不行。
import java.io.*;
import java.nio.ByteBuffer;
import java.nio.channels.FileChannel;

interface FileCopyRunner{


    void copyFile(File source,File target);
}

public class FileCopyDemo {


    private static void close(Closeable closeable){


        if(closeable != null) {


            try {


                closeable.close();
            } catch (IOException e) {


                e.printStackTrace();
            }
        }
    }

    //不使用任何缓冲的留的拷贝
    private static FileCopyRunner noBufferStreamCopy = new FileCopyRunner() {


        @Override
        public void copyFile(File source, File target) {


            InputStream fin = null;
            OutputStream fout = null;
            try {


                fin = new FileInputStream(source);
                fout = new FileOutputStream(target);
                int result;
                while((result = fin.read()) != - 1){


                    fout.write(result);
                }
            } catch (FileNotFoundException e) {


                e.printStackTrace();
            } catch (IOException e) {


                e.printStackTrace();
            }finally {


                close(fin);
                close(fout);
            }
        }
    };

    //使用缓冲区的流的拷贝
    private static FileCopyRunner bufferStreamCopy = new FileCopyRunner() {


        @Override
        public void copyFile(File source, File target) {


            InputStream fin = null;
            OutputStream fout = null;
            try {


                fin = new FileInputStream(source);
                fout = new FileOutputStream(target);
                //创建缓冲区
                byte[] buffer = new byte[1024];
                int result;
                while((result = fin.read(buffer)) != -1){


                    //result这里表示从中读出来的具体字节数
                    //虽然缓冲区中能缓存1024,但是我们读取的时候不一定就有这么多字节
                    //所以我们使用result做下面的参数
                    fout.write(buffer,0,result);
                }
            } catch (FileNotFoundException e) {


                e.printStackTrace();
            } catch (IOException e) {


                e.printStackTrace();
            }finally {


                close(fin);
                close(fout);
            }
        }
    };

    //使用带有缓冲区的channel复制 nio
    private static FileCopyRunner nioBufferCopy = new FileCopyRunner() {


        @Override
        public void copyFile(File source, File target) {


            FileChannel fin = null;
            FileChannel fout = null;

            try {


                fin = new FileInputStream(source).getChannel();
                fout = new FileOutputStream(target).getChannel();
                ByteBuffer byteBuffer = ByteBuffer.allocate(1024);

                while(fin.read(byteBuffer) != -1){


                    byteBuffer.flip();//转变为读模式
                    while (byteBuffer.hasRemaining()){


                        fout.write(byteBuffer);
                    }
                    byteBuffer.clear();//转变为写模式
                }
            } catch (FileNotFoundException e) {


                e.printStackTrace();
            } catch (IOException e) {


                e.printStackTrace();
            }finally {


                close(fin);
                close(fout);
            }
        }
    };

    //使用没有缓冲区的channel复制文件
    private static FileCopyRunner nioTransferCopy = ((source, target) -> {


        FileChannel fin = null;
        FileChannel fout = null;

        try {


            fin = new FileInputStream(source).getChannel();
            fout = new FileOutputStream(target).getChannel();

            long transferred = 0L;
            long size = fin.size();
            while(transferred != size){


                //如果拷贝的大小没有达到源文件的大小就要一直拷贝
                transferred += fin.transferTo(0,size,fout);
            }
        } catch (FileNotFoundException e) {


            e.printStackTrace();
        } catch (IOException e) {


            e.printStackTrace();
        }finally {


            close(fin);
            close(fout);
        }
    });

    public static void main(String[] args) {


        File source = new File("J:\\StudySpace\\Java秒杀系统方案优化-高性能高并发实战\\project.zip");
        File target = new File("J:\\StudySpace\\Java秒杀系统方案优化-高性能高并发实战\\p1.zip");
        File target2 = new File("J:\\StudySpace\\Java秒杀系统方案优化-高性能高并发实战\\p2.zip");
        File target3 = new File("J:\\StudySpace\\Java秒杀系统方案优化-高性能高并发实战\\p3.zip");
        File target4 = new File("J:\\StudySpace\\Java秒杀系统方案优化-高性能高并发实战\\p4.zip");

        new Thread(() -> noBufferStreamCopy.copyFile(source,target)).start();
        new Thread(() -> bufferStreamCopy.copyFile(source,target2)).start();
        new Thread(() -> nioBufferCopy.copyFile(source,target3)).start();
        new Thread(() -> nioTransferCopy.copyFile(source,target4)).start();
    }
}
3. Selector概述
- Channel需要在Selector上注册

- 注册的同时,要告诉Selector监听的状态
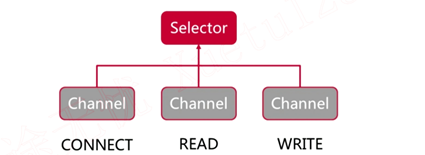
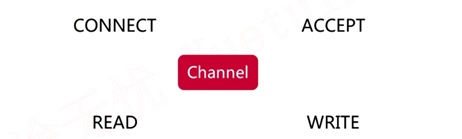
- Channel对应的状态有:
CONNECT:socketChannel已经与服务器建立连接的状态;ACCEPT:serverSocketChannel已经与客户端建立连接的状态;READ:可读状态;WRITE:可写状态
- Channel在Selector上注册完成后,会返回一个SelectKey对象,其中有几个重要的方法:
interestOps:查看注册的Channel绑定的状态;readyOps:查看哪些是可操作的状态;channel:返回channel对象;selector:返回selector对象;attachment:附加其他对象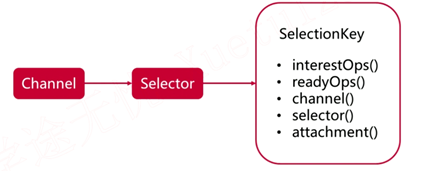
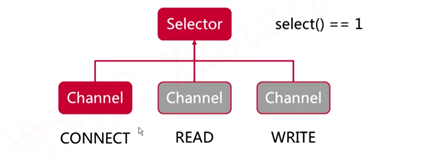
- 调用Selector的select方法,返回它监听的事件的数量,可同时响应多个事件。不过它是阻塞式的调用,当监听的事件中没有可以用来响应请求的,则会被阻塞,直到有可用的channel能够响应该请求,才会返回
加油儿!