概述:
本文主要是对drawBitmapMesh的api研究学习,以及介绍模仿mac吸入动效的实现原理。
drawBitmapMesh:
使bigmap产生形变,功能与drawVertices类似,区别是drawVertices直接对画布产生作用。
首先需要看一下api中的参数列表:

其中关键参数分别是:
bitmap:需要扭曲的图像
meshWidth:横向的格数
meshHeight:纵向的格数
verts:网格交叉点坐标数组,长度为(meshWidth + 1) * (meshHeight + 1) * 2
vertOffset:控制verts数组中从第几个数组元素开始才对bitmap进行扭曲
这里需要注意,根据api的描述在p以下的版本vertOffset和colorOffset不生效,默认为0
通过一个demo来演示具体的使用方法:
1.首先创建一个自定义view,绘制一个bitmap在上面:

绘制的方法:
canvas.drawBitmapMesh(mBitmap,
       WIDTH,
       HEIGHT,
       mVerts,
       0, null, 0, mPaint);
其中WIDTH为行数,HEIGHT为列数,mVerts为坐标数组,暂时随意传即可,不会影响目前绘制的图片。
2.假设将图片分为3行3列,则设置WIDTH,HEIGHT=3,根据行列以及图片的宽高设置坐标数组:
private void buildMesh(float mBmpW, float mBmpH) {
int index = 0;
for (int y = 0; y <= HEIGHT; ++y) {
float fy = y * mBmpH / HEIGHT;
for (int x = 0; x <= WIDTH; ++x) {
float fx = x * mBmpW / WIDTH;
setXY(mVerts, index, fx, fy);
index += 1;
}
}
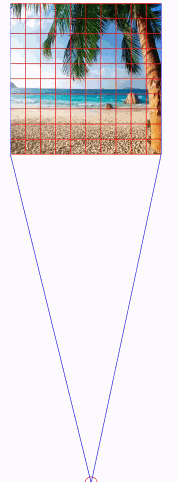
}并且,在ondraw的时候绘制好分割线,效果如图:

//画分割线
mPaint.setStyle(Paint.Style.FILL);
for (int i = 0; i + 1 < mVerts.length / 2; i++) {
    if ((i + WIDTH + 1) * 2 + 1 <= mVerts.length) {
        canvas.drawLine(
                mVerts[i * 2],
                mVerts[i * 2 + 1],
                mVerts[(i + WIDTH + 1) * 2],
                mVerts[(i + WIDTH + 1) * 2 + 1],
                mPaint);
    }
    if (i != 0 && ((i + 1) % (WIDTH + 1) == 0)) {
        continue;
    }
    canvas.drawLine(
            mVerts[i * 2],
            mVerts[i * 2 + 1],
            mVerts[i * 2 + 2],
            mVerts[i * 2 + 3],
            mPaint);
}
3.增加触控监听,在手指点击的位置画一个小圆圈,并绘制两条轨迹线,保存path路径:

绘制的方法就不赘述了,比较简单。
4.最关键的部分,点击测试的时候,启动一个进度值动画,使得进度从0~行数变化,并计算动态的绘制路径,更新坐标数组并刷新视图(这里为了让视图连贯,采取了10行10列):
其中最为关键的是坐标数组动态计算的方法:
/**
 * 动态计算绘制路径
 * 1.计算两条pathmeasure
 * 2.根据动画index 计算左右两边路径各自的第一个点和最后一个点坐标
 * 3.分别计算网格里的每个点位置
 * @param timeIndex
 */
private void buildMeshes(int timeIndex) {
    mFirstPathMeasure.setPath(mFirstPath, false);
    mSecondPathMeasure.setPath(mSecondPath, false);
    int index = 0;
    float[] pos1 = {0.0f, 0.0f};
    float[] pos2 = {0.0f, 0.0f};
    float firstLen = mFirstPathMeasure.getLength();
    float secondLen = mSecondPathMeasure.getLength();
    float len1 = firstLen / HEIGHT;
    float len2 = secondLen / HEIGHT;
    float firstPointDist = timeIndex * len1;    //左边第一个点长度
    float secondPointDist = timeIndex * len2;  //右边第一个点长度
    float height = mBmpH;  //图片高度
    mFirstPathMeasure.getPosTan(firstPointDist, pos1, null);
    mFirstPathMeasure.getPosTan(firstPointDist + height, pos2, null);  //得到第一个点坐标和最后一个点坐标
    float x1 = pos1[0];
    float x2 = pos2[0];
    float y1 = pos1[1];
    float y2 = pos2[1];
    float FIRST_DIST = (float) Math.sqrt((x1 - x2) * (x1 - x2) + (y1 - y2) * (y1 - y2));
    float FIRST_H = FIRST_DIST / HEIGHT;
    mSecondPathMeasure.getPosTan(secondPointDist, pos1, null);
    mSecondPathMeasure.getPosTan(secondPointDist + height, pos2, null);
    x1 = pos1[0];
    x2 = pos2[0];
    y1 = pos1[1];
    y2 = pos2[1];
    float SECOND_DIST = (float) Math.sqrt((x1 - x2) * (x1 - x2) + (y1 - y2) * (y1 - y2));
    float SECOND_H = SECOND_DIST / HEIGHT;
    for (int y = 0; y <= HEIGHT; ++y) {
        //得到每一个点的位置
        mFirstPathMeasure.getPosTan(y * FIRST_H + firstPointDist, pos1, null);
        mSecondPathMeasure.getPosTan(y * SECOND_H + secondPointDist, pos2, null);
        float w = pos2[0] - pos1[0];//横轴最左边到最右边的距离
        //左右两边的点的位置
        float fx1 = pos1[0];
        float fx2 = pos2[0];
        float fy1 = pos1[1];
        float fy2 = pos2[1];
        //左右两边点 x 和 y轴方向的差值
        float dy = fy2 - fy1;
        float dx = fx2 - fx1;
        for (int x = 0; x <= WIDTH; ++x) {
            // y = x * dy / dx
            float fx = x * w / WIDTH;
            //tanα = dy/dx = fy/fx
            float fy = fx * dy / dx;
            mVerts[index * 2 + 0] = fx + fx1;
            mVerts[index * 2 + 1] = fy + fy1;
            index += 1;
        }
    }
}
核心思想还是根据行数等分计算每一个点的坐标,并动态更新坐标数组,刷新图形在轨迹线上显示的位置。
总结:
通过drawBitmapMesh形变方法,可以实现一些其他api做不到的效果,比如一些酷炫的吸附,拖拽效果等,以后会慢慢找一些比较复杂的效果来实现练习一下。
代码下载地址:https://github.com/jiangzhengnan/NguiLib
参考:
https://www.jianshu.com/p/51d8dd99d27d( Android:修图技术之瘦脸效果的实现(drawBitmapMesh))