目录
- 第二章 变量
- 第三章 列表
- 第四章 操作列表
- 第五章 if语句
- 第六章 字典
- 第七章用户输入和while循环
- 第八章 函数
- 第九章类
- 第十章 文件和异常
- 10.1从文件中读取数据
- 10.2写入文件
- 10.3异常
- 处理ZeroDivisionError异常
- 使用try_expect
- 使用异常避免崩溃
- else代码块
- 处理FileNotFoundError异常
- 分析文本
- 使用多个文件
- 失败时一声不吭
- 决定报告哪些错误
- 10.4存储数据
- 第十一章测试代码
- 第十二章 武装飞船
- 第十五章 生成数据
- 第十六章 下载数据
- 第十七章使用API
第二章 变量
2.1
消息储存于变量中:
message =“Hello Python crash world!”
print(message)
2.2变量
变量名的命名和使用
变量名只包含字母、数字、下划线, 可以以字母或下划线打头,但不能以数字打头
不能有空格,使用下划线来分隔单词
不要将Python关键字和函数名用作变量名
变量名应简短又具有描述性
慎用小写字母i和大写字母O,因为可能被人看错成数字1和0
2.2字符串
字符串:用引号括起来的都是,双引号或单引号
修改字符串大小
name=“ada lovelace” print(name.title()) 首字母大写
print(name.upper()) 全部大写
print(name.lower()) 全部小写
合并(拼接)字符串:+
first_name=“ada”
last_name=“lovelace”
full_name=first_name+" "+last_name
print(full_name)
使用制表符或换行符来添加空白
在编程中,空白泛指任何非打印字符,如空格、制表符和换行符,可以使用空白来组织输出,以使其更易读。
 制表符 /t
  换行符/n
                   print("Language:\n\tc\n\tpython\t\njavascript")
删除空白
favorite_lanuage=" python "
print(favorite_lanuage)
print(favorite_lanuage.rstrip()) 暂时删除末尾空白
favorite_lanuage=" python "
favorite_lanuage=favorite_lanuage.rstrip() 永久删除末尾空白永久删除必须将删除操作的结果存回到变量中
print(favorite_lanuage)
favorite_lanuage.lstrip() favorite_lanuage.strip() 开头空白、两端空白同上
使用字符串是避免语法错误
2.4数字
整数
在Python中,可对整数执行加减乘除
浮点数
将带小数点的数字都称为浮点数:小数点可出现在任何位置
== 结果包含的小数位数可能是不确定的==
使用函数str()避免类型错误
age=23
message="happy "+age+“rd birthday!”
print(message)
类型错误:意味着Python无法识别你使用的信息

age=23
message="happy "+str(age)+“rd birthday!”== 函数str()让Python将非字符串值表示为字符串==
print(message)
2.5注释
在Python中,注释使用#标识,#后面的内容会被Python解释器忽略。
第三章 列表
3.1列表是什么
列表 [] 用来储存成组信息,其中包含按特定顺序排列起来的元素,用逗号来分隔其中的元素
bicycles=[‘trek’,‘cannondale’,‘redline’,‘specialized’]
print(bicycles)
访问列表元素元素
指出列表名称,元素索引,并将其放在方括号内
第一个列表元素的索引为0而不是1,第二个列表的索引为1 (要访问列表的任何元素,都可将其位置减1,并将结果作为索引结果)最后一个元素将索引指定为-1,倒数第二个-2
bicycles=[‘trek’,‘cannondale’,‘redline’,‘specialized’]
print(bicycles[0])
索引从0而不是1开始
bicycles=[‘trek’,‘cannondale’,‘redline’,‘specialized’]
print(bicycles[1])
print(bicycles[-1])
使用列表中的各个值
bicycles=[‘trek’,‘cannondale’,‘redline’,‘specialized’]
message=“My first bicycle was a “+bicycles[0].title()+”.”
message_1=“My first bicycle was a “+bicycles[-2].title()+”.”
print(message)
print(message_1)
3.2修改、添加和删除元素
修改列表元素
指定列表名、要修改的元素索引,再指定该元素的新值
motorcycles[0]=‘ducati’
print(motorcycles)
在列表中添加元素
motorcycles=[]
motorcycles.append(‘honda’)== 末尾添加 .append()==
motorcycles.append(‘yamaha’)
print(motorcycles)
motorcycles=[‘honda’,‘yamaha’,‘suzuki’]
motorcycles.insert(0,‘ducati’)== 任意位置.insert()==需要指定新元素的索引和值
print(motorcycles)
从列表中删除元素
motorcycles=[‘honda’,‘yamaha’,‘suzuki’]
print(motorcycles)
del motorcycles[0]== del语句: 知道元素位置,可指定位置【】==删除后无法访问
print(motorcycles)
motorcycles=[‘honda’,‘yamaha’,‘suzuki’]
print(motorcycles)
popped_motorcycles=motorcycles.pop()== pop()删除该元素但还继续使用它, 弹出任意位置元素==弹出后不在列表中
popped_motorcycles_1=motorcycles.pop(0)
print(motorcycles)
print(popped_motorcycles)
print(popped_motorcycles_1)
motorcycles=[‘honda’,‘yamaha’,‘suzuki’]
first_owned=motorcycles.pop(0)
#print(‘the first motorcycle I owend was a ‘+first_owned+’.’)
#print(motorcycles)
motorcycles=[‘honda’,‘yamaha’,‘suzuki’]
#print(motorcycles)
motorcycles.remove(‘yamaha’)== remove() 不知道元素位置,可接着使用它的值==只删除第一个指定的值,如果删除值在列表中出现多次,需要使用循环来判断是否删除了所有这样的值
#print(motorcycles)
motorcycles=[‘honda’,‘yamaha’,‘suzuki’]
#print(motorcycles)
too_expensive=‘yamaha’
motorcycles.remove(too_expensive)
#print(motorcycles)
#print("\nA “+too_expensive+” is too expensive for me.")
3.3 组织列表
基于全部为小写情况
使用方法sort()对列表进行永久性排序
cars=[‘bmw’,‘audi’,‘toyota’,‘subaru’]
cars.sort()== 顺序排序==
print(cars)
cars=[‘bmw’,‘audi’,‘toyota’,‘subaru’]
cars.sort(reverse=True)== 倒序排序==
print(cars)
使用方法sorted()对列表进行临时排序
cars=[‘bmw’,‘audi’,‘toyota’,‘subaru’]
print(sorted(cars))
print(cars)
倒着打印列表
cars=[‘bmw’,‘audi’,‘toyota’,‘subaru’]
print(cars)
cars.reverse()
print(cars)
确定列表长度
cars=[‘bmw’,‘audi’,‘toyota’,‘subaru’]
print(len(cars))
3.4使用列表时避免索引错误
发生索引错误却找不到解决办法时,尝试将列表或其长度打印出来。
第四章 操作列表
4.1循环for
magicians=[‘alice’,‘david’,‘carolina’]
for magician in magicians:
print(magician) == 注意需要缩进==
magicians=[‘alice’,‘david’,‘carolina’]
for magician in magicians:
print(magician.title()+’, that was a great trick!’)== 注意需要缩进==
print(“I can’t wait to see your next trick,”+magician.title()+".\n")== 注意需要缩进==
print(“tank you, everyone. that was a great magic show!”)== 没有缩进的代码只执行一次==
4.2避免缩进错误
位于for语句后面且属于循环组成部分的代码行,一定要缩进(== 可能需要缩进一行或者多行==)
IndentationError: expected an indented block
不必要的缩进IndentationError: unexpected indentn
遗漏了冒号,for语句末尾的冒号告诉Python下一行是循环的第一行
4.3创建数值列表
for value in range(1,5):
print(value) #.range()生成一系列数字== 差一行结果1.2.3.4==
numbers=list(range(1,6))
print(numbers) 函数list()创建列表
even_numbers=list(range(2,11,1)) == 从2开始,直到达到或超过终值11,每个加1==
print(even_numbers) == 使用range()时可指定步长==
digit=[1,2,3,4,5,6,7,8,9,0]
print(min(digit))
print(max(digit))
print(sum(digit)) 对数字列表进行统计计算
squares=[value2 for value in range(1,11)]
print(squares)#列表解析== 结果同下==
squares=[]
for value in range(1,11):
square=value2
squares.append(square)
print(squares)
4.4切片
players=[‘charles’,‘martina’,‘michael’,‘florence’,‘eli’]
print(players[0:3])#起始索引指定为0,终止索引指定为3 == 到达指定的第二个索引前面的元素停止==
print(players[:3])#没有指定起始索引,则从列表开头开始
print(players[0:])
print(players[-3:])
players=[‘charles’,‘martina’,‘michael’,‘florence’,‘eli’]
for player in players[:3]:
print(player) 遍历切片
my_foods=[‘pizza’,‘falafel’,‘carrot cake’]
friends_foods=my_foods[:] 复制列表
print(my_foods)
print(friends_foods)
my_foods=[‘pizza’,‘falafel’,‘carrot cake’]
friends_foods=my_foods[:]== 【】代表使用切片==
my_foods.append(‘cannoli’)
friends_foods.append(‘ice cream’)
print(my_foods)
print(friends_foods)
4.5 元组
Python将不能修改的值称为不可变的,而不可变的列表被称为元组。
定义元组
元组看起来像列表,但使用圆括号而不是方括号来标识。定义元组后,就可以使用索引来访问元素。
dimensions=(200,50)== 确保不被修改==
print(dimensions[0])
print(dimensions[1])
遍历元组中的值
dimensions=(200,50)
for dimension in dimensions:
print(dimension)
修改元组变量
dimensions=(200,50)== 虽然不能修改元组的元素,但可以给元组的变量赋值==
print(“original dimensions:”)
for dimension in dimensions:
print(dimension)
dimensions=(400,100)
print("\nModified dimensions:")
for dimension in dimensions:
print(dimension)
4.6设置代码格式PEP 8指南
缩进:每级缩进使用四个空格== 制表符和空格混合使用问题设置制表符
行长:建议每行不超过80字符显示垂直参考线
空行:不影响代码的运行,但影响可读性
第五章 if语句
5.2条件测试
检查是否相等
cars=[‘audi’,‘bmw’,‘subaru’,‘toyota’]== 一个等号是陈述,两个等号是发问==
for car in cars:
if car==‘bmw’:
print(car.upper())
else:
print(car.title())
car='Audi’两个大小写不同的值会被视为不相等
car==‘audi’
False
car=‘Audi’
car.lower()==‘audi’
True
检查是否不相等
requested_topping=‘mushroom’
if requested_topping !=‘anchovies’:
print(‘hold the anchovies!’)
比较数字
answer=17
if answer !=42:
print(‘that is not the correct answer. please try again!’)
检查多个条件
age_0=22 == 使用and检查多个条件==
age_1=18
if age_0 >= 21 and age_1 >= 21:
print(age_0)
else:
print(age_1)
age_0=22 == 使用or检查多个条件==
age_1=18
if age_0 >= 21 or age_1 >= 21:
print(age_0)
else:
print(age_1)
检查特定值是否包含在列表中
requested_toppings=[‘mushrooms’,‘onions’,‘pineapple’]
if ‘mushrooms’ in requested_toppings:
print(‘mushrooms’)
if “pepperoni” in requested_topping:
print(“pepperoni”)
else:
print(‘sorry’)
检查特定值是否不包含在列表中
banaed_users=[‘andrew’,‘carolina’,‘david’]
users=‘marie’
if users not in banaed_users:
print(users)
5.2 if语句
if-else语句
age=19
if age >=18:
print(“you are old enough to vote!”)
else:
print('please register to vote as soon as you turn 18! ')
if-elif-else结构
age=12
if age < 4:
print(‘your admission cost is $0.’)
elif age < 18:
print(‘your admission cost is $5.’)
else:
print(‘your admission cost is $10.’)
使用多个elif代码块
age=12
if age < 4:
price = 0
elif age < 18:
price = 5
elif age < 65:
price = 10
else:
price = 5
print(‘Your admission cost is $’+str(price)+’.’)
省略else代码块
age=12
if age < 4:
price = 0
elif age < 18:
price = 5
elif age < 65:
price = 10
elif age >= 65:
price = 5
print(‘Your admission cost is $’+str(price)+’.’)
测试多个条件
requested_toppings = [‘mushrooms’, ‘extra cheese’]
if ‘mushrooms’ in requested_toppings:
print(‘adding mushrooms’)
if “pepperoni” in requested_toppings:
print(“adding pepperoni”)
if 'extra cheese’in requested_toppings:
print(‘adding extra cheese’)
5.4使用if语句处理列表
检查特殊列表
requested_toppings = [‘mushrooms’, ‘green peppers’,‘extra cheese’]
for requested_topping in requested_toppings :
if requested_topping ==‘green peppers’:
print(‘sorry,we are out of green peppers right now.’)
else:
print(‘adding ‘+requested_topping+’.’)
检查列表不是空的
requested_toppings = []
if requested_toppings:
for requested_topping in requested_toppings:
print('adding ’ + requested_topping + ‘.’)
else:
print(‘are you sure you want a plain pizza?’)
使用多个列表
available_toppings = [‘mushrooms’,‘olives’,‘green peppers’,‘pepperoni’,‘pineapple’,‘extra cheese’]
requested_toppings = [‘mushrooms’, ‘french fries’,‘extra cheese’]
for requested_topping in requested_toppings:
if requested_topping in available_toppings:
print('adding ’ + requested_topping + ‘.’)
else:
print(‘sorry’)
5.5设置if语句的格式
==、>=、<=等比较运算符两边各添加一个空格,这样的空格不会影响Python对代码的解读,而只是让代码读起来更容易。
第六章 字典
6.1使用字典
字典是一系列键-值对,每个键都与一个值相关联,可以使用键来访问与之相关联的值。与键相关联的值可以是数字、字符串、列表乃至字典。
字典用放在**{}**中的一系列键-值对表示
alien_0 = {‘color’:‘green’,‘points’:5}
print(alien_0[‘color’])
print(alien_0[‘points’])
6.2
访问字典中的值
要获取与键相关联的值,可一次指定字典名和方括号内的键
alien_0 = {‘color’:‘green’,‘points’:5}
new_points=alien_0[‘points’]
print(‘you just earned ’ + str(new_points) + ’ points!’)
添加键-值对
alien_0 = {‘color’:‘green’,‘points’:5}
print(alien_0)
alien_0[‘x_position’] = 0
alien_0[‘y_position’] = 25
print(alien_0)
创建空字典
alien_0={}
alien_0[‘color’]= ‘green’
alien_0[‘points’]=5
print(alien_0)
修改字典中的值
alien_0 = {‘color’:‘green’,}
print(‘that alien is ‘+ alien_0[‘color’]+’.’)
alien_0[‘color’]=‘yellow’
print('the alien is now '+ alien_0[‘color’]+ ‘.’)
删除键-值对
alien_0 = {‘color’:‘green’,‘points’:5}
print(alien_0)
del alien_0[‘points’]
print(alien_0)
由类似对象组成的字典
favorite_language={
‘jen’:‘python’,
‘sarah’:‘c’,
‘endrew’:‘ruby’,
‘phil’:‘python’,
}
print('sarah favorite language is '+
favorite_language[‘sarah’].title()+
‘.’)
6.3遍历字典
遍历所有的键-值对
favorite_language={
‘jen’:‘python’,
‘sarah’:‘c’,
‘endrew’:‘ruby’,
‘phil’:‘python’,
}
for name, language in favorite_language.items():
print(name.title()+ "‘s favorite language is " +
language.title()+’.’)
遍历字典中的所有键
favorite_language={
‘jen’:‘python’,
‘sarah’:‘c’,
‘endrew’:‘ruby’,
‘phil’:‘python’,
}
for name in favorite_language.keys():== 在不需要使用字典中的值时,方法keys很有用==
print(name.title())
按顺序遍历字典中所有的键
favorite_language={
‘jen’:‘python’,
‘sarah’:‘c’,
‘endrew’:‘ruby’,
‘phil’:‘python’,
}
for name in sorted(favorite_language.keys()):
print(name.title() + “, thank you for taking the poll.”)
遍历字典中所有的值
favorite_language={
‘jen’:‘python’,
‘sarah’:‘c’,
‘endrew’:‘ruby’,
‘phil’:‘python’,
}
print(‘the following languages have been mentioned:’)
for language in favorite_language.values():== 如果感兴趣的是主要字典包含的值,可使用方法values==它返回一个值列表,不包含任何键
print(language.title() )
剔除重复项
favorite_language={
‘jen’:‘python’,
‘sarah’:‘c’,
‘endrew’:‘ruby’,
‘phil’:‘python’,
}
print(‘the following languages have been mentioned:’)
for language in set(favorite_language.values()):== 集合类似于列表,但每个元素必须是独一无二的==
print(language.title() )
6.4嵌套
需要将一系列字典储存在列表中,或将列表作为值存储在字典中,称为嵌套。
字典列表
alien_0 = {‘color’:‘green’,‘points’:5}
alien_1 = {‘color’:‘yellow’,‘points’:10}
alien_2 = {‘color’:‘red’,‘points’:15}
aliens=[alien_0,alien_1,alien_2]
for alien in aliens:
print(alien)
在字典中储存列表
pizza={
‘crust’:‘thick’,
‘toppings’:[‘mushroom’,‘extra cheese’],
}
print(‘you ordered a ‘+ pizza[‘crust’]+’-crust pizza’ + ‘with the follow toppings:’)
for topping in pizza[‘toppings’]:
print(’\t’+ topping)
在字典中存储字典
users = {
‘aeinstein’:{
‘first’:‘albert’,
‘last’:‘einstein’,
‘location’:‘princeton’,
},
‘mcurie’:{
‘first’:‘marie’,
‘last’:‘curie’,
‘location’:‘paris’,
},
}
for username,user_info in users.items():
print(’\nusername: ‘+ username)
full_name = user_info[‘first’]+""+user_info[‘last’]
location=user_info[‘location’]
print(’\tfullname: ‘+ full_name.title())
print(’\tlocation: '+ location.title())
第七章用户输入和while循环
7.1函数input()的工作原理
函数input()让程序暂停运行,等待用户输入一些文本。获取用户输入后,Python将其存储在一个变量中,以方便使用。
编写清晰的程序
每当你使用函数input时,都应指定清晰而易于明白的提示,准确指出你需要用户提供什么样的信息。
message = input('tell me something,and I will pepeat it back to you : ')== 在提示末尾(冒号后面)包含一个空格,可将提示与用户输入分开,让用户清楚知道其输入始于何处==
print(message)
name = input('please enter your name: ')
print(‘hello,’ + name + ‘!’)
prompt = ‘if you tell us who you are, we can personlize the messages you see.’
prompt +=’\nwhat is your first name?’
name = input(prompt)== 提示超过一行,可将提示存储在一个变量中,再将该变量传递给函数input==
print(’\nhello,’+’!’)
使用int()来获取数值输入
函数int将数字的字符串表示转换为数值表示。
height = input(‘how tall are you ?’)
height = int(height)
if height >= 36:
print(’\nyour tall enough to ride!’)
else:
print(’\nyou must be a little older.’)
求模运算符
处理信息时,求模运算符%是一个很有用的工具,它将两个数相除并返回余数。
== 求模运算符不会指出一个数是另一个数的多少倍,而只指出余数是多少==
如果一个数被另一个书整除,余数就为0,则求模运算符就返回0,可以利用这一点来判断一个数是奇数还是偶数。
number = input(‘enter a number,and i will tell you if it is even or odd: ‘)
number =int(number)
if number %2 == 0:
print(’\nthe number’ + str(number) + ’ is even.’)
else:
print(’\nthe number’ + str(number) + ’ is odd.’)
7.2while循环简介
for循环用于针对集合中的每个元素都有一个代码块,而while循环则不断运行,直到指定的条件不满足为止。
使用while循环
current_number = 1
while current_number <= 5:
print(current_number)
current_number += 1 == current_number += 1为current_number = current_number + 1的缩写==
让用户选择何时退出
prompt=’\ntell me something,and I will pepeat it back to you : ’
prompt += “\nenter ‘quit’ to end the program.”
message = “”
while message != ‘quit’:
message = input(prompt)
print(message)
使用标志
prompt=’\ntell me something,and I will pepeat it back to you : ’
prompt += “\nenter ‘quit’ to end the program.”
active = True == 在要求很多条件都满足才继续运行的程序中,可定义一个变量,用于判断整个程序是否处于活跃状态==
while active:
message = input(prompt)
if message == ‘quit’:
active=False
else:
print(message)
使用break退出循环
break语句用于控制程序流程,可使用它来控制哪些代码行将执行,哪些代码不执行
prompt=’\nplease enter the name of a city you have visited: ’
prompt +="\n(enter ‘quit’ when you are finished.)"
while True:
city = input(prompt)
if city ==‘quit’:
break
else:
print('i would love to go to ’ + city.title() + ‘!’)
在循环中使用continue
current_number = 0
while current_number < 10:
current_number += 1
if current_number % 2 ==0:
continue
print(current_number)
避免无限循环
x = 1
while x <=5:
print(x)
x += 1 == 每个while循环都必须有停止运行的途径,这样才不会没完没了的执行下去==如果程序陷入无限循环,可按ctrl+c,也可关闭显示程序输出的终端窗口
7.3使用while循环来处理列表和字典
在列表之间移动元素
unconfirmed_users = [‘alice’,‘brain’,‘candace’]
confirmed_users = []
while unconfirmed_users:
current_user = unconfirmed_users.pop()
print('verifying user: ‘+ current_user.title())
confirmed_users.append(current_user)
print(’\nthe following users have been confirmed: ')
for confirmed_user in confirmed_users:
print(confirmed_user.title())
删除包含特定值的所有列表元素
pets = [‘dog’,‘cat’,‘dog’,‘goldfish’,‘cat’,‘rabbit’,‘cat’]
print(pets)
while ‘cat’ in pets:
pets.remove(‘cat’)
print(pets)
使用用户输入来填充字典
responses = {}
polling_active = True
while polling_active:
name = input(’\nwhat is your name?’)
response = input(‘which moutain would like to climb someday?’)
responses[name]=response
repeat = input(‘would you like to let another person respond?(yes/no)’)
if repeat == “no”:
polling_active = False
print(’\n—poll results—’)
for name,response in responses.items():
print(name + ‘would like to climb’ + response + ‘.’)
第八章 函数
函数是带名字的代码块,用于完成具体工作。
要执行函数定义的特定任务,可调用该函数。需要在程序中多次执行同一项任务时,你无需反复编写完成该任务的代码,而只需调用执行该任务的函数,让Python运行其中的代码。
通过使用函数,程序的编写、阅读、测试和修复都将更容易。
8.1定义函数
关键字def告诉Python要定义一个函数
def greet_user():
“”“显示简单问候语”""== 文档字符串的注释==
print(“hello”)
greet_user()== 依次指定函数名以及用括号括起来的必要信息调用函数==
向函数传递信息
def greet_user(username):
“”“显示简单问候语”""
print(“hello,”+username.title()+"!")
greet_user(‘jesse’)向它提供执行print语句所需要的信息
8.2传递实参
位置实参
调用函数时,Python必须将函数调用中的每个实参都关联到函数定义中的一个形参,最简单的关联方式是基于实参的顺序。
def describe_pet(animal_type,pet_name):
“”“显示宠物信息”""
print(’\nI have a ‘+animal_type+’.’)
print('my ‘+animal_type+"‘s name is "+pet_name.title()+’.’)
describe_pet(‘hamster’,‘harry’)
describe_pet(‘dog’,‘willie’)== 多次调用==
关键字实参
传递给函数的名称-值对,直接在实参中将名称和值关联起来,因此向函数传递实参时不会混淆。
无需考虑函数调用中的实参顺序,还清楚的指出了函数调用中各个值的用途。
def describe_pet(animal_type,pet_name):
“”“显示宠物信息”""
print(’\nI have a ‘+animal_type+’.’)
print('my ‘+animal_type+"‘s name is "+pet_name.title()+’.’)
describe_pet(pet_name=‘harry’,animal_type=‘hamster’,)== 务必准确地指定函数定义中形参名==
默认值
编写函数时可给每个形参指定默认值,在函数调用时省略相应的实参。
使用默认值可简化函数调用,还可清楚地指出函数的典型用法。
在调用函数中给形参提供了实参时,Python将使用指定的实参值,否则将使用形参的默认值。
def describe_pet(pet_name,animal_type=‘dog’):
“”“显示宠物信息”""
print(’\nI have a ‘+animal_type+’.’)
print('my ‘+animal_type+"‘s name is "+pet_name.title()+’.’)
describe_pet(pet_name=‘harry’)
等效的函数调用
8.3返回值
返回简单值
def get_foematted_name(first_name,last_name):
“”“返回整洁的名字”""
full_name=first_name+’ '+last_name
return full_name.title()
musician = get_foematted_name(‘jim’,‘hendrix’)== 调用返回值的函数时,需提供一个变量,用于存储返回值==
print(musician)
让实参变为可选
def get_foematted_name(first_name,last_name,middle_name’ ‘):
“”“返回整洁的名字”""
if middle_name:
full_name=first_name+’ ‘+middle_name+’ ‘+last_name
else:
full_name=first_name+’ '+last_name
return full_name.title()
musician = get_foematted_name(‘jim’,‘hendrix’)
print(musician)
musician = get_foematted_name(‘john’,‘hooker’,‘lee’)
print(musician)
返回字典
def build_person(first_name,last_name):
“”“返回一个字典,其中包含一个人的信息”""
person={‘first’:first_name,‘last’:last_name}
return person
musician=build_person(‘jimi’,‘hendrix’)
print(musician)
结合使用函数和while循环
def get_foematted_name(first_name,last_name):
“”“返回整洁的名字”""
full_name = first_name + ’ ’ + last_name
return full_name.title()
while True:
print(’\nplease tell me your name:’)
print("(ebter’q’ at any time to quit)")
f_name=input('first name: ')
if f_name==‘q’:
break
l_name=input(‘last name: ‘)
if l_name==‘q’:
break
formatted_name=get_foematted_name(f_name,l_name)
print(’\nhello, ‘+ formatted_name+’!’)
8.4传递列表
将列表传递给函数后,函数就能直接访问其内容
def greet_users(names):
“”“向列表中的每位用户都发出简单问候”""
for name in names:
msg=‘hello,’+name.title()+’!’
print(msg)
usernames=[‘hannah’,‘try’,‘margot’]
greet_users(usernames)
在函数中修改列表
def print_models(unprinted_designs,completed_models):
“”"
模拟打印每个设计,直到没有未打印的设计为止
打印每个设计后,都将其移到列表completed_models中
“”"
while unprinted_designs:
current_design=unprinted_designs.pop()
print('printing models: ‘+current_design)
completed_models.append(current_design)
def show_completed_models(completed_models):== 可以再一个函数中调用另一个函数==
“”“显示打印好的所有模型”""
print(’\nthe following models have been printed: ')
for completed_model in completed_models:
print(completed_models)
unprinted_designs=[‘iphone case’,‘robot pendant’,‘dodecahedron’]
completed_models=[]
print_models(unprinted_designs,completed_models)
show_completed_models(completed_models)
禁止函数修改列表
切片表示法[ : ]创建列表的副本
8.5传递任意数量的实参
def make_pizza(*toppings):== 让Python创建一个空元组,并将收到的值都封装进这个元组中==
“”“打印顾客点的所有配料”""
print(toppings)
make_pizza(‘pepperoni’)
make_pizza(‘mushrooms’,‘green peppers’,‘extra cheese’)
结合使用位置实参和任意数量实参
def make_pizza(size,*toppings):
“”“概述要制作的披萨”""
print(’\nmaking a ‘+str(size)+
‘-inch pizza with the following toppings:’)
for topping in toppings:
print(’- '+topping)
make_pizza(16,‘pepperoni’)
make_pizza(12,‘mushrooms’,‘green peppers’,‘extra cheese’)
使用任意数量的关键字实参
def build_profile(first,last,**user_info): == 两个*让Python创建一个空字典,并将收到的所有名称-值对都封装到这个字典中==
“”“创建一个字典,其中包含我们所知道的关于用户的一切”""
profile = {}
profile[‘first_name’] = first
profile[‘last_name’] = last
for key,value in user_info.items():
profile[key]=value
return profile
user_profile=build_profile(‘albert’,‘einstein’,
location=‘princeton’,
field=‘physics’)
print(user_profile)
8.6将函数存储在模块中
函数可将代码块与主程序分离;通过给函数指定描述性名称,可让主程序容易理解的多。
将函数存储在被称为模块的独立文件中,再将模块导入主程序中。
import语句允许在当前运行的程序文件中使用模块的代码。
通过将函数存储在独立文件中,可隐藏程序代码的细节,将重点放在程序的高层逻辑上,这能在在不同的程序中重用函数。
将函数存储在独立文件后,可与其他程序员共享这些文件,知道如何导入函数还能使用其他程序员编写的函数库。
导入整个模块
要让函数是可导入的,得先创建函数。模块是扩展名为.py的文件,包含要导入到程序中的代码。
import making
making.make_pizza(16,‘pepperoni’)
making.make_pizza(12,‘mushrooms’,‘green peppers’,‘extra cheese’)
导入特定的函数
from making import make_pizza
making.make_pizza(16,‘pepperoni’)
making.make_pizza(12,‘mushrooms’,‘green peppers’,‘extra cheese’)
使用as给函数指定别名
== import语句将函数make_pizza()重命名为mp()==每当调用make_pizza()时,都简写为mp(),Python将运行make_pizza()中的代码,这可避免与这个程序可能包含的函数make_pizza()混淆
from making import make_pizza as mp
making.make_pizza(16,‘pepperoni’)
making.make_pizza(12,‘mushrooms’,‘green peppers’,‘extra cheese’)
使用as给模块指定别名
==import语句给模块making指定了别名p,但该模块中所有函数的名称都没变。==不仅使代码更简洁,还可以让你不再关注模块名,而专注于描述性的函数名。
这些函数名明确地指出了函数的功能,对理解代码而言,他们比模块名更重要。
import making as p
making.make_pizza(16,‘pepperoni’)
making.make_pizza(12,‘mushrooms’,‘green peppers’,‘extra cheese’)
导入模块中的所有函数
import语句中的* 让Python将模块making中的每个函数都导入到这个程序文件中 。
from making import *
making.make_pizza(16,‘pepperoni’)
making.make_pizza(12,‘mushrooms’,‘green peppers’,‘extra cheese’)
8.7函数编写指南
给形参指定默认值、函数调用中的关键字实参,等号两边不要有空格。
如果程序或模块包含多个函数,可使用两个空行将相邻的函数分开,这样更容易知道前一个函数在什么地方结束,下一个函数从什么地方开始。
第九章类
在面向对象编程中,编写表示现实世界的事物和情景的类,并基于这些类来创建对象。编写类时,定义一大类对象都有的通用行为。基于类创建对象时,每个对象都具备这种通用行为,然后根据需要赋予每个对象独特的个性。
根据类来创建对象被称为实例化,这让你能够使用类的实例。
9.1创建和使用类
创建Dog类
类中的函数称为方法,前面学到有关函数的一切都适用于方法,唯一重要的差别是调用方法的方式。
__init__是一种特殊的方法,每当你根据Dog类创建新实例时,Python都会自动运行它
class Dog():
“”“一次模拟小狗的简单尝试”""
def __init__(self,name,age):
    """初始化属性name和age"""
    self.name = name
    self.age = age

def sit(self):
    """模拟小狗被命令时蹲下"""
    print(self.name.title() + ' is now sitting.')

def roll_over(self):
    """模拟小狗被命令时打滚"""
    print(self.name.title() + ' rolled over!.')
根据类创建实例
class Dog():
“”“一次模拟小狗的简单尝试”""
def init(self,name,age):
“”“初始化属性name和age”""
self.name = name
self.age = age
def sit(self):
    """模拟小狗被命令时蹲下"""
    print(self.name.title() + ' is now sitting.')

def roll_over(self):
    """模拟小狗被命令时打滚"""
    print(self.name.title() + ' rolled over!.')
my_dog=Dog(‘while’,6)
print(‘my dog name is ‘+my_dog.name.title()+’.’)
print('my dog is '+str(my_dog.age)+‘years old.’)
9.2使用类和实例
Car类
class Car():
“”“一次模拟汽车的简单尝试”""
def __init__(self, make, model, year):
    """初始化描述汽车属性"""
    self.make=make
    self.model=model
    self.year=year

def get_descriptive_name(self):
    """返回整洁的描述性信息"""
    long_name=str(self.year)+''+self.make+''+self.model
    return long_name.title()
my_new_car = Car(‘audi’,‘a4’,2016)
print(my_new_car.get_descriptive_name())
给属性指定默认值
class Car():
“”“一次模拟汽车的简单尝试”""
def __init__(self, make, model, year):
    """初始化描述汽车属性"""
    self.make=make
    self.model=model
    self.year=year
    self.odometer_reading = 0

def get_descriptive_name(self):
    """返回整洁的描述性信息"""
    long_name=str(self.year)+''+self.make+''+self.model
    return long_name.title()

def read_odometer(self):
    """打印一条指出汽车里程的信息"""
    print('this car has '+ str(self.odometer_reading)+' miles on it')
my_new_car = Car(‘audi’,‘a4’,2016)
print(my_new_car.get_descriptive_name())
my_new_car.read_odometer()
直接修改属性的值
通过实例直接修改
class Car():
“”“一次模拟汽车的简单尝试”""
def __init__(self, make, model, year):
    """初始化描述汽车属性"""
    self.make=make
    self.model=model
    self.year=year

def get_descriptive_name(self):
    """返回整洁的描述性信息"""
    long_name=str(self.year)+''+self.make+''+self.model
    return long_name.title()

def read_odometer(self):
    """打印一条指出汽车里程的信息"""
    print('this car has '+ str(self.odometer_reading)+' miles on it')
my_new_car = Car(‘audi’,‘a4’,2016)
print(my_new_car.get_descriptive_name())
my_new_car.odometer_reading = 23
my_new_car.read_odometer()
通过方法修改属性的值
class Car():
“”“一次模拟汽车的简单尝试”""
def __init__(self, make, model, year):
    """初始化描述汽车属性"""
    self.make=make
    self.model=model
    self.year=year

def get_descriptive_name(self):
    """返回整洁的描述性信息"""
    long_name=str(self.year)+''+self.make+''+self.model
    return long_name.title()

def read_odometer(self):
    """打印一条指出汽车里程的信息"""
    print('this car has '+ str(self.odometer_reading)+' miles on it')

def update_odometer(self,mileage):
    """将里程表读数设置为指定值"""
    self.odometer_reading=mileage
my_new_car = Car(‘audi’,‘a4’,2016)
print(my_new_car.get_descriptive_name())
my_new_car.update_odometer(23)
my_new_car.read_odometer()
通过方法对属性的值进行增减
class Car():
“”“一次模拟汽车的简单尝试”""
def __init__(self, make, model, year):
    """初始化描述汽车属性"""
    self.make=make
    self.model=model
    self.year=year

def get_descriptive_name(self):
    """返回整洁的描述性信息"""
    long_name=str(self.year)+''+self.make+''+self.model
    return long_name.title()

def read_odometer(self):
    """打印一条指出汽车里程的信息"""
    print('this car has '+ str(self.odometer_reading)+' miles on it')

def update_odometer(self,mileage):
    """将里程表读数设置为指定值"""
    self.odometer_reading=mileage

def increment_odometer(self,miles):
    """将里程表读数增加指定的量"""
    self.odometer_reading +=miles
my_used_car=Car(‘subaru’,‘outbreak’,2013)
print(my_used_car.get_descriptive_name())
my_used_car.update_odometer(23500)
my_used_car.increment_odometer(100)
my_used_car.read_odometer()
9.3继承
编写类时,并非总要从空白开始。如果你要编写的类是另一个现成类的特殊版本,可使用继承。
一个类继承继承另一个类时。它将自动获得另一个类的所有属性和方法:原有的类称为父类,而新类称为子类。
子类继承了其父类的所有属性和方法,同时还可以定义自己的属性和方法。
子类的方法__init__()
class Car():== 创建子类时,父类必须包含在当前文件中,且位于子类的前面==
“”“一次模拟汽车的简单尝试”""
def __init__(self, make, model, year):
    """初始化描述汽车属性"""
    self.make=make
    self.model=model
    self.year=year
    self.odometer_reading = 0

def get_descriptive_name(self):
    """返回整洁的描述性信息"""
    long_name=str(self.year)+''+self.make+''+self.model
    return long_name.title()

def read_odometer(self):
    """打印一条指出汽车里程的信息"""
    print('this car has '+ str(self.odometer_reading)+' miles on it')

def update_odometer(self,mileage):
    """将里程表读数设置为指定值"""
    if mileage >= self.odometer_reading:
        self.odometer_reading=mileage
    else:
        print('you can not roll back an odometer')

def increment_odometer(self,miles):
    """将里程表读数增加指定的量"""
    self.odometer_reading +=miles
class ElectricCar(Car):== 定义子类时,必须在括号内指定父类的名称==
“”“电动汽车的独特之处”""
def __init__(self, make, model, year):
    """初始化父类的属性"""
    super().__init__(make, model, year)
== super是一个特殊函数,帮助Python将父类和子类联系起来==
my_tesla = ElectricCar(‘tesla’, ‘model s’, 2016)
print(my_tesla.get_descriptive_name())
给子类定义属性和方法
让一个类继承另一个类后,可添加区分子类和父类所需的新属性和方法。
重写父类的方法
对于父类的方法,只要它不符合子类模拟的实物的行为,都可对其进行重写。
将实例用作属性
class Car():
“”“一次模拟汽车的简单尝试”""
def __init__(self, make, model, year):
    """初始化描述汽车属性"""
    self.make=make
    self.model=model
    self.year=year
    self.odometer_reading = 0

def get_descriptive_name(self):
    """返回整洁的描述性信息"""
    long_name=str(self.year)+''+self.make+''+self.model
    return long_name.title()

def read_odometer(self):
    """打印一条指出汽车里程的信息"""
    print('this car has '+ str(self.odometer_reading)+' miles on it')

def update_odometer(self,mileage):
    """将里程表读数设置为指定值"""
    if mileage >= self.odometer_reading:
        self.odometer_reading=mileage
    else:
        print('you can not roll back an odometer')

def increment_odometer(self,miles):
    """将里程表读数增加指定的量"""
    self.odometer_reading +=miles
class Battery():== 将类的一部分作为一个独立的类提取出来。==
“”“一次模拟电动汽车电瓶的简单尝试”""
def __inti__(self,battery_size=70):
    """初始化电瓶的属性"""
    self.battery_size=battery_size

def describe_battery(self):
    """打印一条描述电瓶容量的消息"""
    print("this car has a " +str(self.battery_size) + '-kwh battery.')
class ElectricCar(Car):
“”“电动汽车的独特之处”""
def __init__(self, make, model, year):
    """初始化父类的属性,再初始化电动汽车的特有属性"""
    super().__init__(make, model, year)
    self.battery = Battery()
my_tesla = ElectricCar(‘tesla’, ‘model s’, 2016)
print(my_tesla.get_descriptive_name())
my_tesla.battery.describe_battery()
模拟实物
9.4导入类
导入单个类
from car import Car
my_new_car = Car(‘audi’,‘a4’,2016)
print(my_new_car.get_descriptive_name())
my_new_car.odometer_reading = 23
my_new_car.read_odometer()
在一个模块中存储多个类,导入其中一个
from car import ElectricCar
my_tesla = ElectricCar(‘tesla’, ‘model s’, 2016)
print(my_tesla.get_descriptive_name())
my_tesla.battery.describe_battery()
my_tesla.battery.get_range()
从一个模块中导入多个类
from car import Car,ElectricCar
my_beetle=Car(‘volkswagen’,‘beetle’,2016)
print(my_beetle.get_descriptive_name())
my_tesla=ElectricCar(‘tesla’,‘roadster’,2016)
print(my_tesla.get_descriptive_name())
导入模块中的所有类
from module_name import*
在一个模块中导入另一个模块
from car import Car == 从不同模块导入需要的类==
from electric import ElectricCar
my_beetle=Car(‘volkswagen’,‘beetle’,2016)
print(my_beetle.get_descriptive_name())
my_tesla=ElectricCar(‘tesla’,‘roadster’,2016)
print(my_tesla.get_descriptive_name())
9.5Python标准库
 是一组模块,安装的Python都包含它。可使用标准库中的任何函数和类,为此只需要在程序开头包含一条简单的import语句。
 字典能让你将信息关联起来,但他们不记录你添加键-值对的顺序。
 要创建字典并记录其中键-值对的添加顺序,可使用模块collections中的OrderedDict类。OrderedDict实例的行为几乎与字典相同,区别在于记录了键-值对的添加顺序,兼具了列表和字典的主要优点(将信息关联起来的同时保留原来的顺序)
9.6类编码风格
类名应采用驼峰命名法,即类名中的每个单词首字母都大写,而不使用下划线。
实例名和模块名都采用小写格式,并在单词之间加上下划线。
对于每个类,都应紧跟在类的后面包含一个文档字符串简要描述类的功能;每个模块也应包含一个文档字符串,对于其中的类可用于做什么进行描述。
可使用空行来组织代码,但不要滥用。在类中,可使用一个空行来分隔方法,可使用两个空行来分隔类。
需要同时导入标准库中的模块和你编写的模块时,先编写导入标准模块的inport语句,再添加一个空行,编写导入你编写的模块的import语句。
第十章 文件和异常
10.1从文件中读取数据
要使用文本文件中的信息,首先需要将信息读取到内存中,可以一次性读取文件的全部内容,也可以每次一行的方式逐步读取。
读取文件文本时,Python将其中的所有文本都解读为字符串如果读取的是数字,并要将其作为数值使用,就必须使用函数int()将其转换为整数,或使用函数float()将其转换为浮点数。
读取整个文件
函数open返回一个表示文件的对象,关键字with在不需要访问文件后将其关闭。
with open(‘pi.txt’) as file_object:Python在当前执行的文件所在的目录中查找指定文件
contents = file_object.read()
print(contents)
文件路径
要让Python打开不予程序文件位于同一个目录的文件,需要提供文件路径,让Python到系统的特定位置去查找。
相对路径:在同一个文件夹
with open(‘text_files\filename.txt’) as file_object:
绝对路径:
file_path=‘C:\Users\ehmatthes\other_files\text_files\filename.txt’
with open(file_path) as file_object:
逐行读取
读取文件时,常常需要检查其中的每一行:可能要在文件中查找特定的信息,或者以某种方式修改文件中的文本。
filename=‘pi.txt’
with open(filename) as file_object:
for line in file_object:
print(line)
创建一个包含文件各行内容的列表
使用关键字with时,open返回文件对象只在with代码块内可用。如果要在with代码块外访问晚文件内容,可在with代码块内将文件的各行存储在一个列表中,并在with代码块外使用该列表:你可以立即处理文件的各个部分,也可推迟到程序后面再处理。
filename=‘pi.txt’
with open(filename) as file_object:
lines=file_object.readlines()方法readlines从文件中读取每一行,并将其存储在一个列表中
for line in lines:
print(line.rstrip())
使用文件内容
filename = ‘pi.txt’
with open(filename) as file_object:
lines = file_object.readlines()
pi_string = ‘’
for line in lines:
pi_string += line.rstrip()
print(pi_string)
print(len(pi_string))
包含一百万位的大型文件
10.2写入文件
保存文件最简单的方式之一是将其写入到文件中。通过将输出写入文件,即便关闭包含程序输出的终端窗口,这些输出依然存在:你可以在程序结束运行后查看这些输出,可与别人分享输出,还可编写程序来将这些输出读取到内存中进行处理。
写入空文件
Python只能将字符串写入文本文件,要将数值数据存储到文本文件中,必须使用函数str()将其转换为字符串格式。
读取模式‘r’ 写入模式‘w’ 附加模式‘a’ 读取和写入模式‘r+’
== 以写入模式打开文件时千万要小心,因为如果知指定文件已存在,Python将在返回文件对象前清空改文件==
filename=‘programing.txt’
with open(filename,‘w’) as file_project:== 如果写入文件不存在,函数open将自动创建它==
file_project.write(‘I love programing.’)
写入多行
函数write()不会在你写入的文本末尾添加换行符,要让每个字符串单独占一行需要在write()语句中包含换行符。
像显示到终端的输出一样,还可以使用空格、制表符和空行来设置这些输出的格式。
filename=‘programing.txt’
with open(filename,‘w’) as file_project:
file_project.write(‘I love programing.\n’)
file_project.write(‘I love creating new games.\n’)
附加到文件
要给文件添加内容,而不是覆盖原有的内容,可以附加模式打开文件。
filename=‘programing.txt’
with open(filename,‘a’) as file_project:
file_project.write(‘I also love finding meaning in large datasets.\n’)
file_project.write(‘I love creating apps that can run in a browser.\n’)
10.3异常
Python使用被称为异常的特殊对象来管理程序执行期间发生的错误,每当发生让Python不知所措的错误时,他都会创建一个异常对象。
如果你编写了处理该异常的代码,程序将继续运行;如果你未对异常进行处理,程序将停止,并显示一个traceback,其中包含有关异常的报告。
异常是使用try_expect代码块处理的,try_expect代码块让Python执行指定的操作,同时告诉Python发生异常时该怎么办。
使用了try_expect代码块时,即便出现异常,程序也将继续运行:显示你编写的友好的错误消息,而不是令人迷惑traceback。
处理ZeroDivisionError异常
print(5/0)

使用try_expect
当你认为可能发生错误时。可编写一个try_expect代码块来处理可能引发的异常,让Python尝试运行一些代码,并告诉他如果这些代码引发了指定异常该怎么办。
try:
print(5/0)
except ZeroDivisionError:
print(‘you can not divide by zero!’)
使用异常避免崩溃
这个程序没采取任何处理措施,因此让他执行除数为0 的除法运算时它将崩溃。
print(‘give me two numbers, and i will divide them’)
print(“enter ‘q’ to quit.”)
while True:
first_number = input(’\nfirst number:’)
if first_number == ‘q’:
break
second_number = input(‘second number:’)
if second_number== ‘q’:
break
answer = int(first_number)/int(second_number)
print(answer)
else代码块
try_expect_else代码块工作原理:Python尝试运行try代码块中的代码,只有可能引发异常的代码才需要放在try语句中。有时候,有一些仅在try代码块成功执行是才需要运行的代码,这些代码应放在else代码块中。
print(‘give me two numbers, and i will divide them’)
print(“enter ‘q’ to quit.”)
while True:
first_number = input(’\nfirst number:’)
if first_number == ‘q’:
break
second_number = input(‘second number:’)
try:
answer = int(first_number)/int(second_number)
except ZeroDivisionError:
print(‘you can not divide by zero!’)
else:
print(answer)
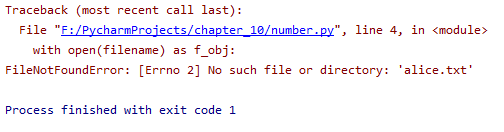
处理FileNotFoundError异常
使用文件一种最常见的问题是找不到文件:你要查找的文件可能在其他地方、文件名可能不正确或者这个文件根本不存在。
filename = ‘alice.txt’
with open(filename) as f_obj:
contents =f_obj.read()
filename = ‘alice.txt’
try:
with open(filename) as f_obj:
contents =f_obj.read()
except FileNotFoundError:
msq=‘sorry,the file’+filename +‘does not exit.’
print(msq)
分析文本
可以分析包含整本书的文本
使用方法split(),它根据一个字符串创建一个单词列表,以空格为分隔符将字符串分拆成多个部分,并将这些部分存储到一个列表中。结果是一个包含字符串中所有单词的列表,虽然有些单词可能包含标点。
title=‘alice in wonderland’
print(title.split())
使用多个文件
使用try-except代码块提供了两个优点:避免让用户看到traceback,让程序能够继续分析能够找到的其他文件。
def count_words(filename):
“”“计算一个文件大致包含多少个单词”""
try:
with open(filename) as f_obj:
contents = f_obj.read()
except FileNotFoundError:
msg = ‘sorry,the file’ + filename + ‘does not exist.’
print(msg)
else:
# 计算文件大致包含多少个单词
words = contents.split()
num_words = len(words)
print('the file ’ + filename + ‘has about’ + str(num_words) + ‘words.’)
filenames = [‘alice.txt’,‘siddhartha.txt’,‘moby_dick.txt’,‘little_women.txt’]
for filename in filenames:
count_words(filename)
失败时一声不吭
程序发生异常时一声不吭,就像什么也没有发生一样继续运行。
def count_words(filename):
“”“计算一个文件大致包含多少个单词”""
try:
with open(filename) as f_obj:
contents = f_obj.read()
except FileNotFoundError:
pass pass语句执行except代码块中的代码,但什么都不会发生,并充当了占位符,提醒你在程序的某个地方什么都没有做,并且以后也许要在这个地方做什么
else:
# 计算文件大致包含多少个单词
words = contents.split()
num_words = len(words)
print('the file ’ + filename + ‘has about’ + str(num_words) + ‘words.’)
filenames = [‘alice.txt’,‘siddhartha.txt’,‘moby_dick.txt’,‘little_women.txt’]
for filename in filenames:
count_words(filename)
决定报告哪些错误
Python的错误处理结构让你能够细致的控制与用户分享错误信息的程度,要分享多少信息有你决定。
10.4存储数据
使用json.dump()和json.load()
程序之间共享数据的简单方式
import json
numbers=[2,3,5,7,11,13]
filename=‘numbers.json’
with open(filename,‘w’) as f_obj:
json.dump(numbers,f_obj)== json.dump存储这组数字,接受两个实参:要存储的数据以及存储数据的文件对象==
import json
filename=‘numbers.json’
with open(filename) as f_obj:
numbers=json.load(f_obj)== json.load将列表读取到内存中==
print(numbers)
保存和读取用户生成的数据
对于用户生成的数据,使用json保存他们大有裨益,因为如果不以某种方式进行存储,等程序停止运行时用户的信息将丢失。
import json
username = input(‘what is your name?’)
filename=‘username.json’
with open(filename,‘w’) as f_obj:
json.dump(username, f_obj)
print(‘we will remember you when you come back,’+username+’!’)
import json
filename=‘username.json’
with open(filename) as f_obj:
username=json.load(f_obj)
print(‘welcome back,’+username+’!’)
import json
#如果以前存储了用户名,就加载它
#否则,就提示用户输入用户名并存储它
filename=‘username.json’
try:
with open(filename) as f_obj:
username=json.load(f_obj)
except FileNotFoundError:
username=input(‘what is your name?’)
with open(filename, ‘w’) as f_obj:
json.dump(username, f_obj)
print(‘we will remember you when you come back,’ + username + ‘!’)
else:
print(‘welcome back,’+username+’!’)
重构
代码能够正常运行,但可做进一步的改进—将代码划分为一系列完成具体工作的函数。
重构能够让代码更清晰,更易于理解,更容易扩展。
import json
def greet_user():
“”“问候用户,并指出其名字”""
filename=‘username.json’
try:
with open(filename) as f_obj:
username=json.load(f_obj)
except FileNotFoundError:
username=input(‘what is your name?’)
with open(filename, ‘w’) as f_obj:
json.dump(username, f_obj)
print(‘we will remember you when you come back,’ + username + ‘!’)
else:
print(‘welcome back,’ + username + ‘!’)
greet_user()
重构greet_user,让它不执行那么多任务,为此先将获取存储的用户名的代码移到另一个函数中
import json
def get_stored_username():
“”“如果存储了用户名就获取它”""
filename=‘username.json’
try:
with open(filename) as f_obj:
username=json.load(f_obj)
except FileNotFoundError:
return None
else:
return username
def greet_user():
“”“问候用户,并指出其名字”""
username=get_stored_username()
if username:
print(‘welcome back,’ + username + ‘!’)
else:
username = input(‘what is your name?’)
filename=‘username.json’
with open(filename, ‘w’) as f_obj:
json.dump(username, f_obj)
print(‘we will remember you when you come back,’ + username + ‘!’)
greet_user()
再将greet_user中的另一个代码块提取出来:没有储存用户名时提示用户输入的代码放入一个独立的函数中
import json
def get_stored_username():
“”“如果存储了用户名就获取它”""
filename=‘username.json’
try:
with open(filename) as f_obj:
username=json.load(f_obj)
except FileNotFoundError:
return None
else:
return username
def get_new_username():
“”“提示用户输入用户名”""
username= input(‘what is your name?’)
filename = ‘username.json’
with open(filename, ‘w’) as f_obj:
json.dump(username, f_obj)
return username
def greet_user():
“”“问候用户,并指出其名字”""
username=get_stored_username()
if username:
print(‘welcome back,’ + username + ‘!’)
else:
username = get_new_username()
print(‘we will remember you when you come back,’ + username + ‘!’)
greet_user()
第十一章测试代码
通过测试,可确定代码面对各种输入都能按要求完成工作。
11.1测试函数
def get_formatted_name(first,last):
“”“generate a neatly formatted full name”""
full_name=first +’’+last
return full_name.title
from name_function import get_formatted_name
print(“enter ‘q’ at any time to quit.”)
while True:
first=input(’\nplease give me a first name: ‘)
if first==‘q’:
break
last = input(’\nplease give me a last name: ')
if first==‘q’:
break
formatted_name=get_formatted_name(first,last)
print('\tneatly formatted name: '+formatted_name+'.')
单元测试和测试用例
Python标准库中的模块unittest提供了代码测试工具。
单元测试:用于核实函数的某个方面没有问题。
测试用例:一组单元测试,这些单元测试一起核实函数在各种情形下的行为都符合要求。良好的测试用例考虑到了函数可能受到的各种输入,包含针对所有这些情形的测试。
全覆盖式测试用例包含一整套单元测试,涵盖了各种可能的函数使用方式。
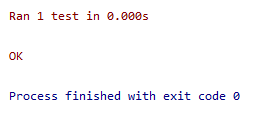
可通过的测试
import unittest
from name_function import get_formatted_name
class NamesTestCase(unittest.TestCase):
“”“测试name_function.py”""
def test_first_last_name(self):
    """能够正确处理像Janise Joplin这样的姓名吗?"""
    formatted_name=get_formatted_name('janis','joplin')
    self.assertEqual(formatted_name,'Janisjoplin')
== 断言:核实得到的结果是否与期望的结果一致 ==
unittest.main()
不能通过的测试
import unittest
from name_function import get_formatted_name
class NamesTestCase(unittest.TestCase):
“”“测试name_function.py”""
def test_first_last_name(self):
    """能够正确处理像Janise Joplin这样的姓名吗?"""
    formatted_name=get_formatted_name('janis','joplin')
    self.assertEqual(formatted_name,'Janis Joplin')
unittest.main()

添加新测试
11.2测试类
各种断言方法
一个要测试的类
测试AnonymousSurvey类
import unittest
from survey import AnonymousSurvey
class TestAnonymousSurvey(unittest.TestCase):
“”“针对AnonymousSurvey类的测试”""
def test_store_single_response(self):
    """针对单个答案会被妥善的存储"""

def test_store_three_responses(self):
    """测试三个答案会被妥善存储"""
    question='what language did you first learn to speak?'
    my_survey = AnonymousSurvey(question)
    responses=['English','Spanish','Mandarin']
    for response in responses:
        my_survey.store_response(response)

    for response in responses:
        self.assertIn(response,my_survey.responses)
unittest.main()
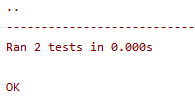
方法setUp()
前面,在每个测试方法中都创建了一个AnonymousSurvey实例,并在每个方法中都创建了答案。
方法setUp()只需创建这些对象一次,并在每个测试方法中使用他们。
import unittest
from survey import AnonymousSurvey
class TestAnonymousSurvey(unittest.TestCase):
“”“针对AnonymousSurvey类的测试”""
def setUp(self):
    """创建一个调查对象和一组答案,供使用的测试方法使用"""
    question = 'what language did you first learn to speak?'
    self.my_survey = AnonymousSurvey(question)
    self.responses = ['English', 'Spanish', 'Mandarin']

def test_store_single_response(self):
    """针对单个答案会被妥善的存储"""
    self.my_survey.store_response(self.responses[0])
    self.assertIn(self.responses[0], self.my_survey.responses)

def test_store_three_responses(self):
    """测试三个答案会被妥善存储"""
    for response in self.responses:
        self.my_survey.store_response(response)
    for response in self.responses:
        self.assertIn(response,self.my_survey.responses)
unittest.main()
第十二章 武装飞船
第十五章 生成数据
数据可视化指的是通过可视化表示来探索数据,它与数据挖掘紧密相关,而数据挖掘指的是使用代码来探索数据集的规律和关联。
数据集可以是用一行代码就能表示的小型数字列表,也可以是数以吉字节的数据。
漂亮的呈现数据关乎的并非仅仅是漂亮的图片,以引人注目的简介方式呈现数据,让观看者能够明白其含义,发现数据集中原本未意识到的规律和意义。
15.2绘制简单的折线图
import matplotlib.pyplot as plt
squares=[1,4,9,16,25]
plt.plot(squares)
plt.show()== 打开matplot查看器==
修改标签文字和线条粗细
import matplotlib.pyplot as plt
squares=[1,4,9,16,25]
plt.plot(squares,linewidth=5)
plt.title(‘square numbers’,fontsize=24)== 设置图表标题,并给坐标轴加上标签==
plt.xlabel(‘value’,fontsize=14)
plt.ylabel(‘square of value’,fontsize=14)
plt.tick_params(axis=‘both’,labelsize=14)设置刻度标记大小
plt.show()
校正图形
当你向plot()提供一系列数字时,它假设第一个数据点对应的x坐标值为0,但我们的第一个点对应的x值为1。为改变这种默认行为,可以给plot同时提供输入值和输出值。
import matplotlib.pyplot as plt
input_values=[1,2,3,4,5]
squares=[1,4,9,16,25]
plt.plot(input_values,squares,linewidth=5)
plt.title(‘square numbers’,fontsize=24)
plt.xlabel(‘value’,fontsize=14)
plt.ylabel(‘square of value’,fontsize=14)
plt.tick_params(axis=‘both’,labelsize=14)
plt.show()
###使用scatter()绘制散点图并设置其样式
import matplotlib.pyplot as plt
plt.scatter(2,4,s=200)使用实参s设置绘制图形时使用的点的尺寸
plt.title(‘square numbers’,fontsize=24)
plt.xlabel(‘value’,fontsize=14)
plt.ylabel(‘square of value’,fontsize=14)
plt.tick_params(axis=‘both’,which=‘major’,labelsize=14)
plt.show()
使用scatter绘制一系列点
import matplotlib.pyplot as plt
x_values=[1,2,3,4,5]
y_values=[1,4,9,16,25]
plt.scatter(x_values,y_values,s=100)
plt.show()
自动计算数据
import matplotlib.pyplot as plt
x_values=list(range(1,1001))
y_values=[x**2 for x in x_values]
plt.scatter(x_values,y_values,s=40)
plt.axis([0,1100,0,110000])函数axis()指定了每个坐标轴的取值范围
plt.show()
删除数据点的轮廓
import matplotlib.pyplot as plt
x_values=list(range(1,1001))
y_values=[x**2 for x in x_values]
plt.scatter(x_values,y_values,edgecolors=‘none’, s=40)
plt.axis([0,1100,0,110000])
plt.show()
自定义颜色
import matplotlib.pyplot as plt
x_values=list(range(1,1001))
y_values=[x**2 for x in x_values]
plt.scatter(x_values,y_values,c=‘red’,edgecolors=‘none’, s=40)改变数据点颜色,可传递参数c
plt.axis([0,1100,0,110000])
plt.show()
import matplotlib.pyplot as plt
x_values=list(range(1,1001))
y_values=[x**2 for x in x_values]
plt.scatter(x_values,y_values,c=(0,0,0.8),edgecolors=‘none’, s=40)使用RGB颜色模式自定义颜色,将其设置为一个元组,包含三个0~1的小数值,分别表示红色、绿色和蓝色分量
plt.axis([0,1100,0,110000])
plt.show()
使用颜色映射
颜色映射是一系列颜色,它们从起始颜色渐变到结束颜色。
在可视化中,颜色映射用于突出数据的规律。
import matplotlib.pyplot as plt
x_values=list(range(1,1001))
y_values=[x**2 for x in x_values]
plt.scatter(x_values,y_values,c=y_values,cmap=plt.cm.Blues,edgecolors=‘none’, s=40)
plt.axis([0,1100,0,110000])
plt.show()
自动保存图表
import matplotlib.pyplot as plt
x_values=list(range(1,1001))
y_values=[x**2 for x in x_values]
plt.scatter(x_values,y_values,c=y_values,cmap=plt.cm.Blues,edgecolors=‘none’, s=40)
plt.axis([0,1100,0,110000])
plt.savefig(‘squares_plot.png’,bbox_inches=‘tight’)
15.3随机漫步
每次行走都完全随机,没有明确的方向,结果是由一系列随机决策决定的。
创建RandomWalk()类
from random import choice
class RandomWalk():
“”“一个生成随机漫步数据的类”""
def __init(self,num_points=5000):
    """初始化随机漫步属性"""
    self.num_points=num_points

    #所有随机漫步都始于(0,0)
    self.x_values=[0]
    self.y_values=[0]
选择方向
from random import choice
class RandomWalk():
“”“一个生成随机漫步数据的类”""
def __init(self,num_points=5000):
    """初始化随机漫步属性"""
    self.num_points=num_points

    #所有随机漫步都始于(0,0)
    self.x_values=[0]
    self.y_values=[0]

def fill_waik(self):
    """计算随机漫步包含的所有的点"""

    # 不断漫步,直到列表达到指定的长度
    while len(self.x_values) < self.num_points:

        #觉得前进方向以及沿这个方向前进的距离
        x_direction=choice([1,-1])
        x_distance=choice([0,1,2,3,4])
        x_step=x_direction*x_distance

        y_direction = choice([1, -1])
        y_distance = choice([0, 1, 2, 3, 4])
        y_step = y_direction * y_distance

        #拒绝原地踏步
        if x_step==0 and y_step==0:
            continue

        #计算下一个点的x和y值
        next_x=self.x_values[-1]+x_step
        next_y = self.y_values[-1] + y_step

        self.x_values.append(next_x)
        self.y_values.append(next_y)
绘制随机漫步图
import matplotlib.pyplot as plt
from randam_walk import RandomWalk
#创建一个RandomWalk实例,并将其包含的点都绘制出来
rw=RandomWalk()
rw.fill_waik()
plt.scatter(rw.x_values,rw.y_values,s=15)
plt.show()
模拟多次随机漫步
import matplotlib.pyplot as plt
from randam_walk import RandomWalk
#只要程序处于活跃状态,就不断模拟随机漫步
while True:
#创建一个RandomWalk实例,并将其包含的点都绘制出来
rw=RandomWalk()
rw.fill_waik()
plt.scatter(rw.x_values,rw.y_values,s=15)
plt.show()
keep_running=input("make another walk?(y/n): ")
if keep_running=='n':
    break
设置随机漫步图的样式
定制图表,以突出每次漫步的特征,并让分散注意力的元素不那么显眼。
给点着色
import matplotlib.pyplot as plt
from randam_walk import RandomWalk
#只要程序处于活跃状态,就不断模拟随机漫步
while True:
#创建一个RandomWalk实例,并将其包含的点都绘制出来
rw=RandomWalk()
rw.fill_waik()
points_numbers=list(range(rw.num_points))
plt.scatter(rw.x_values,rw.y_values,c=points_numbers,cmap=plt.cm.Blues,edgecolors='none',s=15)
plt.show()

keep_running=input("make another walk?(y/n): ")
if keep_running=='n':
    break
重新绘制起点和终点
import matplotlib.pyplot as plt
from randam_walk import RandomWalk
#只要程序处于活跃状态,就不断模拟随机漫步
while True:
#创建一个RandomWalk实例,并将其包含的点都绘制出来
rw=RandomWalk()
rw.fill_waik()
points_numbers=list(range(rw.num_points))
plt.scatter(rw.x_values,rw.y_values,c=points_numbers,cmap=plt.cm.Blues,edgecolors='none',s=15)

#突出起点和终点
plt.scatter(0,0,c='green',edgecolors='none',s=100)
plt.scatter(rw.x_values[-1],rw.y_values[-1],c='red',edgecolors='none',s=100)

plt.show()

keep_running=input("make another walk?(y/n): ")
if keep_running=='n':
    break
隐藏坐标轴
import matplotlib.pyplot as plt
from randam_walk import RandomWalk
#只要程序处于活跃状态,就不断模拟随机漫步
while True:
# 创建一个RandomWalk实例,并将其包含的点都绘制出来
rw = RandomWalk()
rw.fill_waik()
points_numbers = list(range(rw.num_points))
plt.scatter(rw.x_values, rw.y_values, c=points_numbers, cmap=plt.cm.Blues, edgecolors='none', s=15)

# 突出起点和终点
plt.scatter(0, 0, c='green', edgecolors='none', s=100)
plt.scatter(rw.x_values[-1], rw.y_values[-1], c='red', edgecolors='none', s=100)

# 隐藏坐标轴
plt.axes().get_xaxis().set_visible(False)
plt.axes().get_yaxis().set_visible(False)

plt.show()

keep_running = input("make another walk?(y/n): ")
if keep_running == 'n':
    break
增加点数
import matplotlib.pyplot as plt
from randam_walk import RandomWalk
#只要程序处于活跃状态,就不断模拟随机漫步
while True:
#创建一个RandomWalk实例,并将其包含的点都绘制出来
rw=RandomWalk()
rw.fill_waik()
#绘制点并将图形显示出来
points_numbers=list(range(rw.num_points))
plt.scatter(rw.x_values,rw.y_values,c=points_numbers,cmap=plt.cm.Blues,edgecolors='none',s=1)

#突出起点和终点
plt.scatter(0,0,c='green',edgecolors='none',s=100)
plt.scatter(rw.x_values[-1],rw.y_values[-1],c='red',edgecolors='none',s=100)

#隐藏坐标轴
plt.axes().get_xaxis().set_visible(False)
plt.axes().get_yaxis().set_visible(False)

plt.show()

keep_running=input("make another walk?(y/n): ")
if keep_running=='n':
    break
调整尺寸以适合屏幕
import matplotlib.pyplot as plt
from randam_walk import RandomWalk
#只要程序处于活跃状态,就不断模拟随机漫步
while True:
# 创建一个RandomWalk实例,并将其包含的点都绘制出来
rw = RandomWalk()
rw.fill_waik()
# 设置绘图窗口尺寸
plt.figure(figsize=(10, 6))

# 绘制点并将图形显示出来
points_numbers = list(range(rw.num_points))
plt.scatter(rw.x_values, rw.y_values, c=points_numbers, cmap=plt.cm.Blues, edgecolors='none', s=1)

# 突出起点和终点
plt.scatter(0, 0, c='green', edgecolors='none', s=100)
plt.scatter(rw.x_values[-1], rw.y_values[-1], c='red', edgecolors='none', s=100)

# 隐藏坐标轴
plt.axes().get_xaxis().set_visible(False)
plt.axes().get_yaxis().set_visible(False)

plt.show()

keep_running = input("make another walk?(y/n): ")
if keep_running == 'n':
    break
15.4使用pygal模拟掷骰子
创建Die类
from random import randint
class Die():
“”“表示一个骰子的类”""
def __init__(self,num_sides=6):                                                       ==方法 __init__()接受一个可选参数==
    """骰子默认6面"""
    self.num_sides=num_sides

def roll(self):
    """返回一个位于1和骰子面熟之间的随机值"""
    return randint(1,self.num_sides)
== 方法roll()使用函数randint()来返回一个1和面数之间的随机数==
掷骰子
from die import Die
#创建一个D6
die = Die()
#掷几次骰子,并将结果存储在一个列表中
results=[]
for roll_num in range(100):
result=die.roll()
results.append(result)
print(results)
分析结果
from die import Die
#创建一个D6
die = Die()
#掷几次骰子,并将结果存储在一个列表中
results=[]
for roll_num in range(1000):
result=die.roll()
results.append(result)
#分析结果
frequencies=[]
for value in range(1,die.num_sides+1):
frequency=results.count(value)
frequencies.append(frequency)
print(frequencies)
绘制直方图
import pygal
from die import Die
#创建一个D6
die = Die()
#掷几次骰子,并将结果存储在一个列表中
results=[]
for roll_num in range(1000):
result=die.roll()
results.append(result)
#分析结果
frequencies=[]
for value in range(1,die.num_sides+1):
frequency=results.count(value)
frequencies.append(frequency)
#对结果进行可视化
hist=pygal.Bar()
hist.title=“results of rolling one D6 1000 times.”
hist.x_labels=[‘1’,‘2’,‘3’,‘4’,‘5’,‘6’]
hist.x_title=“result”
hist.y_title=“frequency of result”
hist.add(‘D6’,frequencies)
hist.render_to_file(‘die_visual.svg’)
同时掷两个骰子
import pygal
from die import Die
#创建两个D6骰子
die_1=Die()
die_2=Die()
#掷骰子多次,并将结果存储在一个列表中
results=[]
for roll_num in range(1000):
result=die_1.roll()+die_2.roll()
results.append(result)
#分析结果
frequencies=[]
max_result=die_1.num_sides+die_2.num_sides
for value in range(2,max_result+1):
frequency=results.count(value)
frequencies.append(frequency)
#可视化结果
hist=pygal.Bar()
hist.title=“results of rolling two D6 1000 times.”
hist.x_labels=[‘2’,‘3’,‘4’,‘5’,‘6’,‘7’,‘8’,‘9’,‘10’,‘11’,‘12’]
hist.x_title=“result”
hist.y_title=“frequency of result”
hist.add(‘D6+D6’,frequencies)
hist.render_to_file(‘die_visual_2.svg’)
同时掷两个面数不同的骰子
from die import Die
import pygal
#创建一个D6和一个D10
die_1=Die()
die_2=Die(10)
#掷骰子多次,并将结果存储在一个列表中
results=[]
for roll_num in range(50000):
result=die_1.roll()+die_2.roll()
results.append(result)
#分析结果
frequencies=[]
max_result=die_1.num_sides+die_2.num_sides
for value in range(2,max_result+1):
frequency=results.count(value)
frequencies.append(frequency)
#可视化结果
hist=pygal.Bar()
hist.title=“results of rolling D6 and D10 50000 times.”
hist.x_labels=[‘2’,‘3’,‘4’,‘5’,‘6’,‘7’,‘8’,‘9’,‘10’,‘11’,‘12’,‘13’,‘14’,‘15’,‘16’]
hist.x_title=“result”
hist.y_title=“frequency of result”
hist.add(‘D6+D10’,frequencies)
hist.render_to_file(‘die_visual_3.svg’)
第十六章 下载数据
16.1CSV文件格式
要在文本文件中存储数据,最简单的方式是将数据作为一系列以逗号分隔的值(CSV)写入文件。
分析CSV文件头
CSV模块包含在Python标准库中,可用于分析从深V文件中的数据行,让我们能够快速提取感兴趣的值。
第十七章使用API
编写一个独立的程序,并对其获取的数据进行可视化,这个程序将使用Web应用编程接口(API)自动请求网站特定信息而不是整个网页,再对这些信息进行可视化。
17.1 使用Web API
Web API是网站的一部分,用于与使用非常具体的URL请求特定信息的程序交互,这种请求称为API调用。
请求的数据以易于处理的格式(如JSON或CSV)返回。
依赖于外部数据源的大多数应用程序都依赖于API调用,如集成社交媒体网站的应用程序。
Git和GitHub
使用API调用请求数据
安装requiests
处理API响应
import requests
#执行PAI调用并存储响应
url=‘https://api.github.com/search/repositories?q=language:python&sort=stars’
r=requests.get(url)
print(“status code:”,r.status_code)
#将API响应存储在一个变量中
response_dict=r.json()
#处理结果
print(response_dict.keys())
处理响应字典
import requests
#执行PAI调用并存储响应
url=‘https://api.github.com/search/repositories?q=language:python&sort=stars’
r=requests.get(url)
print(“status code:”,r.status_code)
#将API响应存储在一个变量中
response_dict=r.json()
print(“tatal repositories:” , response_dict[‘total_count’])
#探索有关仓库的信息
repo_dicts=response_dict[‘items’]
print(“repositories returned:”, len(repo_dicts))
#研究第一个仓库
repo_dict=repo_dicts[0]
print("\nkeys:",len(repo_dict))
for key in sorted(repo_dict.keys()):
print(key)
17.2使用pygal可视化仓库
import requests
import pygal
from pygal.style import LightColorizedStyle as LCS,LightenStyle as LS
#执行PAI调用并存储响应
url=‘https://api.github.com/search/repositories?q=language:python&sort=stars’
r=requests.get(url)
print(“status code:”,r.status_code)
#将API响应存储在一个变量中
response_dict=r.json()
print(“tatal repositories:” , response_dict[‘total_count’])
#研究有关仓库的信息
repo_dicts=response_dict[‘items’]
names,stars=[],[]
for repo_dict in repo_dicts:
names.append(repo_dict[‘name’])
stars.append(repo_dict[‘stargazers_count’])
#可视化
my_style=LS(’#333366’,base_style=LCS)
chart=pygal.Bar(style=my_style,x_label_rotation=45,show_legend=False)
chart.title=‘most_starred python projects on github’
chart.x_labels=names
chart.add(’’,stars)
chart.render_to_file(‘python_repos.svg’)
改进pygal图表
import requests
import pygal
from pygal.style import LightColorizedStyle as LCS,LightenStyle as LS
#执行PAI调用并存储响应
url=‘https://api.github.com/search/repositories?q=language:python&sort=stars’
r=requests.get(url)
print(“status code:”,r.status_code)
#将API响应存储在一个变量中
response_dict=r.json()
print(“tatal repositories:” , response_dict[‘total_count’])
#研究有关仓库的信息
repo_dicts=response_dict[‘items’]
names,stars=[],[]
for repo_dict in repo_dicts:
names.append(repo_dict[‘name’])
stars.append(repo_dict[‘stargazers_count’])
#可视化
my_style=LS(’#333366’,base_style=LCS)
my_config=pygal.Config()
my_config.x_label_rotation=45
my_config.show_legend=False
my_config.title_font_size=24
my_config.label_font_size=14
my_config.major_label_font_size=18
my_config.truncate_label=15
my_config.show_y_guides=False
my_config.width=1000
chart=pygal.Bar(style=my_style,x_label_rotation=45,show_legend=False)
chart.title=‘most_starred python projects on github’
chart.x_labels=names
chart.add(’’,stars)
chart.render_to_file(‘python_repos_1.svg’)
添加自定义工具提示
在pygal中,将鼠标指向条形将显示它表示的信息,称为工具提示。
import pygal
from pygal.style import LightColorizedStyle as LCS,LightenStyle as LS
my_style=LS(’#333366’,base_style=LCS)
chart=pygal.Bar(style=my_style,x_label_rotation=45,show_legend=False)
chart.title=‘python projects’
chart.x_labels=[‘httpie’,‘django’,‘flask’]
plot_dicts=[
{‘value’:16101,‘label’:‘description of httpie.’},
{‘value’:15028,‘label’:‘description of django.’},
{‘value’:14798,‘label’:‘description of flask.’}
]
chart.add(’’,plot_dicts)
chart.render_to_file(‘bar_descriptions.svg’)
根据数据绘图
import requests
import pygal
from pygal.style import LightColorizedStyle as LCS,LightenStyle as LS
#执行PAI调用并存储响应
url=‘https://api.github.com/search/repositories?q=language:python&sort=stars’
r=requests.get(url)
print(“status code:”,r.status_code)
#将API响应存储在一个变量中
response_dict=r.json()
print(“tatal repositories:” , response_dict[‘total_count’])
#研究有关仓库的信息
repo_dicts=response_dict[‘items’]
print(‘number of items:’,len(repo_dicts))
names,plot_dicts=[],[]
for repo_dict in repo_dicts:
names.append(repo_dict[‘name’])
plot_dict={
    'value':repo_dict['stargazers_count'],
    'label':repo_dict['description'],
    }
plot_dicts.append(plot_dict)
#可视化
my_style=LS(’#333366’,base_style=LCS)
my_config=pygal.Config()
my_config.x_label_rotation=45
my_config.show_legend=False
my_config.title_font_size=24
my_config.label_font_size=14
my_config.major_label_font_size=18
my_config.truncate_label=15
my_config.show_y_guides=False
my_config.width=1000
chart=pygal.Bar(style=my_style,x_label_rotation=45,show_legend=False)
chart.title=‘most_starred python projects on github’
chart.x_labels=names
chart.add(’’,plot_dicts)
chart.render_to_file(‘python_repos_2.svg’)
在图表中添加可单击的链接
pygal允许将图表中的每个条形用作网站的链接
import requests
import pygal
from pygal.style import LightColorizedStyle as LCS,LightenStyle as LS
#执行PAI调用并存储响应
url=‘https://api.github.com/search/repositories?q=language:python&sort=stars’
r=requests.get(url)
print(“status code:”,r.status_code)
#将API响应存储在一个变量中
response_dict=r.json()
print(“tatal repositories:” , response_dict[‘total_count’])
#研究有关仓库的信息
repo_dicts=response_dict[‘items’]
print(‘number of items:’,len(repo_dicts))
names,plot_dicts=[],[]
for repo_dict in repo_dicts:
names.append(repo_dict[‘name’])
plot_dict={
    'value':repo_dict['stargazers_count'],
    'label':repo_dict['description'],
    'xlink':repo_dict['html_url'],
    }                                                                                               ==  pygal根据与键‘XLink’相关联的URL将每个条形都转换为活跃的链接==
plot_dicts.append(plot_dict)
#可视化
my_style=LS(’#333366’,base_style=LCS)
my_config=pygal.Config()
my_config.x_label_rotation=45
my_config.show_legend=False
my_config.title_font_size=24
my_config.label_font_size=14
my_config.major_label_font_size=18
my_config.truncate_label=15
my_config.show_y_guides=False
my_config.width=1000
chart=pygal.Bar(style=my_style,x_label_rotation=45,show_legend=False)
chart.title=‘most_starred python projects on github’
chart.x_labels=names
chart.add(’’,plot_dicts)
chart.render_to_file(‘python_repos_3.svg’)