自定义注解处理器生成代码
先上一段代码:
	public class MainActivity extends AppCompatActivity {

	    @BindView(R.id.tv)
	    TextView tv;
	    @BindView(R.id.tv2)
	    TextView tv2;
	    @BindView(R.id.tv3)
	    TextView tv3;
	    @Override
	    protected void onCreate(Bundle savedInstanceState) {
	        super.onCreate(savedInstanceState);
	        setContentView(R.layout.activity_main);
	        ButterKnife.bind(this);
	        tv.setText(" ViewBinder bindView success!!!");
	    }
	}
我们经常在项目中使用 ButterKnife 来代替大量的 findViewById(),如上代码所示, 据我所知 ButterKnife 最新版本改用注解处理器来生成 findViewById 代码, 今天我就模仿 ButterKnife 造一个轮子分享给大家, 以及记录下关于注解处理器的相关 API 以供查阅.
(我也是在百度了好多关于注解处理器的博客, 并亲自写了Demo尝试, 啃了好久官方 API 文档, 在此记录共同学习, 希望这篇博客能帮到正在看的你)
首先明确几个概念:
-
第一: 注解处理器是由
annotationProcessor "com.jakewharton:butterknife-compiler:8.6.0"在 build.gradle 中配置的内容, 也可以annotationProcessor project(':AnnotationProcessor')这样配置本地的工程. -
第二: 注解处理器在代码编译时运行运行在操作系统上, 不会随工程打入 APK 中(所以注解处理器工程需要是一个 Java Library).
-
第三: 注解处理器一般用来生成代码, 实际上也并非很高深, 只是一些陌生的 api 以及通过这些 api 写文件而已.
说下我的思路, 首先通过注解处理器生成代码(ViewBinding.java), 这些代码处理了 findViewById 的操作, 然后定义一个工具类, 通过反射方式实例化这些生成的代码, 并把 Activity 通过构造方法传给 ViewBinding 以实现 findViewById
首先新建 AnnotationProcessor Module(Java Library), 需要在build.gradle中配置以下代码:
	dependencies {
	    implementation fileTree(dir: 'libs', include: ['*.jar'])
	    api 'com.google.auto.service:auto-service:1.0-rc3'//必须引用此工程才能正常使用注解处理器
	    api project(':AnnoLib')//Bind.java 注解库
	}
然后需要定义 MyProcessor 继承 AbstractProcessor, 并实现process方法, 重写init() getSupportedAnnotationTypes() getSupportedSourceVersion() 三个方法, 代码如下所示.
- getSupportedSourceVersion() 配置 JDK 版本, 写死
SourceVersion.latestSupported()就行 - getSupportedAnnotationTypes() 相当于添加一个注解过滤器, 只有配置了的注解才会走 process() 方法
- init() 方法用于初始化注解处理器, 需要在此处获取一些工具以供之后在 process() 方法执行时使用.
- process() 方法需要在此处解析注解, 进行创建文件的操作, 对于参数 RoundEnvironment 我也是知之甚少, 请参见代码中的注释
- Bind 类在另外一个 Java Moudle 中, 是一个注解:
	package annotation;

	import java.lang.annotation.ElementType;
	import java.lang.annotation.Retention;
	import java.lang.annotation.RetentionPolicy;
	import java.lang.annotation.Target;

	@Retention(RetentionPolicy.SOURCE)
	@Target(ElementType.FIELD)
	public @interface Bind{
	    int value();
	}
- createFile()方法是生成代码的主要逻辑, 生成代码的位置与 使用 Bind 注解 的Activity同一包下 (同包下非 private 变量可以直接访问), 贴下要生成的目标代码:
	package com.eshel.annotationprocessor;

	//Auto generated by apt,do not modify!!

	public class MainActivity_ViewBinding {

		public MainActivity_ViewBinding(MainActivity activity){
			activity.tv = activity.findViewById(2131165325);
			activity.tv2 = activity.findViewById(2131165325);
			activity.tv3 = activity.findViewById(2131165325);
		}
	}
createFile() 方法就是为了生成上述代码(id 是通过注解拿到的), 假设 MainActivity_ViewBinding 已经生成了, 只需要想办法创建 MainActivity_ViewBinding 对象就可以实现对 MainActivity 中的 View 进行赋值.
MyProcessor 代码如下:
	//必须有此注解
	@AutoService(Processor.class)
	public class MyProcessor extends AbstractProcessor{
	    private Filer mFiler;
	    private Messager mMessager;
	    private Elements mElementUtils;
	    @Override
	    public synchronized void init(ProcessingEnvironment processingEnvironment) {
	        super.init(processingEnvironment);
	        //用于生成源码文件
	        mFiler = processingEnvironment.getFiler();
	        //用于打印日志 (日志如何查看下边会说)
	        mMessager = processingEnvironment.getMessager();
	        //工具类, 从 Element 对象中获取 包名类名字段名等
	        mElementUtils = processingEnvironment.getElementUtils();
	    }

	    @Override
	    public Set<String> getSupportedAnnotationTypes() {
	        //添加 MyProcessor要处理的注解
	        Set<String> anno = new HashSet<>();
	        anno.add(Bind.class.getCanonicalName());
	        return anno;
	    }

	    @Override
	    public SourceVersion getSupportedSourceVersion() {
	        return SourceVersion.latestSupported();
	    }

	    @Override
	    public boolean process(Set<? extends TypeElement> set, RoundEnvironment roundEnvironment) {

	        //得到所有Bind注解元素(所有类中的@Bind)
	        //比如我在 MainActivity 和 SecondActivity 中使用 @Bind 注解 View , 分别有 3个 和 2个 成员变量被 @Bind注解
	        //那么 elements 的 size 将是 5
	        Set<? extends Element> elements = roundEnvironment.getElementsAnnotatedWith(Bind.class);
	        note("elementsSize: "+elements.size());

	        //所以需要将所有 Element 按照(包名+类名) MainActivity 和 SecondActivity 分类
	        //即分类后 elementMap 有两个集合, 集合 size() 分别为 3 和 2
	        HashMap<String, List<Element>> elementMap = new HashMap<>();
	        for (Element element : elements) {
	            //获取包名+类名
	            TypeElement enclosingElement = (TypeElement) element.getEnclosingElement();
	            String enclosingName = enclosingElement.getQualifiedName().toString();
	            note(String.format("enclosindClass = %s", enclosingName));
	            //日志打印结果  注: enclosindClass = com.eshel.annotationprocessor.MainActivity

	            //根据包名类名对所有注解进行分类
	            List<Element> elementList = elementMap.get(enclosingName);
	            if(elementList == null) {
	                elementList = new ArrayList<>();
	                elementMap.put(enclosingName, elementList);
	            }
	            elementList.add(element);
	        }

	        for (Map.Entry<String, List<Element>> entry : elementMap.entrySet()) {
	            //根据Activity中带有 Bind注解的字段创建 java 文件 java文件保存在 app/build/generated/source/apt/debug或release 下
	            createFile(entry.getKey(), entry.getValue());
	        }
	        //必须返回 true 才能生成文件
	        return true;
	    }

	    private void note(String msg) {
	        //打印日志
	        mMessager.printMessage(Diagnostic.Kind.NOTE, msg);
	    }

	    private void createFile(String key, List<Element> value) {
	        if(value.size() == 0)
	            return;
	        try {
	            JavaFileObject jfo = mFiler.createSourceFile(key + "_ViewBinding", new Element[]{});
	            Writer writer = jfo.openWriter();

	            //获取包名
	            TypeElement enclosingElement = (TypeElement) value.get(0).getEnclosingElement();
	            Name pkName = mElementUtils.getPackageOf(enclosingElement).getQualifiedName();

	            //获取类名
	            String className = enclosingElement.getSimpleName().toString();

	            StringBuilder builder = new StringBuilder();
	            builder.append("package ").append(pkName).append(";\n\n");
	            builder.append("//Auto generated by apt,do not modify!!\n\n");
	            builder.append("public class ").append(className).append("_ViewBinding").append(" { \n\n");
	            builder.append("\tpublic ").append(className).append("_ViewBinding(").append(className).append(" activity){ \n");

	            for (Element element : value) {
	                VariableElement bindViewElement = (VariableElement) element;
	                String bindViewFiledName = bindViewElement.getSimpleName().toString();
	                String bindViewFiledClassType = bindViewElement.asType().toString();

	                Bind bindView = element.getAnnotation(Bind.class);
	                int id = bindView.value();
	                note(String.format(Locale.getDefault(), "%s %s = %d", bindViewFiledClassType, bindViewFiledName, id));

	                String info = String.format(Locale.getDefault(),
	                        "\t\tactivity.%s = activity.findViewById(%d);\n", bindViewFiledName, id);
	                builder.append(info);
	            }

	            builder.append("\t}\n");
	            builder.append("}");

	            writer.write(builder.toString());
	            writer.flush();
	            writer.close();
	        } catch (IOException e) {
	            e.printStackTrace();
	        }
	    }
	}
然后定义 工具类 ViewBinder , 通过反射的方式创建 MainActivity_ViewBinding 对象:(ViewBinder 和 @Bind 注解都需要编入 apk 中, 所以需要在 主moudle 中进行依赖引用)
	public class ViewBinder {

		//由于我的 ViewBinder 所在工程是一个 Java工程, 所以没法使用 Activity, 故使用 class.isInstance() 来判断是否是 activity
	    public static void bind(Object activity){
	        if(activity == null)
	            return;
	        try {
	            Class<?> clazz = Class.forName("android.app.Activity");
	            if(clazz != null){
	                if(clazz.isInstance(activity)){
	                    Class<?> activityClass = activity.getClass();
	                    Class<?> ViewBindingClass = Class.forName(activityClass.getCanonicalName() + "_ViewBinding");
	                    Constructor<?> constructor = ViewBindingClass.getConstructor(activityClass);
	                    Object ViewBinding = constructor.newInstance(activity);
	                }
	            }
	        } catch (NoSuchMethodException e) {
	            e.printStackTrace();
	        } catch (ClassNotFoundException e) {
	            e.printStackTrace();
	        } catch (IllegalAccessException e) {
	            e.printStackTrace();
	        } catch (InstantiationException e) {
	            e.printStackTrace();
	        } catch (InvocationTargetException e) {
	            e.printStackTrace();
	        }
	    }
	}
最后在 MainActivity 中使用(当然还少了一步使用插件根据xml生成成员变量, 这个暂时不知道如何实现):
	public class MainActivity extends AppCompatActivity {

	    @Bind(R.id.tv)
	    TextView tv;
	    @Bind(R.id.tv)
	    TextView tv2;
	    @Bind(R.id.tv)
	    TextView tv3;
	    @Override
	    protected void onCreate(Bundle savedInstanceState) {
	        super.onCreate(savedInstanceState);
	        setContentView(R.layout.activity_main);
	        ViewBinder.bind(this);
	        tv.setText(" ViewBinder bindView success!!!");
	    }
	}
在主工程app下的 build.gradle 中配置:
dependencies {
    annotationProcessor project(':AnnotationProcessor')//引用注解处理器
    api project(':AnnoLib')//Bind注解 和 ViewBinder 所在的库
}
注意: 调试时 只有先clean Project , 再点小锤子按钮编译 或者 直接点击 rebuild Project, 才会执行注解处理器生成代码
center 标签突然不能用了, 图片不能居中这这么看吧 ~_~

关于在注解处理器中通过mMessager.printMessage(Diagnostic.Kind.NOTE, msg);打印的日志如何查看, 需要在 Build 窗口选中下图红框圈中的按钮
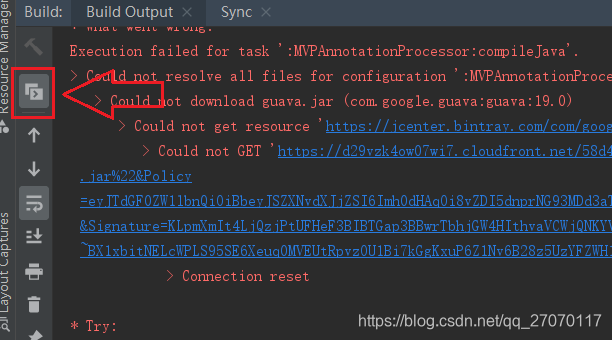
然后Build面板会变成下图所示, 在此处可以查看注解处理器中打印的日志
[外链图片转存失败,源站可能有防盗链机制,建议将图片保存下来直接上传(img-1Ug77opr-1573805736553)(https://i.imgur.com/z0i5gpK.png)]
效果图如下, 成功给tv变量进行了赋值:
[外链图片转存失败,源站可能有防盗链机制,建议将图片保存下来直接上传(img-0Hsxl2oj-1573805736553)(https://i.imgur.com/4Vwx7rV.png)]
想看 Demo 完整工程代码请移步 GitHub: https://github.com/EshelGuo/AnnotationProcessorDemo
更新:
最近再次写APT时发现com.google.auto.service:auto-service:1.0-rc3出了问题,无法生成对应配置文件,针对这种情况,可以手动编辑配置文件:
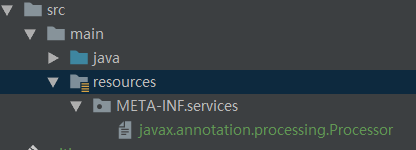
如上图,新建 resources/META-INF.services/javax.annotation.processing.Processor文件,在其中配置注解处理器的包名加类名:

感兴趣的可以到 Github 下载代码跑下, 有什么问题请告知我, 大家共同学习!!