文章目录
关于Nginx:
●一款高性能,轻量级Web服务软件
●稳定性高
●系统资源消耗低
●对HTTP并发连接的处理能力
- 高单台物理服务器可支持30000-50000个并发要求
特点就是处理高并发,apache是做不到
Nginx编译安装
安装支持软件
[root@promote ~]# yum -y install gcc gcc-c++ pcre pcre-devel zlib-devel创建运行用户,组
[root@promote ~]# useradd -M -s /sbin/nologin nginx -M不创建家目录 -s指定不能登录编译安装Nginx
[root@promote ~]# tar zxvf nginx-1.12.2.tar.gz  ##加压nginx的工具包[root@promote ~]# cd ngjinx-1.12.2
[root@promote ~]# ./configure \
--prefix=/usr/local/nginx \   ##指定路径
--user=nginx \           ##管理用户
--group=nginx \         ##管理属组
--with-http_stub_status_module \    ##这是统计模块,统计多少人来访问[root@promote ~]# make &&make install   编译和编译安装
[root@promote ~]# ln -s /usr/local/nginx/sbin/nginx  /usr/local/sbin/    ##建立软链接方便管理
Nginx运行控制
●检查配置文件
[root@promote ~]# nginx -t●启动、重载配置、停止Nginx
[root@promotet ~]# nginx '//启动'
[root@promote ~]# netstat -anpt | grep nginx
tcp 0 0 0.0.0.0:80 0.0.0.0:* LISTEN 7180/nginx: master
[root@promote ~]# yum -y install elinks
[root@promote ~]# elinks http://localhost  '//显示"Welcome to nginx!"页面,表明Nginx服务已经正常运行'
[root@promote ~]# killall -s HUP nginx '//-S选项指定信号种类,HUP信号表示重载配置'
[root@promote ~]# killall -s QUIT nginx '//QUIT信号表示退出进程'
●Nginx添加为系统服务
添加使用service工具进行管理
[root@localhost ~]# cd /etc/inid.d		'//或者添加使用service工具进行管理'
[root@localhost init.d]# ls
[root@localhost init.d]# vim nginx
#!/bin/bash
# chkconfig: - 99 20
# description: Nginx Service Control Script
PROG="/usr/local/nginx/sbin/nginx"
PIDF="/usr/local/nginx/logs/nginx.pid"
case "$1" in
  start)
   $PROG
   ;;
  stop)
   kill -s QUIT $(cat $PIDF)
   ;;
  restart)
   $0 stop
   $0 start
   ;;
  reload)
   kill -s HUP $(cat $PIDF)
   ;;
  *)
  		echo "Usage: $0 {start|stop|restart|reload}"
  		exit 1
esac
exit 0
配置文件nginx.conf
全局配置
#user nobody;
worker_ processes 1;
#error_ log logs/error.log;
#pid logs/nginx.pid;
1/O时间配置
events {
  use epoll;
  worker connections 4096;
}
HTTP配置
http {
  ....
  access_log logs/access.log main;
  sendfile on;
  ...
  keepalive_ _timeout 65;
  server {
 listen  80;
 server name localhost;
 charset utf-8;
 location / {
  root html;
  index index.html index.php; }
 error_ page 500 502 503 504 /50x.html;
 location = /50x.html {
  root html; }}
}
Nginx的访问状态统计实验
实验环境:
一台centos7系统的虚拟机;做nginx的服务器
一台win10系统的虚拟机;做访问主机
推荐步骤:
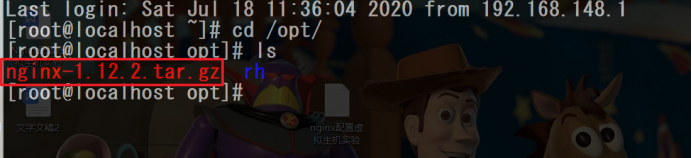
1.先用xftp将nginx的工具包放到opt目录下,关闭防火墙和防护功能
[root@localhost opt]# setenforce 0
[root@localhost opt]# iptables -F
2.将实验所需的环境包用yum工具进行安装
[root@localhost opt]# yum -y install gcc gcc-c++ pcre pcre-devel zlib-devel3.安装完环境包后,解压nginx工具包
[root@localhost opt]# tar zxvf nginx-1.12.2.tar.gz4.添加指定用户和组,不创建家目录,用来管理服务
[root@localhost opt]# useradd -M -s /sbin/nologin nginx
5.配置.configure编译安装
[root@localhost nginx-1.12.2]# ./configure \
--prefix=/usr/local/nginx \
--user=nginx \
--group=nginx \
--with-http_stub_status_module
[root@localhost nginx-1.12.2]# make &&make install  ##编译安装
6.建立一个软连接方便管理nginx,并用nginx -t命令检查一下
[root@localhost nginx-1.12.2]# ln -s /usr/local/nginx/sbin/nginx /usr/local/bin/
7. 创建nginx的启动脚本
[root@localhost ~]# cd /etc/inid.d  '//或者添加使用service工具进行管理'
[root@localhost init.d]# ls
[root@localhost init.d]# vim nginx
#!/bin/bash
# chkconfig: - 99 20
# description: Nginx Service Control Script
PROG="/usr/local/nginx/sbin/nginx"
PIDF="/usr/local/nginx/logs/nginx.pid"
case "$1" in
  start)
   $PROG
   ;;
  stop)
   kill -s QUIT $(cat $PIDF)
   ;;
  restart)
   $0 stop
   $0 start
   ;;
  reload)
   kill -s HUP $(cat $PIDF)
   ;;
  *)
    echo "Usage: $0 {start|stop|restart|reload}"
    exit 1
esac
exit 0
[root@localhost init.d]# chmod +x nginx
[root@localhost init.d]# chkconfig --add nginx
[root@localhost init.d]# chkconfig --level 35 nginx on
8.配置统计页面
[root@localhost init.d]# vim /usr/local/nginx/conf/nginx.conf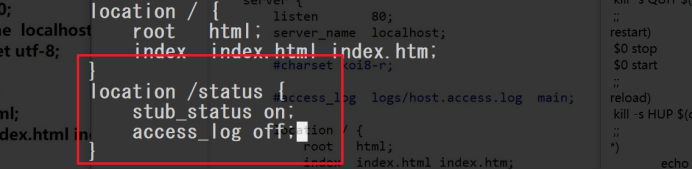
[root@localhost init.d]# service nginx restart 
9.回到win系统主机,访问nginx页面

Nginx支持的虚拟主机
- 基于域名的虚拟主机
- 基于IP的虚拟主机
- 基于端口的虚拟主机通过“server{}”配置段实现
- 基于域名的虚拟Web主机
nginx虚拟主机实验
基于域名
1.到/var目录下创建两个站点
[root@localhost init.d]# cd /var/
[root@localhost var]# cd www/
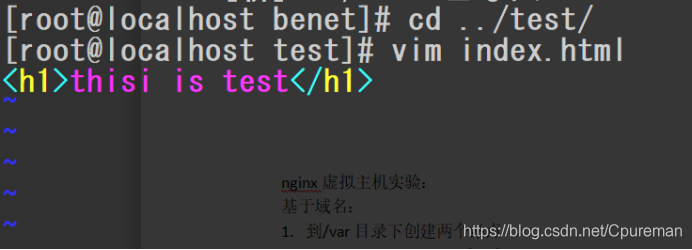
[root@localhost www]# mkdir benet
[root@localhost www]# cd benet/
创建benet的站点 wq保存

[root@localhost www]# mkdir test
[root@localhost www]# cd test/
创建test的站点 wq保存
2.安装DNS的工具包
[root@localhost www]# yum -y install bind修改主配置文件:
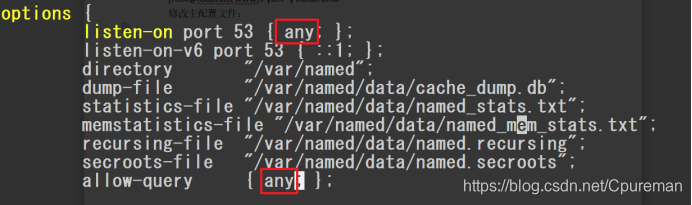
修改区域配置文件:
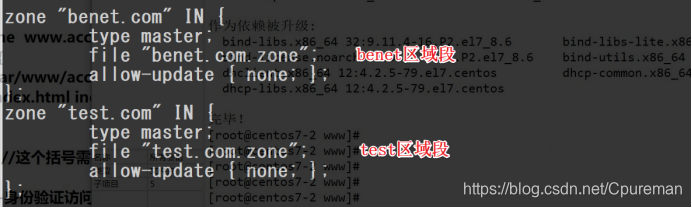
修改区域数据配置文件
[root@localhost www]# cd /var/named/
[root@localhost named]# cp -p named.localhost benet.com.zone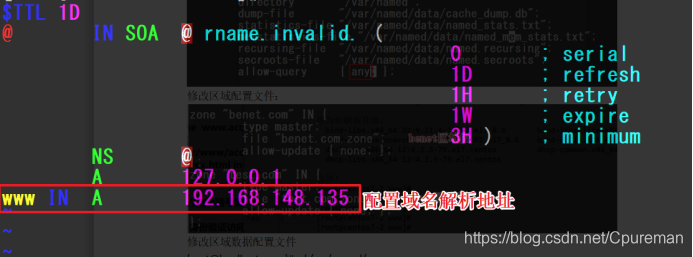
[root@localhost named]# cp -p benet.com.zone test.com.zone
[root@localhost named]# systemctl start named ##启动DNS服务3.修改nginx的配置文件
[root@localhost named]# vim /usr/local/nginx/conf/nginx.conf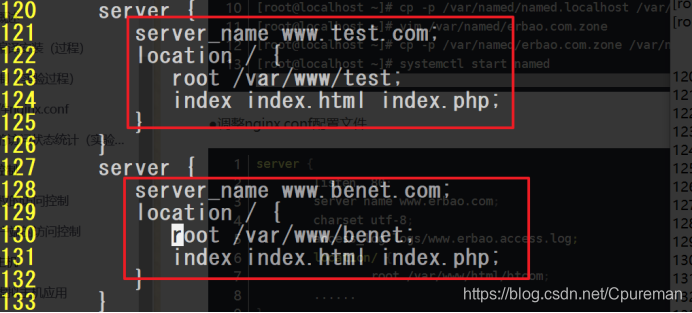
用nginx -t命令可以检查配置文件是否有问题

[root@localhost named]# service nginx restart ##配置完成后需要重启nginx服务
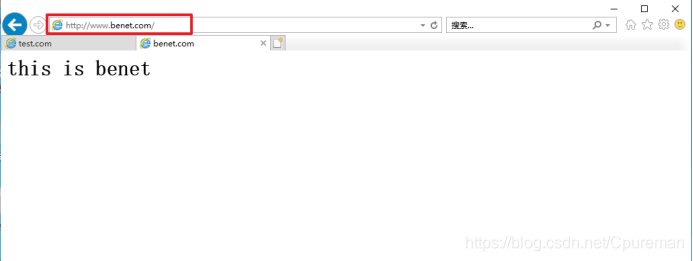
4.回到win系统中,用不同的域名查看情况
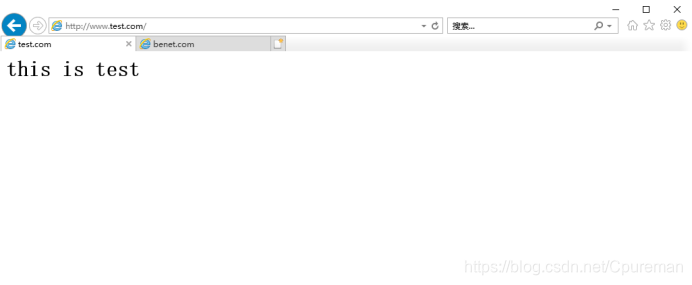
benet.com
基于端口区分
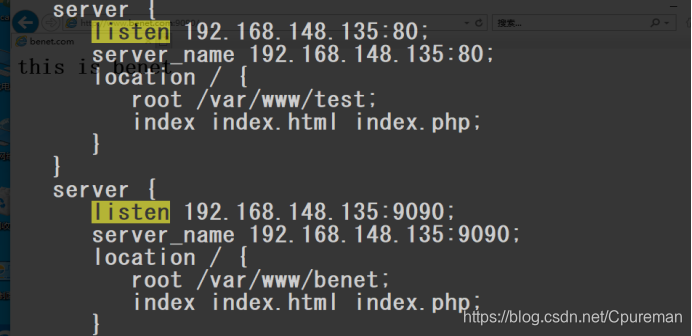
基于IP地址区分
注意需要再添加一张网卡
Nginx访问控制
基于授权的访问控制
配置步骤与Apache基本一致
●生成用户密码认证文件
●修改主配置文件对相应目录,添加认证配置项
●重启服务,访问测试
基于身份验证实验
推荐步骤
1.先检查是否有htpasswd的命令
[root@localhost named]# which htpasswd 
如果没有的话,只需安装apache服务即可
2. 创建用户
[root@localhost named]# htpasswd -c /usr/local/nginx/passwd.db
hu
New password:
Re-type new password:
Adding password for user hu
3.设置属主位nginx,并设置权限
[root@localhost named]# chown nginx /usr/local/nginx/passwd.db
[root@localhost named]# chown 400 /usr/local/nginx/passwd.db
4.修改配置文件
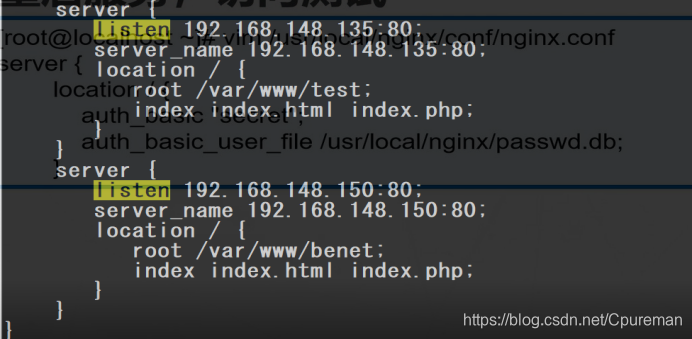
[root@localhost nginx]# vim /usr/local/nginx/conf/nginx.conf给test.com设置身份验证
server {
       listen 192.168.148.135:80;
       server_name 192.168.148.135:80;
       location / {
       auth_basic "secret";
       auth_basic_user_file /usr/local/nginx/passwd.db;
          root /var/www/test;
          index index.html index.php;
       }
    }
给benet.com设置拒绝win系统地址192.168.148.200访问
 server {
       listen 192.168.148.135:9090;
       server_name 192.168.148.135:9090;
       location / {
       deny 192.168.148.200;
       allow all;
          root /var/www/benet;
          index index.html index.php;
       }
}[root@localhost nginx]# service nginx restart ##重启服务5.回到win系统验证情况:www.test.com
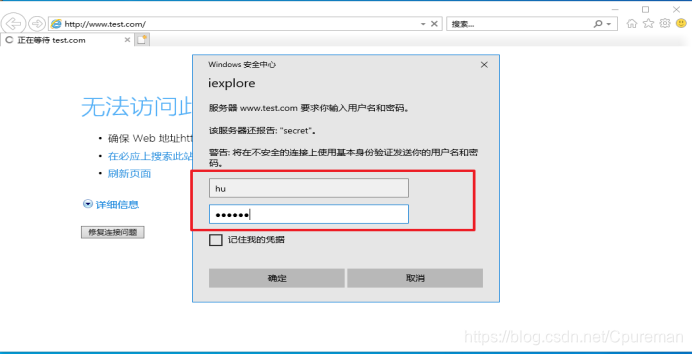
www.benet.com显示无法访问
