VSFTP
VSFTP是一个基于GPL发布的类Unix系统上使用的FTP服务器软件,它的全称是Very Secure FTP 从此名称可以看出来,编制者的初衷是代码的安全。
特点
1、它是一个安全、高速、稳定的FTP服务器;
2、它可以做基于多个IP的虚拟FTP主机服务器;
3、匿名服务设置十分方便;
4、匿名FTP的根目录不需要任何特殊的目录结构,或系统程序或其它的系统文件;
5、不执行任何外部程序,从而减少了安全隐患;
6、支持虚拟用户,并且每个虚拟用户可以具有独立的属性配置;
7、可以设置从inetd中启动,或者独立的FTP服务器两种运行方式;
8、支持两种认证方式(PAP或xinetd/ tcp_wrappers);
9、支持带宽限制;
VSFTP市场应用十分广范,很多国际性的大公司和自由开源组织在使用,如:Red Hat, Suse,Debian,OpenBSD。
文章目录
安装vsftp包
[root@localhost ~]# yum -y install vsftpd
Running transaction
  正在更新    : vsftpd-3.0.2-27.el7.x86_64                                  1/2
  清理        : vsftpd-3.0.2-25.el7.x86_64                                  2/2
  验证中      : vsftpd-3.0.2-27.el7.x86_64                                  1/2
  验证中      : vsftpd-3.0.2-25.el7.x86_64                                  2/2

更新完毕:
  vsftpd.x86_64 0:3.0.2-27.el7

完毕!
查找配置文件位置
[root@localhost ~]# rpm -ql vsftpd | grep /etc
/etc/logrotate.d/vsftpd
/etc/pam.d/vsftpd
/etc/vsftpd
/etc/vsftpd/ftpusers
/etc/vsftpd/user_list                #用户列表
/etc/vsftpd/vsftpd.conf            #配置文件
/etc/vsftpd/vsftpd_conf_migrate.sh
[root@localhost ~]#
注:这个时候就算啥也不改,这个vsftp也已经可以使用了,但是记得关闭防火墙
[root@localhost ~]# systemctl stop firewalld.service
[root@localhost ~]# setenforce 0
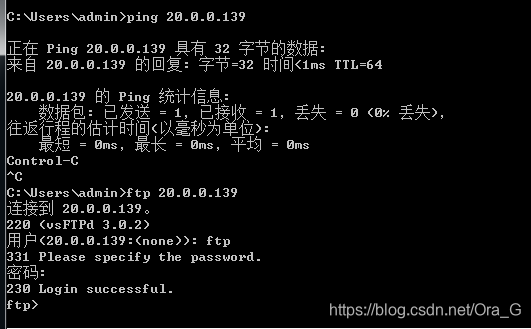
匿名用户连接
本次因实验需要,故开放了匿名用户权限,在工作和生活中,就算开,也别开最大啊!!!
CentOS端
[root@localhost ~]# systemctl stop firewalld.service
[root@localhost ~]# setenforce 0
[root@localhost ~]# iptables -F
[root@localhost ~]# systemctl start vsftpd
win7端
使用匿名用户连接,用户名ftp,匿名用户无需输入密码,直接回车
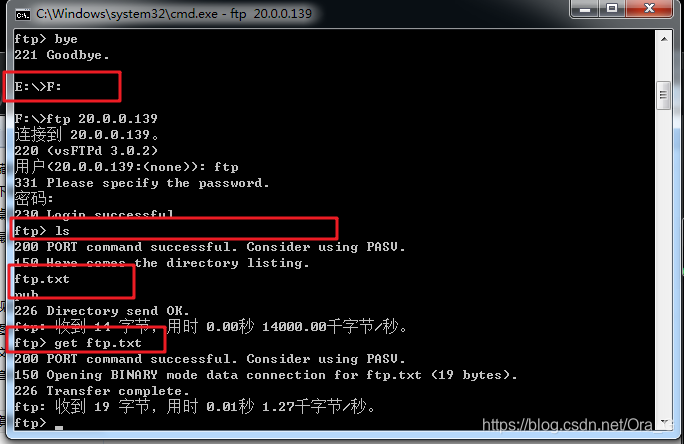
下载服务端内容到本地
在服务端创建一个文件 放到ftp站点中
[root@localhost ~]# cd /var/ftp/
[root@localhost ftp]# echo "这里是ftp站点" > /var/ftp/ftp.txt
win7端
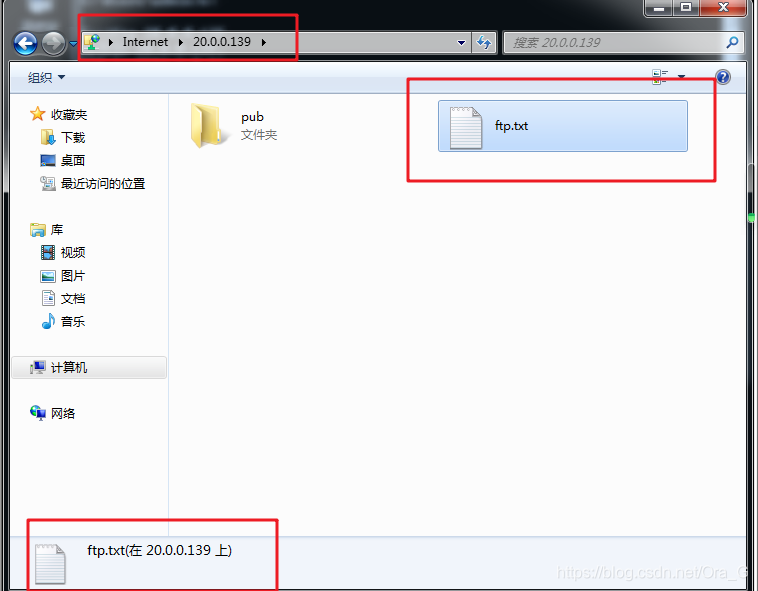
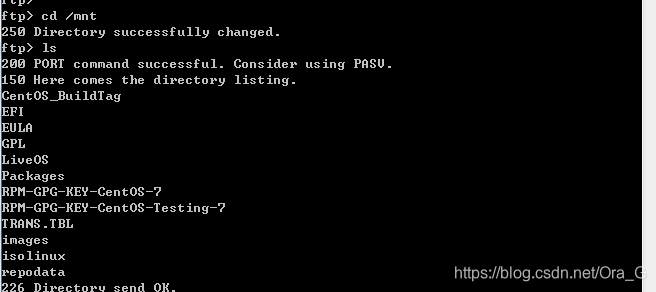
注:其实也可以图形化界面直接复制……地址栏输入: ftp://20.0.0.139
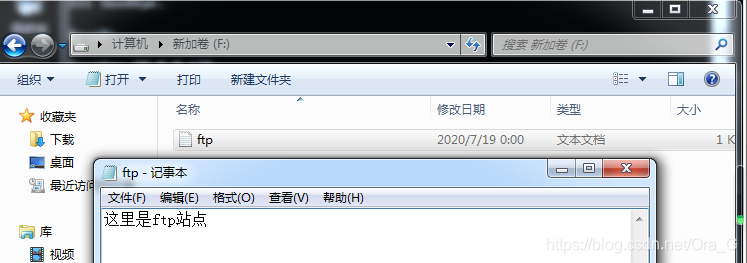
这是回到F盘去查看,发现成功下载该文件了
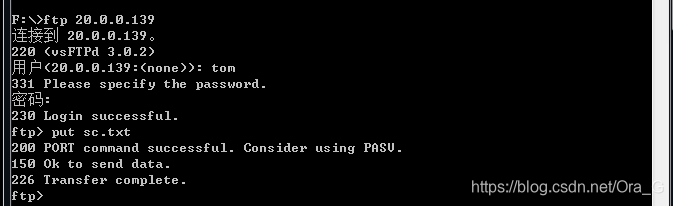
上传文件至服务端
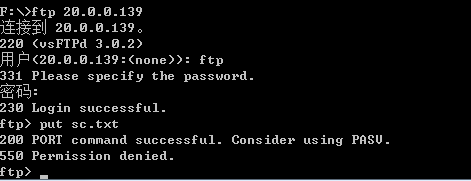
使用put命令,上传
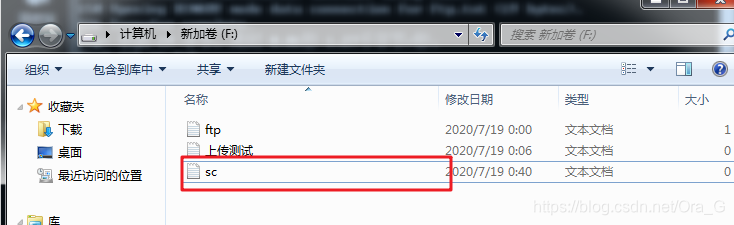
在win7中创建一个txt文件sc
 使用put命令上传,会发现没有权限
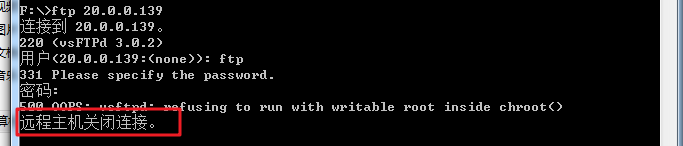
如果想让匿名用户上传文件,要对配置文件进行编辑
[root@localhost ftp]# vim /etc/vsftpd/vsftpd.conf
# When SELinux is enforcing check for SE bool allow_ftpd_anon_write, allow_ftpd_full_access
anon_upload_enable=YES              ///这行去掉#就好,意思是给匿名用户上传权限,一般不开的
# Uncomment this if you want the anonymous FTP user to be able to create
# new directories.
anon_mkdir_write_enable=YES          ///这行去掉#就好,意思是给匿名用户创建目录权限,一般不开的
anon_other_write_enable=YES          ///这条手敲的
[root@localhost ftp]# systemctl restart vsftpd
再次尝试,发现还是上传失败,是因为ftp目录的其他用户没有写入权限,但是ftp的目录如果给777最大权限的话,会报错,这是一个Linux的安全机制
[root@localhost var]# chmod 777 ftp
[root@localhost var]# ll |grep ftp
drwxrwxrwx.  3 root root    46 7月  19 01:01 ftp
所以不能i修改ftp的权限,但是我们可以修改 该ftp目录下,pub的权限
[root@localhost var]# cd ftp/
[root@localhost ftp]# ls
ftp.txt  pub
[root@localhost ftp]# chmod 777 pub/
[root@localhost ftp]# ll
总用量 4
-rw-r--r--. 1 root root 19 7月  18 23:48 ftp.txt
drwxrwxrwx. 2 root root  6 4月   1 12:55 pub

[root@localhost ftp]# cd pub/
[root@localhost pub]# ls
sc.txt                         ///有上传的文件,上传成功
[root@localhost pub]#
本地用户连接
[root@localhost pub]# tail -5 /etc/passwd
cj:x:1002:1002::/home/cj:/bin/bash
zk:x:1003:1003::/home/zk:/bin/bash
cc:x:1004:1004::/home/cc:/bin/bash
cg:x:1005:1005::/home/cg:/bin/bash
stu:x:1006:1006::/home/stu:/bin/bash
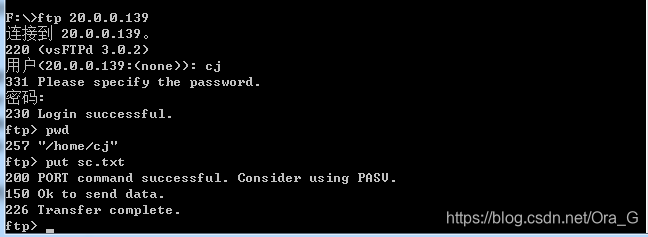 但是这个cj用户仅仅是一个普通用户,却可以随意切换目录,万一修改了配置文件,就很危险,所以要对其配置文件进行修改
将用户可切换目录进行修改
[root@localhost cj]# vim /etc/vsftpd/vsftpd.conf
chroot_local_user=YES                     ///这行去#
allow_writeable_chroot=YES            ///这行手敲,不然报错
[root@localhost cj]# systemctl restart vsftpd
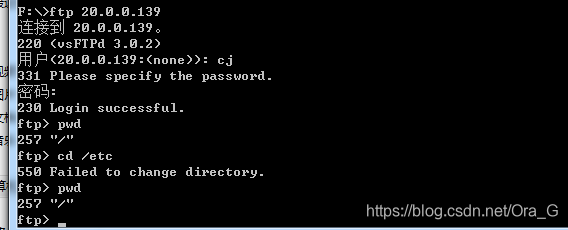
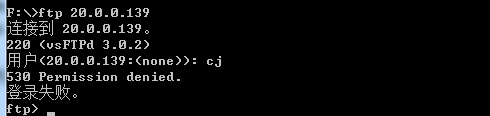
修改用户登录列表
添加黑名单
说的通俗点,就是我不让你登录你就不能登录,这个文件默认是黑名单
[root@localhost vsftpd]# vim user_list
# vsftpd userlist
# If userlist_deny=NO, only allow users in this file                   ///这行可以翻译一下
# If userlist_deny=YES (default), never allow users in this file, and
# do not even prompt for a password.
# Note that the default vsftpd pam config also checks /etc/vsftpd/ftpusers
# for users that are denied.
root
bin
daemon
adm
lp
sync
shutdown
halt
mail
news
uucp
operator
games
nobody
cj     ///我把cj用户加了进来
[root@localhost vsftpd]# systemctl restart vsftpd
这时原本能登录的cj用户,已经不能登录了
仅允许白名单
[root@localhost vsftpd]# vim vsftpd.conf
按 G 切到行末查看以下
pam_service_name=vsftpd
userlist_enable=YES
userlist_deny=NO          ///手巧进去,将user_list文件变成白名单,仅允许该列表的用户访问
tcp_wrappers=YES
[root@localhost vsftpd]# systemctl restart vsftpd
除了列表之外的用户已经无法登录了

虚拟用户
新建用户
创建一个系统不存在的用户,和你的已经存在的账户进行映射
[root@localhost opt]# cd /etc/vsftpd/
[root@localhost vsftpd]# ls
1  ftpusers  user_list  vsftpd  vsftpd.conf  vsftpd_conf_migrate.sh  vuser
[root@localhost vsftpd]# vim xnyh.txt        ///奇数行用户名,偶数行密码
tom
123123
jerry
123123
~
生成数据库文件
生成Vsftpd虚拟用户数据库认证文件,并设置权限700
[root@localhost vsftpd]# db_load  -T  -t  hash  -f  /etc/vsftpd/xnyh.txt  /etc/vsftpd/xnyh.db
[root@localhost vsftpd]# chmod 700 xnyh.db
db_load做数据库生成;
-T 允许应用程序能够将文本文件转译载入进数据库。由于我们之后是将虚拟用户的信息以文件方式存储在文件里的,为了让Vsftpd这个应用程序能够通过文本来载入用户数据,必须要使用这个选项。指定了选项-T,那么一定要追加子选项-t;
-t 追加在在-T选项后,用来指定转译载入的数据库类型;
hash就是使用hash码加密
-f 参数后面接包含用户名和密码的文本文件
创建映射用户
所有Vsftpd虚拟用户需要映射到一个系统用户,该系统用户不需要密码,也不需要登录,主要用于虚拟用户映射使用
[root@localhost vsftpd]# useradd -d /opt/vuser -s /sbin/nologin vuser
编辑PAM认证模块
[root@localhost vsftpd]# cd /etc/pam.d/
[root@localhost pam.d]# vim vsftpd.vu
auth      required        pam_userdb.so   db=/etc/vsftpd/xnyh
account   required        pam_userdb.so   db=/etc/vsftpd/xnyh
编辑配置文件
[root@localhost pam.d]# cd /etc/vsftpd/
[root@localhost vsftpd]# vim vsftpd.conf
userlist_deny=YES
///在行尾插入
#pam_service_name=vsftpd
guest_enable=YES
guest_username=vuser
pam_service_name=vsftpd.vu
验证
[root@localhost /]# cd /opt/vuser/
[root@localhost vuser]# ls
sc.txt
[root@localhost vuser]# ll
总用量 0
-rw-------. 1 vuser vuser 0 7月  19 02:52 sc.txt
换个用户再来

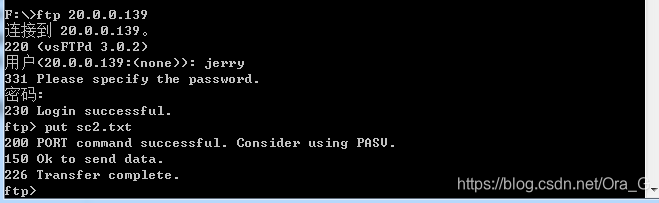
[root@localhost vuser]# ll
总用量 0
-rw-------. 1 vuser vuser 0 7月  19 02:56 sc2.txt
-rw-------. 1 vuser vuser 0 7月  19 02:52 sc.txt
[root@localhost vuser]#
属主属组保持不变