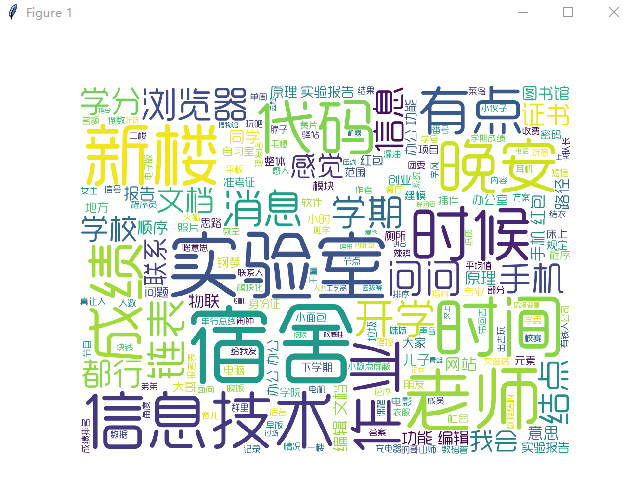
刚开学第一天,因为老师没在实验室,所以就没去。之前有看到过别人展示过热点词汇的那种图片,闲着也是闲着,所以就捣鼓了一下午,为了整理一下学的东西,下面就以QQ聊天记录为例子,生成热点词汇。具体的效果如下
前提准备:
环境:anaconda+python3.5(一开始在python2中写的,但是py2中open这个内置函数没有encoding这个属性,所以文件读取时编码格式转换有点麻烦,捣鼓了很久没弄好,干脆用了py3来写。)
1、安装wordcloud和jieba
pip install wordcloud
pip install jieba
wordcloud是用于生成词云图的模块,jieba是一个强大的分词库,并且完美支持中文分词。
另外anaconda安装wordcloud的时候,可能会出错,这时候可以去网上下载个轮子进行本地安装。地址:https://www.lfd.uci.edu/~gohlke/pythonlibs/#wordcloud
2、从QQ中导出一份聊天记录
不会的可以参考百度:https://jingyan.baidu.com/article/2a138328541fcb074a134f81.html
导出格式选择txt就可以了。
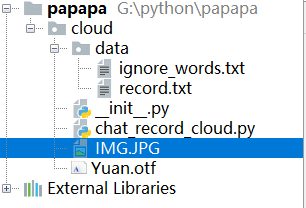
另外需要准备另一个txt文件(如图ignore_words.txt),里面填写几个需要忽略的词语,如姓名或者一些助词。
下面就开始写如何做词云图了!
导入基本模块:
# coding:utf-8
from scipy.misc import imread
from wordcloud import WordCloud
import jieba.posseg as pseg
import matplotlib.pyplot as plt
from scipy.misc import imread
import re
解释一下下面的这个函数:
先读取这两个文件,聊天记录的文件需要将时间的行数据以及空格之类的数据筛掉,忽略的词汇放入一个set中。
然后重点是下面这几句:
    for line in line_list:
        word_map = pseg.cut(line)
        for word, type in word_map:
            if word not in stop_words and type == 'n':
                word_list.append(word)
pseg.cut()的作用就是通过jieba中的模块进行分词,返回结果是分的词跟这个词的词性,选择词性是名词,这里也可以加上些其他的词性。
词性表如下:摘自:https://www.cnblogs.com/adienhsuan/p/5674033.html
Ag |
形语素 |
形容词性语素。形容词代码为 a,语素代码g前面置以A。 |
a |
形容词 |
取英语形容词 adjective的第1个字母。 |
ad |
副形词 |
直接作状语的形容词。形容词代码 a和副词代码d并在一起。 |
an |
名形词 |
具有名词功能的形容词。形容词代码 a和名词代码n并在一起。 |
b |
区别词 |
取汉字“别”的声母。 |
c |
连词 |
取英语连词 conjunction的第1个字母。 |
| dg | 副语素 |
副词性语素。副词代码为 d,语素代码g前面置以D。 |
d |
副词 |
取 adverb的第2个字母,因其第1个字母已用于形容词。 |
e |
叹词 |
取英语叹词 exclamation的第1个字母。 |
f |
方位词 |
取汉字“方” |
g |
语素 |
绝大多数语素都能作为合成词的“词根”,取汉字“根”的声母。 |
h |
前接成分 |
取英语 head的第1个字母。 |
i |
成语 |
取英语成语 idiom的第1个字母。 |
j |
简称略语 |
取汉字“简”的声母。 |
k |
后接成分 |
|
l |
习用语 |
习用语尚未成为成语,有点“临时性”,取“临”的声母。 |
m |
数词 |
取英语 numeral的第3个字母,n,u已有他用。 |
Ng |
名语素 |
名词性语素。名词代码为 n,语素代码g前面置以N。 |
n |
名词 |
取英语名词 noun的第1个字母。 |
nr |
人名 |
名词代码 n和“人(ren)”的声母并在一起。 |
ns |
地名 |
名词代码 n和处所词代码s并在一起。 |
nt |
机构团体 |
“团”的声母为 t,名词代码n和t并在一起。 |
nz |
其他专名 |
“专”的声母的第 1个字母为z,名词代码n和z并在一起。 |
o |
拟声词 |
取英语拟声词 onomatopoeia的第1个字母。 |
p |
介词 |
取英语介词 prepositional的第1个字母。 |
q |
量词 |
取英语 quantity的第1个字母。 |
r |
代词 |
取英语代词 pronoun的第2个字母,因p已用于介词。 |
s |
处所词 |
取英语 space的第1个字母。 |
tg |
时语素 |
时间词性语素。时间词代码为 t,在语素的代码g前面置以T。 |
t |
时间词 |
取英语 time的第1个字母。 |
u |
助词 |
取英语助词 auxiliary |
vg |
动语素 |
动词性语素。动词代码为 v。在语素的代码g前面置以V。 |
v |
动词 |
取英语动词 verb的第一个字母。 |
vd |
副动词 |
直接作状语的动词。动词和副词的代码并在一起。 |
vn |
名动词 |
指具有名词功能的动词。动词和名词的代码并在一起。 |
w |
标点符号 |
|
x |
非语素字 |
非语素字只是一个符号,字母 x通常用于代表未知数、符号。 |
y |
语气词 |
取汉字“语”的声母。 |
z |
状态词 |
取汉字“状”的声母的前一个字母。 |
un |
未知词 |
不可识别词及用户自定义词组。取英文Unkonwn首两个字母。(非北大标准,CSW分词中定义) |
def createText():
    record_file = open('./data/record.txt', 'r', encoding='utf-8')
    ignore_file = open('./data/ignore_words.txt','r', encoding='utf-8')

    # strip()去除字符前面的空格
    line_list = []
    for line in record_file:
        if line.isspace():
            continue
        if re.match(r'(\d{4}-\d{1,2}-\d{1,2})',line[:10]) is not None:
            continue
        line_list.append(line.strip())

    stop_words = set(line.strip() for line in ignore_file)

    word_list = []

    for line in line_list:
        word_map = pseg.cut(line)
        for word, type in word_map:
            if word not in stop_words and type == 'n':
                word_list.append(word)

    record_file.close()
    ignore_file.close()
    return ' '.join(word_list)
通过下面这个函数可以生成词云图。
主要的代码是这句:
WordCloud(font_path='./Yuan.otf', background_color='#fff', mask=mask_img).generate(text)
WordCloud的参数有很多:
其中的mask参数需要传进一个nd数组,因而这里用到了scipy的imread()来将图片转换为二维数组。
摘自:http://blog.csdn.net/u010309756/article/details/67637930
font_path : string //字体路径,需要展现什么字体就把该字体路径+后缀名写上,如:font_path = '黑体.ttf'

width : int (default=400) //输出的画布宽度,默认为400像素

height : int (default=200) //输出的画布高度,默认为200像素

prefer_horizontal : float (default=0.90) //词语水平方向排版出现的频率,默认 0.9 (所以词语垂直方向排版出现频率为 0.1 )

mask : nd-array or None (default=None) //如果参数为空,则使用二维遮罩绘制词云。如果 mask 非空,设置的宽高值将被忽略,遮罩形状被 mask 取代。除全白(#FFFFFF)的部分将不会绘制,其余部分会用于绘制词云。如:bg_pic = imread('读取一张图片.png'),背景图片的画布一定要设置为白色(#FFFFFF),然后显示的形状为不是白色的其他颜色。可以用ps工具将自己要显示的形状复制到一个纯白色的画布上再保存,就ok了。

scale : float (default=1) //按照比例进行放大画布,如设置为1.5,则长和宽都是原来画布的1.5倍。

min_font_size : int (default=4) //显示的最小的字体大小

font_step : int (default=1) //字体步长,如果步长大于1,会加快运算但是可能导致结果出现较大的误差。

max_words : number (default=200) //要显示的词的最大个数

stopwords : set of strings or None //设置需要屏蔽的词,如果为空,则使用内置的STOPWORDS

background_color : color value (default=”black”) //背景颜色,如background_color='white',背景颜色为白色。

max_font_size : int or None (default=None) //显示的最大的字体大小

mode : string (default=”RGB”) //当参数为“RGBA”并且background_color不为空时,背景为透明。

relative_scaling : float (default=.5) //词频和字体大小的关联性

color_func : callable, default=None //生成新颜色的函数,如果为空,则使用 self.color_func

regexp : string or None (optional) //使用正则表达式分隔输入的文本

collocations : bool, default=True //是否包括两个词的搭配

colormap : string or matplotlib colormap, default=”viridis” //给每个单词随机分配颜色,若指定color_func,则忽略该方法。
其中关于生成的图像的设置可以借鉴:http://blog.csdn.net/heyuexianzi/article/details/76851377 文章讲的很详细。
def createCloud(text):
    mask_img = imread('./IMG.JPG')
    wordCloud = WordCloud(font_path='./Yuan.otf', background_color='#fff', mask=mask_img).generate(text)
    plt.imshow(wordCloud)
    plt.axis('off')
    plt.show()
完整代码如下:
# coding:utf-8
from scipy.misc import imread
from wordcloud import WordCloud
import jieba.posseg as pseg
import matplotlib.pyplot as plt
from scipy.misc import imread
import re

def createText():
    record_file = open('./data/record.txt', 'r', encoding='utf-8')
    ignore_file = open('./data/ignore_words.txt','r', encoding='utf-8')

    # strip()去除字符前面的空格
    line_list = []
    for line in record_file:
        if line.isspace():
            continue
        if re.match(r'(\d{4}-\d{1,2}-\d{1,2})',line[:10]) is not None:
            continue
        line_list.append(line.strip())

    stop_words = set(line.strip() for line in ignore_file)

    word_list = []

    for line in line_list:
        word_map = pseg.cut(line)
        for word, type in word_map:
            if word not in stop_words and (type == 'n' or type == 'v'):
                word_list.append(word)

    ignore_file.close()
    record_file.close()

    return ' '.join(word_list)

def createCloud(text):
    mask_img = imread('./IMG.JPG')
    wordCloud = WordCloud(font_path='./Yuan.otf', background_color='#fff', mask=mask_img).generate(text)
    plt.imshow(wordCloud)
    plt.axis('off')
    plt.show()


if __name__ == '__main__':
    txt = createText()
    createCloud(txt)
这个词汇云图的应用方面很广,大家也可以根据自身的需要结合其他的领域来使用。