本文参考链接:https://www.cnblogs.com/xuchunlin/p/9415620.html
首先收集原始的验证码图片:
![]()
![]()
![]()
![]()
![]()
![]()
![]()
![]()
![]()
![]()
![]()
![]()
![]()
![]()
![]()
![]()
![]()
![]()
![]()
![]()
![]()
![]()
![]()
![]()
![]()
![]()
![]()
![]()
![]()
![]()
![]()
![]()
![]()
![]()
![]()
![]()
![]()
![]()
![]()
![]()
这种验证码的特点是统一都是红色字体的四个字符组成,其中包括大写字母 A-Z,小写字母 a-z 和数字 0-9。我这儿需要的验证码识别对大小写不加以区分,所以大小写识别错误不算作识别错误,比如第一个验证码:DwP6,如果识别成:Dwp6,我们也把他算作识别正确。通过观察,我们可以提前想到,这种验证码识别的难度在于部分字符的难以区分,比如 S 和 5、I 和 1、 i 和 j、2 和 Z、0 和 o 、y 和 v 、9 和 g 等等之类。字符间的间距也会有一定的干扰,降低了单个字符的区分度,比如会把紧邻的两个字符 vv识别成一个字符 w。验证码中的部分字符连人本身都难以区分,对机器而言难度也就可想而知了。
首先进行灰度处理,将原来的彩色图片变成灰度图片,同时去除部分图片中的暗色条纹。这里选择合适的阈值参数比较重要,阈值太大过滤不掉太多杂质信息,阈值太小则剩下的有效信息又太少。下面是阈值 threshold 分别为 210, 180, 150 对应的灰度图片,我程序里选择的 threshold=180。
![]()
![]()
![]()
import os

import pytesseract
from PIL import Image

before = r"D:\MyProject\Python\ReturnVisit\auth_code\before\\"  # 原始验证码图片目录
after = r"D:\MyProject\Python\ReturnVisit\auth_code\after\\"  # 处理后验证码图片目录


def grey_processing():  # 灰度处理
    threshold = 180
    file_list = os.listdir(before)
    for file in file_list:
        path = before + file
        img = Image.open(path)
        w, h = img.size
        for x in range(w):
            for y in range(h):
                r, g, b = img.getpixel((x, y))
                if 190 <= r <= 255 and 170 <= g <= 255 and 0 <= b <= 140:
                    img.putpixel((x, y), (0, 0, 0))
                if 0 <= r <= 90 and 210 <= g <= 255 and 0 <= b <= 90:
                    img.putpixel((x, y), (0, 0, 0))
        img = img.convert('L').point([0] * threshold + [1] * (256 - threshold), '1')
        #  边缘噪点处理
        for x in range(0, img.size[0]):
            for y in range(0, img.size[1]):
                if x in [0, img.size[0] - 1] or y in [0, img.size[1] - 1]:
                    img.putpixel((x, y), 255)  # 将边缘全变为非黑的点(简单粗暴)
        path = path.replace('PNG', 'jpeg')
        path = path.replace('before', 'after')  # 更换新图片保存路径
        img.save(path)
灰度处理后的图片:
![]()
![]()
![]()
![]()
![]()
![]()
![]()
![]()
![]()
![]()
![]()
![]()
![]()
![]()
![]()
![]()
![]()
![]()
![]()
![]()
![]()
![]()
![]()
![]()
![]()
![]()
![]()
![]()
![]()
![]()
![]()
![]()
![]()
![]()
![]()
![]()
![]()
![]()
![]()
![]()
然后进行二值化处理和内部噪点处理:
t2val = {}  # 使用字典来保存二值化像素矩阵

def two_value(image, G):  # 二值化处理, G是图像二值化阀值
    for y in range(0, image.size[1]):
        for x in range(0, image.size[0]):
            g = image.getpixel((x, y))
            if g < G:  # 灰度处理以后,点的区分度已经比较明显了。
                t2val[(x, y)] = 1
            else:
                t2val[(x, y)] = 0


# 自定义孤立点为噪点
def clear_noise(image):  # 清噪
    #  边缘噪点处理(本来想放到这块,但是这儿对像素的修改不能即使生效,对内部噪点处理会有影响,这不是我想要的结果!)
    # for x in range(0, image.size[0]):
    #     for y in range(0, image.size[1]):
    #         if x in [0, image.size[0] - 1] or y in [0, image.size[1] - 1]:
    #             image.putpixel((x, y), 255)  # 将边缘全变为非黑的点(简单粗暴)
    # 内部噪点处理
    for x in range(1, image.size[0] - 1):
        for y in range(1, image.size[1] - 1):
            nearDots = 0
            L = 1  # 黑点用1表示
            if L == t2val[(x - 1, y - 1)]:
                nearDots += 1
            if L == t2val[(x - 1, y)]:
                nearDots += 1
            if L == t2val[(x - 1, y + 1)]:
                nearDots += 1
            if L == t2val[(x, y - 1)]:
                nearDots += 1
            if L == t2val[(x, y + 1)]:
                nearDots += 1
            if L == t2val[(x + 1, y - 1)]:
                nearDots += 1
            if L == t2val[(x + 1, y)]:
                nearDots += 1
            if L == t2val[(x + 1, y + 1)]:
                nearDots += 1

            if nearDots == 0 and t2val[(x, y)] == 1:  # 如果当前是黑点且周围领域没有其他黑点
                image.putpixel((x, y), 255)  # 将当前点变为非黑的点
def denoise():  # 降噪
    file_list = os.listdir(after)
    for file in file_list:
        path = after + file
        image = Image.open(path)
        two_value(image, 100)
        clear_noise(image)
        path = path.replace('before', 'after')
        image.save(path)
降噪处理后的图片:
![]()
![]()
![]()
![]()
![]()
![]()
![]()
![]()
![]()
![]()
![]()
![]()
![]()
![]()
![]()
![]()
![]()
![]()
![]()
![]()
![]()
![]()
![]()
![]()
![]()
![]()
![]()
![]()
![]()
![]()
![]()
![]()
![]()
![]()
![]()
![]()
![]()
![]()
![]()
![]()
然后就是关于对降噪后的验证码图片进行识别了,其中会用到 pytesseract,这个包的安装和使用请自行参考链接https://blog.csdn.net/EB_NUM/article/details/77060009。需要下载 tesseract-ocr-setup-3.02.02.exe 进行安装,并对 pytesseract.py文件进行相应修改。
def recognize():  # 识别
    file_list = os.listdir(after)
    for file in file_list:
        img_path = after + file
        im = Image.open(img_path)
        text = pytesseract.image_to_string(im, lang='eng')
        exclude_char_list = ' ‘’.:\\|\'\"?![],()~@#$%^&*_+-={};<>/¥©“連'
        #  去除识别结果中的特殊字符
        text = ''.join([x for x in text if x not in exclude_char_list])[:4]
        #  对易混淆字符添加识别结果可选项,提高识别率
        #  S 和 5、l 和 1、 i 和 j、2 和 Z、0 和 o 、y 和 v 、9 和 g、h 和 n
        options = [text]
        if len(text) == 4:
            if 'i' in text:
                options.append(text.replace('i', 'j'))
            if 'j' in text:
                options.append(text.replace('j', 'i'))
            if 'l' in text:
                options.append(text.replace('l', '1'))
            if '1' in text:
                options.append(text.replace('1', 'l'))
            if 's' in text:
                options.append(text.replace('s', '5'))
            if '5' in text:
                options.append(text.replace('5', 's'))
            if '2' in text:
                options.append(text.replace('2', 'z'))
            if 'z' in text:
                options.append(text.replace('z', '2'))
            if '0' in text:
                options.append(text.replace('0', 'o'))
            if 'o' in text:
                options.append(text.replace('o', '0'))
            if 'y' in text:
                options.append(text.replace('y', 'v'))
            if 'v' in text:
                options.append(text.replace('v', 'y'))
            if '9' in text:
                options.append(text.replace('9', 'g'))
            if 'g' in text:
                options.append(text.replace('g', '9'))
            if 'h' in text:
                options.append(text.replace('h', 'n'))
            if 'n' in text:
                options.append(text.replace('n', 'h'))
            if '8' in text:
                options.append(text.replace('8', 'B'))
            if 'B' in text:
                options.append(text.replace('B', '8'))
        elif len(text) == 3 and "W" in text.upper():
            options.append(text.upper().replace('W', 'vv'))
            options.append(text.upper().replace('W', 'yy'))
        print(file, options)
识别结果如下:
"D:\Program Files\Python36\python3.exe" D:/MyProject/Python/ReturnVisit/verification_code_recognize.py
IMG_0326.jpeg ['DwP6']
IMG_0327.jpeg ['QXH']
IMG_0328.jpeg ['hzew', 'h2ew', 'nzew']
IMG_0329.jpeg ['']
IMG_0330.jpeg ['iQlg', 'jQlg', 'iQ1g', 'iQl9']
IMG_0331.jpeg ['apor', 'ap0r']
IMG_0332.jpeg ['apor', 'ap0r']
IMG_0333.jpeg ['wsn', 'vvSN', 'yySN']
IMG_0334.jpeg ['uSZ5', 'uSZs']
IMG_0335.jpeg ['nz']
IMG_0336.jpeg ['aNpW']
IMG_0337.jpeg ['RWU', 'RvvU', 'RyyU']
IMG_0338.jpeg ['LNX1', 'LNXl']
IMG_0339.jpeg ['Mzln', 'Mz1n', 'M2ln', 'Mzlh']
IMG_0340.jpeg ['Xo1v', 'Xolv', 'X01v', 'Xo1y']
IMG_0341.jpeg ['WBJ4']
IMG_0342.jpeg ['Qc1S', 'QclS']
IMG_0343.jpeg ['JTPB']
IMG_0344.jpeg ['rW7N']
IMG_0345.jpeg ['ZSLE']
IMG_0347.jpeg ['b3D']
IMG_0348.jpeg ['OY7']
IMG_0349.jpeg ['HQK7']
IMG_0350.jpeg ['X304', 'X3o4']
IMG_0351.jpeg ['2PQW', 'zPQW']
IMG_0352.jpeg ['psks', 'p5k5']
IMG_0353.jpeg ['NOE']
IMG_0354.jpeg ['WYOY']
IMG_0355.jpeg ['M3oA', 'M30A']
IMG_0356.jpeg ['AMV']
IMG_0357.jpeg ['VFSR']
IMG_0358.jpeg ['ZZIH']
IMG_0359.jpeg ['4RoS', '4R0S']
IMG_0360.jpeg ['mu']
IMG_0361.jpeg ['mm']
IMG_0362.jpeg ['FBV2', 'FBVz']
IMG_0363.jpeg ['2eEc', 'zeEc']
IMG_0364.jpeg ['Wm']
IMG_0365.jpeg ['EoFR', 'E0FR']
IMG_0366.jpeg ['CQU9', 'CQUg']

Process finished with exit code 0
其中列表第一个元素为原始识别结果,通过统计,识别正确率大概只有25%左右。如果把S 和 5、I 和 1、 i 和 j、2 和 Z、0 和 o 、y 和 v 、9 和 g这些容易混淆字符稍作处理给出多个可选项,识别正确率应该会有一定的提升。
如果你想自己训练模型来进行验证码的识别,请继续往下看:
自己训练模型的话,最重要的是训练集的收集了。为表诚意,小弟先奉上1056张带标记的验证码图片百度云链接(为了便于分享,已经将图片文件夹压缩成了rar文件,其中图片文件名为验证码生成的真实字符串,完全手工标记,因此也有部分出错的地方,不过出错的部分很少,不用过于担心!):链接:https://pan.baidu.com/s/14pJdTXD9OarUSrkgeDGE5g 提取码:xfym,我自己使用了其中 1000 张作为训练集,剩下的 56 张作为验证集使用。
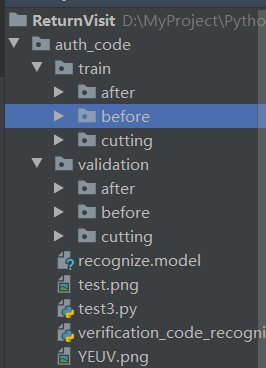
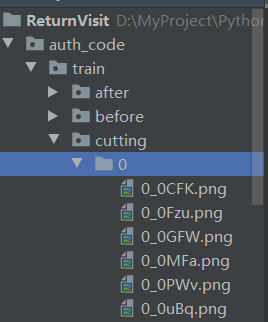
目录结构如图:其中 train 目录是训练集所在目录,before 为带标签的原始验证码图片目录;after 为二值化、降噪处理后的验证码图片目录;cutting 则为验证码处理后的图片再次切割后的单个字符图片目录。validation 目录是验证集所在目录,目录结构与 train 目录类似:


验证集有了以后,先进行灰度化处理(同上),然后对每四个字符的验证码图片进行切割标记:
import numpy as np
from sklearn.externals import joblib
from sklearn.neighbors import KNeighborsClassifier
before = r"D:\MyProject\Python\ReturnVisit\auth_code\train\before\\"  # 原始验证码图片目录
after = r"D:\MyProject\Python\ReturnVisit\auth_code\train\after\\"  # 处理后验证码图片目录
cutting = r"D:\MyProject\Python\ReturnVisit\auth_code\train\cutting\\"  # 切割后的图片目录


def smart_slice_image(img, outDir, file, count=4, p_w=3):
    """
    :param img: image对象
    :param outDir: 切割图片输出目录
    :param count: 图片中有多少个图片
    :param p_w: 对切割地方多少像素内进行判断
    """
    w, h = img.size
    pixdata = img.load()
    eachWidth = int(w / count)  # 每个切割图片的宽度
    beforeX = 0
    for i in range(count):
        # temp_dir = file[i]
        allBCount = []
        nextXOri = (i + 1) * eachWidth
        for x in range(nextXOri - p_w, nextXOri + p_w):
            if x >= w:
                x = w - 1
            if x < 0:
                x = 0
            b_count = 0
            for y in range(h):
                if pixdata[x, y] == 0:
                    b_count += 1
            allBCount.append({'x_pos': x, 'count': b_count})
        sort = sorted(allBCount, key=lambda e: e.get('count'))
        nextX = sort[0]['x_pos']
        box = (beforeX, 0, nextX, h)
        isExists = os.path.exists(outDir + file[i].upper() + "\\")
        # 判断结果
        if not isExists:
            os.makedirs(outDir + file[i].upper() + "\\")
        img.crop(box).save(outDir + file[i].upper() + "\\" + file[i] + "_" + file)
        beforeX = nextX


def cutting_image():
    file_list = os.listdir(after)
    for file in file_list:
        path = after + file
        img = Image.open(path)
        out_dir = cutting
        smart_slice_image(img, out_dir, file, count=4, p_w=3)
验证码图片切割好以后,开始进行模型训练,我这儿的原始验证码图片规格为 49×25:
def load_dataset():  # 将切割后的图片与字符标签对应起来保存成数组
    X = []
    Y = []
    for i in "0123456789ABCDEFGHIJKLMNOPQRSTUVWXYZ":
        target_path = cutting + i  # 训练集
        for title in os.listdir(target_path):
            # pix = np.asarray(Image.open(os.path.join(target_path, title)).convert('L'))
            pix = np.asarray(Image.open(os.path.join(target_path, title)).resize((13, 25), Image.ANTIALIAS))
            pix = pix.reshape(13 * 25)
            X.append(pix)
            Y.append(i)
    X = np.asarray(X)
    Y = np.asarray(Y)
    return X, Y


def train_model():
    X, Y = load_dataset()
    knn = KNeighborsClassifier()
    knn.fit(X, Y)
    joblib.dump(knn, 'recognize.model')
模型训练完成以后,开始进行模型验证:
def verify_model(model):
    pre_list = []
    y_list = []
    for i in "0123456789ABCDEFGHIJKLMNOPQRSTUVWXYZ":
        part_path = cutting.replace('train', 'validation') + i  # 验证集
        if os.path.exists(part_path):
            for title in os.listdir(part_path):
                pix = np.asarray(Image.open(os.path.join(part_path, title)).resize((13, 25), Image.ANTIALIAS))
                pix = pix.reshape(13 * 25)
                pre_list.append(pix)  # 待预测列表
                y_list.append(i)
    pre_list = np.asarray(pre_list)
    # y_list = np.asarray(y_list)
    predict_list = list(model.predict(pre_list))  # 预测结果
    acc = 0
    for i in range(len(y_list)):
        if y_list[i] == predict_list[i]:
            acc += 1
    print("原始字符:", list(y_list))
    print("预测字符:", list(predict_list))
    print("单个字符识别正确率:", "%.2f" % (100 * acc / len(y_list)) + "%")


if __name__ == '__main__':
    train_model()
    model = joblib.load('recognize.model')
    verify_model(model)
运行输出结果为(一张验证码图片如果有相同字符,按照我当前对分割图片的命名规则会覆盖掉,所以这儿的原始字符个数并不是 56*4=224张),验证码字符的粘连性导致切割后的图片与字符的对应关系出错:
原始字符: ['0', '0', '1', '2', '4', '5', '5', '5', '5', '6', '6', '6', '6', '7', '7', '7',
'9', '9', '9', 'A', 'A', 'A', 'B', 'B', 'B', 'B', 'C', 'C', 'C', 'C', 'C', 'C', 'C', 'C',
'D', 'D', 'D', 'D', 'D', 'D', 'E', 'E', 'E', 'E', 'E', 'E', 'E', 'E', 'E', 'E', 'F', 'F',
'F', 'G', 'G', 'G', 'G', 'G', 'H', 'H', 'H', 'H', 'H', 'H', 'H', 'I', 'I', 'I', 'I', 'I',
'I', 'J', 'J', 'J', 'J', 'K', 'K', 'K', 'K', 'K', 'K', 'K', 'L', 'L', 'L', 'L', 'L', 'M',
'M', 'M', 'N', 'N', 'N', 'N', 'N', 'N', 'N', 'O', 'O', 'O', 'O', 'O', 'P', 'P', 'P', 'P',
'P', 'P', 'Q', 'Q', 'Q', 'Q', 'Q', 'Q', 'Q', 'Q', 'R', 'R', 'R', 'R', 'R', 'R', 'R', 'R',
'R', 'S', 'S', 'S', 'S', 'S', 'S', 'T', 'T', 'T', 'U', 'U', 'V', 'V', 'V', 'V', 'V', 'V',
'V', 'V', 'V', 'V', 'V', 'V', 'W', 'W', 'W', 'W', 'X', 'X', 'X', 'X', 'Y', 'Y', 'Y', 'Y',
'Y', 'Y', 'Y', 'Y', 'Y', 'Y', 'Y', 'Y', 'Y', 'Y', 'Y', 'Y', 'Y', 'Y', 'Y', 'Y', 'Y', 'Y',
'Y', 'Y', 'Y', 'Y', 'Y', 'Y', 'Y', 'Y', 'Y', 'Z', 'Z', 'Z', 'Z', 'Z', 'Z', 'Z', 'Z', 'Z',
'Z', 'Z', 'Z', 'Z', 'Z', 'Z', 'Z', 'Z', 'Z', 'Z', 'Z', 'Z', 'Z', 'Z', 'Z', 'Z', 'Z', 'Z',
'Z', 'Z', 'Z', 'Z']
预测字符: ['1', '0', '1', '2', '4', '5', '5', '5', '1', '5', '6', '6', '5', '7', '7', '7',
'D', '9', '9', 'Q', 'A', 'A', '1', 'B', 'B', 'B', 'C', '1', 'C', 'O', 'C', '1', 'C', 'O',
'L', 'D', 'D', 'Q', 'D', 'W', 'E', 'C', '5', 'E', 'E', 'E', 'E', 'E', 'E', 'C', 'F', 'F',
'4', 'G', 'G', 'G', 'G', 'G', 'H', 'H', 'H', 'H', 'H', 'H', 'H', '5', 'J', 'I', 'I', 'I',
'I', 'D', '1', 'B', '1', '1', 'K', 'K', 'K', 'K', 'K', 'I', 'L', '1', 'I', '1', 'L', 'M',
'H', 'M', 'N', 'N', 'M', 'H', 'N', '1', 'K', 'H', 'O', 'O', 'C', '0', 'B', 'P', '1', 'C',
'B', 'O', 'D', 'O', 'Q', 'O', 'O', 'Q', 'I', 'Q', '0', 'S', 'L', 'R', '1', 'R', 'R', 'R',
'H', 'H', 'S', 'S', 'S', 'S', 'S', 'H', 'U', 'T', 'U', 'I', 'V', '1', '1', 'V', 'V', '5',
'Y', 'V', 'V', 'V', 'V', 'V', 'W', '1', 'W', 'W', 'X', 'X', 'X', 'X', 'Y', 'Y', 'Y', 'Y',
'H', 'Y', '4', '1', 'Y', 'Y', 'Y', 'Y', 'Y', 'Y', 'Y', 'Y', 'Y', 'Y', 'Y', 'Y', 'Y', 'W',
'Y', 'Y', '1', '1', 'Y', 'Y', 'Y', '1', 'I', 'Z', 'Z', '7', '7', 'Z', '2', 'Z', '7', 'Z',
'7', 'Z', '7', 'Z', '2', 'Z', '7', '7', '7', 'Z', 'Z', '7', '1', '7', 'Z', '7', 'Z', '7',
'7', 'Z', 'Z', 'Z']
单个字符识别正确率: 61.01%
单个字符识别率在60%左右的话,整体的识别率还是偏低的,肯定还有可以进行改进的地方,比如降噪这块,可以使用 8-连通 区域范围黑点的个数来进行更加合理的降噪。为了便于查看整个识别过程的步骤,我将单张验证码图片的识别单独写了一个函数。
import os

import pytesseract
from PIL import Image
import numpy as np
from sklearn.externals import joblib
from sklearn.neighbors import KNeighborsClassifier

before = r"D:\MyProject\Python\ReturnVisit\auth_code\train\before\\"  # 原始验证码图片目录
after = r"D:\MyProject\Python\ReturnVisit\auth_code\train\after\\"  # 处理后验证码图片目录
cutting = r"D:\MyProject\Python\ReturnVisit\auth_code\train\cutting\\"  # 切割后的图片目录


def single_picture_recognize(model, image_path):  # 单张验证码图片识别
    # 灰度处理
    img = Image.open(image_path)
    threshold = 180  # 阈值
    w, h = img.size
    for x in range(w):
        for y in range(h):
            r, g, b = img.getpixel((x, y))
            if 190 <= r <= 255 and 170 <= g <= 255 and 0 <= b <= 140:
                img.putpixel((x, y), (0, 0, 0))
            if 0 <= r <= 90 and 210 <= g <= 255 and 0 <= b <= 90:
                img.putpixel((x, y), (0, 0, 0))
    img = img.convert('L').point([0] * threshold + [1] * (256 - threshold), '1')

    #  边缘噪点处理
    for x in range(0, img.size[0]):
        for y in range(0, img.size[1]):
            if x in [0, img.size[0] - 1] or y in [0, img.size[1] - 1]:
                img.putpixel((x, y), 255)  # 将边缘全变为非黑的点(简单粗暴)
    img.save(image_path)

    # 降噪处理
    image = Image.open(image_path)
    two_value(image, 100)
    clear_noise(image)
    image.save(image_path)

    # 图片切割
    """
    :param img: image对象
    :param outDir: 切割图片输出目录
    :param count: 图片中有多少个图片
    :param p_w: 对切割地方多少像素内进行判断
    """
    img = Image.open(image_path)
    cutting_picture = []
    count = 4
    p_w = 3
    w, h = img.size
    pixdata = img.load()
    eachWidth = int(w / count)  # 每个切割图片的宽度
    beforeX = 0
    for i in range(count):
        # temp_dir = file[i]
        allBCount = []
        nextXOri = (i + 1) * eachWidth
        for x in range(nextXOri - p_w, nextXOri + p_w):
            if x >= w:
                x = w - 1
            if x < 0:
                x = 0
            b_count = 0
            for y in range(h):
                if pixdata[x, y] == 0:
                    b_count += 1
            allBCount.append({'x_pos': x, 'count': b_count})
        sort = sorted(allBCount, key=lambda e: e.get('count'))
        nextX = sort[0]['x_pos']
        box = (beforeX, 0, nextX, h)
        pix = np.asarray(img.crop(box).resize((13, 25), Image.ANTIALIAS))
        pix = pix.reshape(13 * 25)
        cutting_picture.append(pix)
        beforeX = nextX

    # 开始识别
    pre_list = np.asarray(cutting_picture)
    predict_list = list(model.predict(pre_list))  # 预测结果
    return predict_list


if __name__ == '__main__':
    # train_model()
    model = joblib.load('recognize.model')
    image_path = r"D:\MyProject\Python\ReturnVisit\auth_code\test.png"
    predict_result = single_picture_recognize(model, image_path)
    print(predict_result)
识别输出结果如下:
"D:\Program Files\Python36\python3.exe" D:/MyProject/Python/ReturnVisit/auth_code/verification_code_recognize.py
['Y', 'E', 'U', 'V']

Process finished with exit code 0原始图片为:![]()