写在前面: 我是
「nicedays」,一枚喜爱做特效,听音乐,分享技术的大数据开发猿。这名字是来自world order乐队的一首HAVE A NICE DAY。如今,走到现在很多坎坷和不顺,如今终于明白nice day是需要自己赋予的。
白驹过隙,时光荏苒,珍惜当下~~
写博客一方面是对自己学习的一点点总结及记录,另一方面则是希望能够帮助更多对大数据感兴趣的朋友。如果你也对大数据与机器学习感兴趣,可以关注我的动态https://blog.csdn.net/qq_35050438,让我们一起挖掘数据与人工智能的价值~
Flume实操:
一:监控文件夹往HDFS写入文件,并在HIve中增量写入对应的外部表
第一步:编写HDFS脚本
vi /opt/flumeconf/conf_0805_readfile.properties
a2.channels = c2
a2.sources = s2
a2.sinks = k2


a2.sources.s2.type = spooldir
a2.sources.s2.spoolDir = /opt/datas
a2.sources.s2.channels = c2

a2.channels.c2.type = memory
a2.channels.c2.capacity = 10000
# 管道一次事务能承受的数量,要大于batchsize
a2.channels.c2.transactionCapacity = 1000


a2.sinks.k2.type = hdfs
a2.sinks.k2.hdfs.path = hdfs://192.168.56.101:9000/flume/customs
a2.sinks.k2.hdfs.filePrefix = events-
# 文件里放5000行
a2.sinks.k2.rollCount = 5000
# 临时文件大小为
a2.sinks.k2.rollSize = 600000
# 一批写500
a2.sinks.k2.batchSize = 500

a2.sinks.k2.channel = c2
第二步:运行flume脚本文件
flume-ng agent -n a2 -c conf -f /opt/flumeconf/conf_0805_readfile.properties
第三步:打开hive,建立外部表
create external table xxx(
    id string,
    fname string,
    lname string,
    xxx string
)
row format delimited fields terminated by '|'
stored as sequencefile
location '/flume/customs'
第四步:往对应的flume配置文件的文件夹里放入对应文件
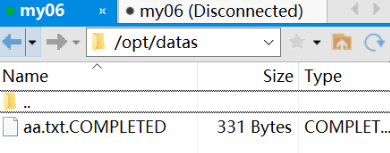
flume自动读取,并将其写成COMPLETED完成读取
第五步:hive对应的hdfs路径查看文件

二:自定义拦截器完成传输过程的数据过滤
需求:
userid|username|男
35831|event_login|950803560158|192.168.56.187|男
24129|event_login|954284760158|192.168.56.87|女
54750|event_login|955472760158|192.168.56.74|女
userid|wy|女
31664|event_login|957269160158|192.168.56.131|男
71032|event_login|960473160158|192.168.56.55|女
70252|event_login|962867160158|192.168.56.34|女将文件的男女替换成1
第一步:编写java代码
- 导入flume依赖包:
 <dependencies>
    <dependency>
      <groupId>junit</groupId>
      <artifactId>junit</artifactId>
      <version>4.11</version>
      <scope>test</scope>
    </dependency>
    <dependency>
      <groupId>org.apache.flume</groupId>
      <artifactId>flume-ng-sdk</artifactId>
      <version>1.8.0</version>
    </dependency>
    <dependency>
      <groupId>org.apache.flume</groupId>
      <artifactId>flume-ng-core</artifactId>
      <version>1.8.0</version>
    </dependency>
  </dependencies>
- 编写java,创建CustomParameterInterceptor类
package com.wyw;

import com.google.common.base.Charsets;
import org.apache.flume.Context;
import org.apache.flume.Event;
import org.apache.flume.interceptor.Interceptor;
import java.security.MessageDigest;
import java.security.NoSuchAlgorithmException;
import java.util.ArrayList;
import java.util.List;
import java.util.regex.Matcher;
import java.util.regex.Pattern;


/**
 * @author lenovo
 */
public class CustomParameterInterceptor implements Interceptor {

		@Override
		public void initialize() {

		}


		/**
		* @author WYW
		* @date 05/08/2020 18:16
		* @param
		* @return org.apache.flume.Event
		* @description 单个事件拦截
		*/
		@Override
		public Event intercept(Event event) {
			String line = new String(event.getBody(), Charsets.UTF_8);
			String[] splits = line.split("\\|");
			for(int i = 0; i < splits.length; i++) {
				System.out.println(splits[i]);
				if ("男".equals(splits[i])){
					splits[i] = "0";
				}else if ("女".equals(splits[i])) {
					splits[i] = "1";
				}else {
					splits[i] = splits[i];
				}
			}


			StringBuilder result = new StringBuilder(splits[0]);
			for(int i = 1; i < splits.length; i++) {
				result.append("|").append(splits[i]);
				System.out.println(result);
			}
			event.setBody(result.toString().getBytes(Charsets.UTF_8));
			return event;
		}

		/**
		* @author WYW
		* @date 05/08/2020 18:16
		* @param
		* @return java.util.List<org.apache.flume.Event>
		* @description 批量事件拦截
		*/
		@Override
		public List<Event> intercept(List<Event> list) {
			for (Event event : list) {
				intercept(event);
			}
			return list;
		}

		@Override
		public void close() {

		}

		public static class Builder implements Interceptor.Builder {
			@Override
			public Interceptor build() {
				return new CustomParameterInterceptor();
			}

			@Override
			public void configure(Context context) {
			}
		}

}
第二步:打成jar包上传到flume的lib包上


第三步:编写脚本
a3.channels = c3
a3.sinks = k3
a3.sources = s3


a3.sources.s3.type = spooldir
a3.sources.s3.spoolDir = /opt/datas
a3.sources.s3.interceptors = u1
a3.sources.s3.interceptors.u1.type = com.wyw.CustomParameterInterceptor$Builder


a3.channels.c3.type = memory

a3.sinks.k3.type = logger

a3.sources.s3.channels = c3
a3.sinks.k3.channel = c3
第四步:运行flume脚本
flume-ng agent -n a3 -c conf -f /opt/flumeconf/conf_0805_interceptor2.properties -Dflume.root.logger=INFO,console
第五步:将文件放入指定文件夹/opt/datas
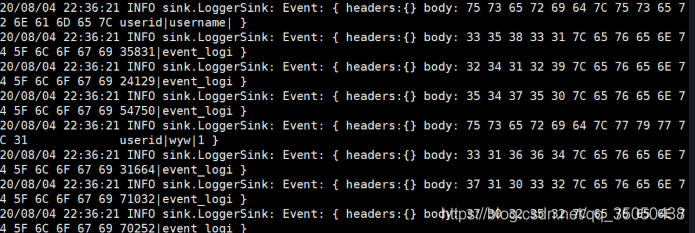
修改成功
三:Flume传输数据生产给Kafka进行消费:
第一步:创建Kafka的topic
kafka-topics.sh --create --zookeeper 192.168.56.101:2181 --replication-factor 1 --partitions 1 --topic demo
第二步:编写flume传输kafka的脚本
a5.channels=c5
a5.sources=s5
a5.sinks=k5

a5.sources.s5.type=spooldir
a5.sources.s5.spoolDir=/opt/datas
a5.sources.s5.interceptors=head_filter
a5.sources.s5.interceptors.head_filter.type=regex_filter
a5.sources.s5.interceptors.head_filter.regex=^event_id.*
a5.sources.s5.interceptors.head_filter.excludeEvents=true

a5.sinks.k5.type=org.apache.flume.sink.kafka.KafkaSink
a5.sinks.k5.kafka.bootstrap.servers=192.168.56.101:9092
a5.sinks.k5.kafka.topic=msgEvent

a5.channels.c5.type=memory
a5.channels.c5.capacity=10000
a5.channels.c5.transactionCapacity=10000

a5.sinks.k5.channel=c5
a5.sources.s5.channels=c5
第三步:将文件传到对应/opt/datas文件夹下打开kafka消费
kafka-console-consumer.sh --bootstrap-server 192.168.56.101:9092 --from-beginning --topic demo
第四步:启动flume脚本
flume-ng agent -n a5 -c conf -f /opt/flumeconf/conf_0806_kafka2.properties