@Autowired这个注解在spring的源代码里的定义,如下所示:
package org.springframework.beans.factory.annotation;

import java.lang.annotation.Documented;
import java.lang.annotation.ElementType;
import java.lang.annotation.Retention;
import java.lang.annotation.RetentionPolicy;
import java.lang.annotation.Target;

@Target({ElementType.CONSTRUCTOR, ElementType.METHOD, ElementType.PARAMETER, ElementType.FIELD, ElementType.ANNOTATION_TYPE})
@Retention(RetentionPolicy.RUNTIME)
@Documented
public @interface Autowired {
    boolean required() default true;
}
阅读代码我们可以看到,Autowired注解可以应用在构造方法,普通方法,参数,字段,以及注解这五种类型的地方,它的保留策略是在运行时。下面,我们不多说直接来看spring对这个注解进行的逻辑实现.
在Spring源代码当中,Autowired注解位于包org.springframework.beans.factory.annotation之中,该包的内容如下:

经过分析,不难发现Spring对Autowired注解的实现逻辑位于类:AutowiredAnnotationBeanPostProcessor之中,已在上图标红。其中的核心处理代码如下:
private InjectionMetadata buildAutowiringMetadata(final Class<?> clazz) {
		LinkedList<InjectionMetadata.InjectedElement> elements = new LinkedList<>();
		Class<?> targetClass = clazz;//需要处理的目标类

		do {
			final LinkedList<InjectionMetadata.InjectedElement> currElements = new LinkedList<>();

            /*通过反射获取该类所有的字段,并遍历每一个字段,并通过方法findAutowiredAnnotation遍历每一个字段的所用注解,并如果用autowired修饰了,则返回auotowired相关属性*/

			ReflectionUtils.doWithLocalFields(targetClass, field -> {
				AnnotationAttributes ann = findAutowiredAnnotation(field);
				if (ann != null) {//校验autowired注解是否用在了static方法上
					if (Modifier.isStatic(field.getModifiers())) {
						if (logger.isWarnEnabled()) {
							logger.warn("Autowired annotation is not supported on static fields: " + field);
						}
						return;
					}//判断是否指定了required
					boolean required = determineRequiredStatus(ann);
					currElements.add(new AutowiredFieldElement(field, required));
				}
			});
            //和上面一样的逻辑,但是是通过反射处理类的method
			ReflectionUtils.doWithLocalMethods(targetClass, method -> {
				Method bridgedMethod = BridgeMethodResolver.findBridgedMethod(method);
				if (!BridgeMethodResolver.isVisibilityBridgeMethodPair(method, bridgedMethod)) {
					return;
				}
				AnnotationAttributes ann = findAutowiredAnnotation(bridgedMethod);
				if (ann != null && method.equals(ClassUtils.getMostSpecificMethod(method, clazz))) {
					if (Modifier.isStatic(method.getModifiers())) {
						if (logger.isWarnEnabled()) {
							logger.warn("Autowired annotation is not supported on static methods: " + method);
						}
						return;
					}
					if (method.getParameterCount() == 0) {
						if (logger.isWarnEnabled()) {
							logger.warn("Autowired annotation should only be used on methods with parameters: " +
									method);
						}
					}
					boolean required = determineRequiredStatus(ann);
					PropertyDescriptor pd = BeanUtils.findPropertyForMethod(bridgedMethod, clazz);
              	    currElements.add(new AutowiredMethodElement(method, required, pd));
				}
			});
    //用@Autowired修饰的注解可能不止一个,因此都加在currElements这个容器里面,一起处理
			elements.addAll(0, currElements);
			targetClass = targetClass.getSuperclass();
		}
		while (targetClass != null && targetClass != Object.class);

		return new InjectionMetadata(clazz, elements);
	}
最后这个方法返回的就是包含所有带有autowire注解修饰的一个InjectionMetadata集合。这个类由两部分组成:
public InjectionMetadata(Class<?> targetClass, Collection<InjectedElement> elements) {
		this.targetClass = targetClass;
		this.injectedElements = elements;
	}
一是我们处理的目标类,二就是上述方法获取到的所有elements集合。
有了目标类,与所有需要注入的元素集合之后,我们就可以实现autowired的依赖注入逻辑了,实现的方法如下:
@Override
	public PropertyValues postProcessPropertyValues(
			PropertyValues pvs, PropertyDescriptor[] pds, Object bean, String beanName) throws BeanCreationException {

		InjectionMetadata metadata = findAutowiringMetadata(beanName, bean.getClass(), pvs);
		try {
			metadata.inject(bean, beanName, pvs);
		}
		catch (BeanCreationException ex) {
			throw ex;
		}
		catch (Throwable ex) {
			throw new BeanCreationException(beanName, "Injection of autowired dependencies failed", ex);
		}
		return pvs;
	}
它调用的方法是InjectionMetadata中定义的inject方法,如下
public void inject(Object target, @Nullable String beanName, @Nullable PropertyValues pvs) throws Throwable {
		Collection<InjectedElement> checkedElements = this.checkedElements;
		Collection<InjectedElement> elementsToIterate =
				(checkedElements != null ? checkedElements : this.injectedElements);
		if (!elementsToIterate.isEmpty()) {
			for (InjectedElement element : elementsToIterate) {
				if (logger.isTraceEnabled()) {
					logger.trace("Processing injected element of bean '" + beanName + "': " + element);
				}
				element.inject(target, beanName, pvs);
			}
		}
	}
其逻辑就是遍历,然后调用inject方法,inject方法其实现逻辑如下:
/**
		 * Either this or {@link #getResourceToInject} needs to be overridden.
		 */
		protected void inject(Object target, @Nullable String requestingBeanName, @Nullable PropertyValues pvs)
				throws Throwable {

			if (this.isField) {
				Field field = (Field) this.member;
				ReflectionUtils.makeAccessible(field);
				field.set(target, getResourceToInject(target, requestingBeanName));
			}
			else {
				if (checkPropertySkipping(pvs)) {
					return;
				}
				try {
					Method method = (Method) this.member;
					ReflectionUtils.makeAccessible(method);
					method.invoke(target, getResourceToInject(target, requestingBeanName));
				}
				catch (InvocationTargetException ex) {
					throw ex.getTargetException();
				}
			}
		}
在这里的代码当中我们也可以看到,是inject也使用了反射技术并且依然是分成字段和方法去处理的。在代码里面也调用了makeAccessible这样的可以称之为暴力破解的方法,但是反射技术本就是为框架等用途设计的,这也无可厚非。
对于字段的话,本质上就是去set这个字段的值,即对对象进行实例化和赋值,例如下面代码:
@Autowired
ObjectTest objectTest;
那么在这里实现的就相当于给这个objecTest引用赋值了。

对于方法的话,本质就是去调用这个方法,因此这里调用的是method.invoke.
getResourceToInject方法的参数就是要注入的bean的名字,这个方法的功能就是根据这个bean的名字去拿到它。
以上,就是@Autowire注解实现逻辑的全部分析。结合源代码再看一遍的话,会更加清楚一点。下面是spring容器如何实现@AutoWired自动注入的过程的图:
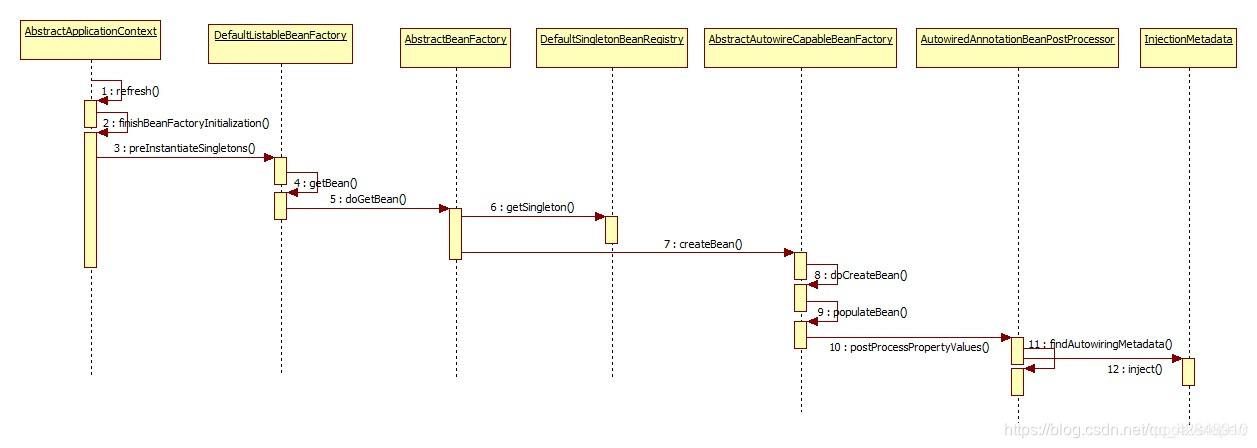
总结起来一句话:使用@Autowired注入的bean对于目标类来说,从代码结构上来讲也就是一个普通的成员变量,@Autowired和spring一起工作,通过反射为这个成员变量赋值,也就是将其赋为期望的类实例。