文章目录
6. SpringBoot配置
SpringBoot会自动的帮我们配置需要用到的模块,例如刚才创建web项目时,SpringMVC的一些配置,都已经默认配置好了,但是如果我们想修改一些配置或者自定义一些配置怎么办?例如修改服务器启动的端口号,这时候就需要在SpringBoot的配置文件中进行配置,覆盖默认配置
-
配置文件位置:
SpringBoot默认的全局配置文件在resource目录下
-
配置文件名称:
名称固定是application.properties 或者 application.yml
分别在application.properties、application.yml 中修改端口,启动项目,查看自定义端口是否覆盖默认端口
- application.properties
server.port=8081
-
application.yml
注释掉application.properties中的端口,在application.yml中配置端口
server:
  port: 8081
使用浏览器访问项目:http://localhost:8082/demo
properties文件大家已经非常熟悉了,里面的内容都是键值对格式key=value
这里讲一下yml这种新的配置文件语法格式
6.1. YML
YAML (YAML Ain’t a Markup Language)YAML不是一种标记语言(xml、HTML),通常以.yml为后缀的文件,一种专门用来写配置文件的语言。非常简洁容易阅读。
6.2. YML编写规则
- 使用key:(空格)value表示键和值,注意冒号右边必须有空格。
- value不论什么类型不需要加引号,直接写
- 如果value值中有特殊表达式需要解析(\t \n …),就加双引号,单引号不会解析这些表达式,会原样输出:
testKey1: "传智\t学院"  # 传智  学院
testKey2: '传智\t学院'  # 传智\t学院
testKey3:  传智\t学院   # 传智\t学院
-
大小写敏感,但基本都是全小写
例如: name 和 Name 是表示两个不同的属性值
# 区分大小写,这是2个不同的属性
name: czxy
Name: itcast
-
使用空格Space 缩进对齐表示分层
不同层次之间的缩进可以使用不同数目的空格,(不能使用 Tab,各个系统 Tab对应的 Space 数目可能不同,导致层次混乱)
server:
 port: 8081
spring:
  datasource:
    name: root
    password: root
- #` 表示注释,只能单行注释
# 只能单行注释
# 数据源相关配置
spring:
  datasource:
    name: root
    password: root
6.3. YML配置属性
properties和YML文件中保存的数据都是键值对结构,但是根据不同的写法,可以表示出不同类型的数据:
- 普通键值对
- 对象类型
- 数组和集合类型
6.3.1. 设置普通键值对
# 普通键值对
clazz: 大数据
houseNumber: 202
# 多层级属性,相当于province.city.area=shuyang
province:
  city:
    area: shuyang
6.3.2. 设置对象类型数据
# 对象类型
user:
  username: tom
  age: 12
  birthday: 1997-10-10
  isVip: true

# 对象行内写法
person: {pname: tom,age: 22, birthday: 1997-10-10 }
6.3.2. 设置数组和集合类型数据
# 数组 list set写法一致
valueList:
  - MyBatis
  - SpringMVC
  - SpringBoot

ageArray:
  - 18
  - 20
  - 22
# 数组 list set行内写法
inlineNum: [1,2,3]
6.3.3. 复杂类型
# 复杂写法 List<Map> -> [{name:tom,age:20},{name:Jack,age:22}]
userList:
  - name: tom
    age: 20
  - name: Jack
    age: 22
6.4. YML获取配置
获取配置的属性有2种方式:
-
@Value注解
一次只能获取一个属性值
-
@ConfigurationProperties
一次能够获取多个属性值
6.4.1. @Value取值
在类属性上使用@value("${key}")获取配置,获取方式分为2种:
- 键值对(普通属性/map/对象)都是通过key取值
- 数组、list、set,取值都是通过索取值[0]
@SpringBootTest
class Springboot01Tests {

    @Value("${clazz}")
    private String clazzs;

    @Value("${houseNumber}")
    private Integer num;

    @Value("${province.city.area}")
    private String address;

    //注意这里需要使用字符串接收,如果要转Date类型可以自己转
    @Value("${user.birthday}")
    private String birthday;

    @Value("${person.age}")
    private Integer age;

    @Value("${valueList[1]}")
    private String subject;

    @Value("${userList[1].age}")
    private Integer listMapAge;

    @Test
    void contextLoads() {
        System.out.println("clazz = "+clazzs);
        System.out.println("houseNumber = "+num);
        System.out.println("province.city.area = "+address);
        System.out.println("user.birthday = "+birthday);
        System.out.println("person.age = "+age);
        System.out.println("valueList[1] = "+subject);
        System.out.println("userList[1].age = "+listMapAge);
    }

}
控制台:
clazz = 大数据
houseNumber = 202
province.city.area = shuyang
user.birthday = 1997-10-10
person.age = 22
valueList[1] = SpringMVC
userList[1].age = 22
6.4.2. @Value特殊用法(了解)
{}从环境变量取值、支持 #{spEL} 表达式语法
package com.czxy.springboot;

import org.junit.jupiter.api.Test;
import org.springframework.beans.factory.annotation.Value;
import org.springframework.boot.test.context.SpringBootTest;

@SpringBootTest
public class ValueTest {

        //字面量
        @Value("hello")
        private String strValue;

        //${} 配置文件中没有该属性值就从环境变量中获取
        @Value("${JAVA_HOME}")
        private String pathValue;

        //#{SpEL}表达式
        @Value("#{10+10}")
        private String spValue_1;

        //#{SpEL}表达式
        @Value("#{'HelloWorld'.toLowerCase()}")
        private String spValue_2;

        @Test
        public void testSpEL(){
            System.out.println("strValue = "+strValue);
            System.out.println("pathValue = "+pathValue);
            System.out.println("spValue_1 = "+spValue_1);
            System.out.println("spValue_2 = "+spValue_2);
        }

}
控制台:
strValue = hello
pathValue = D:\software\Java\jdk1.8.0_171
spValue_1 = 20
spValue_2 = helloworld
6.4.3. @ConfigurationProperties
该注解支持将多个配置属性一次读取到实体类中
- 添加配置处理器的jar包依赖
这样编写配置文件时会提示与哪个属性进行映射
- 编写配置类
用于封装配置文件中的属性值
-
配置属性
-
测试
测试配置类是否自动装备了配置文件中对应的属性值
- 添加配置处理器依赖
<dependency>
    <groupId>org.springframework.boot</groupId>
    <artifactId>spring-boot-configuration-processor</artifactId>
    <optional>true</optional>
</dependency>
如果在应用程序中定义了@ConfigurationProperties,请确保配置spring boot maven插件,以防止重新打包目标将依赖项添加到fat jar中
<build>
    <plugins>
        <plugin>
            <groupId>org.springframework.boot</groupId>
            <artifactId>spring-boot-maven-plugin</artifactId>
            <configuration>
                <excludes>
                    <exclude>
                        <groupId>org.springframework.boot</groupId>
                        <artifactId>spring-boot-configuration-processor</artifactId>
                    </exclude>
                </excludes>
            </configuration>
        </plugin>
    </plugins>
</build>
- 编写配置类
@Component
@ConfigurationProperties(prefix = "config-properties")
public class Config {
    private String value;
    private String[] valueArray;
    private List<String> valueList;
    private HashMap<String, String> valueMap;

    //get set toString()
}
-
@Component
表示这是一个组件,Spring容器会自动管理这个组件,只有这个组件受Spring容器管理,才会根据@ConfigurationProperties注解,将配置文件中的值注入到对应属性中
-
@ConfigurationProperties
表示本类中所有的属性,都需要通过配置文件进行绑定,注入对应的属性值
prefix:配置文件中哪部分下面所有的属性和类中的属性进行绑定
-
配置属性
application.yml
config-properties:
  value: this is config properties    #对应单个键值对
  valueMap:                          #对应map
    name: lily
    age: 18
    sex: girl
  valueArray: [1,2,3,4]              #对应数组/list/set(行内写法)
  value-list:                         #对应数组/list/set
    - SpringBoot
    - SpringMVC
    - MyBatis
- 测试
@SpringBootTest
public class ConfigPropertiesTest {

    @Autowired
    ConfigProperties config;

    @Test
    public void test(){
        System.out.println(config);
    }
}
- 控制台:
ConfigProperties{value='this is config properties', valueArray=[1, 2, 3, 4], valueList=[SpringBoot, SpringMVC, MyBatis], valueMap={name=lily, age=18, sex=girl}}
- 小知识:
@ConfigurationProperties注解支持配置文件中属性名称的松散写法:valueList 和value-list都能和类中的属性valueList绑定。
但是@Value注解不支持这种松散写法,类中的属性和配置文件中的属性必须一致
6.4.4. 复杂属性的绑定
将类中复杂类型属性和配置文件中的属性绑定:List<Map<String,String>>、List
@Component
@ConfigurationProperties(prefix = "config-properties")
public class ConfigProperties {
    private String value;
    private String[] valueArray;
    private List<String> valueList;
    private HashMap<String, String> valueMap;

    // 复杂属性
    private List<Map<String, String>> valueListMap;
    private List<User> users;

    // get set toString()
}
User.java
public class User {
    private String username;
    private Double salary;

    // get set toString()
}
- 测试
@SpringBootTest
public class ConfigPropertiesTest {

    @Autowired
    ConfigProperties config;

    @Test
    public void test(){
        System.out.println(config);
    }
}
控制台:
ConfigProperties{value='this is config properties', valueArray=[1, 2, 3, 4], valueList=[SpringBoot, SpringMVC, MyBatis], valueMap={name=lily, age=18, sex=girl}, valueListMap=[{name=tom, age=22}, {name=Jack, age=20}], users=[User{username='zhangsan', salary=3000.1}, User{username='lisi', salary=4000.2}]}
6.5. 配置导入
“@Value”与“@ConfigurationProperties”可以从全局配置文件“application.properties”或者“application.yml”中取值,然后为需要的属性赋值。
当应用比较大的时候,如果所有的内容都当在一个配置文件中,就会显得比较臃肿,同时也不太好理解和维护,此时可以将一个文件拆分为多个,使用 @PropertySource 注解加载指定的配置文件。
@PropertySource可以直接解析properties文件配置,但是不能直接解析YML文件配置,需要添加YML解析器
6.5.1. 导入properties文件
- 在resource目录下新建config-dev.properties
#对应单个键值对
config-properties.value = this is config properties

#对应map
config-properties.valueMap.name = lily
config-properties.valueMap.age = 18
config-properties.valueMap.sex = girl

#对应数组/list/set(行内写法)
config-properties.value-array = [1,2,3,4]

#对应数组/list/set
config-properties.valueList[0] = SpringBoot
config-properties.valueList[1] = SpringMVC
config-properties.valueList[2] = MyBatis
config-properties.valueListMap[0].name = tom
config-properties.valueListMap[0].age = 22
config-properties.valueListMap[1].name = Jack
config-properties.valueListMap[1].age = 20

# list<User>
config-properties.users[0].username = zhangsan
config-properties.users[0].salary = 13000.1
config-properties.users[1].username = lisi
config-properties.users[1].salary = 15000.2
- 修改配置类,添加@PropertySource
@Component
@ConfigurationProperties(prefix = "config-properties")
@PropertySource("classpath:config-dev.properties")
public class ConfigProperties {
	//...
}
- 运行测试方法
@SpringBootTest
public class ConfigPropertiesTest {

    @Autowired
    ConfigProperties config;

    @Test
    public void test(){
        System.out.println(config);
    }
}
6.5.2. 导入YML文件
@PropertySource并不能直接解析yml配置文件,需要使用yml的属性解析器
- 编写加载器工厂
/**
 * 用于  @PropertySource 加载 yml 配置文件
 */
public class PropertySourceFactory extends DefaultPropertySourceFactory {
    @Override
    public PropertySource<?> createPropertySource(String name,
                                 EncodedResource resource) throws IOException {
        if (resource == null) {
            return super.createPropertySource(name, resource);
        }
        //使用yml资源加载器加载yml配置
        List<PropertySource<?>> sources = new YamlPropertySourceLoader().
            load(resource.getResource().getFilename(), resource.getResource());
        return sources.get(0);
    }
}
-
修改配置类
使用自定义的YML文件解析器解析YML文件
@Component
@ConfigurationProperties(prefix = "config-properties")
@PropertySource(value = "classpath:config-prop.yml",
                factory = com.czxy.springboot.config.PropertySourceFactory.class)
public class ConfigProperties {
 	//...
}
-
新建yml配置文件
config-prop.yml
config-properties:
  value: this is config properties   #对应单个键值对
  valueMap:                          #对应map
    name: lily
    age: 18
    sex: girl
  value-array: [1,2,3,4]             #对应数组/list/set(行内写法)
  value-list:                        #对应数组/list/set
    - SpringBoot
    - SpringMVC
    - MyBatis
  value-list-map:
    - name: tom
      age: 22
    - name: Jack
      age: 20
  users:
    - username: zhangsan
      salary: 13000.1
    - username: lisi
      salary: 15000.2
- 运行测试方法
@SpringBootTest
public class ConfigPropertiesTest {
	@Autowired
    ConfigProperties config;

    @Test
    public void test(){
        System.out.println(config);
    }
}
6.5.3. 其他属性
@PropertySource的其他属性
- 导入多个配置文件
@PropertySource(value= {"classpath:emp-dev.properties","classpath:emp-test.properties"})
- 是否忽略不存在的文件
ignoreResourceNotFound 默认值是false,当文件不存在时会抛出异常,改成true表示文件不存在时忽略,不报错
@PropertySource(value= {"classpath:emp-dev.properties","classpath:emp-test.properties"},ignoreResourceNotFound = true)
- 指定打开属性文件的编码
指定读取属性文件所使用的编码,默认没有配置,安装项目环境编码读取属性文件。可以不设置或设置为UTF-8
@PropertySource(value= {"classpath:emp-dev.properties","classpath:emp-test.properties"},
        ignoreResourceNotFound = true,
        encoding = "utf-8")
6.6. 配置文件优先级
SpringBoot默认会扫描以下位置的application.properties application.yml作为SpringBoot的默认配置
- file:./config/:项目jar包所在目录的config目录
- file:./ :项目jar包所在的同级目录
- classpath:/config:classpath(resource)目录下config目录
- classpath:/:classpath(resource)目录下
config目录中的配置优先级高于外部配置
6.6.1. 实验
-
验证resource资源目录下,config中的配置优先级高于外部
2个配置文件配置不同的端口,使用浏览器访问controller方法,看哪个端口生效

有效地址:http://localhost:8085/demo -
验证打包后的配置优先级
打包后,resource下配置文化被打入到jar中,难以修改,可以在jar包外部存放配置文件,优先级高于jar包内部。
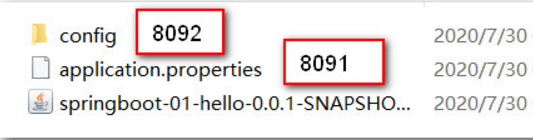
有效地址:http://localhost:8092/demo
6.6.2. 总结
- 这些位置的配置文件会全部加载,可以理解为这些配置文件的配置回合并到一起
- 如果不同的配置文件中有相同的属性配置,则优先级最高的生效(最高优先级1)
- 打包后,外部配置优先级高于jar包内部配置
- config目录下的配置高于外部配置