概述
 - 采用springboot2.2.4.RELEASE版本,采用lettuce对redis进行整合,并且使用mybatisPlus实战
 -
 - 源码地址:https://github.com/Blithe0/CmsServer-master.git
一、添加相关依赖
// An highlighted block
		<!-- redis -->
        <dependency>
            <groupId>org.apache.commons</groupId>
            <artifactId>commons-pool2</artifactId>
        </dependency>
        <dependency>
            <groupId>org.springframework.boot</groupId>
            <artifactId>spring-boot-starter-cache</artifactId>
        </dependency>
        <dependency>
            <groupId>com.baomidou</groupId>
            <artifactId>mybatis-plus-boot-starter</artifactId>
            <version>2.3.3</version>
        </dependency>
二、编辑redis和MP的yml文件
# redis配置
spring
  cache:
    type: redis
    redis:
      time-to-live: 20000 #缓存超时时间ms
      cache-null-values: false #是否缓存空值
  redis:
    port: 6379
    host: localhost  # 127.0.0.1
    password: 123456 # Redis 服务器连接密码(默认为空)
    lettuce:
      pool:
        max-active: 8 # 连接池最大连接数(使用负值表示没有限制)
        max-wait: -1  # 连接池最大阻塞等待时间(使用负值表示没有限制)
        max-idle: 8   # 连接池中的最大空闲连接
        min-idle: 0   # 连接池中的最小空闲连接
    timeout: 10000  #redis 连接超时时间ms
    database: 0 # 数据库索引,默认是0
# MP配置
mybatis-plus:
  ##主键类型  0:"数据库ID自增", 1:"用户输入ID",2:"全局唯一ID (数字类型唯一ID)", 3:"全局唯一ID UUID";
  #mybatis-plus.global-config.id-type=3
  ##字段策略 0:"忽略判断",1:"非 NULL 判断"),2:"非空判断"
  #mybatis-plus.global-config.field-strategy=2
  #驼峰下划线转换
  global-config:
    db-column-underline: true
    #mp2.3+ 全局表前缀 mp_
    #mybatis-plus.global.table-prefix: mp_
    #刷新mapper 调试神器
    refresh-mapper: true
    #数据库大写下划线转换
    capital-mode: true
    # Sequence序列接口实现类配置
    #mybatis-plus.global-config.key-generator=com.baomidou.mybatisplus.incrementer.OracleKeyGenerator
    #逻辑删除配置(下面3个配置)
    logic-delete-value: 1
    logic-not-delete-value: 0
  #mybatis-plus.global-config.sql-injector=com.baomidou.springboot.MyMetaObjectHandler
  #配置返回数据库(column下划线命名&&返回java实体是驼峰命名),自动匹配无需as(没开启这个,SQL需要写as: select user_id as userId)
  configuration:
    map-underscore-to-camel-case: true
    cache-enabled: false
    log-impl: org.apache.ibatis.logging.stdout.StdOutImpl
  #控制台是否显示sql
  #mybatis.configuration.log-impl=org.apache.ibatis.logging.stdout.StdOutImpl
  mapper-locations: classpath:mapper/*/*.xml
三、编写config类
@Configuration
//继承CachingConfigurerSupport,为了自定义生成KEY的策略。可以不继承。
public class RedisConfiguration extends CachingConfigurerSupport {
    /**
     * SpringBoot 2.X 缓存管理器配置
     *
     * @param redisConnectionFactory
     * @return
     */
    @Bean
    public CacheManager redisCacheManager(RedisConnectionFactory redisConnectionFactory) {
        // 使用json方式序列化,在实体类中可以不进行序列化了
        RedisSerializer<String> redisSerializer = new StringRedisSerializer();
        Jackson2JsonRedisSerializer jackson2JsonRedisSerializer = new Jackson2JsonRedisSerializer(Object.class);
        //  解决查询缓存转换异常的问题
        ObjectMapper om = new ObjectMapper();
        om.setVisibility(PropertyAccessor.ALL, JsonAutoDetect.Visibility.ANY);
        om.enableDefaultTyping(ObjectMapper.DefaultTyping.NON_FINAL);
        jackson2JsonRedisSerializer.setObjectMapper(om);
//        CacheKeyPrefix keyPrefix = new CacheKeyPrefix() {
//            @Override
//            public String compute(String cacheName) {
//                return cacheName + "::";
//            }
//        };

        // 生成一个默认配置,通过config对象即可对缓存进行自定义配置   配置序列化(解决乱码的问题)
        RedisCacheConfiguration config = RedisCacheConfiguration.defaultCacheConfig()
                .entryTtl(Duration.ofMinutes(0)) // 默认缓存时间
                .serializeKeysWith(RedisSerializationContext.SerializationPair.fromSerializer(redisSerializer)) // 设置key的序列化方式
                .serializeValuesWith(RedisSerializationContext.SerializationPair.fromSerializer(jackson2JsonRedisSerializer)) // 设置value的序列化方式
                .disableCachingNullValues(); // 不缓存null值

        // 对每个缓存空间应用不同的配置
        Map<String, RedisCacheConfiguration> configMap = new HashMap<>();
        configMap.put("my-redis-cache1", config.entryTtl(Duration.ofHours(30L)));   // my-redis-cache1过期时间为30分钟
        configMap.put("my-redis-cache2", config.entryTtl(Duration.ofSeconds(120))); // my-redis-cache2过期时间120s

        // 使用自定义的缓存配置初始化一个cacheManager
        return RedisCacheManager.builder(redisConnectionFactory)
                .cacheDefaults(config) // 默认缓存
                .withInitialCacheConfigurations(configMap) // 特殊缓存
                .transactionAware() // 事务
                .build();

    }

    /**
     * 自定义key. 此方法将会根据类名+方法名+所有参数的值生成唯一的一个key,即使@Cacheable中的value属性一样,key也会不一样。
     */
    @Override
    public KeyGenerator keyGenerator() {
        return new KeyGenerator() {
            @Override
            public Object generate(Object o, Method method, Object... objects) {
                StringBuilder sb = new StringBuilder();
                sb.append(o.getClass().getName());  // 类名
                sb.append(method.getName()); // 方法名
                for (Object obj : objects) {
                    sb.append(obj.toString()); // 参数名
                }
                return sb.toString();
            }
        };
    }

    /**
     * redisTemplate 自定义序列化
     * @param redisConnectionFactory
     * @return
     */
    @Bean
    public RedisTemplate<String,Object> redisTemplate(RedisConnectionFactory redisConnectionFactory) {
        RedisTemplate<String,Object> redisTemplate = new RedisTemplate<>();
        redisTemplate.setConnectionFactory(redisConnectionFactory);
        //使用Jackson2JsonRedisSerializer来序列化和反序列化redis的value值
        Jackson2JsonRedisSerializer jackson2JsonRedisSerializer = new Jackson2JsonRedisSerializer(Object.class);
        ObjectMapper objectMapper = new ObjectMapper();
        objectMapper.setVisibility(PropertyAccessor.ALL, JsonAutoDetect.Visibility.ANY);
        objectMapper.enableDefaultTyping(ObjectMapper.DefaultTyping.NON_FINAL);
        objectMapper.setSerializationInclusion(JsonInclude.Include.NON_NULL);
        objectMapper.configure(SerializationFeature.FAIL_ON_EMPTY_BEANS, false);
        jackson2JsonRedisSerializer.setObjectMapper(objectMapper);

        //使用StringRedisSerializer来序列化和反序列化redis的key值
        redisTemplate.setKeySerializer(new StringRedisSerializer());
//      redisTemplate.setValueSerializer(jackson2JsonRedisSerializer);
        // value序列化方式采用jackson
        redisTemplate.setValueSerializer(new RedisObjectSerializer());
        // hash的key采用String的序列化方式
        redisTemplate.setHashKeySerializer(new StringRedisSerializer());
//      redisTemplate.setHashValueSerializer(jackson2JsonRedisSerializer);
        // value序列化方式采用jackson
        redisTemplate.setHashValueSerializer(new RedisObjectSerializer());
        redisTemplate.afterPropertiesSet();
        return redisTemplate;
    }
}
四、编写对象序列化工具类(更友好)
public class RedisObjectSerializer implements RedisSerializer<Object> {
    private Converter<Object, byte[]> serializer = new SerializingConverter();
    private Converter<byte[], Object> deserializer = new DeserializingConverter();
    static final byte[] EMPTY_ARRAY = new byte[0];

    public Object deserialize(byte[] bytes) {
        if (isEmpty(bytes)) {
            return null;
        }
        try {
            return deserializer.convert(bytes);
        } catch (Exception ex) {
            throw new SerializationException("Cannot deserialize", ex);
        }
    }

    public byte[] serialize(Object object) {
        if (object == null) {
            return EMPTY_ARRAY;
        }
        try {
            return serializer.convert(object);
        } catch (Exception ex) {
            return EMPTY_ARRAY;
        }
    }

    private boolean isEmpty(byte[] data) {
        return (data == null || data.length == 0);
    }
}
五、编写实体类:
	// BaseVo
@EqualsAndHashCode(callSuper=false)
@Data
public abstract class BaseVO implements java.io.Serializable{
	private static final long serialVersionUID = 1L;

	@TableField(exist = false)
	private Integer page;

	@TableField(exist = false)
	private Integer limit;
	/**
	 * 接收多个ID
	 */
	@TableField(exist = false)
	private Integer[] ids;

	@TableField(exist = false)
	@DateTimeFormat(pattern="yyyy-MM-dd HH:mm:ss")
	private Date startTime;

	@TableField(exist = false)
	@DateTimeFormat(pattern="yyyy-MM-dd HH:mm:ss")
	private Date endTime;
}
六、单元测试:
@RunWith(SpringRunner.class)
@SpringBootTest(classes = SpringBootRedisApplicationTests.class)
@ComponentScan("com.blithe.cms")
public class SpringBootRedisApplicationTests {

    // 注入spring为我们提供的接口
    @Autowired
    private RedisTemplate redisTemplate;

    @Test
    public void testObj(){

        Loginfo loginfo = new Loginfo();
        loginfo.setLoginname("小剑");
        loginfo.setLogintime(new Date());
        loginfo.setLoginip(IpUtil.getIpAddr(HttpContextUtils.getHttpServletRequest()));
        redisTemplate.opsForValue().set("loginInfo_",loginfo);

        /**
         * 在上面这个例子中我们使用redisTemplate调用了opsForValue会得到一个ValueOperations操作。
         * 这个是专门操作String类型的数据,所以里面的键值对中键为String,而值是我们的User。
         * 当然redisTemplate还为我们提供了其他几个,也就是redis为我们提供的数据类型
         */
//        Boolean exists = (Boolean) redisTemplate.opsForValue().get("loginInfo_");
//        System.out.println("redis是否存在key" + exists);
        Loginfo loginInfo_ = (Loginfo)  redisTemplate.opsForValue().get("loginInfo_");
        System.out.println("从redis取出对象" + loginInfo_.toString());
    }
}
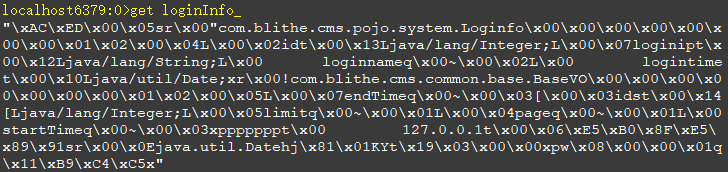
控制台打印:

此时看下redis数据: 测试没什么问题,但是为什么出来的结果是默认的IO序列化的数据呢?不是编写了自定义JSON序列化吗?这块测试我们只是拿到了spring为我们提供的redisTemplate。
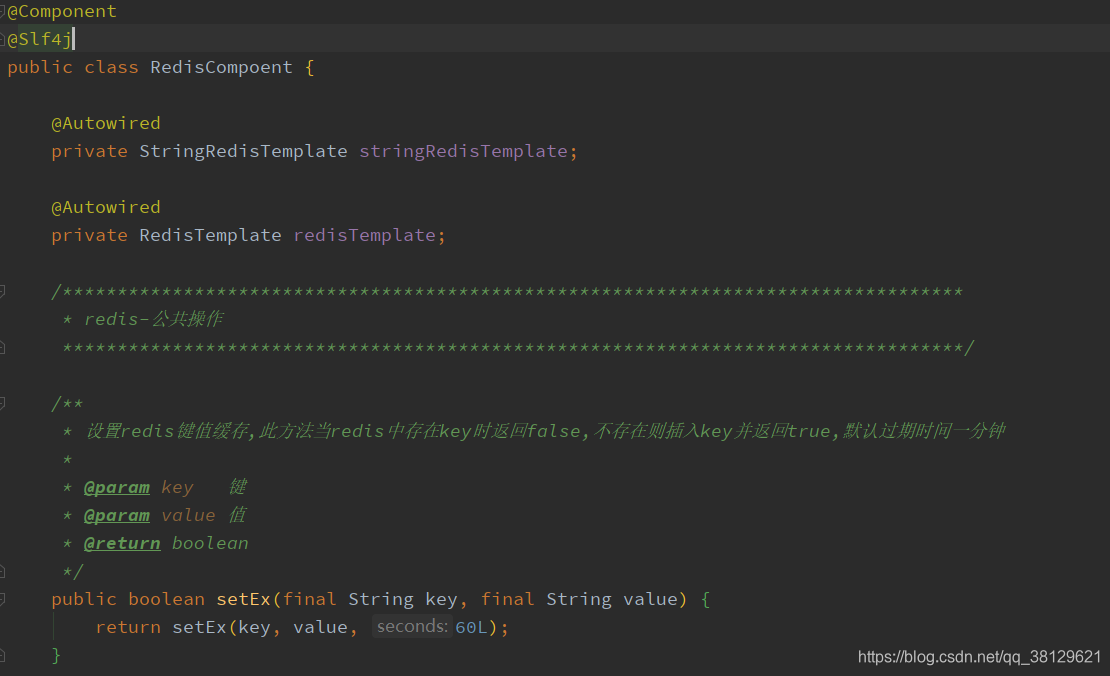
七、编写RedisCompoent组件,更方便的使用redis,这里贴出一部分代码,可自行GitHub下载
八、业务开发使用
@Service
public class DeptServiceImpl extends ServiceImpl<DeptMapper, Dept> implements DeptService {

	@Autowired
	private DeptMapper deptMapper;

	@Autowired
	private RedisCompoent redisCompoent;

	@Override
	@Cacheable(value = {"dept"},key = "'selectById' + #p0",sync=true)
	public Dept selectById(Serializable id) {
		return deptMapper.selectById(id);
	}

	/**
	 *  延时双删策略
	 *         在写库前后都进行redis.del(key)操作,并且设定合理的超时时间。具体步骤是:
	 *
	 *         1)先删除缓存
	 *
	 *         2)再写数据库
	 *
	 *         3)休眠500毫秒(根据具体的业务时间来定)
	 *
	 *         4)再次删除缓存。
	 *
	 * @param dept
	 * @return
	 */
	@Override
	@Cacheable(value = {"dept"},key = "'updateById_' + #p0.id",sync=true)
	public boolean updateById(Dept dept) {
//		redisCompoent.remove("updateById_" + dept.getId());
//		boolean editFlag = super.updateById(dept);
//		try {
//			Thread.sleep( 500 );
//		} catch (InterruptedException e) {
//			e.printStackTrace();
//		}
//		redisCompoent.remove("updateById_" + dept.getId());
		return super.updateById(dept);
	}

	@Override
	@CacheEvict(value = {"dept"},allEntries = true)
	public boolean deleteById(Serializable id) {
		return super.deleteById(id);
	}
}
九、编写controller:
@RestController
@RequestMapping("/dept")
public class DeptController {

    @Autowired
    private DeptService deptService;

    /**
     * 保存
     * @param dept
     * @return
     */
    @PostMapping("/deptSaveOrUpdate")
    public R deptSaveOrUpdate(Dept dept){
        try {
            if(dept.getId() == null){
                dept.setCreatetime(new Date());
                this.deptService.insert(dept);
            }else{
                this.deptService.updateById(dept);
            }
        }catch (Exception e){
            return R.error(e.getMessage());
        }
        return R.ok();
    }

    @RequestMapping("/selectById")
    public R findById(Integer id){
        Dept dept = this.deptService.selectById(id);
        return R.ok().put("dept",dept);
    }
}
十、跑起来
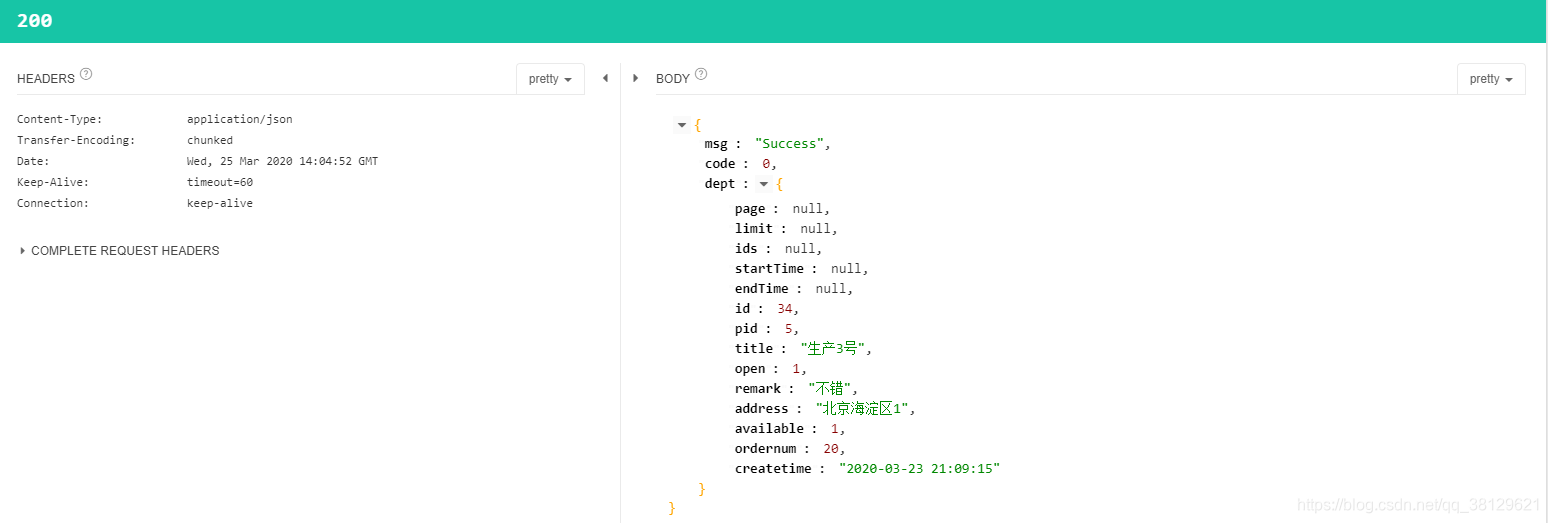

// biubiu
 测试接口返回数据,看下redis中,也都没问题了。其实在此笔者也踩了很多坑,遇到挺多问题和疑惑的?下面列举一些问题和疑惑?
在整合测试的时候报这个错误
Caused by: org.springframework.beans.factory.UnsatisfiedDependencyException: Error creating bean with name 'springBootRedisApplicationTests': Unsatisfied dependency expressed through field 'redisUtil'; nested exception is org.springframework.beans.factory.NoSuchBeanDefinitionException: No qualifying bean of type 'com.blithe.cms.common.tools.RedisUtil' available: expected at least 1 bean which qualifies as autowire candidate. Dependency annotations: {@org.springframework.beans.factory.annotation.Autowired(required=true)}
   at org.springframework.beans.factory.annotation.AutowiredAnnotationBeanPostProcessor$AutowiredFieldElement.inject(AutowiredAnnotationBeanPostProcessor.java:643) ~[spring-beans-5.2.3.RELEASE.jar:5.2.3.RELEASE]
   at org.springframework.beans.factory.annotation.InjectionMetadata.inject(InjectionMetadata.java:116) ~[spring-beans-5.2.3.RELEASE.jar:5.2.3.RELEASE]
   at org.springframework.beans.factory.annotation.AutowiredAnnotationBeanPostProcessor.postProcessProperties(AutowiredAnnotationBeanPostProcessor.java:399) ~[spring-beans-5.2.3.RELEASE.jar:5.2.3.RELEASE]
   at org.springframework.beans.factory.support.AbstractAutowireCapableBeanFactory.populateBean(AbstractAutowireCapableBeanFactory.java:1422) ~[spring-beans-5.2.3.RELEASE.jar:5.2.3.RELEASE]
   at org.springframework.beans.factory.support.AbstractAutowireCapableBeanFactory.doCreateBean(AbstractAutowireCapableBeanFactory.java:594) ~[spring-beans-5.2.3.RELEASE.jar:5.2.3.RELEASE]
   at org.springframework.beans.factory.support.AbstractAutowireCapableBeanFactory.createBean(AbstractAutowireCapableBeanFactory.java:517) ~[spring-beans-5.2.3.RELEASE.jar:5.2.3.RELEASE]
   at org.springframework.beans.factory.support.AbstractBeanFactory.lambda$doGetBean$0(AbstractBeanFactory.java:323) ~[spring-beans-5.2.3.RELEASE.jar:5.2.3.RELEASE]
   at org.springframework.beans.factory.support.DefaultSingletonBeanRegistry.getSingleton(DefaultSingletonBeanRegistry.java:222) ~[spring-beans-5.2.3.RELEASE.jar:5.2.3.RELEASE]
   at org.springframework.beans.factory.support.AbstractBeanFactory.doGetBean(AbstractBeanFactory.java:321) ~[spring-beans-5.2.3.RELEASE.jar:5.2.3.RELEASE]
   at org.springframework.beans.factory.support.AbstractBeanFactory.getBean(AbstractBeanFactory.java:202) ~[spring-beans-5.2.3.RELEASE.jar:5.2.3.RELEASE]
   at org.springframework.beans.factory.support.DefaultListableBeanFactory.preInstantiateSingletons(DefaultListableBeanFactory.java:879) ~[spring-beans-5.2.3.RELEASE.jar:5.2.3.RELEASE]
   at org.springframework.context.support.AbstractApplicationContext.finishBeanFactoryInitialization(AbstractApplicationContext.java:878) ~[spring-context-5.2.3.RELEASE.jar:5.2.3.RELEASE]
   at org.springframework.context.support.AbstractApplicationContext.refresh(AbstractApplicationContext.java:550) ~[spring-context-5.2.3.RELEASE.jar:5.2.3.RELEASE]
   at org.springframework.boot.SpringApplication.refresh(SpringApplication.java:747) ~[spring-boot-2.2.4.RELEASE.jar:2.2.4.RELEASE]
   at org.springframework.boot.SpringApplication.refreshContext(SpringApplication.java:397) ~[spring-boot-2.2.4.RELEASE.jar:2.2.4.RELEASE]
   at org.springframework.boot.SpringApplication.run(SpringApplication.java:315) ~[spring-boot-2.2.4.RELEASE.jar:2.2.4.RELEASE]
   at org.springframework.boot.test.context.SpringBootContextLoader.loadContext(SpringBootContextLoader.java:126) ~[spring-boot-test-2.2.4.RELEASE.jar:2.2.4.RELEASE]
   at org.springframework.test.context.cache.DefaultCacheAwareContextLoaderDelegate.loadContextInternal(DefaultCacheAwareContextLoaderDelegate.java:99) ~[spring-test-5.2.3.RELEASE.jar:5.2.3.RELEASE]
   at org.springframework.test.context.cache.DefaultCacheAwareContextLoaderDelegate.loadContext(DefaultCacheAwareContextLoaderDelegate.java:124) ~[spring-test-5.2.3.RELEASE.jar:5.2.3.RELEASE]
   ... 24 more
Caused by: org.springframework.beans.factory.NoSuchBeanDefinitionException: No qualifying bean of type 'com.blithe.cms.common.tools.RedisUtil' available: expected at least 1 bean which qualifies as autowire candidate. Dependency annotations: {@org.springframework.beans.factory.annotation.Autowired(required=true)}
   at org.springframework.beans.factory.support.DefaultListableBeanFactory.raiseNoMatchingBeanFound(DefaultListableBeanFactory.java:1695) ~[spring-beans-5.2.3.RELEASE.jar:5.2.3.RELEASE]
   at org.springframework.beans.factory.support.DefaultListableBeanFactory.doResolveDependency(DefaultListableBeanFactory.java:1253) ~[spring-beans-5.2.3.RELEASE.jar:5.2.3.RELEASE]
   at org.springframework.beans.factory.support.DefaultListableBeanFactory.resolveDependency(DefaultListableBeanFactory.java:1207) ~[spring-beans-5.2.3.RELEASE.jar:5.2.3.RELEASE]
   at org.springframework.beans.factory.annotation.AutowiredAnnotationBeanPostProcessor$AutowiredFieldElement.inject(AutowiredAnnotationBeanPostProcessor.java:640) ~[spring-beans-5.2.3.RELEASE.jar:5.2.3.RELEASE]
   at org.springframework.beans.factory.annotation.InjectionMetadata.inject(InjectionMetadata.java:116) ~[spring-beans-5.2.3.RELEASE.jar:5.2.3.RELEASE]
   at org.springframework.beans.factory.annotation.AutowiredAnnotationBeanPostProcessor.postProcessProperties(AutowiredAnnotationBeanPostProcessor.java:399) ~[spring-beans-5.2.3.RELEASE.jar:5.2.3.RELEASE]
   at org.springframework.beans.factory.support.AbstractAutowireCapableBeanFactory.populateBean(AbstractAutowireCapableBeanFactory.java:1422) ~[spring-beans-5.2.3.RELEASE.jar:5.2.3.RELEASE]
   at org.springframework.beans.factory.support.AbstractAutowireCapableBeanFactory.doCreateBean(AbstractAutowireCapableBeanFactory.java:594) ~[spring-beans-5.2.3.RELEASE.jar:5.2.3.RELEASE]
   at org.springframework.beans.factory.support.AbstractAutowireCapableBeanFactory.createBean(AbstractAutowireCapableBeanFactory.java:517) ~[spring-beans-5.2.3.RELEASE.jar:5.2.3.RELEASE]
   at org.springframework.beans.factory.support.AbstractBeanFactory.lambda$doGetBean$0(AbstractBeanFactory.java:323) ~[spring-beans-5.2.3.RELEASE.jar:5.2.3.RELEASE]
   at org.springframework.beans.factory.support.DefaultSingletonBeanRegistry.getSingleton(DefaultSingletonBeanRegistry.java:222) ~[spring-beans-5.2.3.RELEASE.jar:5.2.3.RELEASE]
   at org.springframework.beans.factory.support.AbstractBeanFactory.doGetBean(AbstractBeanFactory.java:321) ~[spring-beans-5.2.3.RELEASE.jar:5.2.3.RELEASE]
   at org.springframework.beans.factory.support.AbstractBeanFactory.getBean(AbstractBeanFactory.java:202) ~[spring-beans-5.2.3.RELEASE.jar:5.2.3.RELEASE]
   at org.springframework.beans.factory.support.DefaultListableBeanFactory.preInstantiateSingletons(DefaultListableBeanFactory.java:879) ~[spring-beans-5.2.3.RELEASE.jar:5.2.3.RELEASE]
   at org.springframework.context.support.AbstractApplicationContext.finishBeanFactoryInitialization(AbstractApplicationContext.java:878) ~[spring-context-5.2.3.RELEASE.jar:5.2.3.RELEASE]
   at org.springframework.context.support.AbstractApplicationContext.refresh(AbstractApplicationContext.java:550) ~[spring-context-5.2.3.RELEASE.jar:5.2.3.RELEASE]
   at org.springframework.boot.SpringApplication.refresh(SpringApplication.java:747) ~[spring-boot-2.2.4.RELEASE.jar:2.2.4.RELEASE]
   at org.springframework.boot.SpringApplication.refreshContext(SpringApplication.java:397) ~[spring-boot-2.2.4.RELEASE.jar:2.2.4.RELEASE]
   at org.springframework.boot.SpringApplication.run(SpringApplication.java:315) ~[spring-boot-2.2.4.RELEASE.jar:2.2.4.RELEASE]
   at org.springframework.boot.test.context.SpringBootContextLoader.loadContext(SpringBootContextLoader.java:126) ~[spring-boot-test-2.2.4.RELEASE.jar:2.2.4.RELEASE]
   at org.springframework.test.context.cache.DefaultCacheAwareContextLoaderDelegate.loadContextInternal(DefaultCacheAwareContextLoaderDelegate.java:99) ~[spring-test-5.2.3.RELEASE.jar:5.2.3.RELEASE]
   at org.springframework.test.context.cache.DefaultCacheAwareContextLoaderDelegate.loadContext(DefaultCacheAwareContextLoaderDelegate.java:124) ~[spring-test-5.2.3.RELEASE.jar:5.2.3.RELEASE]
其实这个问题就是在注入redisTemplate的bean的时候出现问题,在注入时候直接使用自动注入方式@Autowired时,会出现问题,因为我们自己编写的redisTemplate这个RedisTemplate<String,Object>带有泛型,而@Autowired注入是通过类型来进行注入的,这时候可以采用@Resource注解,它是根据名字来进行注入的。
几个问题?
1、lettuce与jedis、Redisson区别?
概念:

  Jedis:是Redis的Java实现客户端,提供了比较全面的Redis命令的支持,

  Redisson:实现了分布式和可扩展的Java数据结构。

  Lettuce:高级Redis客户端,用于线程安全同步,异步和响应使用,支持集群,Sentinel,管道和编码器。

优点:

  Jedis:比较全面的提供了Redis的操作特性

  Redisson:促使使用者对Redis的关注分离,提供很多分布式相关操作服务,例如,分布式锁,分布式集合,可通过Redis支持延迟队列

  Lettuce:主要在一些分布式缓存框架上使用比较多

可伸缩:

Jedis:使用阻塞的I/O,且其方法调用都是同步的,程序流需要等到sockets处理完I/O才能执行,不支持异步。Jedis客户端实例不是线程安全的,所以需要通过连接池来使用Jedis。

Redisson:基于Netty框架的事件驱动的通信层,其方法调用是异步的。Redisson的API是线程安全的,所以可以操作单个Redisson连接来完成各种操作

Lettuce:基于Netty框架的事件驱动的通信层,其方法调用是异步的。Lettuce的API是线程安全的,所以可以操作单个Lettuce连接来完成各种操作


结论:

建议使用:Jedis + Redisson,个人喜欢使用Lettuce和Jedis 。
2、为什么要自定义RedisTemplate?
其实通过源码可以看出,SpringBoot自动帮我们在容器中生成了一个RedisTemplate和一个StringRedisTemplate。

RedisTemplate的泛型是<Object,Object>,写代码不是很方便,一般我们的key是String类型,我们需要一个<String,Object>的泛型。

RedisTemplate没有设置数据存储在Redis时,Key和Value的序列化方式。(采用默认的JDK序列化方式)
3、针对StringRedisSerializer,Jackson2JsonRedisSerializer和JdkSerializationRedisSerializer进行测试?
StringRedisSerializer进行序列化后的值,在Java和Redis中保存的内容时一致的。

用Jackson2JsonRedisSerializer序列化后,在Redis中保存的内容,比Java中多一对逗号。

用JdkSerializationRedisSerializer序列化后,对于Key-Value结构来说,在Redis中不可读;对于Hash的Value来说,比Java的内容多了一些字符。
4、注解式的Redis处理(基于注解的支持)
Spring 提供注解来支持 Spring Cache。其核心主要是 @Cacheable 和 @CacheEvict。
使用 @Cacheable标记的方法在执行后 Spring Cache 将缓存其返回结果,而使用 @CacheEvict标记的方法会在方法执行前或者执行后移除 Spring Cache中的某些元素

说白了:注解式的使用就是在方法上面加上Cacheable / CacheEvict / CachePut的注解
*注解支持使用EL表达式 这里就是支持使用相关的参数和属性来表示

1> @Cacheable :
@Cacheable 注解 源码如下 :
@Target({ElementType.METHOD, ElementType.TYPE})
@Retention(RetentionPolicy.RUNTIME)
@Inherited
@Documented
public @interface Cacheable {
   @AliasFor("cacheNames")
   String[] value() default {};

   @AliasFor("value")
   String[] cacheNames() default {};

   String key() default "";

   String keyGenerator() default "";

   String cacheManager() default "";

   String cacheResolver() default "";

   String condition() default "";

   String unless() default "";

   boolean sync() default false;
}
value、cacheNames 属性 : 指定 Cache名称 表示当前方法的返回值是会被缓存在哪个 Cache上,对应 Cache 名称,名称可以是一个 Cache 也可以是多个 Cache,当需要缓存在多个 Cache 上时其是一个数组

key 属性 : 用来指定 Spring缓存方法的返回结果时对应的 ke。该属性支持 SpringEL表达式,当没有指定该属性时,Spring 将使用默认策略生成 key。先来看看自定义策略,自定义策略是指可以通过 SpringEL 表达式来指定 key。这里的 EL表达式可以使用方法参数及对应的属性,使用方法参数时可以直接使用 "#参数名" 或者 "#p参数index"
@Cacheable(value = "users", key = "#id")
public User find(Integer id) {
    return null;
}
@Cacheable(value = "users", key = "#p0")
public User find(Integer id) {
    return null;
}
@Cacheable(value = "users", key = "#user.id")
public User find(User user) {
    return null;
}
@Cacheable(value = "users", key = "#p0.id")
public User find(User user) {
    return null;
}
@Cacheable(value = "UserCache")
public boolean isReserved(String userId) {
    System.out.println("UserCache:" + userId);
    return false;
}
@Cacheable(value = "UserCache", key = "'user:' + #userId")
public void removeUser(String userId) {
    System.out.println("UserCache remove:" + userId);
}

除上述使用方法参数作为 key之外,Spring 还提供了一个 root对象可以用来生成key,通过该 root对象可以获取到以下信息
属性名称:
methodName	当前方法名	#root.methodName
method	当前方法	#root.method.name
target	当前被调用的对象	#root.target
targetClass	当前被调用的对象的 class	#root.targetClass
args	当前方法参数组成的数组	#root.args[0]
caches	当前被调用的方法使用的 Cache	#root.caches[0].name
示例使用:
     *  #root.targetClass 是类名
     *  #p0是第一个参数值
     * #p1是第二个参数值
     * @Cacheable(value = "test", key = "#root.targetClass + '_' + #p0 + '_' + #p1")

sync属性 : 在多线程环境下,某些操作可能使用相同参数同步调用。默认情况下,缓存不锁定任何资源,可能导致多次计算,而违反了缓存的目的。对于这些特定的情况,属性 sync 可以指示底层将缓存锁住,使只有一个线程可以进入计算,而其他线程堵塞,直到返回结果更新到缓存中
@Cacheable(cacheNames="foos", sync="true")
public Foo executeExpensiveOperation(String id) {
}

condition属性 : 指定发生的条件,condition属性默认为空,表示将缓存所有的调用情形。其值是通过 SpringEL表达式来指定的,当为true时表示进行缓存处理;当为 false 时表示不进行缓存处理,即每次调用该方法时该方法都会执行一次
@Cacheable(value={"users"}, key="#user.id", condition="#user.id%2==0")
public User find(User user) {
    System.out.println("find user by user " + user);
    return user;
}

还有一个 unless 属性可以用来是决定是否添加到缓存,与 condition不同的是,unless表达式是在方法调用之后进行评估的。如果返回false,才放入缓存 (与condition相反),#result指返回值
@Cacheable(cacheNames="book", condition="#name.length < 32", unless="#result.name.length > 5")
public Book findBook(String name)

2> @CachePut : 在支持 Spring Cache 的环境下,对于使用 @Cacheable标注的方法,Spring 在每次执行前都会检查 Cache 中是否存在相同 key 缓存元素,如果存在就不再执行该方法,而是直接从缓存中获取结果进行返回,否则才会执行并将返回结果存入指定的缓存中。@CachePut也可以声明一个方法支持缓存功能。与@Cacheable不同的是使用 @CachePut标注的方法在执行前不会去检查缓存中是否存在之前执行过的结果,而是每次都会执行该方法,并将执行结果以键值对的形式存入指定的缓存中。@CachePut 也可以标注在类上和方法上,使用 @CachePut 时可以指定的属性跟 @Cacheable是一样的
@CachePut("users") // 每次都会执行方法,并将结果存入指定的缓存中
public User find(Integer id) {
    return null;
}

3> @CacheEvict : 用来标注在需要清除缓存元素的方法或类上。当标记在一个类上时表示其中所有的方法的执行都会触发缓存的清除操作。@CacheEvict 可以指定的属性有 value、key、condition、allEntries 和 beforeInvocation。其中 value、key 和 condition 的语义与 @Cacheable对应的属性类似。即 value表示清除操作是发生在哪些 Cache 上的 (对应 Cache的名称);key表示需要清除的是哪个 key,如未指定则会使用默认策略生成的key;condition表示清除操作发生的条件。另外 @CacheEvict 还有另外两个属性
allEntries属性 : 是 boolean类型,表示是否需要清除缓存中的所有元素。默认为false,表示不需要。当指定 allEntries为true时,Spring Cache将忽略指定的key 并把缓存信息全部删除
@CacheEvict(value="users", allEntries=true)
public void delete(Integer id) {
    System.out.println("delete user by id: " + id);
}

beforeInvocation属性 : 清除操作默认是在对应方法成功执行之后触发的,即方法如果因为抛出异常而未能成功返回时也不会触发清除操作。使用 beforeInvocation可以改变触发清除操作的时间,当指定该属性值为 true时,Spring会在调用该方法之前清除缓存中的指定元素
@CacheEvict(value="users", beforeInvocation=true)
public void delete(Integer id) {
    System.out.println("delete user by id: " + id);
}
其实除了使用 @CacheEvict清除缓存元素外,当使用 Ehcache作为实现时,也可以配置 Ehcache自身的驱除策略,其是通过 Ehcache的配置文件来指定的

4> @Caching : @Caching注解可以在一个方法或者类上同时指定多 个Spring Cache 相关的注解。其拥有三个属性 : cacheable、put和evict,分别用于指定@Cacheable、@CachePut 和 @CacheEvict
@Caching(cacheable = @Cacheable("users"),
         evict = { @CacheEvict("cache2"),
                   @CacheEvict(value = "cache3", allEntries = true) })
public User find(Integer id) {
    return null;
}

5> @CacheConfig : 只能用在类上,,允许共享缓存的名称、KeyGenerator、CacheManager 和 CacheResolver,相应的属性可以被方法级别的对应属性值所覆盖