【SpringBoot】尚硅谷
一、概述
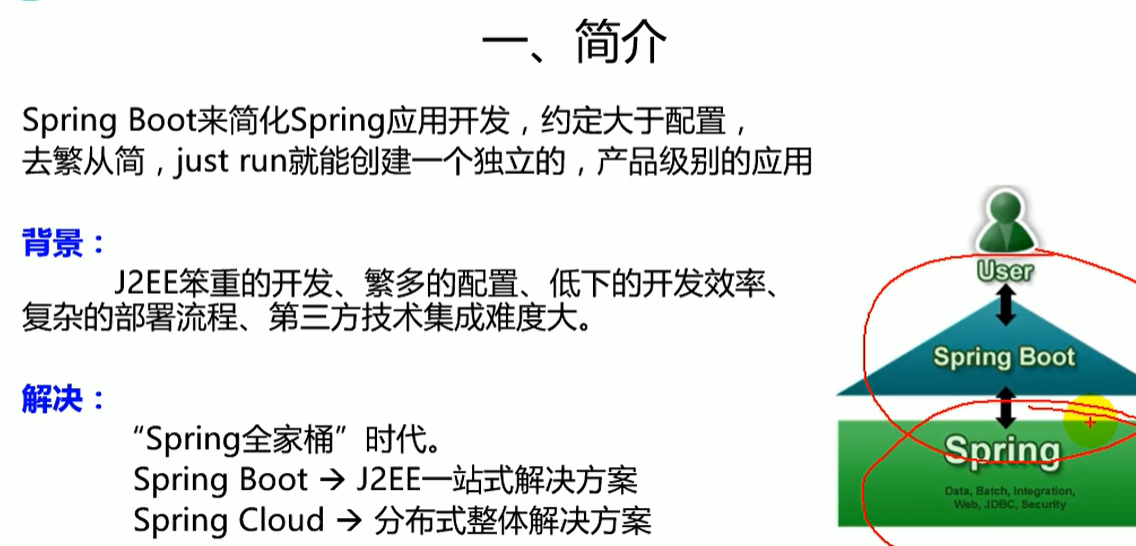
1.1 简介
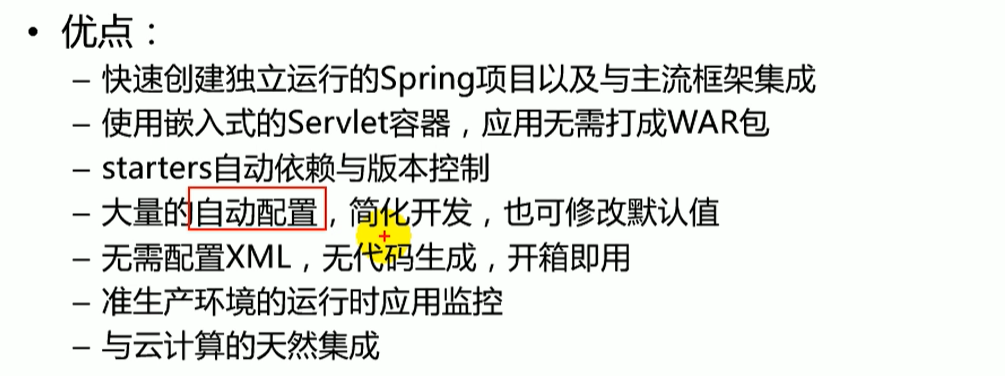
1.1 Spring Boot的优点
1.3 微服务

二、快速入门
2.1 HelloWorld程序
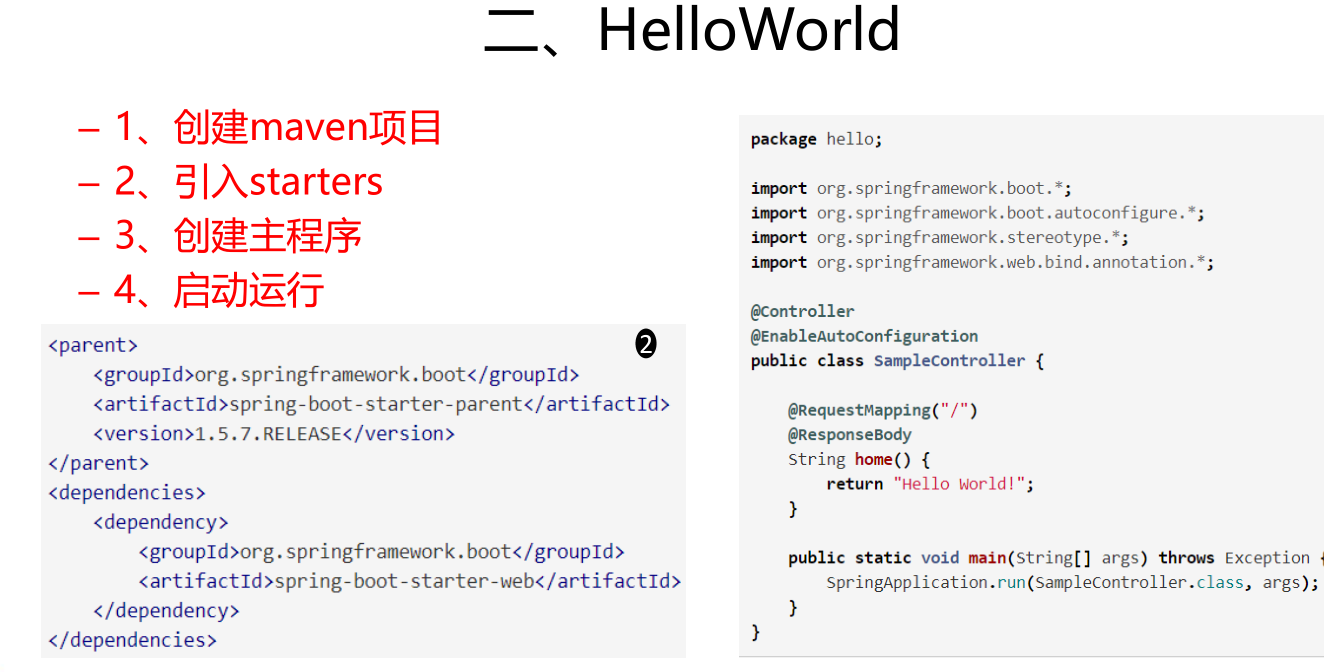
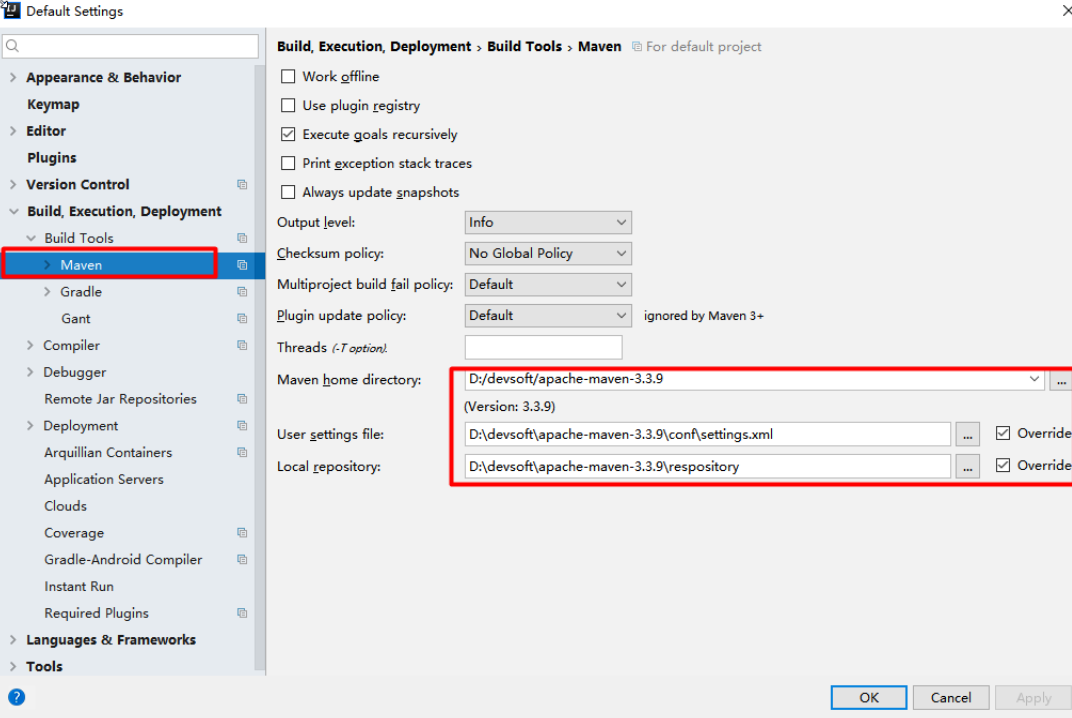
- 在使用maven建立工程之前,先检测自己安装的maven安装目录下的配置,是否是java 1.8 的环境
<profile>
  <id>jdk‐1.8</id>
  <activation>
    <activeByDefault>true</activeByDefault>
    <jdk>1.8</jdk>
  </activation>
  <properties>
    <maven.compiler.source>1.8</maven.compiler.source>
    <maven.compiler.target>1.8</maven.compiler.target>
    <maven.compiler.compilerVersion>1.8</maven.compiler.compilerVersion>
  </properties>
</profile>
- 创建maven工程后。修改POM.xml 导入必要的依赖
 <parent>
        <groupId>org.springframework.boot</groupId>
        <artifactId>spring‐boot‐starter‐parent</artifactId>
        <version>1.5.9.RELEASE</version>
    </parent>
    <dependencies>
        <dependency>
            <groupId>org.springframework.boot</groupId>
            <artifactId>spring‐boot‐starter‐web</artifactId>
        </dependency>
    </dependencies>
- 编写SpringBoot的引导类
/**
 *  @SpringBootApplication 来标注一个主程序类,说明这是一个Spring Boot应用
 */
@SpringBootApplication
public class HelloWorldMainApplication {
    public static void main(String[] args) {
        // Spring应用启动起来
        SpringApplication.run(HelloWorldMainApplication.class,args);
    }
}
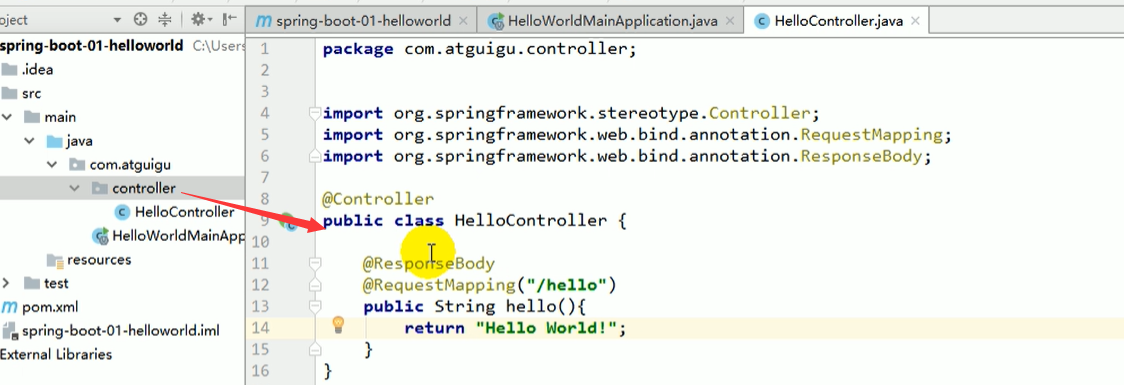
- 编写Controller或者Service
@Controller
public class HelloController {
    @ResponseBody
    @RequestMapping("/hello")
    public String hello(){
        return "Hello World!";
    }
}
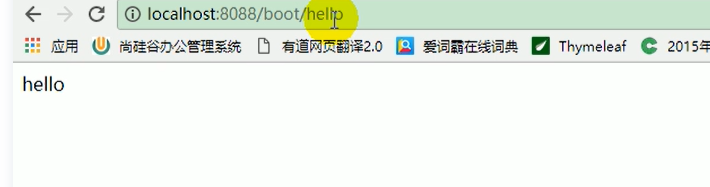
通过以上几步编程就可以实现SpringBoot的快速入门了,通过网页端访问Tomcat的8080端口中的 /hello 路径就可以执行Controller。
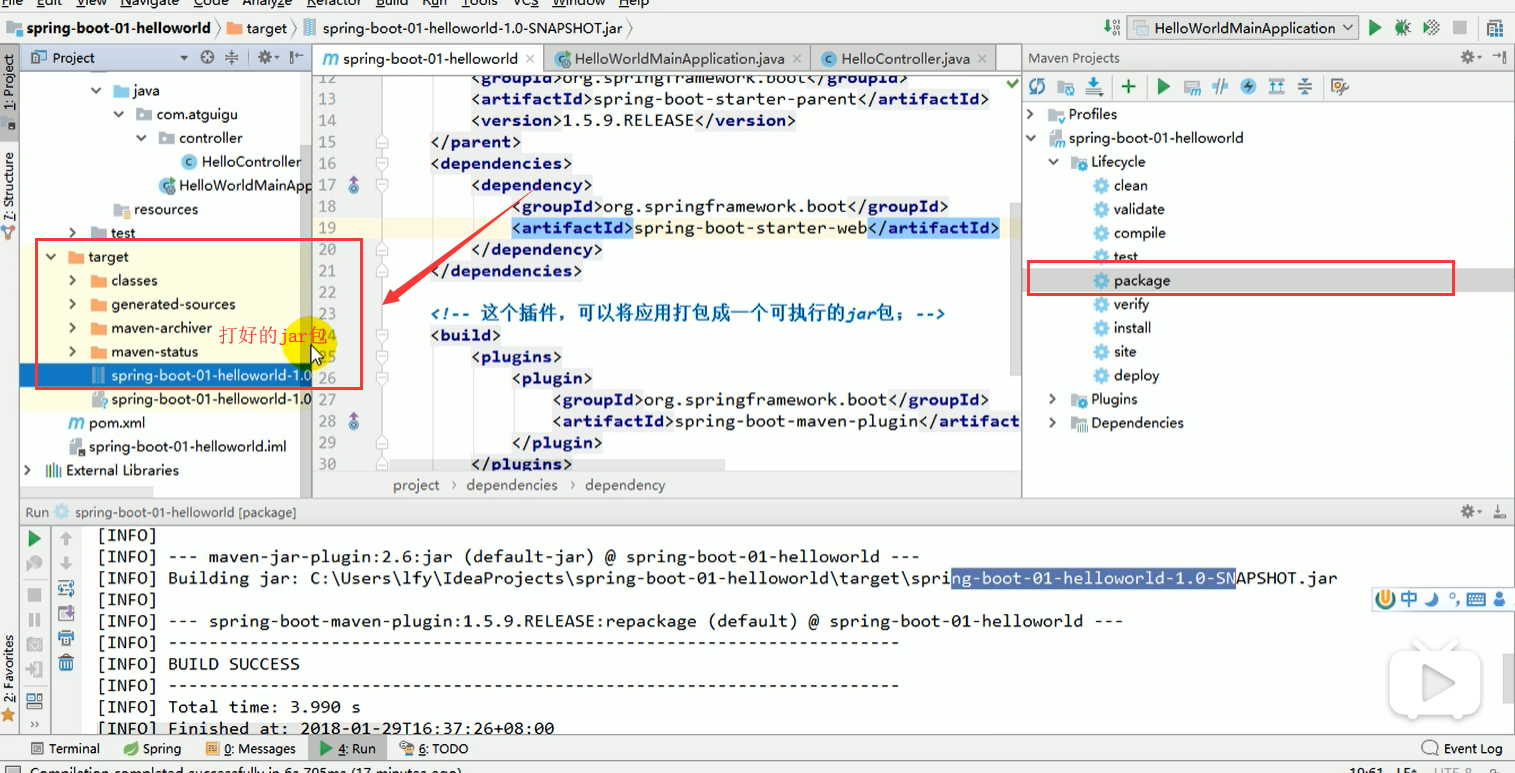
2.2 简化部署
即使我们目标服务器没有安装tomcat的运行环境,也可以运行应用程序。
也可以使用下面的插件,自动将我们的应用程序打包成可执行的jar包,我们就无需在目标服务器安装tomcat的运行环境了。
 <!‐‐ 这个插件,可以将应用打包成一个可执行的jar包;‐‐>
    <build>
        <plugins>
            <plugin>
                <groupId>org.springframework.boot</groupId>
                <artifactId>spring‐boot‐maven‐plugin</artifactId>
            </plugin>
        </plugins>
    </build>
✔ 2.3 原理分析
- 研究以下一开始继承的父项目
我们快速入门的SpringBoot工程的父项目

<parent>
    <groupId>org.springframework.boot</groupId>
    <artifactId>spring‐boot‐starter‐parent</artifactId>
    <version>1.5.9.RELEASE</version>
</parent>

父项目还有它的父项目是
<parent>
  <groupId>org.springframework.boot</groupId>
  <artifactId>spring‐boot‐dependencies</artifactId>
  <version>1.5.9.RELEASE</version>
  <relativePath>../../spring‐boot‐dependencies</relativePath>
</parent>
他来真正管理Spring Boot应用里面的所有依赖版本;
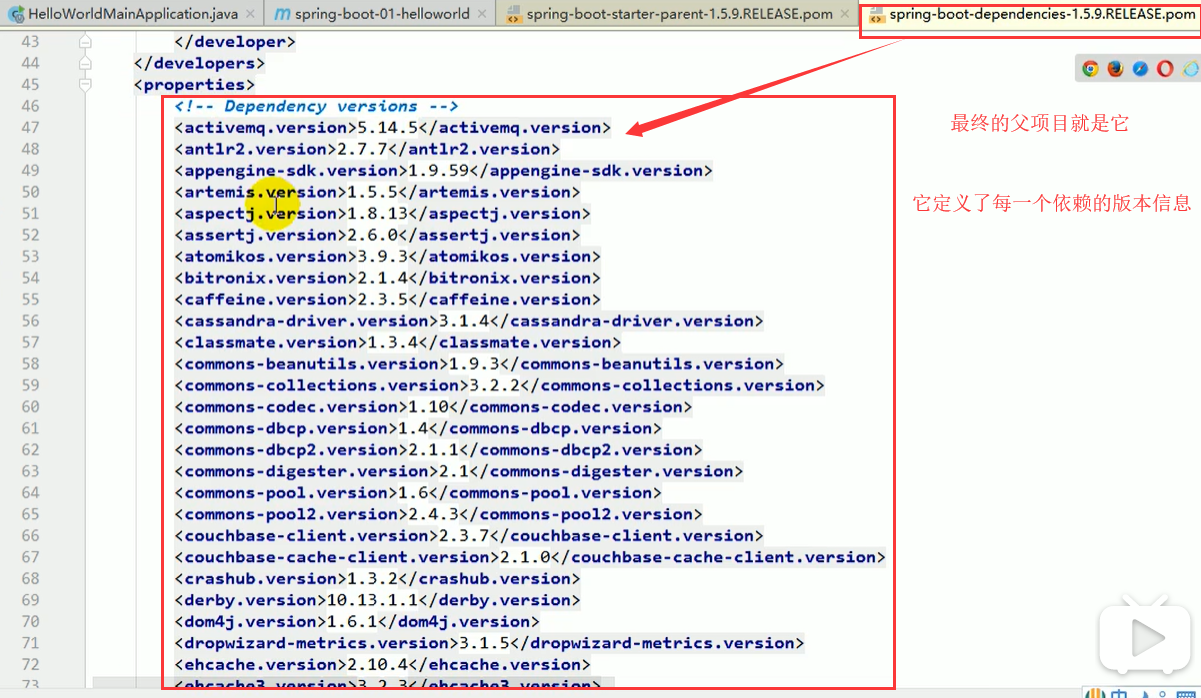
可以看到在最终的父工程中定义了非常多的依赖,并且这些依赖的属性都已经设置好了版本号,
所以以后我们导入依赖默认是不需要写版本号的;(没有在dependencies里面管理的依赖自然需要声明版本号)
- 再来研究一下我们入门程序中导入的第二个依赖,就是启动器
<dependency>
    <groupId>org.springframework.boot</groupId>
    <artifactId>spring‐boot‐starter‐web</artifactId>
</dependency>
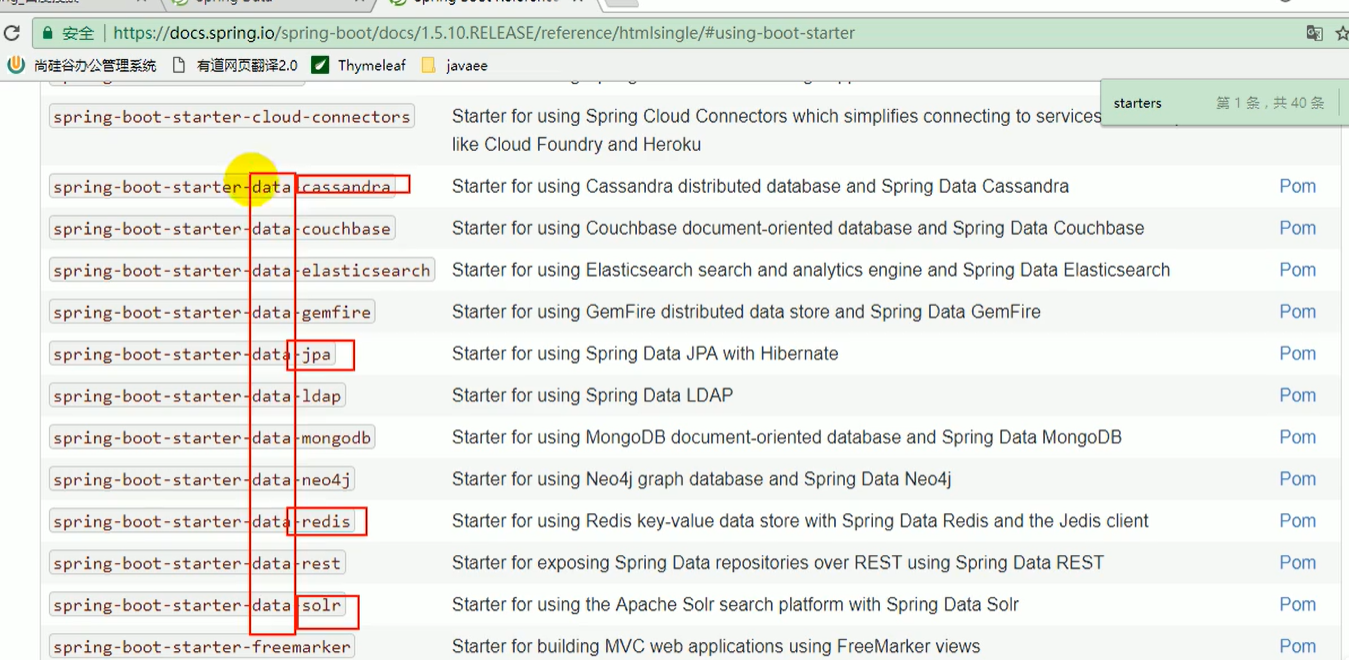
spring-boot-starter-web:
spring-boot-starter:spring-boot 场景启动器;帮我们导入了web模块正常运行所依赖的组件;
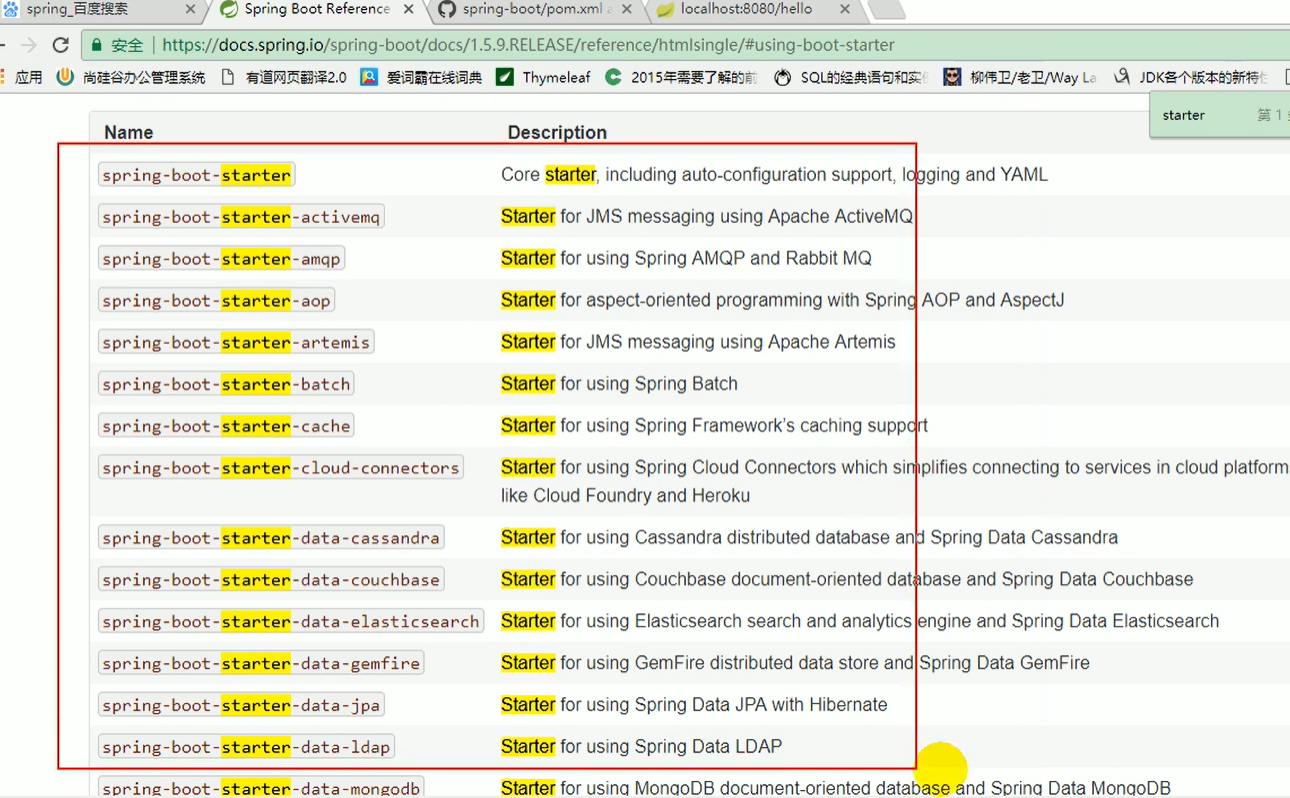
Spring Boot将所有的功能场景都抽取出来,做成一个个的starters(启动器),只需要在项目里面引入这些starter,相关场景的所有依赖都会像一个打包好的包裹一起导入进来。要用什么功能就导入什么场景的启动器,非常的简化配置。
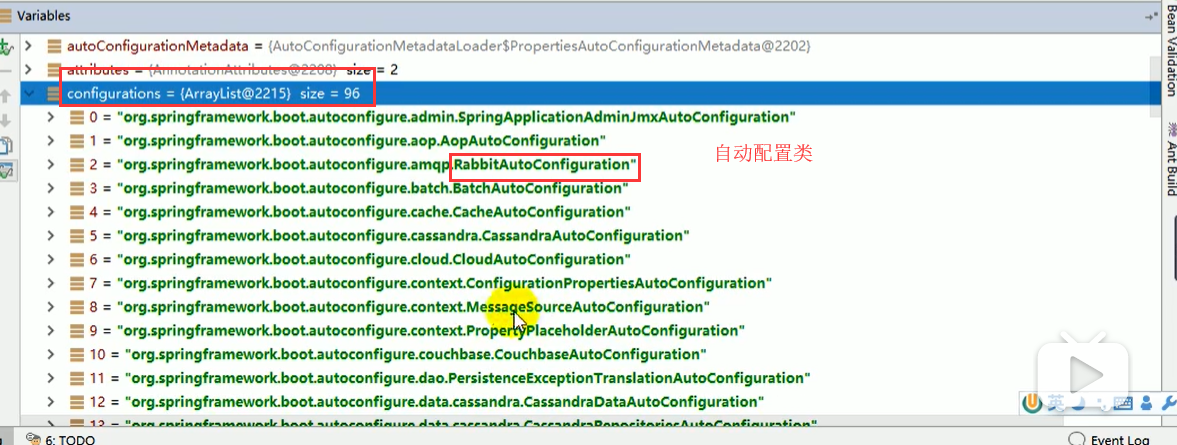
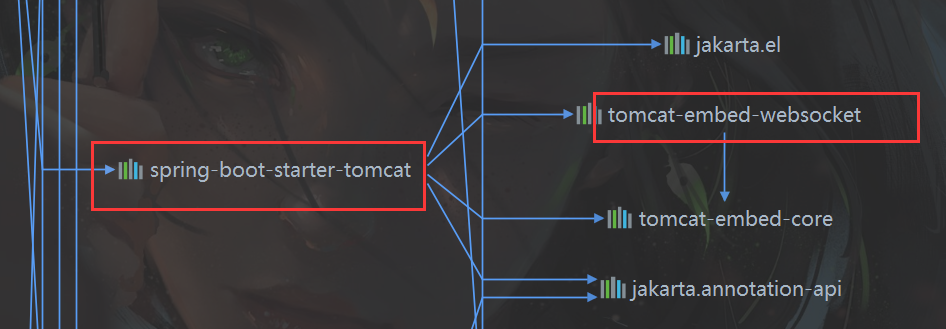
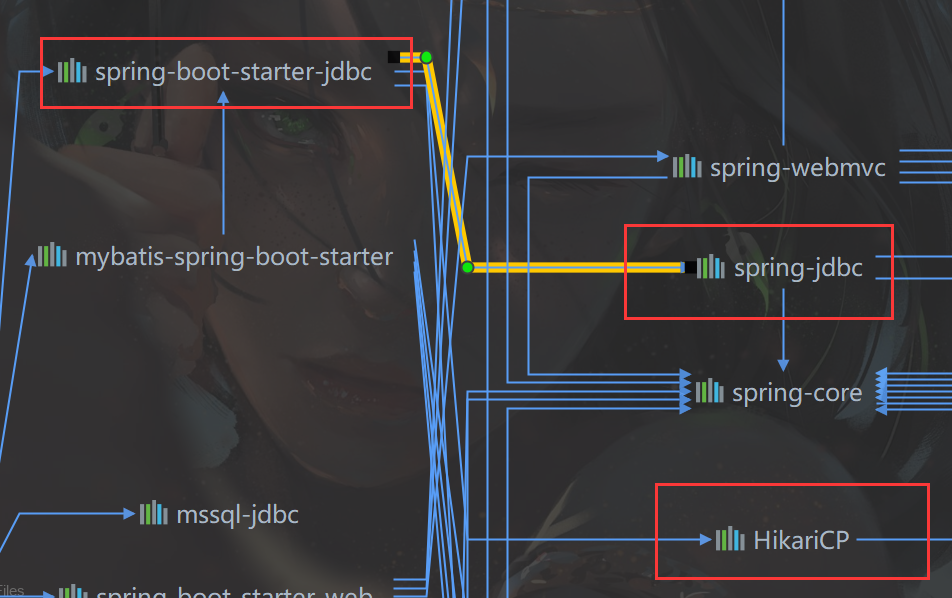
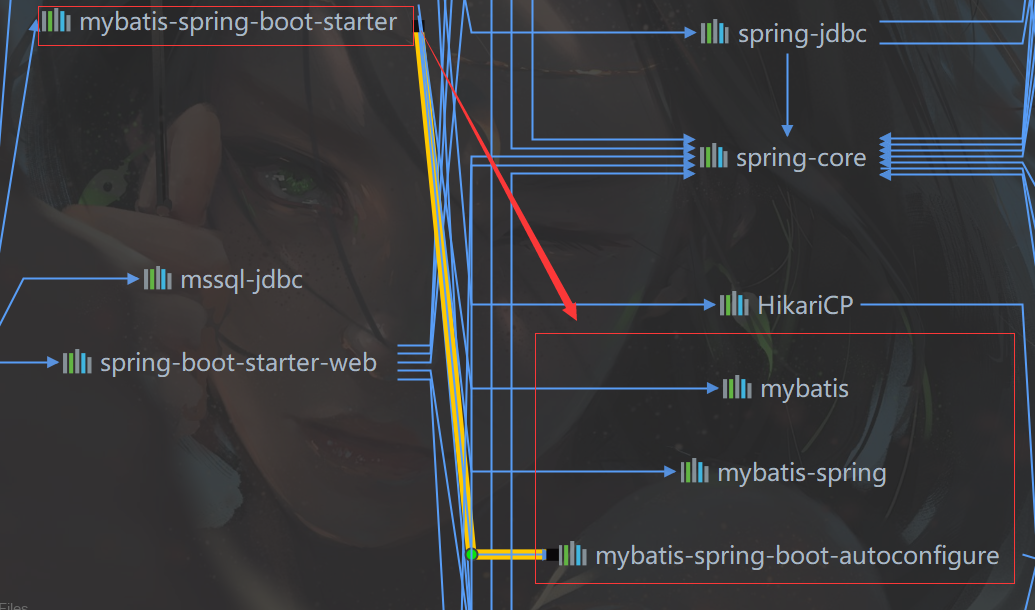
如下图,就是 spring‐boot‐starter‐web 的依赖,可见,它依赖了很多有关前端mvc的相关依赖,这些子依赖都会随着我们用了这个启动器而一起导入进来,就不需要我们像以前那样一个个导入了。
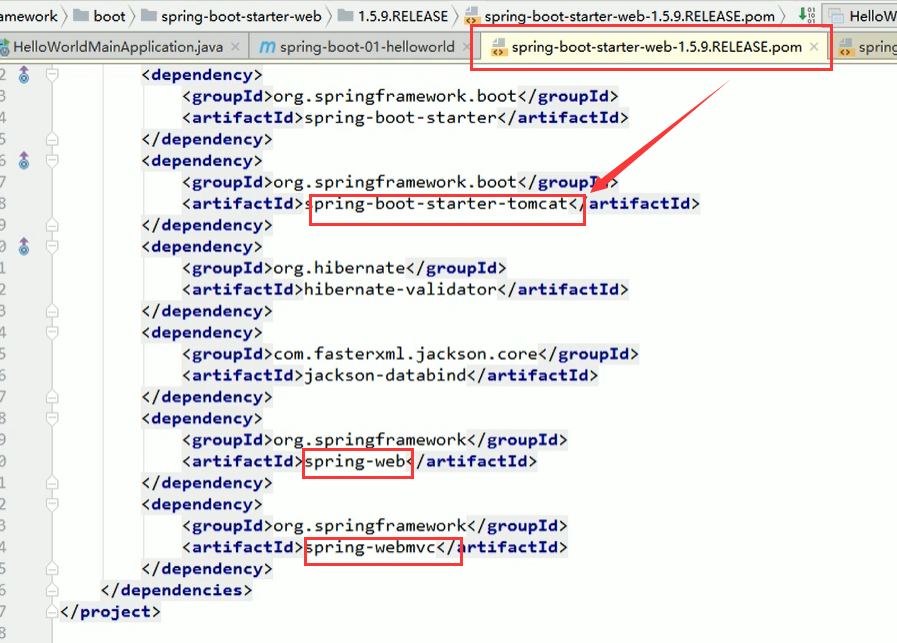
通过官网说明,我们知道springBoot帮助我们抽取了很多启动器Starter,当我们在应用某个场景下想要使用某些功能时,只需要导入该场景的启动器就可以 " 一键部署" 了。
- 第三步:再来看一下入门程序中的主配置类
/**
 *  @SpringBootApplication 来标注一个主程序类,说明这是一个Spring Boot应用
 */
@SpringBootApplication
public class HelloWorldMainApplication {
    public static void main(String[] args) {
        // Spring应用启动起来
        SpringApplication.run(HelloWorldMainApplication.class,args);
    }
}
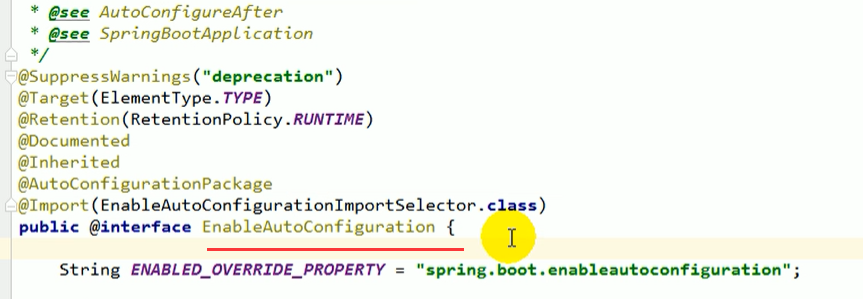
@SpringBootApplication: Spring Boot应用标注在某个类上说明这个类是SpringBoot的主配置类,SpringBoot
就应该运行这个类的main方法来启动SpringBoot应用;
@SpringBootApplication:源码,这个注解是个组合注解
@Target(ElementType.TYPE)
@Retention(RetentionPolicy.RUNTIME)
@Documented
@Inherited
@SpringBootConfiguration//表明这是一个Spring Boot的配置类;
@EnableAutoConfiguration//开启自动配置功能,重要!!!
@ComponentScan(excludeFilters = {
      @Filter(type = FilterType.CUSTOM, classes = TypeExcludeFilter.class),
      @Filter(type = FilterType.CUSTOM, classes = AutoConfigurationExcludeFilter.class) })
public @interface SpringBootApplication {
@SpringBootConfiguration: 该注解标注的类表明这是一个Spring Boot的配置类;
- 该注解还能继续往里面深入,也是一个组合注解,底层是使用的 我们原理熟悉的 `@Configuration:配置类
- 配置类 ----- 配置文件;配置类也是容器中的一个组件;@Component
@EnableAutoConfiguration:开启自动配置功能;
以前在Spring我们需要手动import 导入一个依赖的配置类,比如主配置类需要导入SqlMapContext的配置类。
Spring Boot帮我们自动配置;@EnableAutoConfiguration告诉SpringBoot开启自动配置功能;这样自动配置才能生效;
-
@AutoConfigurationPackage:自动配置包。
- 将主配置类(@SpringBootApplication标注的类)的所在包及下面所有子包里面的所有组件扫描到Spring容器;(所以可以自动扫描到Contoller组件,Controller所在包必须和主配置类在同一个包)
-
**@Import(AutoConfigurationPackages.Registrar.class):**Spring的底层注解@Import,给容器中导入另一个配置类;
- 导入的组件由AutoConfigurationPackages.Registrar.class;选择器指定
- 将所有需要导入的配置类以全类名的方式返回;这些配置类就会被添加到容器中;
- 会给容器中导入非常多的自动配置类(xxxAutoConfiguration);就是给容器中导入这个场景需要的所有配置类
-
有了自动配置类,免去了我们手动编写配置注入功能组件等的工作;
SpringFactoriesLoader.loadFactoryNames(EnableAutoConfiguration.class,classLoader);Spring Boot在启动的时候从每个已经导入的jar包的类路径下的META-INF/spring.factories中获取EnableAutoConfiguration指定的值,其实这个值就是jar包中的配置类,将这些值作为自动配置类导入到容器中,自动配置类就生效,帮我们进行自动配置工作;
以前我们需要自己配置的东西,自动配置类都帮我们;
J2EE的整体整合解决方案和自动配置都在spring-boot-autoconfigure-1.5.9.RELEASE.jar;
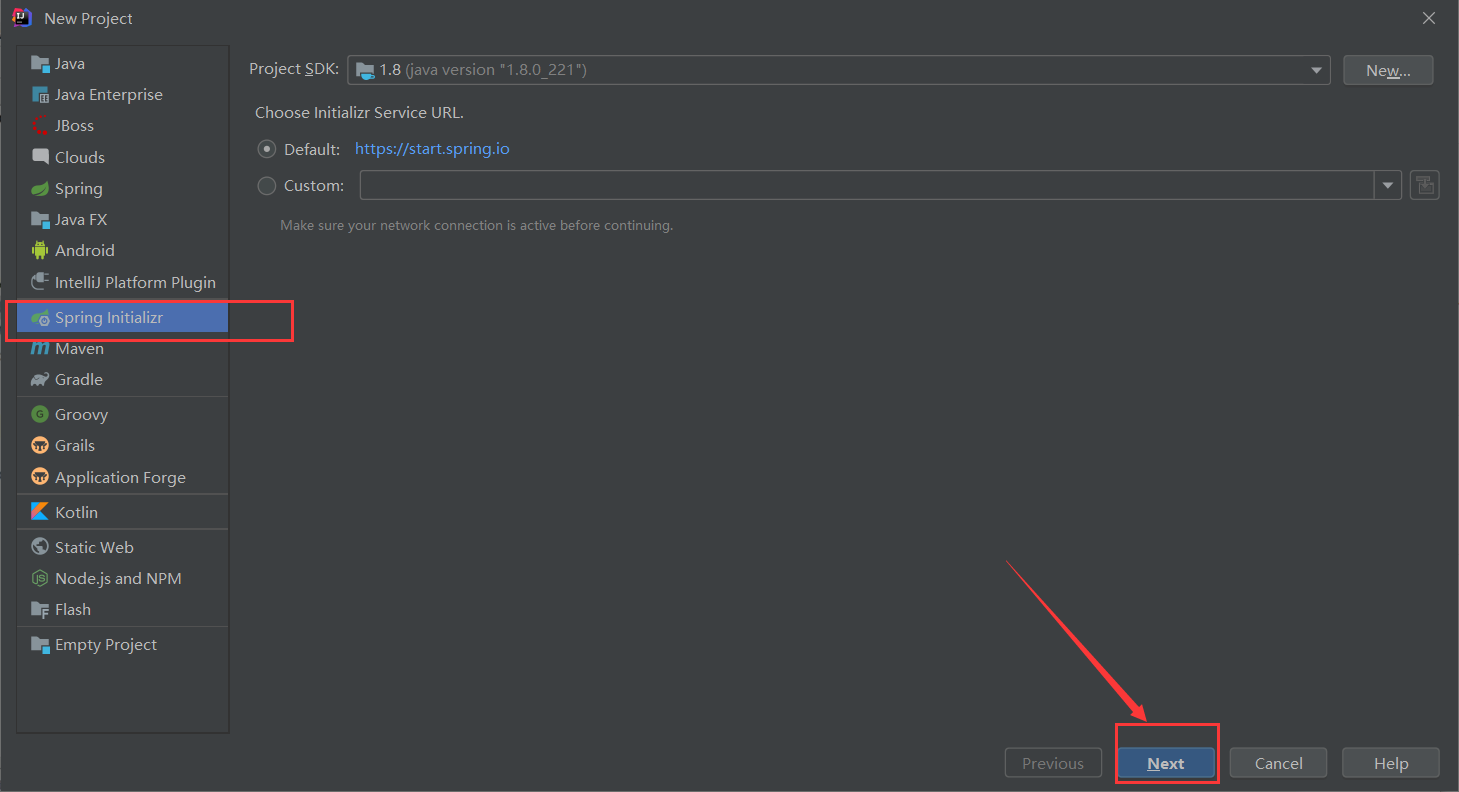
2.4 快速向导SpringBoot项目
通过Idea的快速向导创建一个工程
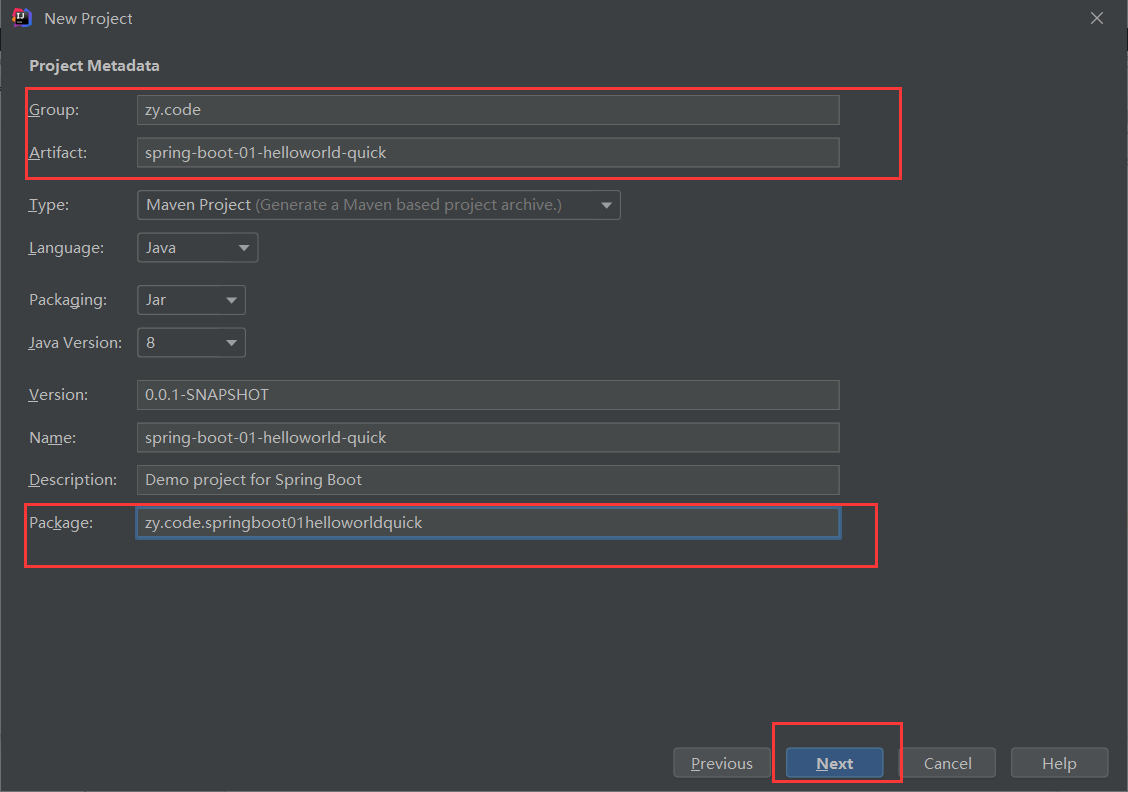
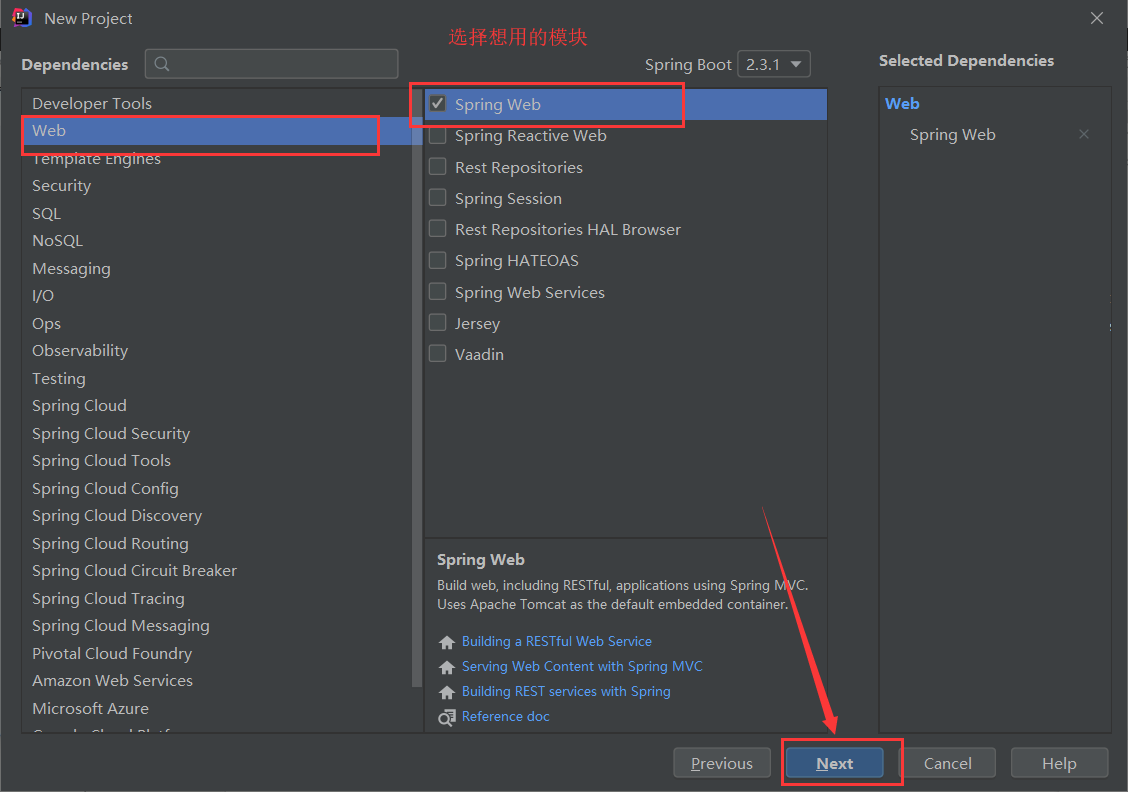
通过快速向导创建工程后,POM.xml中自动帮我加入了需要使用的模块的依赖,自动写好了SpringBoot的主配置类。
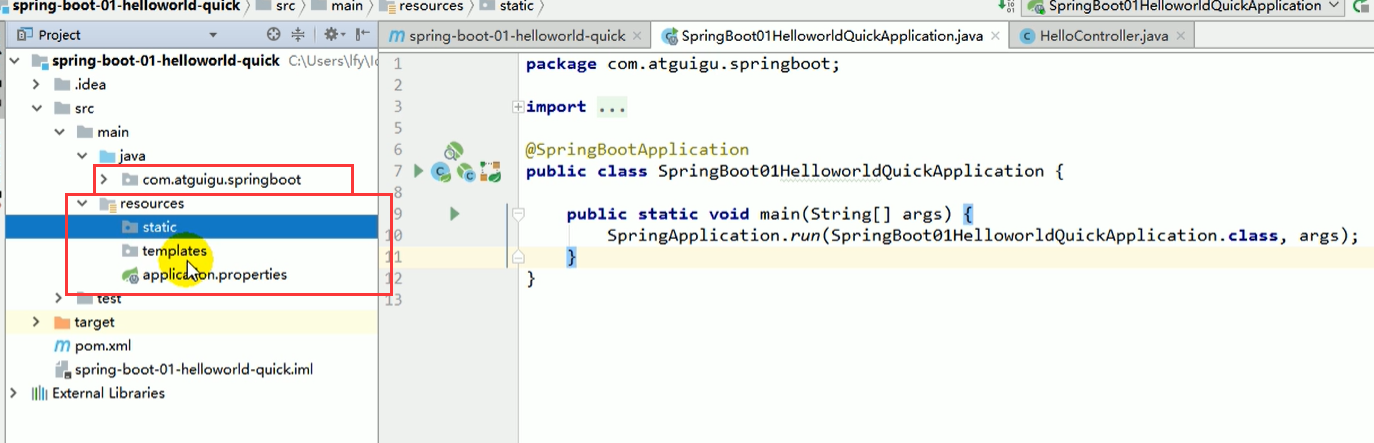
- resources文件夹中目录结构
- static:保存所有的静态资源; js css images;
- templates:保存所有的模板页面;(Spring Boot默认jar包使用嵌入式的Tomcat,默认不支持JSP页
面);可以使用模板引擎(freemarker、thymeleaf); - application.properties:Spring Boot应用的配置文件;可以修改一些默认设置,比如设置server的port端口号;
三、配置文件
3.1 配置文件
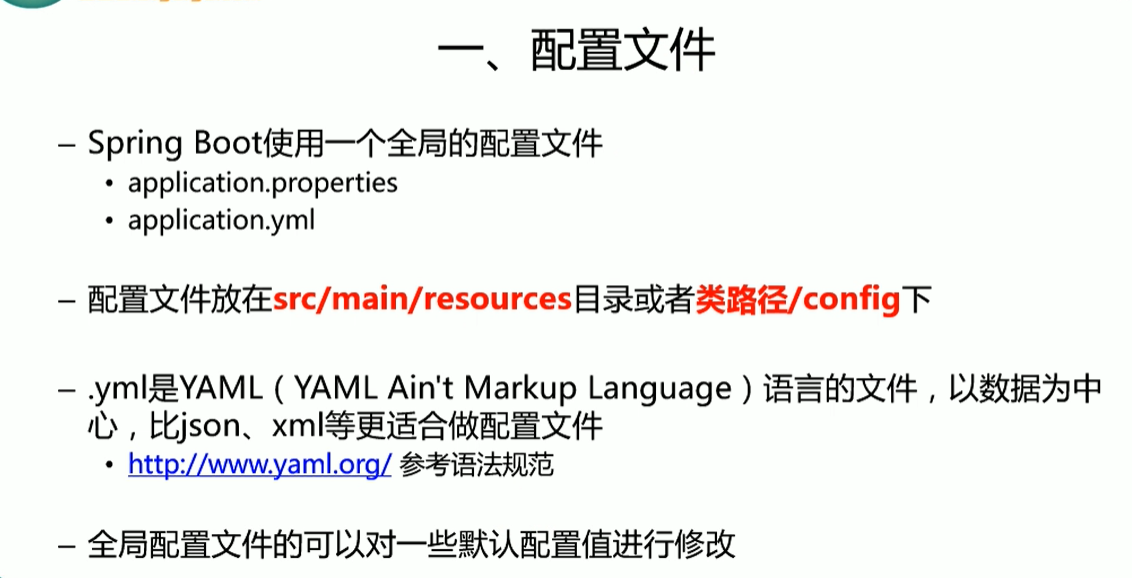
配置文件的类型:
-
application.properties
-
application.yml
配置文件的作用:修改SpringBoot自动配置的默认值;SpringBoot在底层都给我们自动配置好;
3.2 YML语法
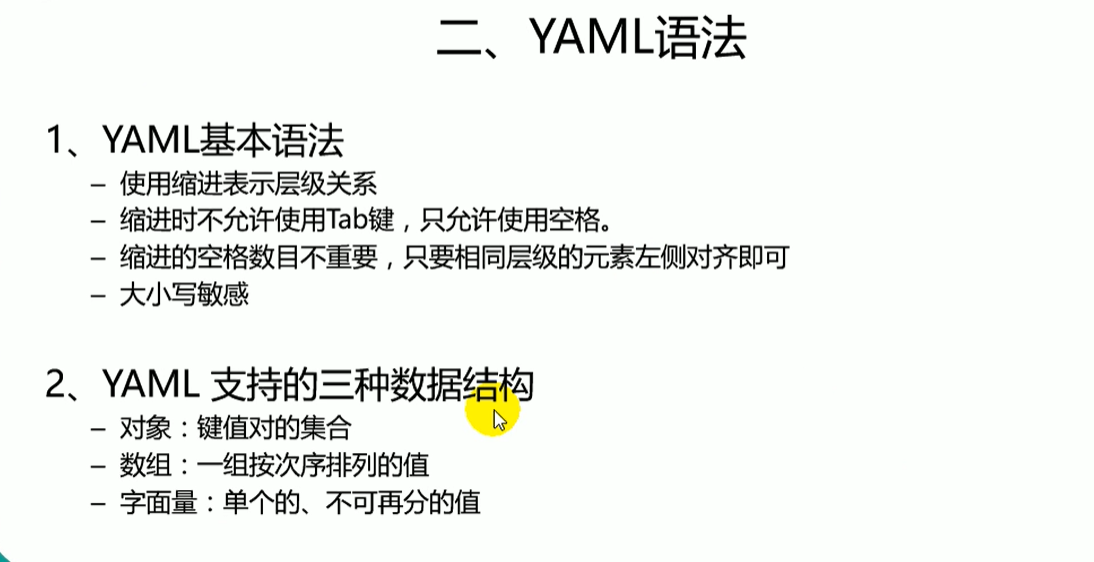
#基本语法
#以空格的缩进来控制层级关系;只要是左对齐的一列数据,都是同一个层级的
server:
  port: 8083

#对象的配置
person:
  name: zhangsan
  age: 18
  addr: beijing

#行内对象配置
person2: {name: zhangsan,age: 18,addr: beijing}

#数组的配置
#注意:value1与 - 之间存在一个空格
city:
  - beijing
  - tianjing
  - shanghai
  - guangzhou

citys: [beijing,tianjing,shanghai,guangzhou]

#数组内容是对象
students:
  - name: tom
    age: 18
    addr: beijing
  - name: lucy
    age: 17
    addr: shanghai

student: [{name: tome,age: 18,addr: beijing},{name: lucy,age: 17,addr: shanghai}]
3.3 YML配置文件值注入
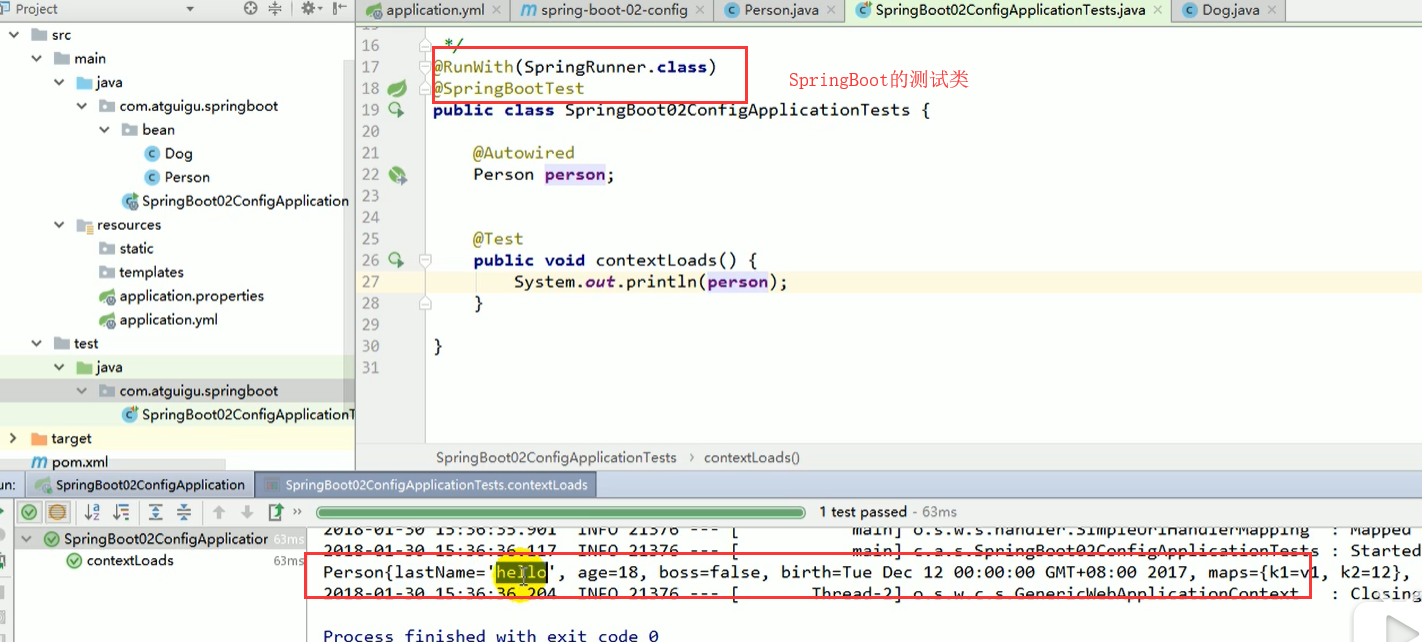
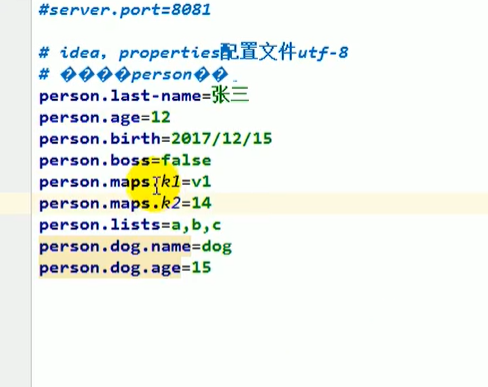
配置文件如下:
person:
    lastName: hello
    age: 18
    boss: false
    birth: 2017/12/12
    maps: {k1: v1,k2: 12}
    lists:
      ‐ lisi
      ‐ zhaoliu
    dog:
      name: 小狗
      age: 12
JavaBean:
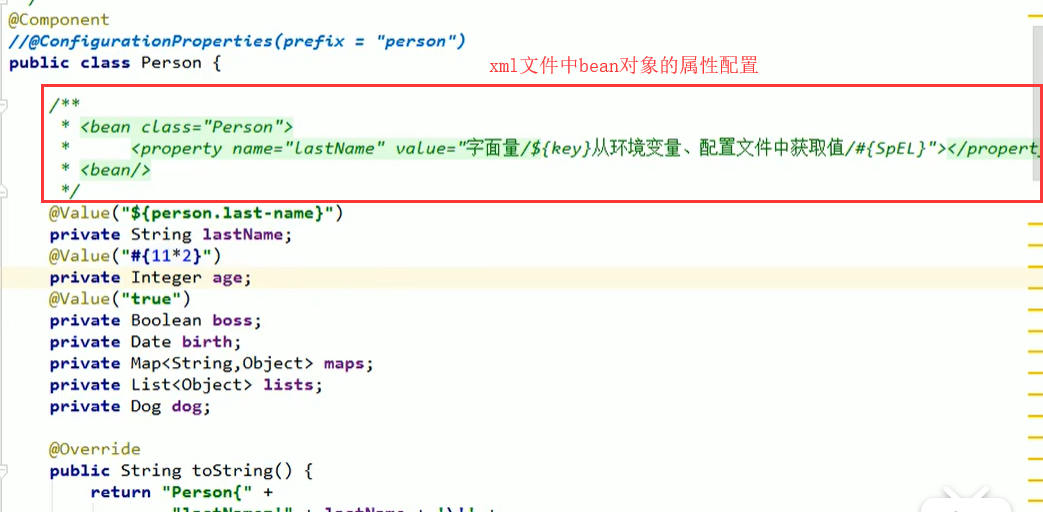
/**
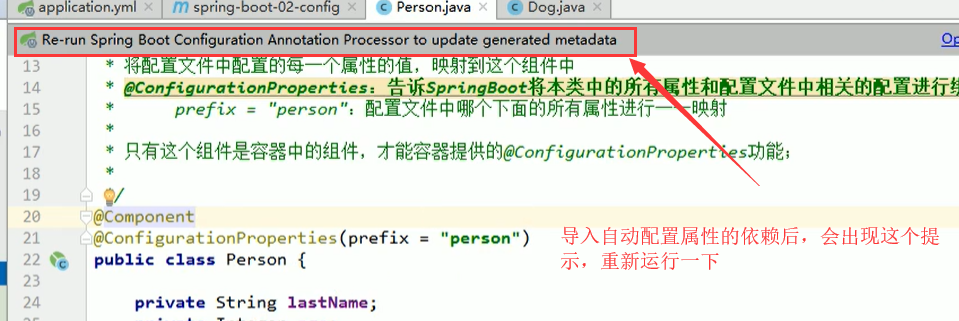
* 将配置文件中配置的每一个属性的值,映射到这个组件中
* @ConfigurationProperties:告诉SpringBoot将本类中的所有属性和配置文件中相关的配置进行绑定;
* prefix = "person":前缀-----配置文件中哪个下面的所有属性进行一一映射
*
* @Component:作用是只有这个组件是容器中的组件,才能获得容器提供的@ConfigurationProperties功能
*
*/
@Component
@ConfigurationProperties(prefix = "person")
public class Person {
private String lastName;
private Integer age;
private Boolean boss;
private Date birth;
private Map<String,Object> maps;
private List<Object> lists;
private Dog dog;
我们可以导入配置文件处理器,以后编写配置就有提示了
<!‐‐导入配置文件处理器,配置文件进行绑定就会有提示‐‐>
<dependency>
	<groupId>org.springframework.boot</groupId>
	<artifactId>spring‐boot‐configuration‐processor</artifactId>
	<optional>true</optional>
</dependency>
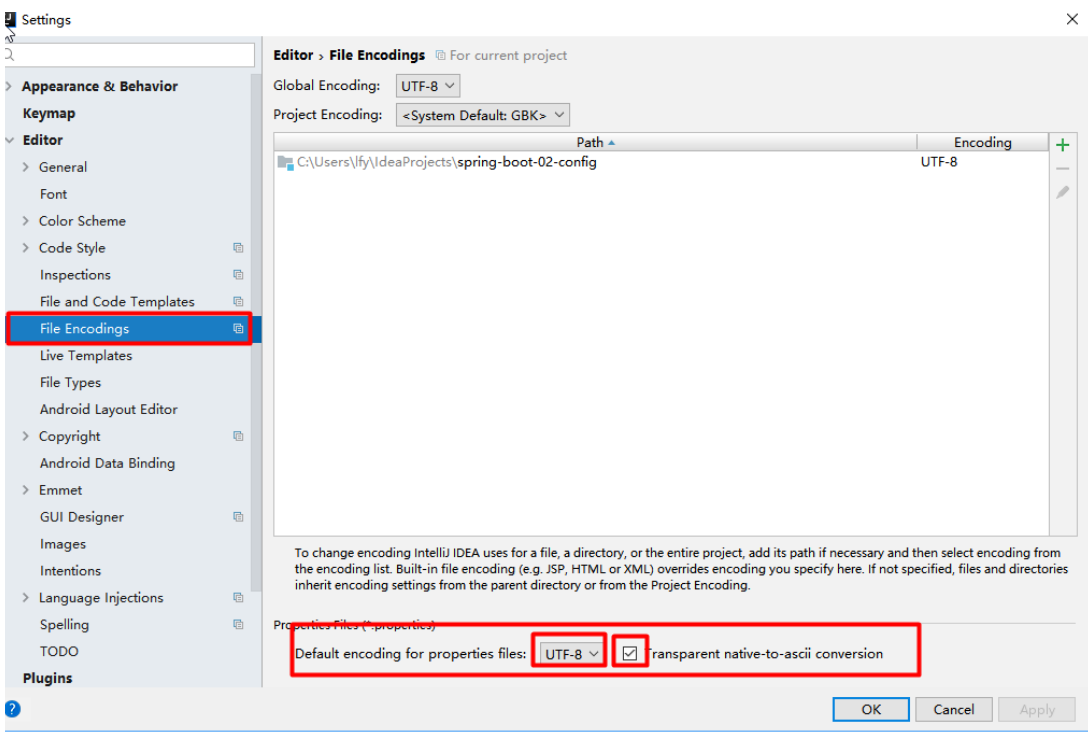
3.4 properties配置文件默认utf-8乱码
3.5 @Value注解的值注入
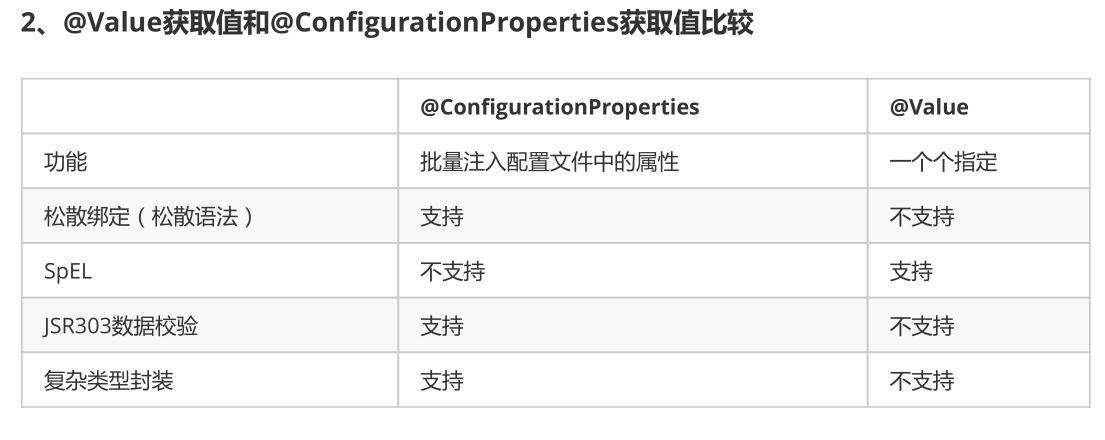
配置文件yml还是properties他们都能获取到值;
如果说,我们只是在某个业务逻辑中需要获取一下配置文件中的某项值,使用@Value;
如果说,我们专门编写了一个javaBean来和配置文件进行映射,我们就直接使用@ConfigurationProperties;
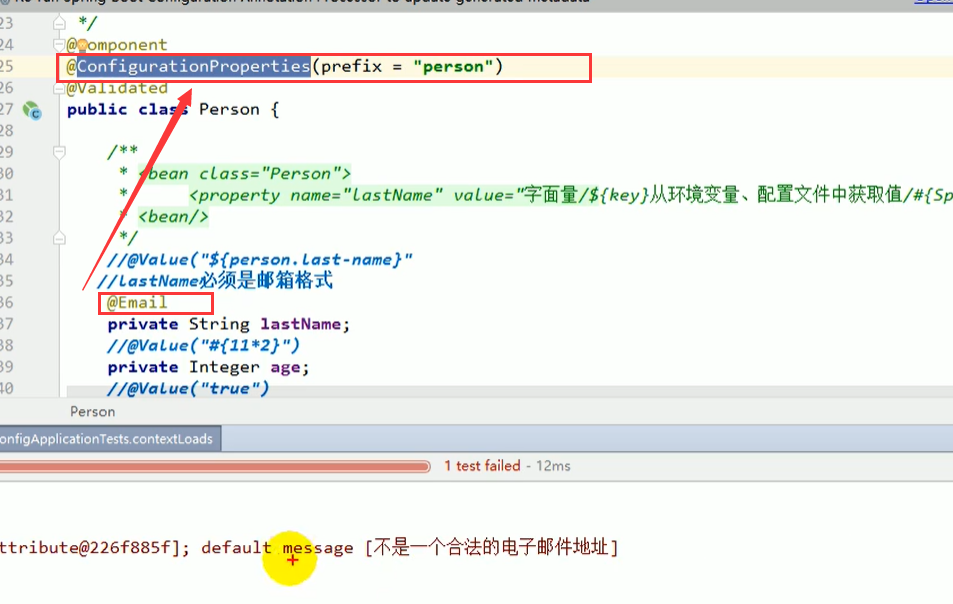
3.6 @ConfigurationProperties值注入(数据校验)
@Component
@ConfigurationProperties(prefix = "person")
@Validated
public class Person {
    /**
     * <bean class="Person">
     *      <property name="lastName" value="字面量/${key}从环境变量、配置文件中获取值/#
{SpEL}"></property>
     * <bean/>
     */
   //lastName必须是邮箱格式
    @Email
    //@Value("${person.last‐name}")
    private String lastName;
    //@Value("#{11*2}")
    private Integer age;
    //@Value("true")
    private Boolean boss;
    private Date birth;
    private Map<String,Object> maps;
    private List<Object> lists;
    private Dog dog;
@Value 注解:不支持数据校验,不支持取出maps复杂类型
@@ConfigurationProperties; 支持数据校验、支持复杂类型
@3.7 PropertySource值注入(读取指定配置文件)
语义: 加载指定的配置文件;
/**
 * 将配置文件中配置的每一个属性的值,映射到这个组件中
 * @ConfigurationProperties:告诉SpringBoot将本类中的所有属性和配置文件中相关的配置进行绑定;
 *      prefix = "person":配置文件中哪个下面的所有属性进行一一映射
 *
 * 只有这个组件是容器中的组件,才能容器提供的@ConfigurationProperties功能;
 *  @ConfigurationProperties(prefix = "person")默认从全局配置文件中获取值;
 *
 */
@PropertySource(value = {"classpath:person.properties"})//读取指定的配置文件
@Component
@ConfigurationProperties(prefix = "person")//读取全局配置文件
//@Validated
public class Person {
    /**
     * <bean class="Person">
     *      <property name="lastName" value="字面量/${key}从环境变量、配置文件中获取值/#
{SpEL}"></property>
     * <bean/>
     */
   //lastName必须是邮箱格式
   // @Email
    //@Value("${person.last‐name}")
    private String lastName;
    //@Value("#{11*2}")
    private Integer age;
    //@Value("true")
    private Boolean boss;
3.8 @ImportResource
@ImportResource:导入Spring的配置文件,让配置文件里面的内容生效;
Spring Boot里面没有Spring支持的XML配置文件,我们自己编写的xml配置文件,也不能自动识别;
想让Spring的配置文件生效,加载进来;@ImportResource标注在一个配置类上
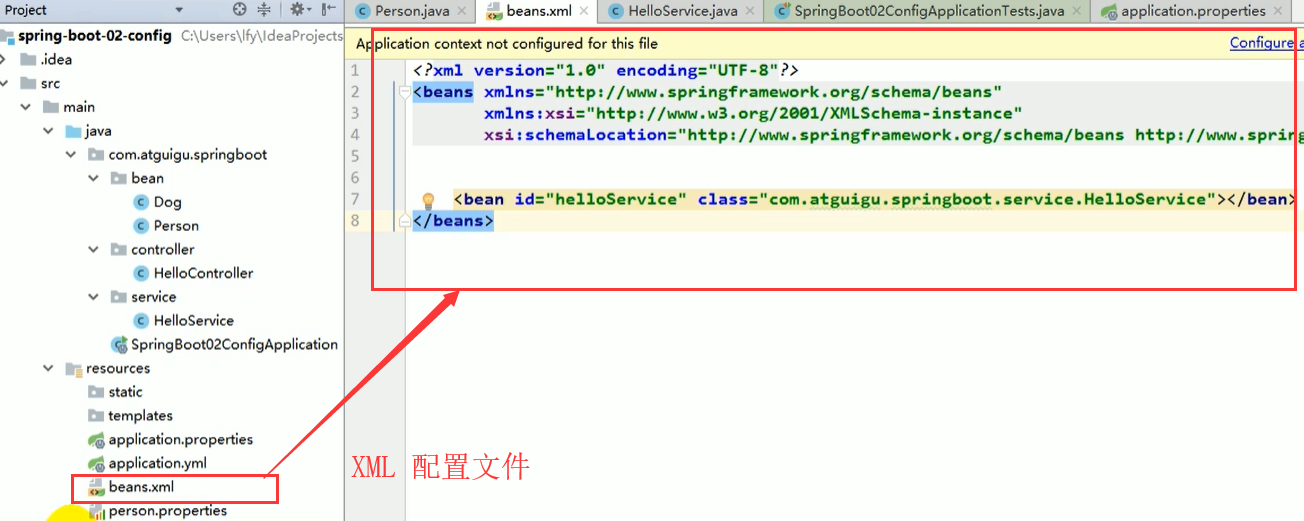
@ImportResource(locations = {"classpath:beans.xml"})
导入Spring的配置文件让其生效
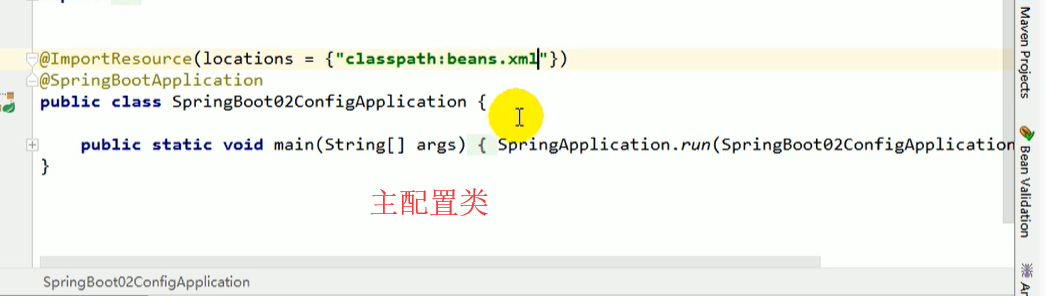
注意:上面的其他注解都是用在 实体类上标注的,而这个注解是用在主配置类上的。
3.9 @Bean
第二种方式去读取Spring中的配置Bean,也可以通过自己定义一个配置类,专门用来配置Spring中的Bean组件。
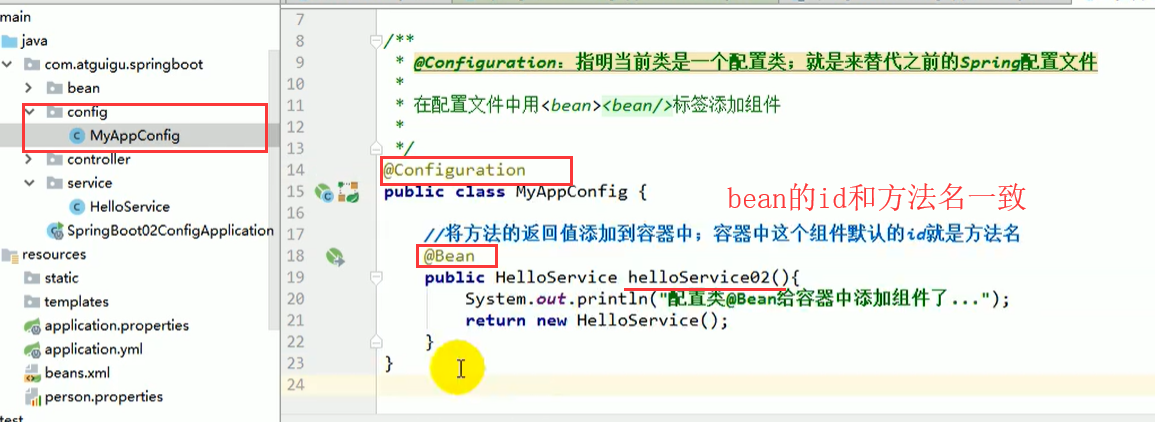
/**
 * @Configuration:指明当前类是一个配置类;就是来替代之前的Spring配置文件
 *
  * 在配置文件中用<bean><bean/>标签添加组件
 *
 */
@Configuration
public class MyAppConfig {
    //将方法的返回值添加到容器中;容器中这个组件默认的id就是方法名
    @Bean
    public HelloService helloService02(){
        System.out.println("配置类@Bean给容器中添加组件了...");
        return new HelloService();
    }
}
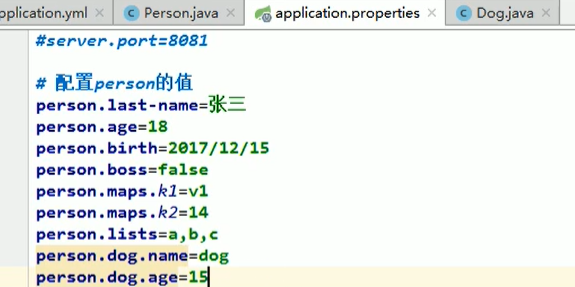
3.10 配置文件中的占位符
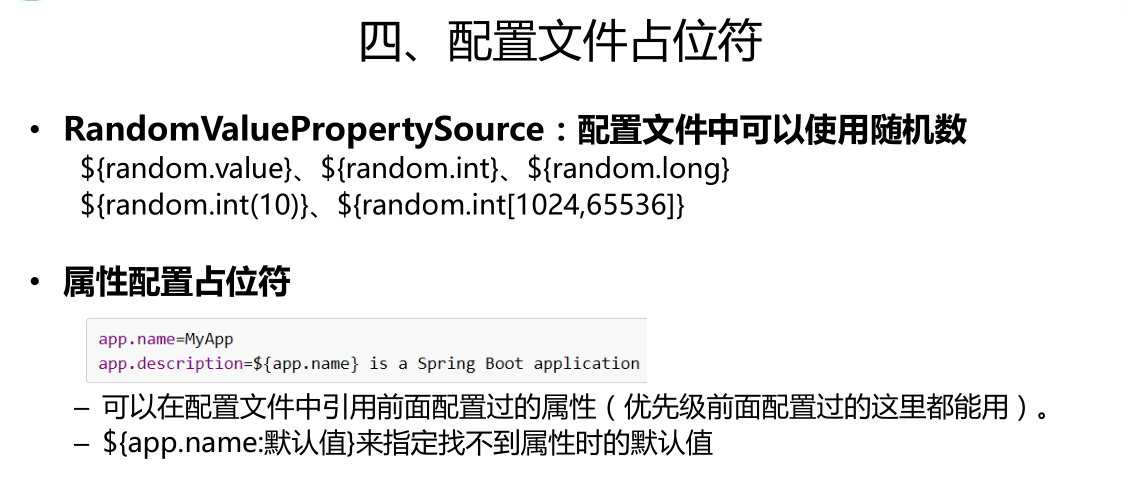
${random.value}、${random.int}、${random.long}
${random.int(10)}、${random.int[1024,65536]}
person.last‐name=张三${random.uuid}
person.age=${random.int}
person.birth=2017/12/15
person.boss=false
person.maps.k1=v1
person.maps.k2=14
person.lists=a,b,c
#这里想要使用person.hello的值,但是没有这个值,冒号后面就指定了一个默认值
person.dog.name=${person.hello:hello}_dog

person.dog.age=15
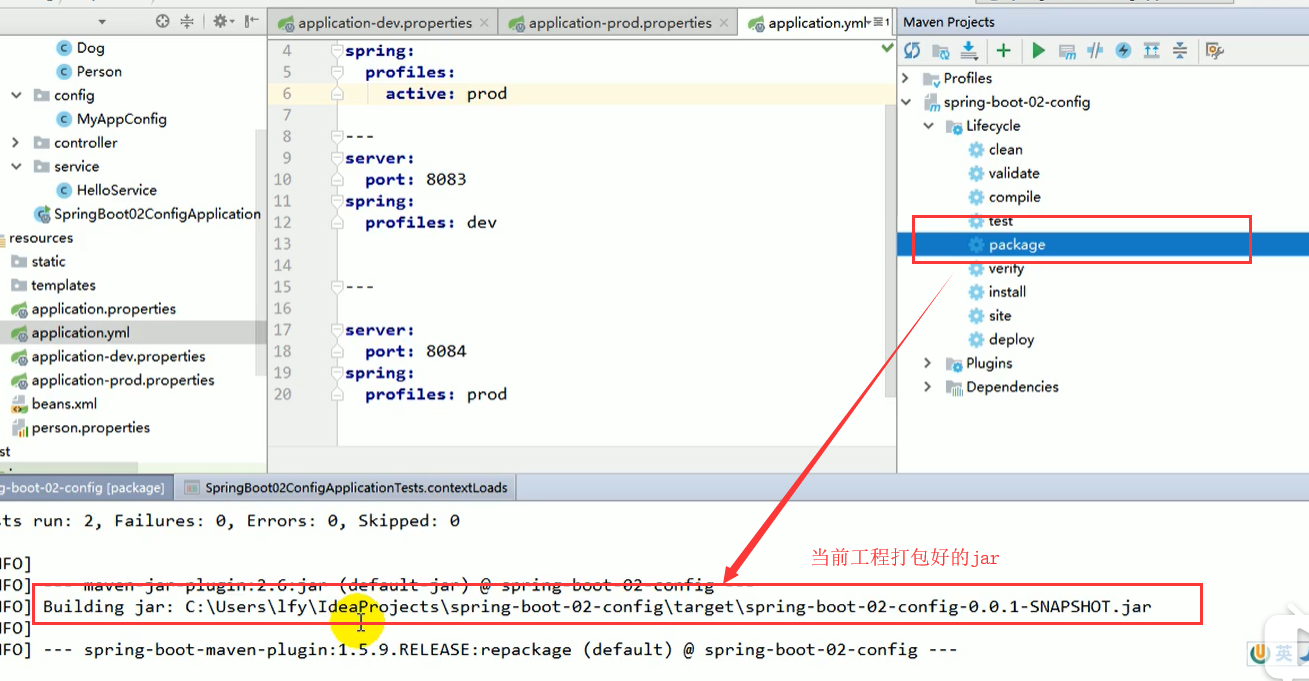
3.11 Profile 配置
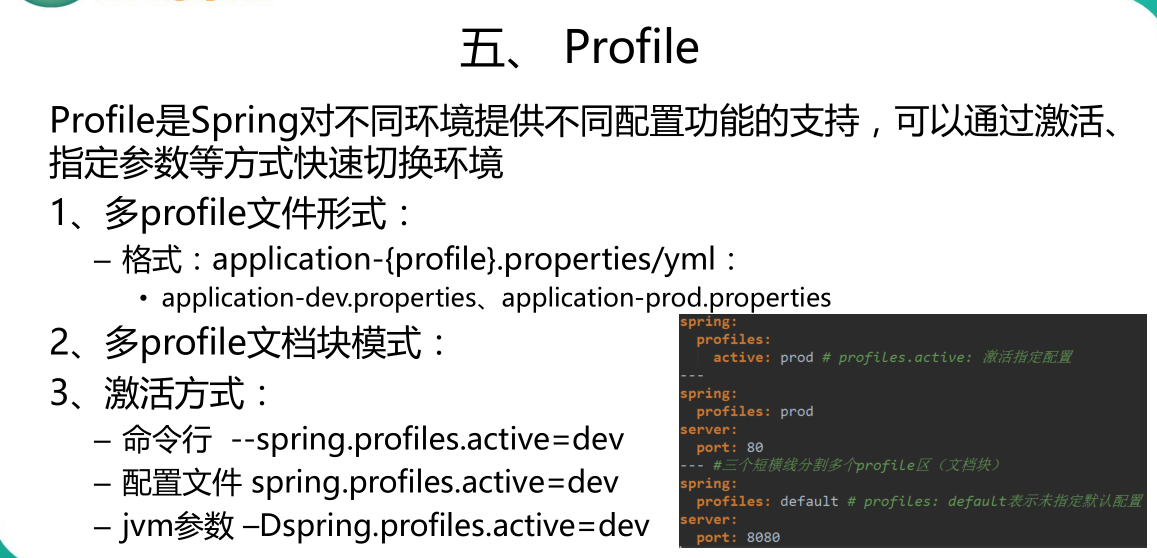
一、创建多个配置文件
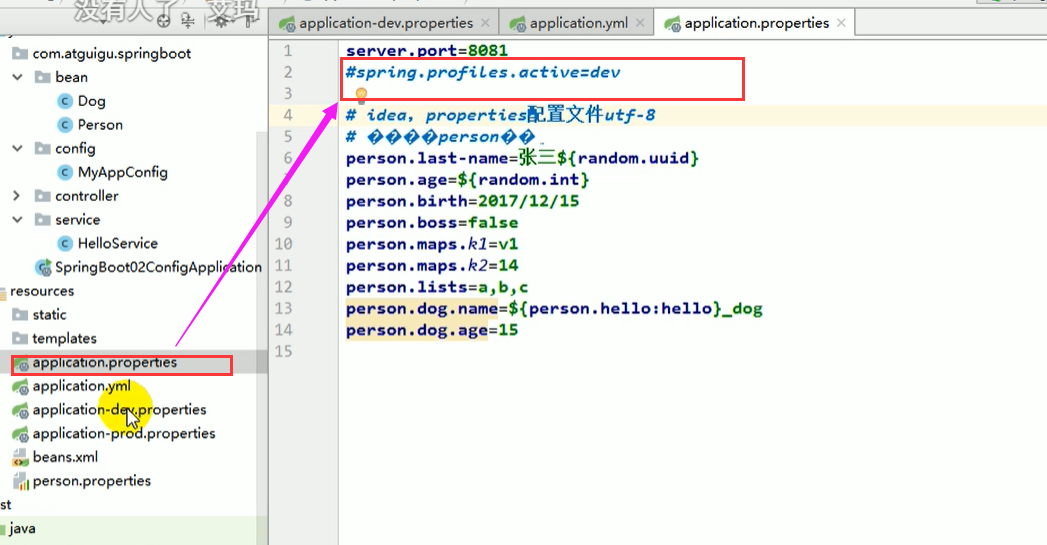
我们在主配置文件编写的时候,文件名可以是 application-{profile}.properties/yml
默认使用application.properties的配置;
文件名写法必须是这样

二、激活指定profile
1、在配置文件中指定 spring.profiles.active=dev
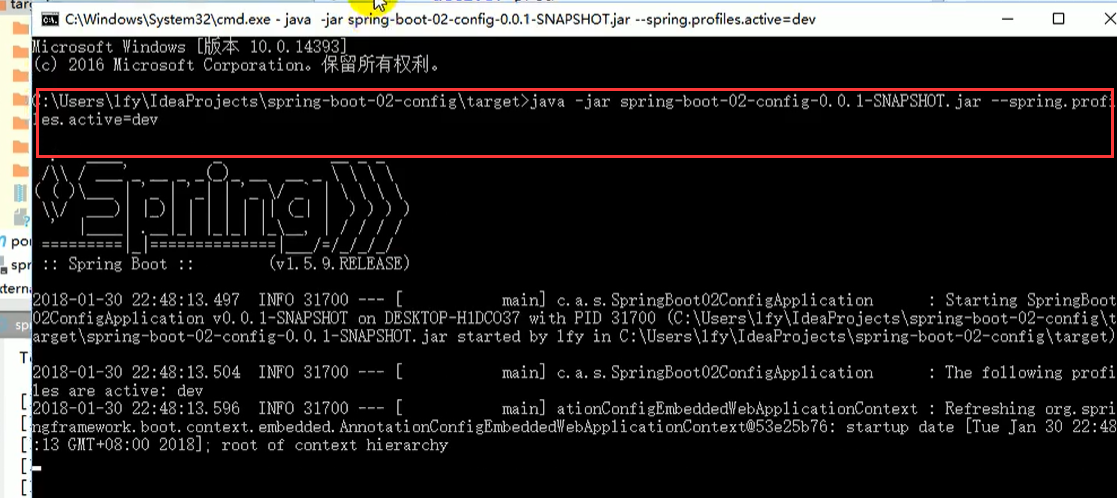
- 命令行:
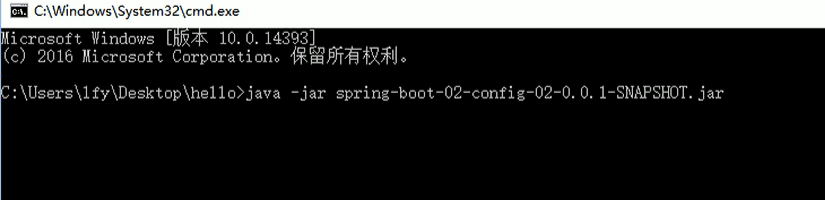
java -jar spring-boot-02-config-0.0.1-SNAPSHOT.jar --spring.profiles.active=dev;
可以直接在测试的时候,配置传入命令行参数
3、虚拟机参数;
–spring.profiles.active=dev
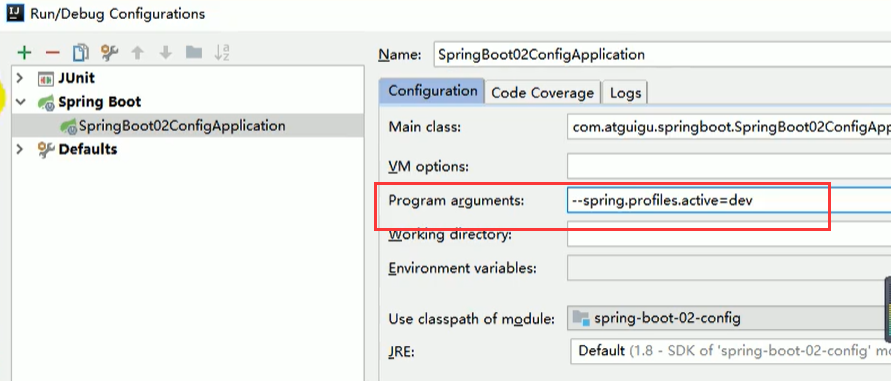
-Dspring.profiles.active=dev

- yml支持多文档块方式

3.12 配置文件的加载位置
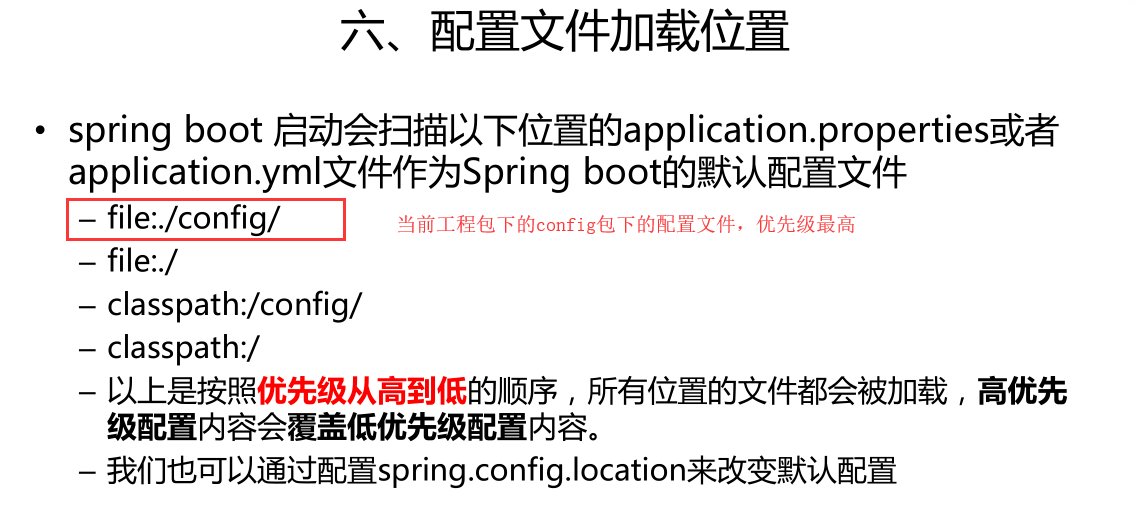

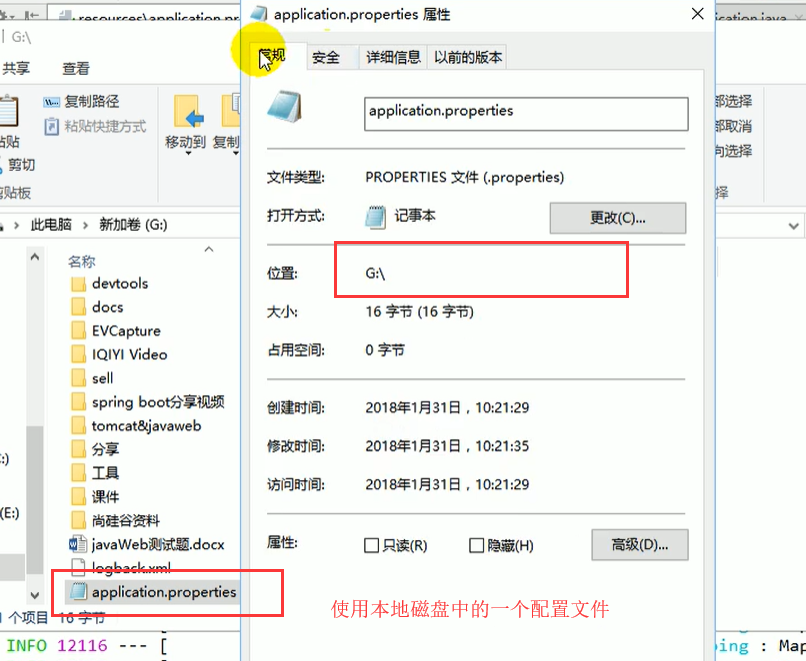
我们也可以通过配置spring.config.location来改变默认配置
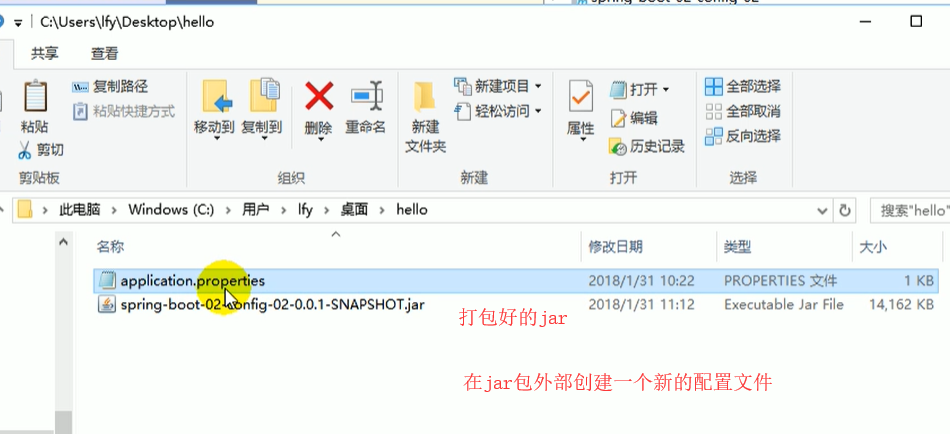
项目打包好以后,我们可以使用命令行参数的形式,启动项目的时候来指定配置文件的新位置;指定配置文件和默
认加载的这些配置文件共同起作用形成互补配置;
3.13 外部配置加载顺序
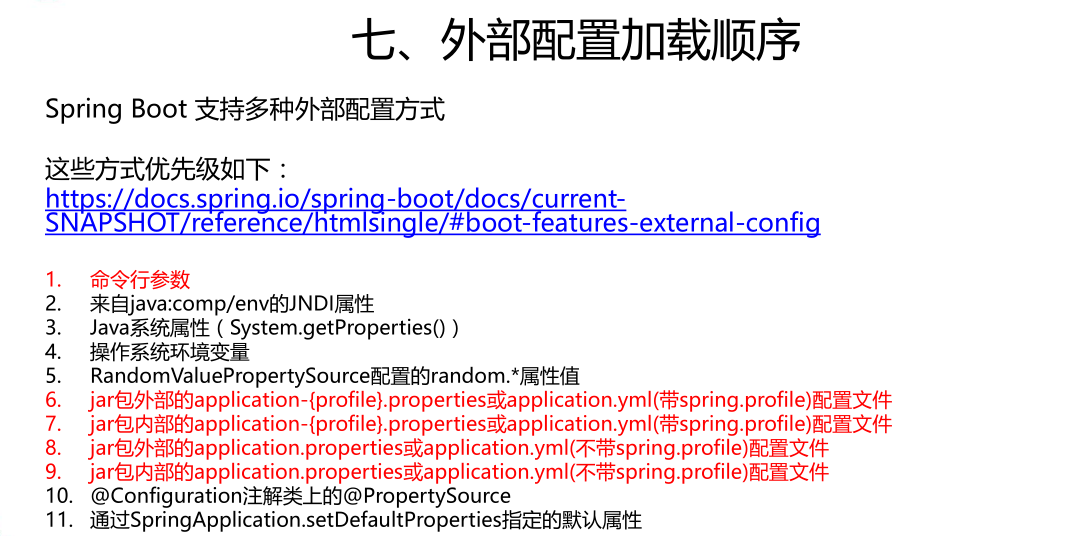
所有支持的配置加载来源;
参考官方文档上述的外部配置文件优先级都是按照从上到下,依次减弱的。
1.命令行参数
所有的配置都可以在命令行上进行指定
java -jar spring-boot-02-config-02-0.0.1-SNAPSHOT.jar --server.port=8087 --server.context-path=/abc
多个配置用空格分开; --配置项=值

- 由jar包外向jar包内进行寻找;
优先加载带profile
- 6.jar包外部的
application-{profile}.properties或application.yml(带spring.profile)配置文件 - 7.jar包内部的
application-{profile}.properties或application.yml(带spring.profile)配置文件
再来加载不带profile
- 8.jar包外部的
application.properties或application.yml(不带spring.profile)配置文件 - 9.jar包内部的
application.properties或application.yml(不带spring.profile)配置文件

✔ 3.14 自动配置原理
上面的不管是全局默认配置文件,还是我们自己创建的yml/properties配置文件,都会被主配置类自动配置。
那么springBoot是怎么将配置文件中设置的属性扫描、配置到工程中的呢?使用了哪些必要的代码和参数?
1)、SpringBoot启动的时候加载主配置类,开启了自动配置功能 @EnableAutoConfiguration
2)、@EnableAutoConfiguration 作用:
- 利用EnableAutoConfigurationImportSelector给容器中导入一些组件?
- 可以查看selectImports()方法的内容;
- List configurations = getCandidateConfigurations(annotationMetadata, attributes); //获取候选的配置
SpringFactoriesLoader.loadFactoryNames()
扫描所有已导入的jar包类路径下的  META‐INF/spring.factories
把扫描到的这些文件的内容包装成 properties对象
从 properties 中获取到 EnableAutoConfiguration.class类(类名)对应的值,然后把他们添加在容器中
将 类路径下 META-INF/spring.factories 里面配置的所有EnableAutoConfiguration的值加入到了容器中;
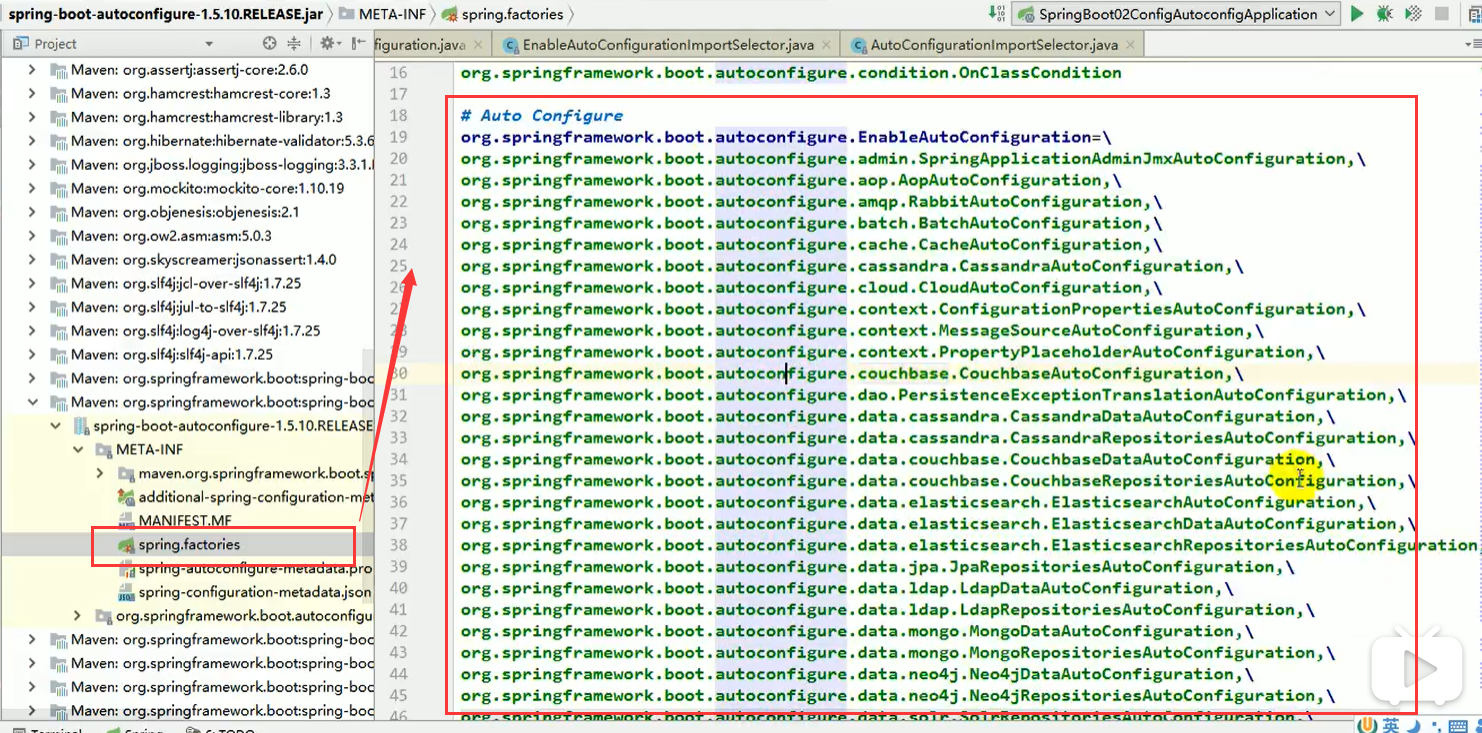
每一个这样的 xxxAutoConfiguration类都是容器中的一个组件,都加入到容器中;用他们来做自动配置;
3)、每一个自动配置类进行自动配置功能;
4)、以HttpEncodingAutoConfiguration(Http编码自动配置)为例解释自动配置原理;
//表示这是一个配置类,以前编写的配置文件一样,也可以给容器中添加组件
@Configuration
//启动指定类的
//ConfigurationProperties功能;将配置文件中对应的值和HttpEncodingProperties绑定起来;并把
//HttpEncodingProperties加入到ioc容器中
@EnableConfigurationProperties(HttpEncodingProperties.class)
//Spring底层@Conditional注解(Spring注解版),根据不同的条件,如果满足指定的条件,整个配置类里面的配置就会生效;
// 判断当前应用是否是web应用,如果是,当前配置类生效
@ConditionalOnWebApplication
//判断当前项目有没有这个类 CharacterEncodingFilter;SpringMVC中进行乱码解决的过滤器;
@ConditionalOnClass(CharacterEncodingFilter.class)
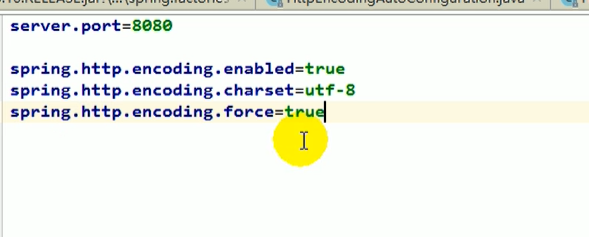
//判断配置文件中是否存在某个配置 spring.http.encoding.enabled;如果不存在,判断也是成立的
//即使我们配置文件中不配置pring.http.encoding.enabled=true,也是默认生效的;
@ConditionalOnProperty(prefix = "spring.http.encoding", value = "enabled", matchIfMissing =true)
public class HttpEncodingAutoConfiguration {
//他已经和SpringBoot的配置文件映射了
private final HttpEncodingProperties properties;
//只有一个有参构造器的情况下,参数的值就会从容器中拿
public HttpEncodingAutoConfiguration(HttpEncodingProperties properties) {
this.properties = properties;
}
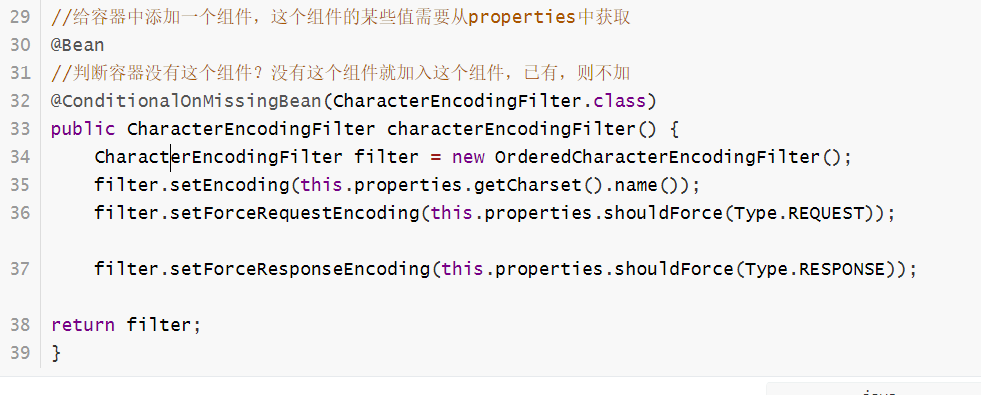
//给容器中添加一个组件,这个组件的某些值需要从properties中获取
@Bean
//判断容器没有这个组件?没有这个组件就加入这个组件,已有,则不加
@ConditionalOnMissingBean(CharacterEncodingFilter.class)
public CharacterEncodingFilter characterEncodingFilter() {
CharacterEncodingFilter filter = new OrderedCharacterEncodingFilter();
filter.setEncoding(this.properties.getCharset().name());
filter.setForceRequestEncoding(this.properties.shouldForce(Type.REQUEST));
filter.setForceResponseEncoding(this.properties.shouldForce(Type.RESPONSE));
return filter;
}
根据当前不同的条件判断,决定这个配置类是否生效?
一但这个配置类生效;这个配置类就会给容器中添加各种组件;这些组件的属性是从对应的properties类中获取
的,这些类里面的每一个属性又是和配置文件绑定的;
5)、所有在配置文件中能配置的属性都是在xxxxProperties类中;配置文件能配置什么就可以参照某个功
能对应的这个xxxxProperties类
//从配置文件中获取指定的值和bean的属性进行绑定
@ConfigurationProperties(prefix = "spring.http.encoding")

public class HttpEncodingProperties {
   public static final Charset DEFAULT_CHARSET = Charset.forName("UTF‐8");

精髓:
1)、SpringBoot启动会加载大量的自动配置类
2)、我们看我们需要的功能有没有SpringBoot默认写好的自动配置类;
3)、我们再来看这个自动配置类中到底配置了哪些组件;(如果有我们要用的组件,我们就不需要再来手动配置了)
4)、给容器中自动配置类添加组件的时候,会从properties类中获取某些属性。我们就可以在配置文件中指定这
些属性的值;
xxxxAutoConfigurartion:自动配置类;给容器中添加组件
xxxxProperties:封装配置文件中相关属性;
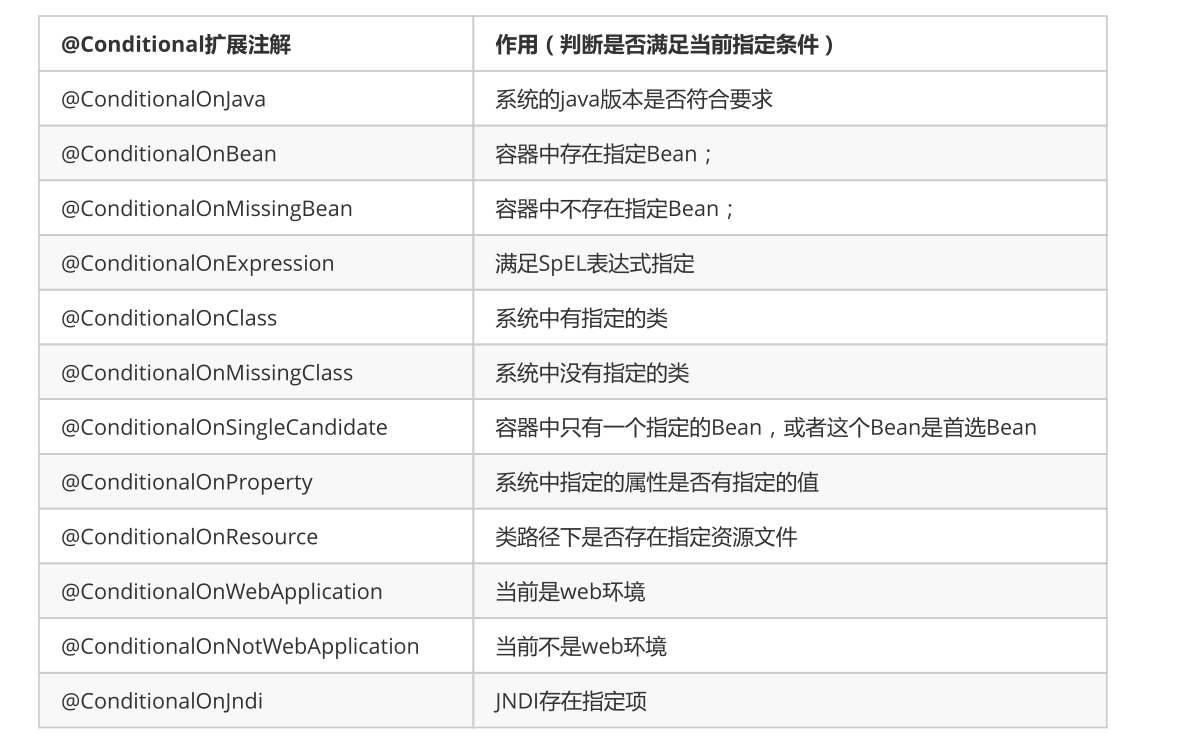
细节:@Conditional派生注解
@Conditional派生注解(Spring注解版原生的@Conditional作用)
作用:必须是@Conditional指定的条件成立,才给容器中添加组件,配置配里面的所有内容才生效;
例如上面的HttpEncodingAutoConfiguration自动配置类中有这样一段代码
自动配置类必须在一定的条件下才能生效;
我们怎么知道哪些自动配置类生效;
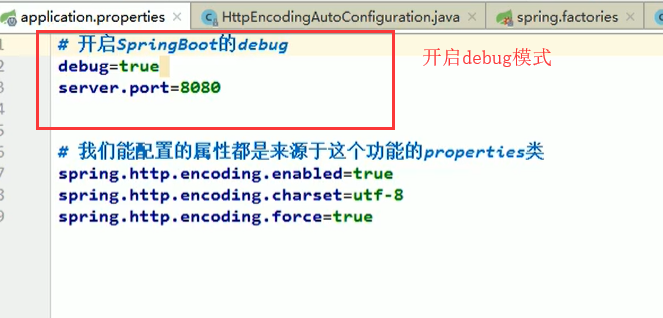
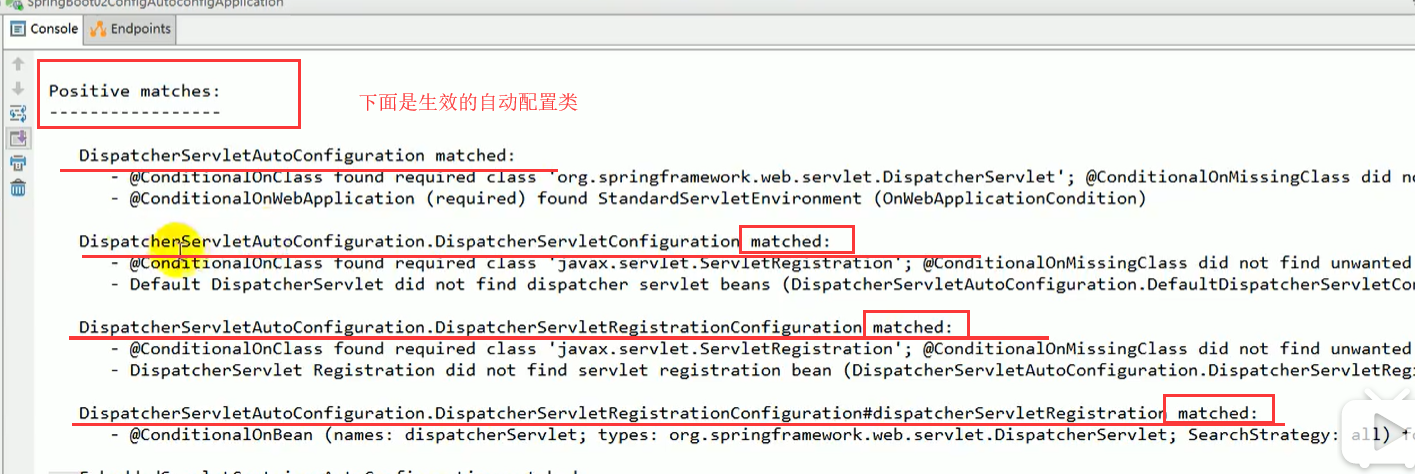
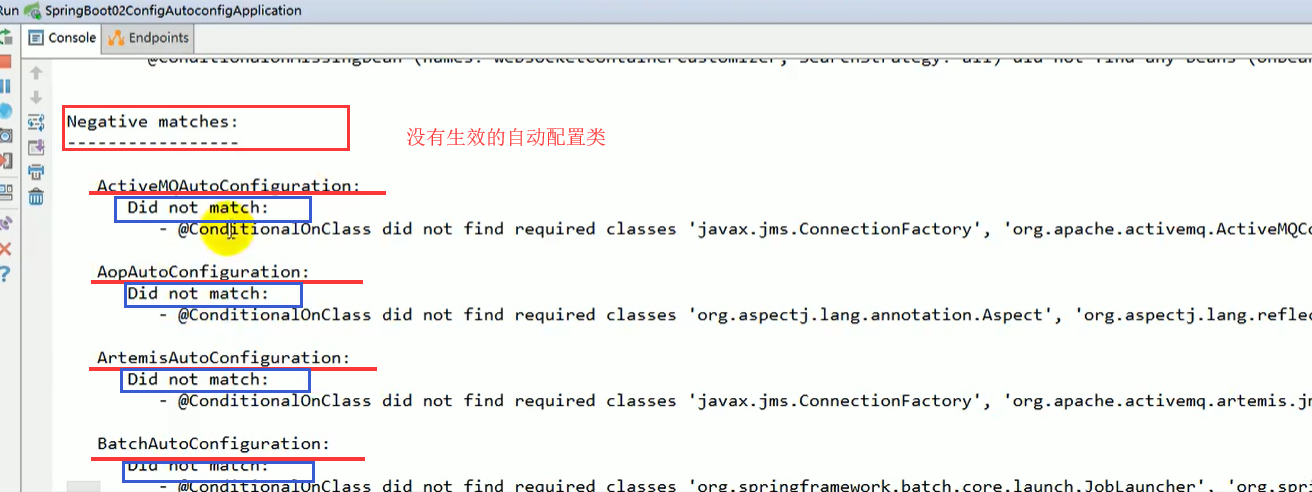
我们可以通过启用 debug=true属性;来让控制台打印自动配置报告,这样我们就可以很方便的知道哪些自动配置类是生效的;
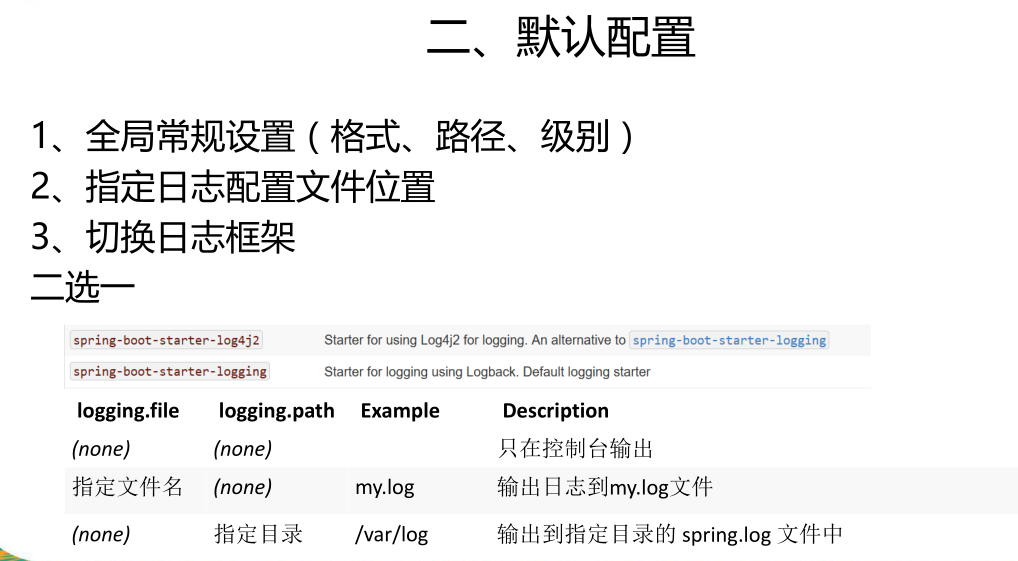
四、日志
SpringBoot:底层是Spring框架,Spring框架默认是用JCL;‘
SpringBoot选用 SLF4j和logback;
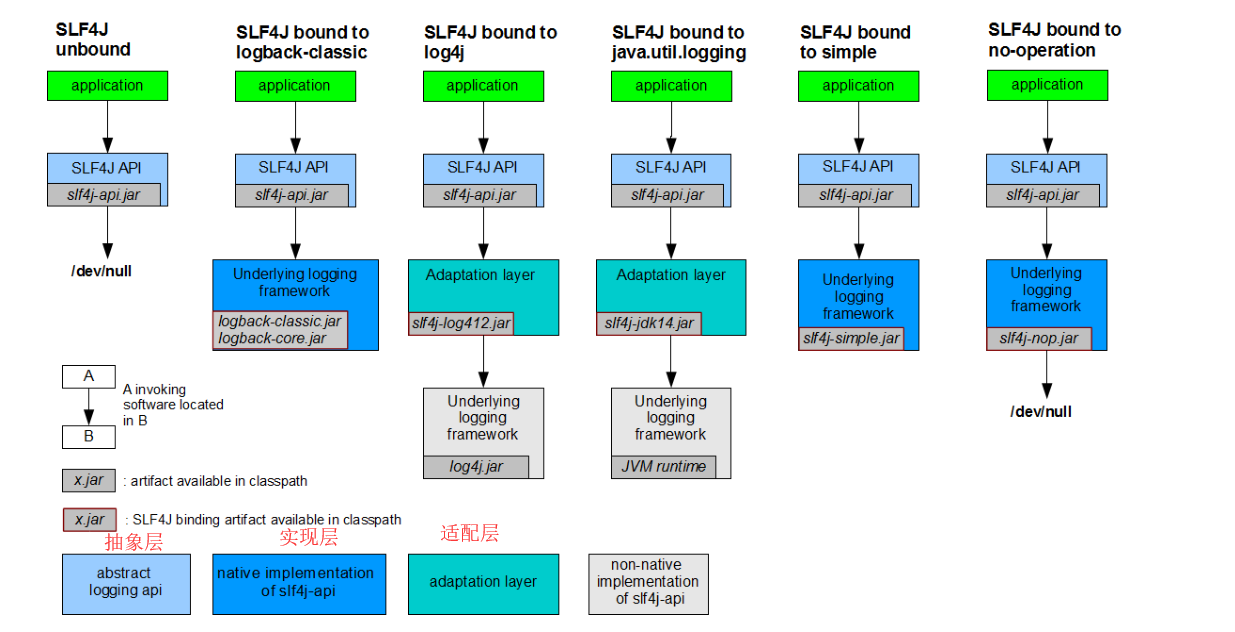
4.1 SLF4j使用
以后开发的时候,日志记录方法的调用,不应该来直接调用日志的实现类,而是调用日志抽象层里面的方法;
给系统里面导入slf4j的jar和 logback的实现jar
图示;
import org.slf4j.Logger;
import org.slf4j.LoggerFactory;
public class HelloWorld {
  public static void main(String[] args) {
    Logger logger = LoggerFactory.getLogger(HelloWorld.class);
    logger.info("Hello World");
  }
}
每一个日志的实现框架都有自己的配置文件。使用slf4j以后,配置文件还是做成日志实现框架自己本身的配置文
件;
4.2 遗留问题
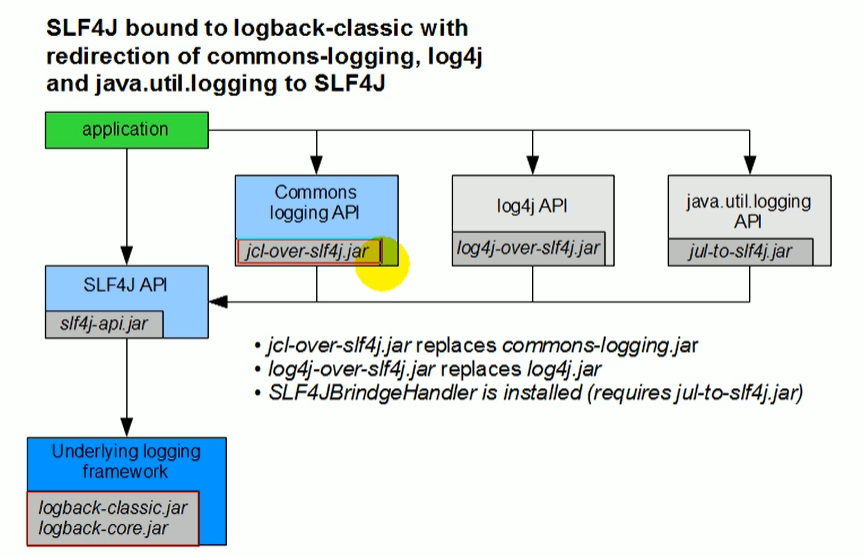
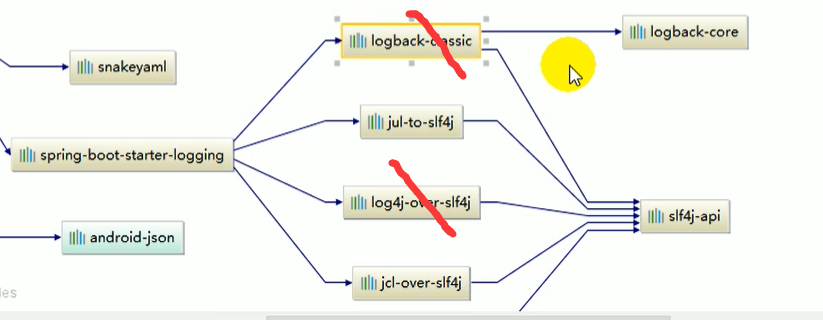
在多个框架下,可能每个框架都是用了不同的日志框架
springboot:(slf4j+logback): Spring(commons-logging)、Hibernate(jboss-logging)、MyBatis、xxxx
统一日志记录,即使是别的框架和我一起统一使用slf4j进行输出?
如何让系统中所有的日志都统一到slf4j;
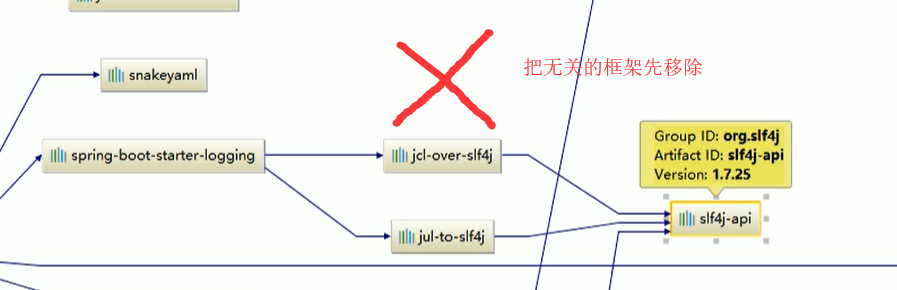
- 1、将系统中其他日志框架先排除出去;
- 2、用中间包来替换原有的日志框架;
- 3、我们导入slf4j其他的实现
4.3 SpringBoot日志关系
<dependency>
	<groupId>org.springframework.boot</groupId>
	<artifactId>spring‐boot‐starter</artifactId>
</dependency>
SpringBoot使用它来做日志功能;
<dependency>
	<groupId>org.springframework.boot</groupId>
	<artifactId>spring‐boot‐starter‐logging</artifactId>
</dependency>
该依赖的底层依赖关系
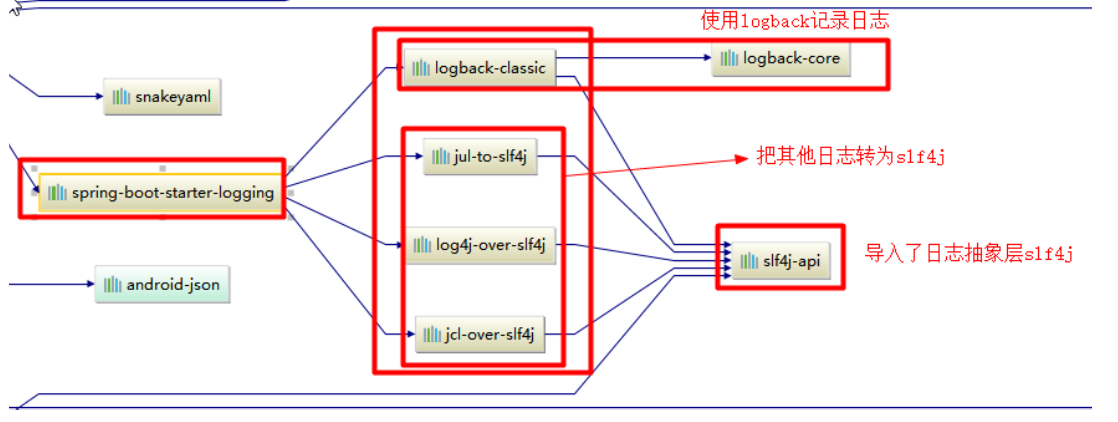
总结:
1)、SpringBoot底层也是使用slf4j+logback的方式进行日志记录
2)、SpringBoot也把其他的日志都替换成了slf4j;
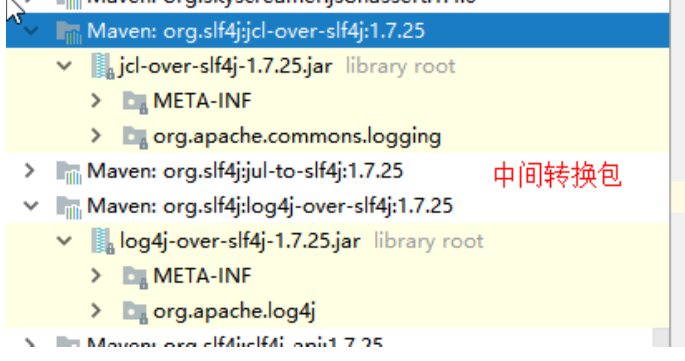
3)、中间替换包?
@SuppressWarnings("rawtypes")
public abstract class LogFactory {
    static String UNSUPPORTED_OPERATION_IN_JCL_OVER_SLF4J =
"http://www.slf4j.org/codes.html#unsupported_operation_in_jcl_over_slf4j";
    static LogFactory logFactory = new SLF4JLogFactory();
4)、如果我们要引入其他框架?一定要把这个框架的默认日志依赖移除掉?
Spring框架用的是commons-logging;
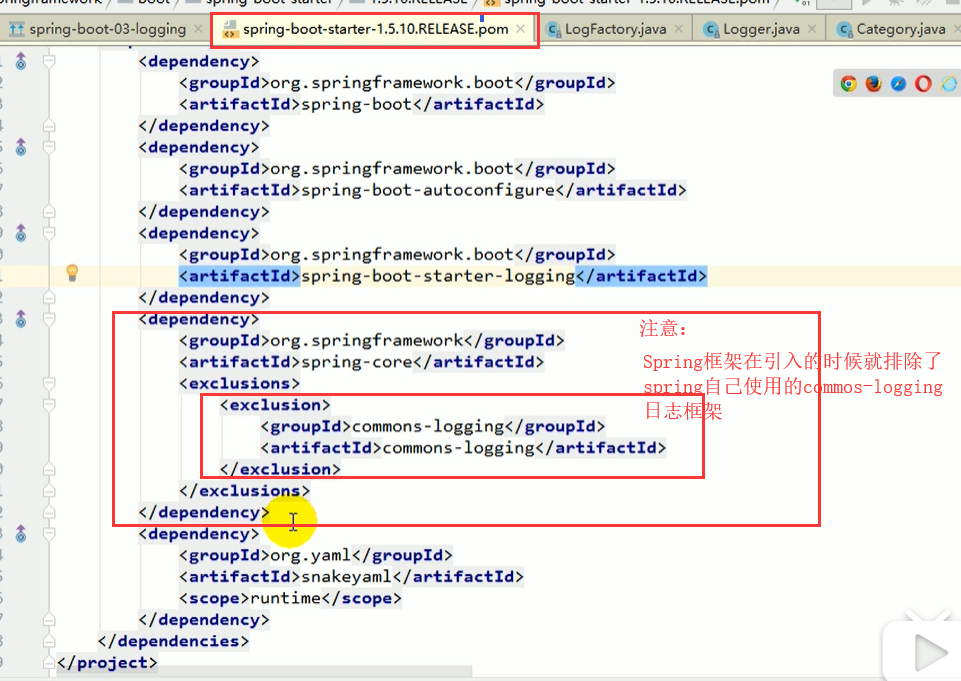
总结:
SpringBoot能自动适配所有的日志,而且底层使用slf4j+logback的方式记录日志,引入其他框架的时候,只需要把这个框架依赖的日志框架排除掉即可;
4.4 日志使用
- 使用默认配置,查看日志
//记录器
Logger logger = LoggerFactory.getLogger(getClass());
@Test
public void contextLoads() {
    //System.out.println();
    //日志的级别;
    //由低到高   trace<debug<info<warn<error
    //可以调整输出的日志级别;日志就只会在这个级别以以后的高级别生效
    logger.trace("这是trace日志...");
    logger.debug("这是debug日志...");
    //SpringBoot默认给我们使用的是info级别的,没有指定级别的就用SpringBoot默认规定的级别;root级别

    logger.info("这是info日志...");
    logger.warn("这是warn日志...");
    logger.error("这是error日志...");
}
SpringBoot 配置文件中 修改日志的默认配置
logging.level.com.atguigu=trace
#logging.path=
# 不指定路径在当前项目下生成springboot.log日志
# 可以指定完整的路径;
#logging.file=G:/springboot.log
# 在当前磁盘的根路径下创建spring文件夹和里面的log文件夹;使用 spring.log 作为默认文件
logging.path=/spring/log
#  在控制台输出的日志的格式
logging.pattern.console=%d{yyyy‐MM‐dd} [%thread] %‐5level %logger{50} ‐ %msg%n
# 指定文件中日志输出的格式
logging.pattern.file=%d{yyyy‐MM-dd} === [%thread] === %-5level === %logger{50} ==== %msg%n
 日志输出格式:
%d表示日期时间,
%thread表示线程名,
%‐5level:级别从左显示5个字符宽度
%logger{50} 表示logger名字最长50个字符,否则按照句点分割。
%msg:日志消息,
%n是换行符
    ‐‐>
    %d{yyyy‐MM‐dd HH:mm:ss.SSS} [%thread] %‐5level %logger{50} ‐ %msg%n
4.5 指定配置
给类路径下放上每个日志框架自己的配置文件即可;SpringBoot就不使用他默认配置的了
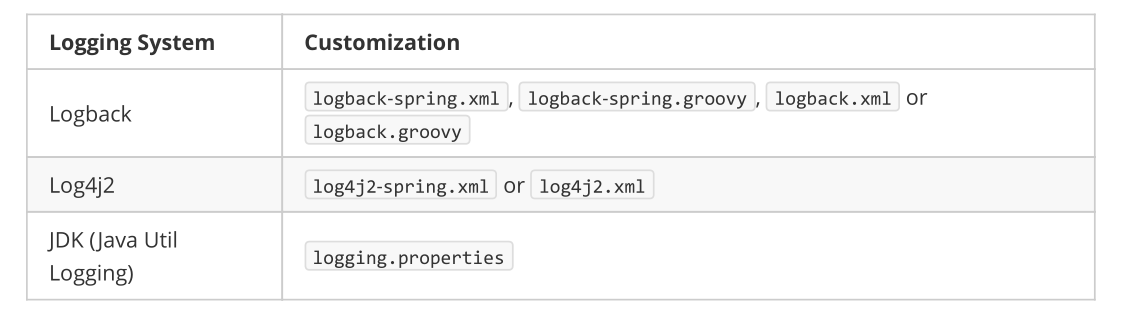
logback.xml:直接就被日志框架识别了;
logback-spring.xml:日志框架就不直接加载日志的配置项,由SpringBoot解析日志配置,可以使用SpringBoot的高级Profile功能
<springProfile name="staging">
    <!‐‐ configuration to be enabled when the "staging" profile is active ‐‐>
   可以指定某段配置只在某个环境下生效
</springProfile>
<appender name="stdout" class="ch.qos.logback.core.ConsoleAppender">
        <!‐‐
        日志输出格式:
        %d表示日期时间,
        %thread表示线程名,
        %‐5level:级别从左显示5个字符宽度
        %logger{50} 表示logger名字最长50个字符,否则按照句点分割。
        %msg:日志消息,
        %n是换行符
        ‐‐>
        <layout class="ch.qos.logback.classic.PatternLayout">
            <springProfile name="dev">
                <pattern>%d{yyyy‐MM‐dd HH:mm:ss.SSS} ‐‐‐‐> [%thread] ‐‐‐> %‐5level
%logger{50} ‐ %msg%n</pattern>
            </springProfile>
            <springProfile name="!dev">
                <pattern>%d{yyyy‐MM‐dd HH:mm:ss.SSS} ==== [%thread] ==== %‐5level
%logger{50} ‐ %msg%n</pattern>
            </springProfile>
        </layout>
    </appender>
如果使用logback.xml作为日志配置文件,还要使用profile功能,会有以下错误
no applicable action for [springProfile]
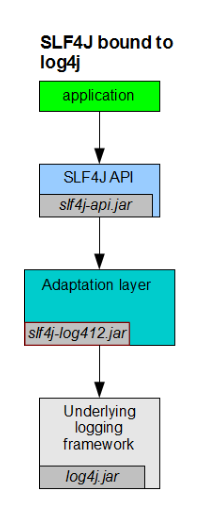
4.6 切换日志框架
可以按照slf4j的日志适配图,进行相关的切换;
slf4j+log4j的方式;
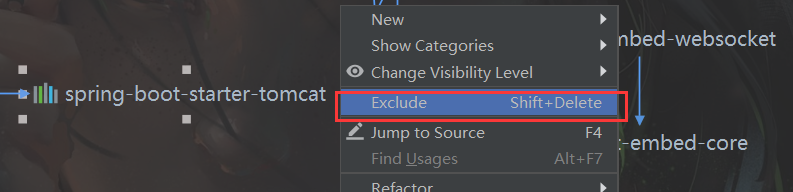
(1) 切换为log4j日志框架时。如图,想要使用SLF4J抽象层配置log4j,需要一个中间包 slf4j-log412.jar
排除原来的启动器中,子依赖的包
<dependency>
  <groupId>org.springframework.boot</groupId>
  <artifactId>spring‐boot‐starter‐web</artifactId>
      <exclusions>
        <exclusion>
          <artifactId>logback‐classic</artifactId>
          <groupId>ch.qos.logback</groupId>
        </exclusion>
        <exclusion>
          <artifactId>log4j‐over‐slf4j</artifactId>
          <groupId>org.slf4j</groupId>
        </exclusion>
      </exclusions>
</dependency>

<!-- 加入中间包依赖 -->
<dependency>
  <groupId>org.slf4j</groupId>
  <artifactId>slf4j‐log4j12</artifactId>
</dependency>
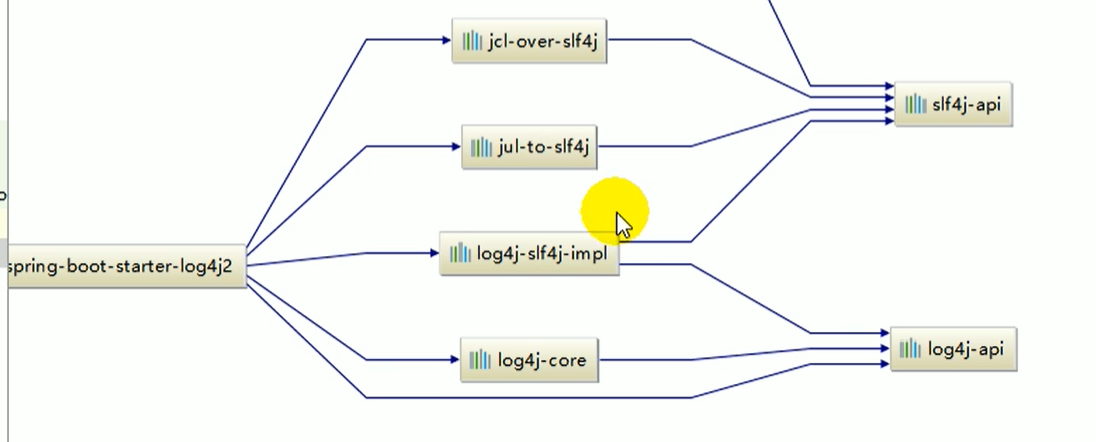
(2) 切换为log4j2日志框架时,排除依赖,再添加相关依赖。。。
  <dependency>
      <groupId>org.springframework.boot</groupId>
      <artifactId>spring‐boot‐starter‐web</artifactId>
           <exclusions>
               <exclusion>
                    <artifactId>spring‐boot‐starter‐logging</artifactId>
                    <groupId>org.springframework.boot</groupId>
               </exclusion>
           </exclusions>
  </dependency>
<dependency>
  <groupId>org.springframework.boot</groupId>
  <artifactId>spring‐boot‐starter‐log4j2</artifactId>
</dependency>
五、Web开发
使用SpringBoot;
1)、创建SpringBoot应用,选中我们需要的模块;
2)、SpringBoot已经默认将这些场景配置好了,只需要在配置文件中指定少量配置就可以运行起来
3)、自己编写业务代码;
自动配置原理?
这个场景SpringBoot帮我们配置了什么?能不能修改?能修改哪些配置?能不能扩展?xxx
xxxxAutoConfiguration:帮我们给容器中自动配置组件;
xxxxProperties:配置类来封装配置文件中可修改的属性;
5.1 静态资源的映射
- SpringBoot对静态资源的映射规则;
@ConfigurationProperties(prefix = "spring.resources", ignoreUnknownFields = false)
public class ResourceProperties implements ResourceLoaderAware {
  //可以设置和静态资源有关的参数,缓存时间等
WebMvcAuotConfiguration:
@Override
public void addResourceHandlers(ResourceHandlerRegistry registry) {
if (!this.resourceProperties.isAddMappings()) {
logger.debug("Default resource handling disabled");
return;
}
Integer cachePeriod = this.resourceProperties.getCachePeriod();
if (!registry.hasMappingForPattern("/webjars/**")) {
customizeResourceHandlerRegistration(
registry.addResourceHandler("/webjars/**")
.addResourceLocations(
"classpath:/META‐INF/resources/webjars/")
.setCachePeriod(cachePeriod));
}
String staticPathPattern = this.mvcProperties.getStaticPathPattern();
           //静态资源文件夹映射
if (!registry.hasMappingForPattern(staticPathPattern)) {
customizeResourceHandlerRegistration(
registry.addResourceHandler(staticPathPattern)
.addResourceLocations(
this.resourceProperties.getStaticLocations())
.setCachePeriod(cachePeriod));
}
}
        //配置欢迎页映射
@Bean
public WelcomePageHandlerMapping welcomePageHandlerMapping(
ResourceProperties resourceProperties) {
return new WelcomePageHandlerMapping(resourceProperties.getWelcomePage(),
this.mvcProperties.getStaticPathPattern());
}
       //配置喜欢的图标
@Configuration
@ConditionalOnProperty(value = "spring.mvc.favicon.enabled", matchIfMissing = true)
public static class FaviconConfiguration {
private final ResourceProperties resourceProperties;
public FaviconConfiguration(ResourceProperties resourceProperties) {
this.resourceProperties = resourceProperties;
}
@Bean
public SimpleUrlHandlerMapping faviconHandlerMapping() {
SimpleUrlHandlerMapping mapping = new SimpleUrlHandlerMapping();
mapping.setOrder(Ordered.HIGHEST_PRECEDENCE + 1);
               //所有  **/favicon.ico
mapping.setUrlMap(Collections.singletonMap("**/favicon.ico",
faviconRequestHandler()));
return mapping;
}
@Bean
public ResourceHttpRequestHandler faviconRequestHandler() {
ResourceHttpRequestHandler requestHandler = new
ResourceHttpRequestHandler();

requestHandler
.setLocations(this.resourceProperties.getFaviconLocations());
return requestHandler;
}
}
解读上面的源码总结:
**(1) /webjars/****
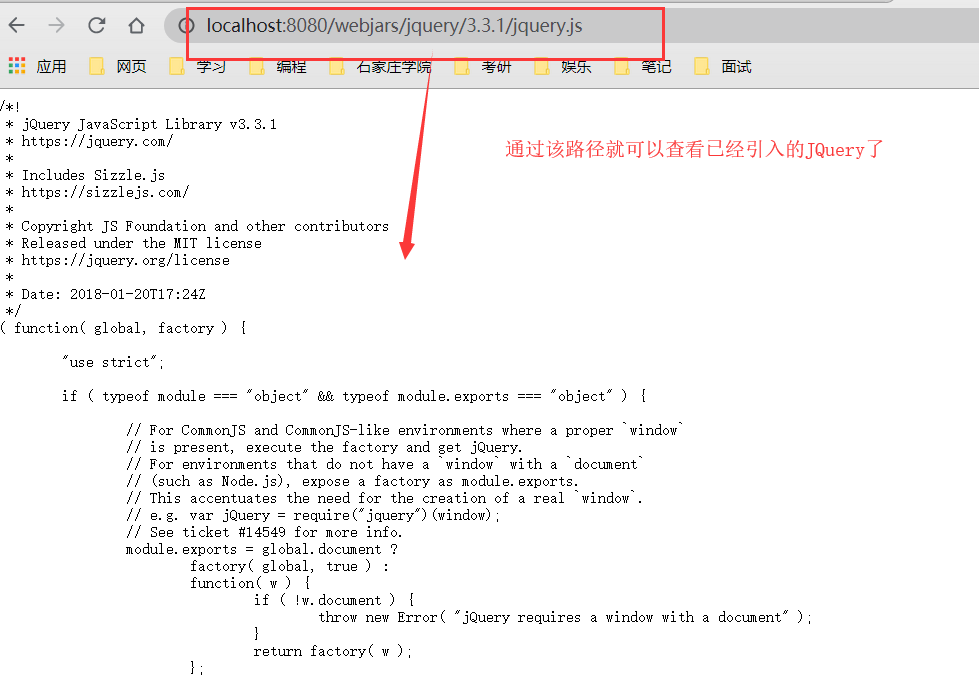
所有 /webjars/** 的访问请求,都去 classpath:/META-INF/resources/webjars/ 找资源;
webjars:以jar包的方式引入静态资源;http://www.webjars.org/
例如引入JQuery时 localhost:8080/webjars/jquery/3.3.1/jquery.js
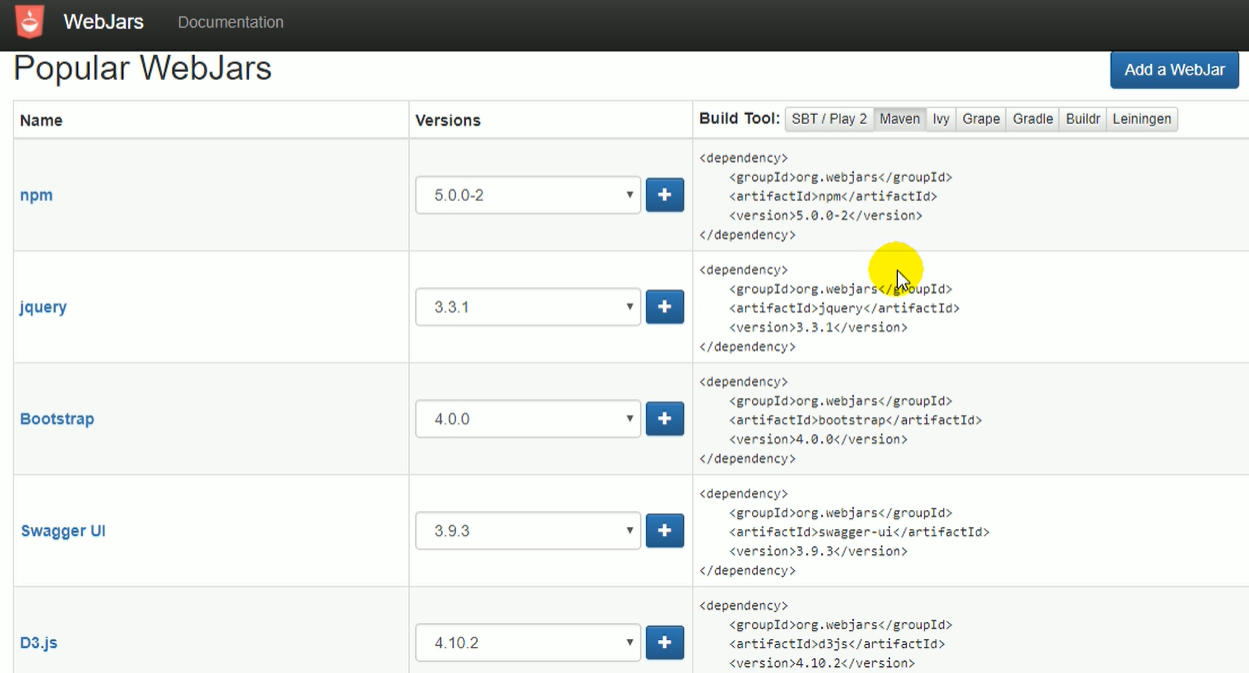
引入的webjar的目录结构如下
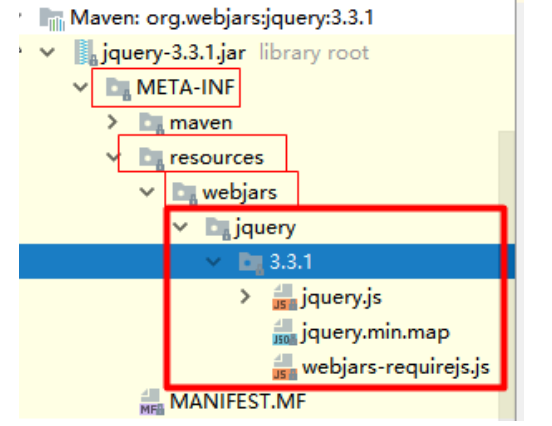
<!‐‐引入jquery‐webjar‐‐>在访问的时候只需要写webjars下面资源的名称即可
<dependency>
    <groupId>org.webjars</groupId>
    <artifactId>jquery</artifactId>
    <version>3.3.1</version>
</dependency>
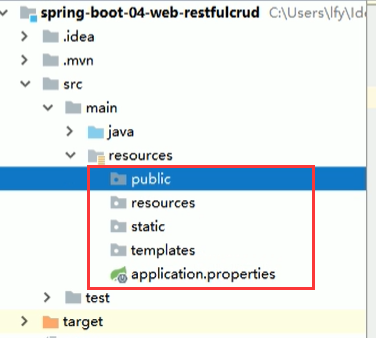
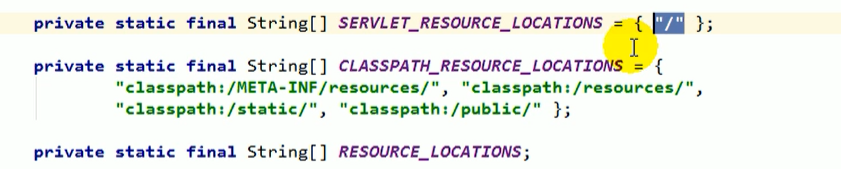
2)、"/" 访问当前项目的任何资源,都去(静态资源的文件夹)找映射**
一下目录路径都默认被视为存放静态资源的路径
"classpath:/META‐INF/resources/",
"classpath:/resources/",
"classpath:/static/",
"classpath:/public/"
"/":当前项目的根路径
localhost:8080/abc === 去静态资源文件夹里面找abc
3)、欢迎页; 静态资源文件夹下的所有index.html页面;被"/** 映射
访问 localhost:8080/会自动去静态资源目录下寻找 index 页面
4)、所有的 **/favicon.ico请求,表示一个图标的请求,该请求 都是在静态资源文件下找;
5.2 模板引擎
所谓的模板引擎就是使用什么方式,将我们后台逻辑结果数据填充到网页上,以前我们都用的的是JSP,在网页上拿到 session域中的对象数据。
但是springBoot不支持jsp,那么它怎么让数据填充到网页上呢?
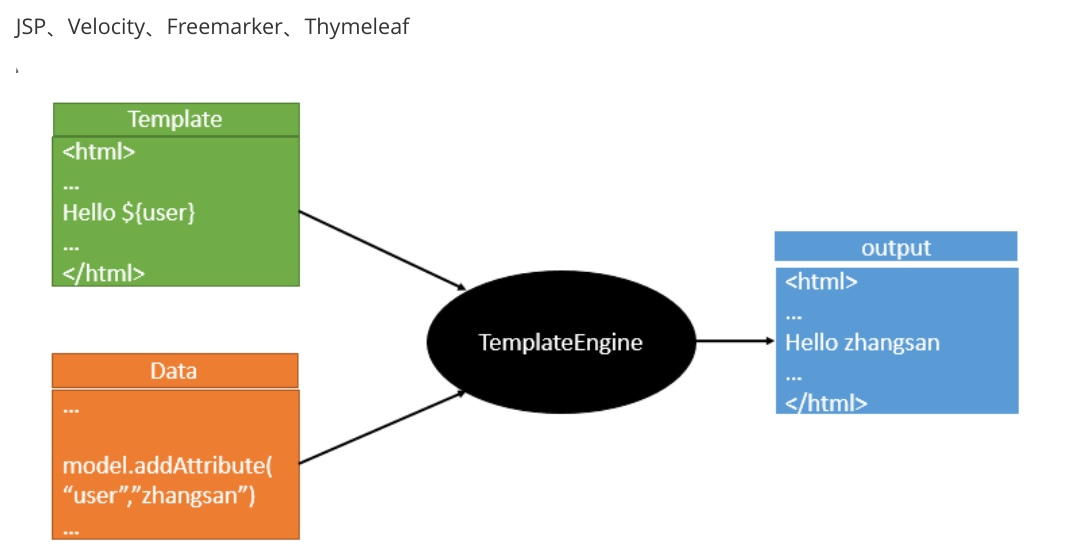
SpringBoot推荐的Thymeleaf;语法更简单,功能更强大;
<dependency>
    <groupId>org.springframework.boot</groupId>
    <artifactId>spring‐boot‐starter‐thymeleaf</artifactId>
</dependency>


<properties>
    <!-- thymeleaf3主程序 -->
    <thymeleaf.version>3.0.9.RELEASE</thymeleaf.version>
    <!-- 布局功能的支持程序 -->
    <thymeleaf-layout-dialect.version>2.2.2</thymeleaf-layout-dialect.version>
</properties>
5.3 Thymeleaf使用
只要我们把HTML页面放在classpath:/templates/,thymeleaf就能自动渲染;
使用步骤
- 在Html页面 导入thymeleaf的名称空间
- 使用thymeleaf语法取数据
<!DOCTYPE html>
<html lang="en" xmlns:th="http://www.thymeleaf.org">
<head>
    <meta charset="UTF‐8">
    <title>Title</title>
</head>
<body>
    <h1>成功!</h1>
    <!‐‐th:text 将div里面的文本内容设置为=号右边的指定值 ‐‐>
    <div th:text="${hello}">这是显示欢迎信息</div>
</body>
</html>
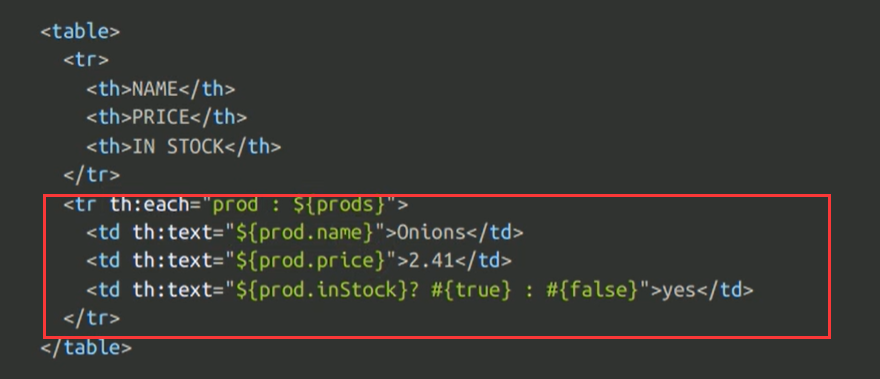
5.4 thymeleaf语法规则
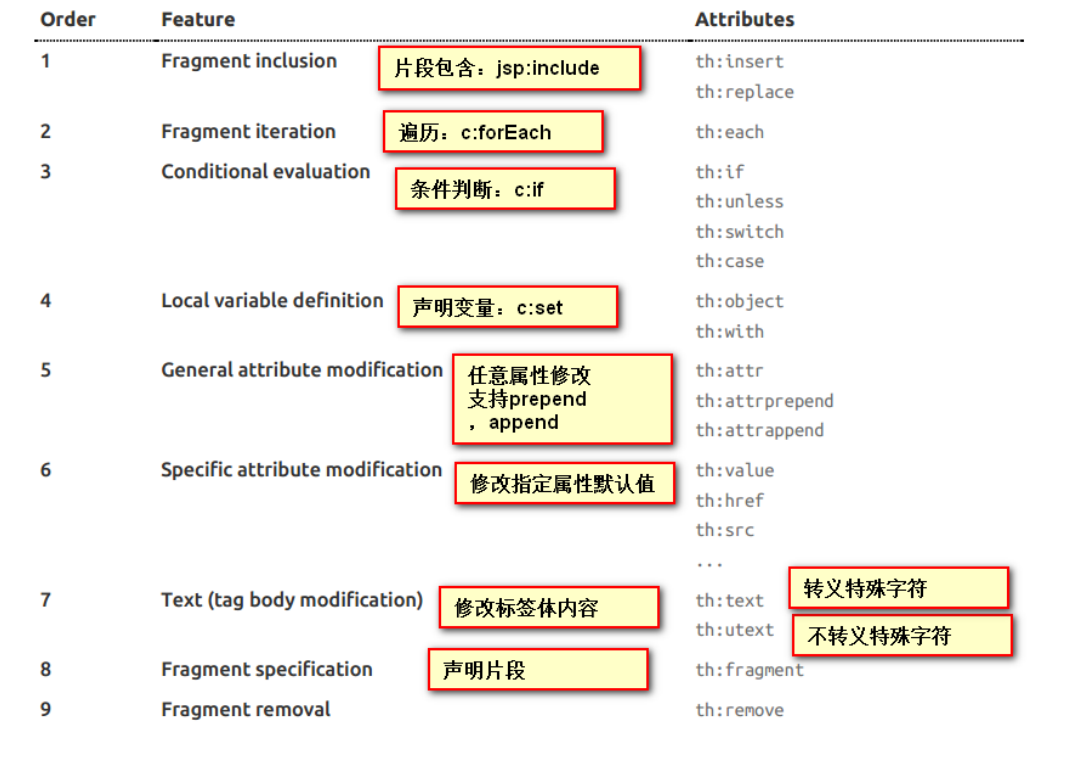
${…}:获取变量值;OGNL;
1)、获取对象的属性、调用方法
2)、使用内置的基本对象:

*{…}:选择表达式:和 {session.user}:
  <div th:object="${session.user}">
    <p>Name: <span th:text="*{firstName}">Sebastian</span>.</p>
    <p>Surname: <span th:text="*{lastName}">Pepper</span>.</p>
    <p>Nationality: <span th:text="*{nationality}">Saturn</span>.</p>
    </div>
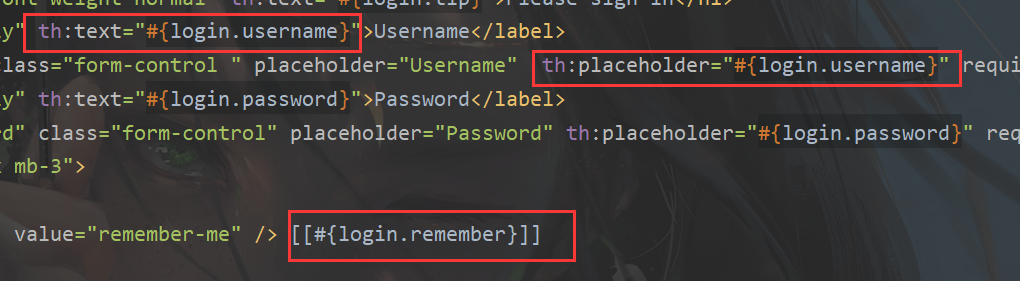
#{…}:获取国际化内容
#{login.username}
@{…}:定义URL;
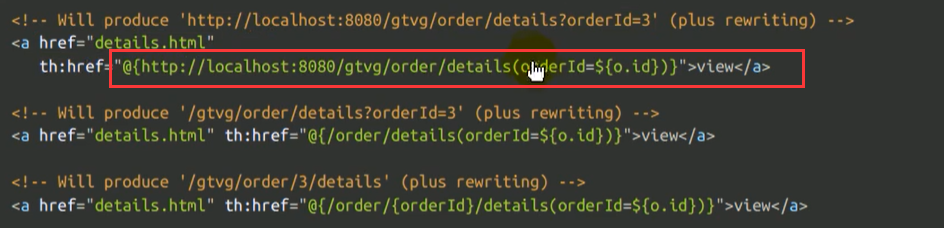
th:href="@{/order/process(execId=${execId},execType=‘FAST’)} "
th:src="@{/user/login}"
5.5 SpringMVC是如何自动配置的呢?
以下是SpringBoot对SpringMVC的默认配置:(WebMvcAutoConfiguration)
ContentNegotiatingViewResolver and BeanNameViewResolver beans.
自动配置了ViewResolver(视图解析器:根据方法的返回值得到视图对象(View),视图对象决定如何
渲染(转发?重定向?))
ContentNegotiatingViewResolver:组合所有的视图解析器的;
如何定制:我们可以自己给容器中添加一个视图解析器;自动的将其组合进来;
Support for serving static resources, including support for WebJars (see below).
静态资源文件夹路径,webjars
Static index.html support. 静态首页访问
Custom Favicon support (see below). favicon.ico 自定义 图标
自动注册了 of Converter , GenericConverter , Formatter beans.
Converter:转换器;比如Contriller中方法 public String hello(User user):将前台参数转换成参数User对象。类型转换使用。
Formatter 格式化器; 2017.12.17===Date;自己添加的格式化器转换器,我们只需要放在容器中即可
@ConditionalOnProperty(prefix = "spring.mvc", name = "date‐format")//在文件中配置日期格式化的规则

public Formatter<Date> dateFormatter() {
return new DateFormatter(this.mvcProperties.getDateFormat());//日期格式化组件
}
Support for HttpMessageConverters (see below).
HttpMessageConverter:SpringMVC用来转换Http请求和响应的;User—Json;
HttpMessageConverters 是从容器中确定;懒加载模式,获取所有的HttpMessageConverter;
自己给容器中添加HttpMessageConverter,只需要将自己的组件注册容器中(@Bean,@Component)
Automatic registration of MessageCodesResolver (see below).定义错误代码生成规则
Automatic use of a ConfigurableWebBindingInitializer bean (see below).
我们可以配置一个ConfigurableWebBindingInitializer来替换默认的;(添加到容器)
初始化WebDataBinder;
请求数据=====JavaBean;
5.6 扩展SpringMVC
以往我们都是使用springmvc.xml 来做springmvc层的配置
<mvc:view‐controller path="/hello" view‐name="success"/>
    <mvc:interceptors>
        <mvc:interceptor>
            <mvc:mapping path="/hello"/>
            <bean></bean>
        </mvc:interceptor>
    </mvc:interceptors>
而SpringBoot ,则需要编写一个配置类(@Configuration),是WebMvcConfigurerAdapter类型;不能标注@EnableWebMvc;
既保留了所有的自动配置,也能用我们扩展的配置;
// @EnableWebMvc; 注解使用后,就会将我自定义的Mvc配置类当作系统webMvc配置类,就相当于停用了SpringBoot提供的原有WebMvc配置类。我们不能让他停掉默认的,而是再默认的基础上附加自定义的。
//继承 WebMvcConfigurerAdapter可以来扩展SpringMVC的功能,只需要重写方法调用addXXXXX,就可以往容器中添加组件
@Configuration
public class MyMvcConfig extends WebMvcConfigurerAdapter {

    //想要配置springmvc的相关设置,只需要根据接口中的方法自己定制
    @Override
    public void addViewControllers(ViewControllerRegistry registry) {
       // super.addViewControllers(registry);
        //浏览器发送 /atguigu 请求来到 success
        registry.addViewController("/atguigu").setViewName("success");
    }


     @Bean
    public WebMvcConfigurerAdapter WebMvcConfigurerAdapter(){

         WebMvcConfigurerAdapter adapter = new WebMvcConfigurerAdapter() {
             //。。。。调用add方法,生成的组件会通过该方法上的 @Bean 注解,封装在 adapter对象中,
             //返回到容器中一起生效


         };
      return  adapter;
    }
}
原理:
1)、WebMvcAutoConfiguration是SpringMVC的自动配置类
2)、在做其他自动配置时会导入;@Import(EnableWebMvcConfiguration.class)
@Configuration
public static class EnableWebMvcConfiguration extends DelegatingWebMvcConfiguration {
      private final WebMvcConfigurerComposite configurers = new WebMvcConfigurerComposite();
	 //从容器中获取所有的WebMvcConfigurer
      @Autowired(required = false)
      public void setConfigurers(List<WebMvcConfigurer> configurers) {
          if (!CollectionUtils.isEmpty(configurers)) {
              this.configurers.addWebMvcConfigurers(configurers);
             //一个参考实现;将所有的WebMvcConfigurer相关配置都来一起调用;
             @Override
             // public void addViewControllers(ViewControllerRegistry registry) {
              //    for (WebMvcConfigurer delegate : this.delegates) {
               //       delegate.addViewControllers(registry);
               //   }
              }
          }
}
3)、容器中所有的WebMvcConfigurer都会一起起作用;
4)、我们的配置类也会被调用;
效果:SpringMVC的自动配置和我们的扩展配置都会起作用;
5.7 全面接管SpringMVC
SpringBoot对SpringMVC的自动配置不需要了,所有都是我们自己配置;所有的SpringMVC的自动配置都失效了
我们需要在配置类中添加@EnableWebMvc注解即可;
但是不建议这么做
//使用WebMvcConfigurerAdapter可以来扩展SpringMVC的功能
@EnableWebMvc
@Configuration
public class MyMvcConfig extends WebMvcConfigurerAdapter {
    @Override
    public void addViewControllers(ViewControllerRegistry registry) {
       // super.addViewControllers(registry);
        //浏览器发送 /atguigu 请求来到 success
        registry.addViewController("/atguigu").setViewName("success");
    }
}
1)@EnableWebMvc的核心
@Import(DelegatingWebMvcConfiguration.class)
public @interface EnableWebMvc {
@Configuration
//继承WebMvcConfigurationSupport组件,在这里实现引入 WebMvcConfigurationSupport.class
public class DelegatingWebMvcConfiguration extends WebMvcConfigurationSupport {
@Configuration
@ConditionalOnWebApplication
@ConditionalOnClass({ Servlet.class, DispatcherServlet.class,
WebMvcConfigurerAdapter.class })
//容器中没有WebMvcConfigurationSupport.class这个组件的时候,这个自动配置类才生效
//由于第 2)步可见,已经导入了该组件,这里的自动配置类就失效了
@ConditionalOnMissingBean(WebMvcConfigurationSupport.class)
@AutoConfigureOrder(Ordered.HIGHEST_PRECEDENCE + 10)
@AutoConfigureAfter({ DispatcherServletAutoConfiguration.class,
ValidationAutoConfiguration.class })
public class WebMvcAutoConfiguration {
4)、@EnableWebMvc将WebMvcConfigurationSupport组件导入进来;
5)、导入的WebMvcConfigurationSupport只是SpringMVC最基本的功能;
如何修改SpringBoot的默认配置
模式:
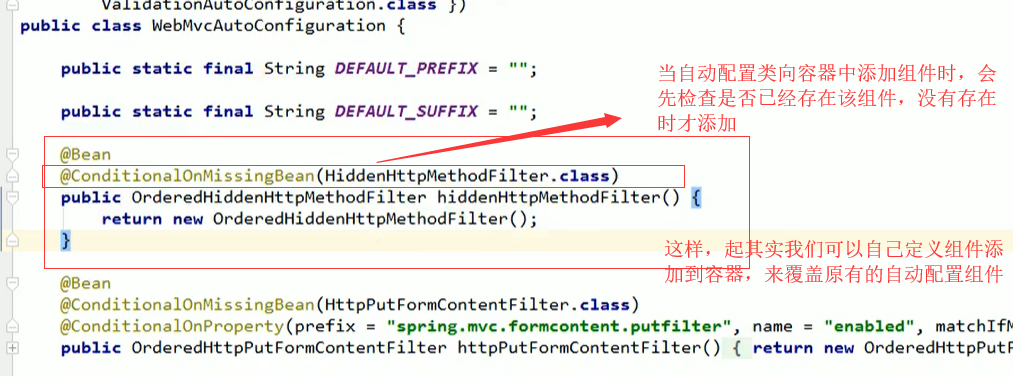
1)、SpringBoot在自动配置很多组件的时候,先看容器中有没有用户自己配置的(@Bean、@Component)如
果有就用用户配置的,如果没有,才自动配置;如果有些组件可以有多个(ViewResolver)将用户配置的和自己默
认的组合起来;
2)、在SpringBoot中会有非常多的xxxConfigurer帮助我们进行扩展配置
3)、在SpringBoot中会有很多的xxxCustomizer帮助我们进行定制配置
六、Web实验案例
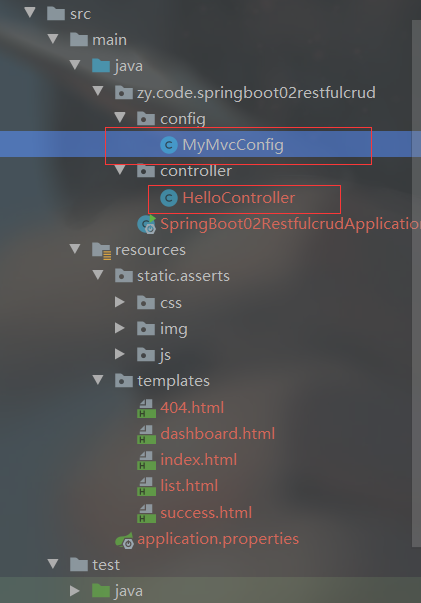
工程准备,新建一个工程 spring-boot-02-restfulcrud,勾选 Web、thymeleaf两个模块。
导入 jquery 的webjars依赖
 <!--  引入jquery‐webjar -->
        <dependency>
            <groupId>org.webjars</groupId>
            <artifactId>jquery</artifactId>
            <version>3.3.1</version>
        </dependency>
准备好老师给的资料,复制到静态资源目录下面。
创建并编写好 Controller 、MyMvcConfig配置类,测试一下工程是否创建成功
网页输入一个url进行访问,访问成功,说明创建成功
6.1 默认访问首页
@Configuration
public class MyMvcConfig extends WebMvcConfigurerAdapter {

    @Override
    public void addViewControllers(ViewControllerRegistry registry) {
        //浏览器发送 /atguigu 请求来到 success.html 页面
       registry.addViewController("/atguigu").setViewName("success");
    }

//所有的WebMvcConfigurerAdapter组件都会一起起作用
//@Bean:将组件注册在容器,没有这个注解下面的配置就是无效的
    @Bean
    public WebMvcConfigurerAdapter WebMvcConfigurerAdapter(){
        WebMvcConfigurerAdapter webMvcConfigurerAdapter = new WebMvcConfigurerAdapter() {
            @Override
            public void addViewControllers(ViewControllerRegistry registry) {
                registry.addViewController("/").setViewName("index");
                registry.addViewController("/index.html").setViewName("index");
            }
        };
        return  webMvcConfigurerAdapter;

    }
}
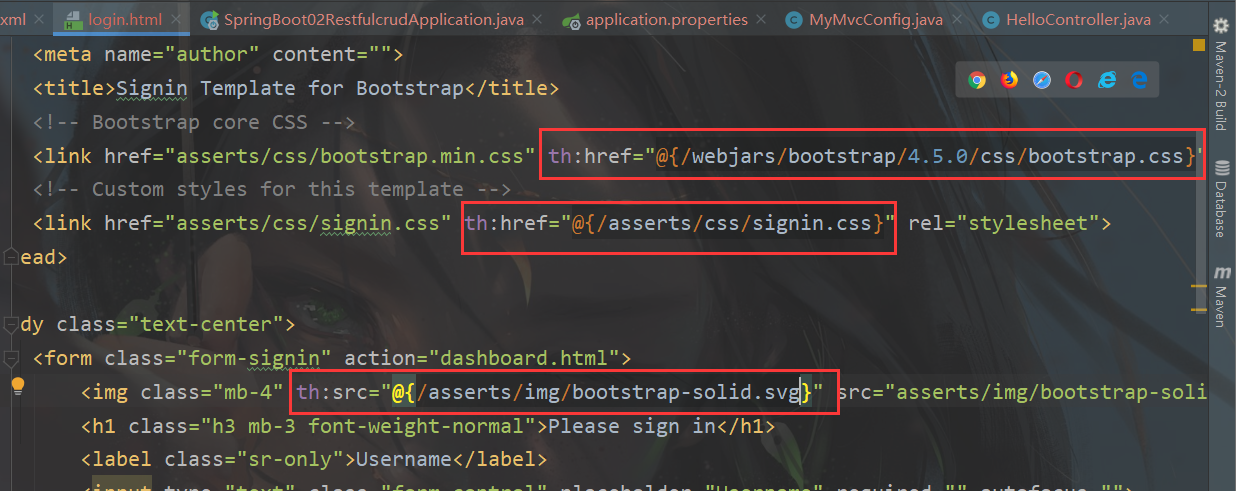
使用bootstarp
<!--        引入bootstrap的webjars-->
        <dependency>
            <groupId>org.webjars</groupId>
            <artifactId>bootstrap</artifactId>
            <version>4.5.0</version>
        </dependency>
6.2 国际化
我们需要让我们的网页页面的语言显示可以支持中英文:
1)、编写国际化配置文件;
2)、使用ResourceBundleMessageSource管理国际化资源文件
3)、在页面使用fmt:message取出国际化内容

页面上获取国际化信息
启动项目,将浏览器的语言设置成中文时,页面显示中文,浏览器语言设置为英文时显示英文。
但是我们页面上有一个中英文切换的按钮,可以实现点击,让用户自定义切换。
怎么实现的呢?
那就要搞清楚国际化的原理,为什么我们浏览器切换语言时,后台可以接收到这个切换,去更改国际化。
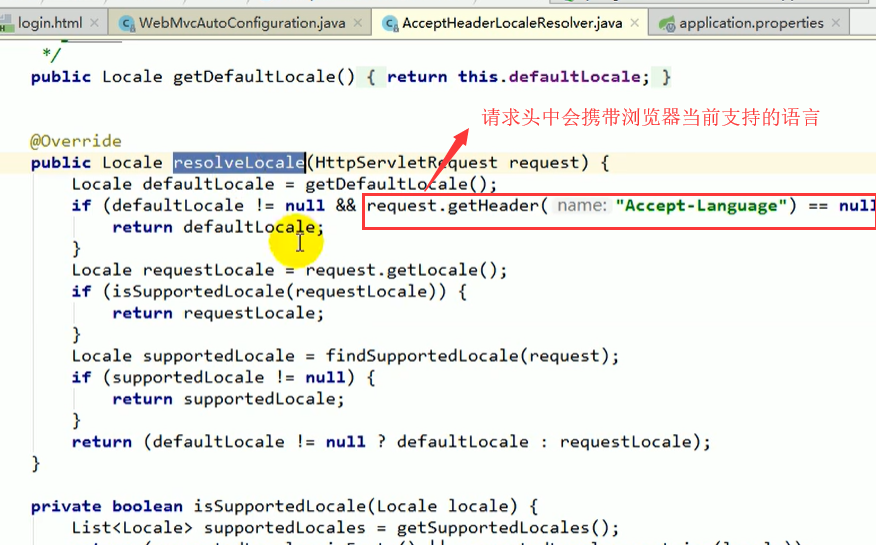
国际化Locale(区域信息对象);LocaleResolver(获取区域信息对象);
@Bean
@ConditionalOnMissingBean
@ConditionalOnProperty(prefix = "spring.mvc", name = "locale")
public LocaleResolver localeResolver() {
	if (this.mvcProperties.getLocaleResolver() == WebMvcProperties.LocaleResolver.FIXED) {
	return new FixedLocaleResolver(this.mvcProperties.getLocale());
}

AcceptHeaderLocaleResolver localeResolver = new AcceptHeaderLocaleResolver();
localeResolver.setDefaultLocale(this.mvcProperties.getLocale());
return localeResolver;
}
//默认的就是根据请求头带来的区域信息获取Locale进行国际化
既然语言参数是可以放在请求头中的,我们也可以自己定义按钮的submit,在参数中指定语言
public class MyLocaleResolver implements LocaleResolver {
    @Override
    public Locale resolveLocale(HttpServletRequest request) {
        String l = request.getParameter("l");//获得请求参数
        Locale locale = Locale.getDefault();//初始化一个Locale对象,默认使用jvm默认的locale区域信息
        if (!StringUtils.isEmpty(l)){
            String[] split = l.split("_");
            locale = new Locale(split[0],split[1]);//赋值给locale
        }
        return locale;
    }

    @Override
    public void setLocale(HttpServletRequest httpServletRequest, HttpServletResponse httpServletResponse, Locale locale) {

    }
}
在主配置类中将我自己定义的LocaleResolver添加到容器中
//配置我们自己定义的组件,这样springBoot就不会使用自动配置的LocaleResolver了
@Bean
    public LocaleResolver localeResolver(){
        return new MyLocaleResolver();
    }
6.3 登录拦截
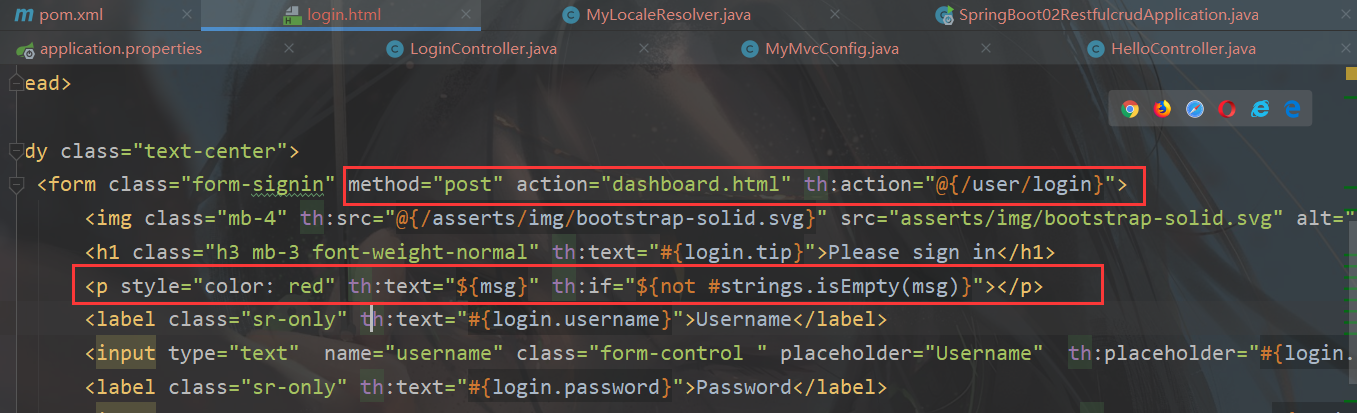
- 设置请求登录页面和访问路径
@Controller
public class LoginController {

    @PostMapping(value = "/user/login")
    public String login(@RequestParam("username") String username, @RequestParam("password") String password, Map<String,String> map, HttpSession session){
        if (!StringUtils.isEmpty(username)&& "12345".equals(password)){
            //为了防止表单重复提交,使用重定向
            session.setAttribute("loginUser",username);//将用户存储在session中,主页中可以获取已登录用户
            return "redirect:/main.html";
        }else {
            map.put("msg","用户名密码错误");
            return "login";
        }
    }
}
- 自定义拦截器
implements HandlerInterceptor
/**
 * 登录的拦截器:检查登录状态
 */
public class LoginHandlerInterceptor implements HandlerInterceptor {

    @Override
    public boolean preHandle(HttpServletRequest request, HttpServletResponse response, Object handler) throws Exception {
        //只有登陆后才会有用户信息
        Object loginUser = request.getSession().getAttribute("loginUser");
        if (loginUser == null){
            //未登录,重定向到登录页面
            request.setAttribute("msg","没有权限,请先登录");
            request.getRequestDispatcher("/index.html").forward(request,response);
            return false;
        }else {
            //已登录,放行

            return true;
        }
    }

    @Override
    public void postHandle(HttpServletRequest request, HttpServletResponse response, Object handler, ModelAndView modelAndView) throws Exception {

    }

    @Override
    public void afterCompletion(HttpServletRequest request, HttpServletResponse response, Object handler, Exception ex) throws Exception {

    }
}
- 将自定义的拦截器注册到容器中
在MyWebConfig配置类中,adpter适配器里重写方法,可以添加自定义拦截器到容器中
    //自定义拦截器
            @Override
            public void addInterceptors(InterceptorRegistry registry) {
                //静态资源;  *.css , *.js
                // SpringBoot已经做好了静态资源映射
                //"/webjars/**" 不拦截静态资源
                registry.addInterceptor(new LoginHandlerInterceptor()).addPathPatterns("/**")
                        .excludePathPatterns("/","/index.html","/user/login","/webjars/**");
            }
- 登录成功后,后台主页面,获得登录用户名
<a class="navbar-brand col-sm-3 col-md-2 mr-0" href="http://getbootstrap.com/docs/4.0/examples/dashboard/#">[[${session.loginUser}]]</a>
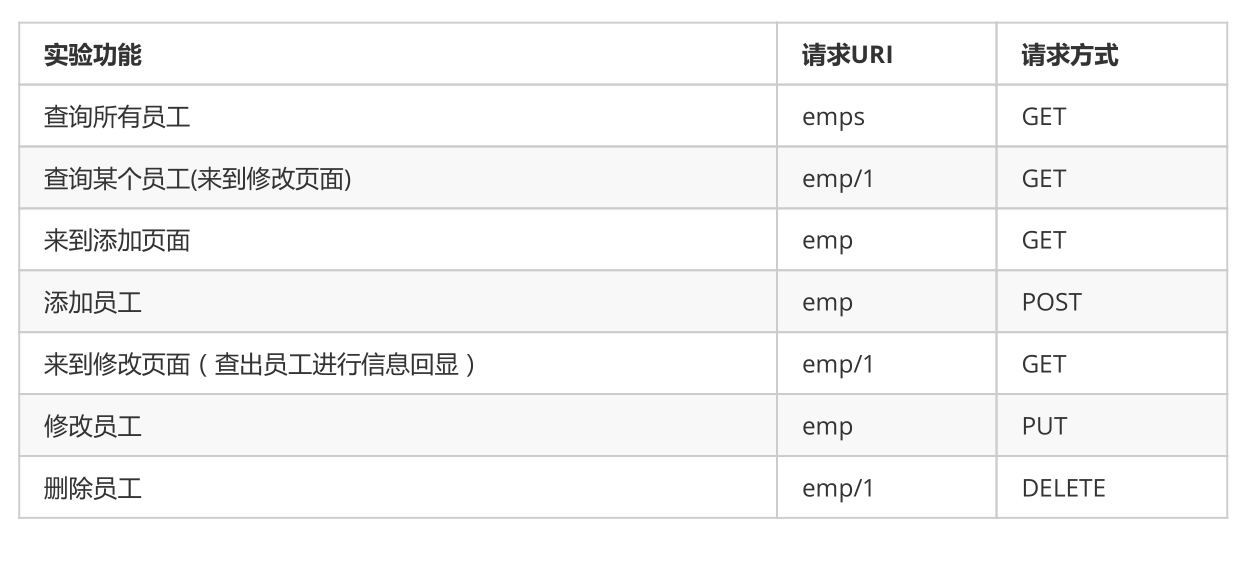
6.4 CRUD-员工列表
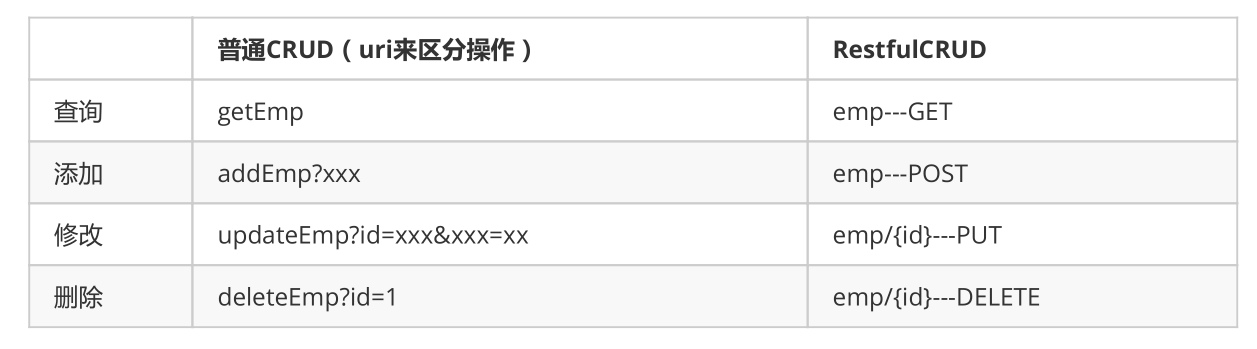
实验要求:
1)、RestfulCRUD:CRUD满足Rest风格;
URI: /资源名称/资源标识 HTTP请求方式区分对资源CRUD操作
2)、实验的请求架构;
thymeleaf公共页面元素抽取
1、抽取公共片段
<div th:fragment="copy">
© 2011 The Good Thymes Virtual Grocery
</div>
2、引入公共片段
<div th:insert="~{footer :: copy}"></div>
~{templatename::selector}:模板名::选择器
~{templatename::fragmentname}:模板名::片段名
3、默认效果:
insert的公共片段在div标签中
如果使用th:insert等属性进行引入,可以不用写~{}:
行内写法可以加上:[[~{}]];[(~{})];
三种引入公共片段的th属性:
th:insert:将公共片段整个插入到声明引入的元素中
th:replace:将声明引入的元素替换为公共片段
th:include:将被引入的片段的内容包含进这个标签中
<footer th:fragment="copy">
© 2011 The Good Thymes Virtual Grocery
</footer>
引入方式
<div th:insert="footer :: copy"></div>
<div th:replace="footer :: copy"></div>
<div th:include="footer :: copy"></div>
效果
<div>
<footer>
© 2011 The Good Thymes Virtual Grocery
</footer>
</div>
<footer>
© 2011 The Good Thymes Virtual Grocery
</footer>
<div>
© 2011 The Good Thymes Virtual Grocery
</div>
引入片段的时候传入参数:
th:class="${activeUri=='main.html'?'nav‐link active':'nav‐link'}"
实验案例阶段得笔记不写了,这部分视频也没有看完
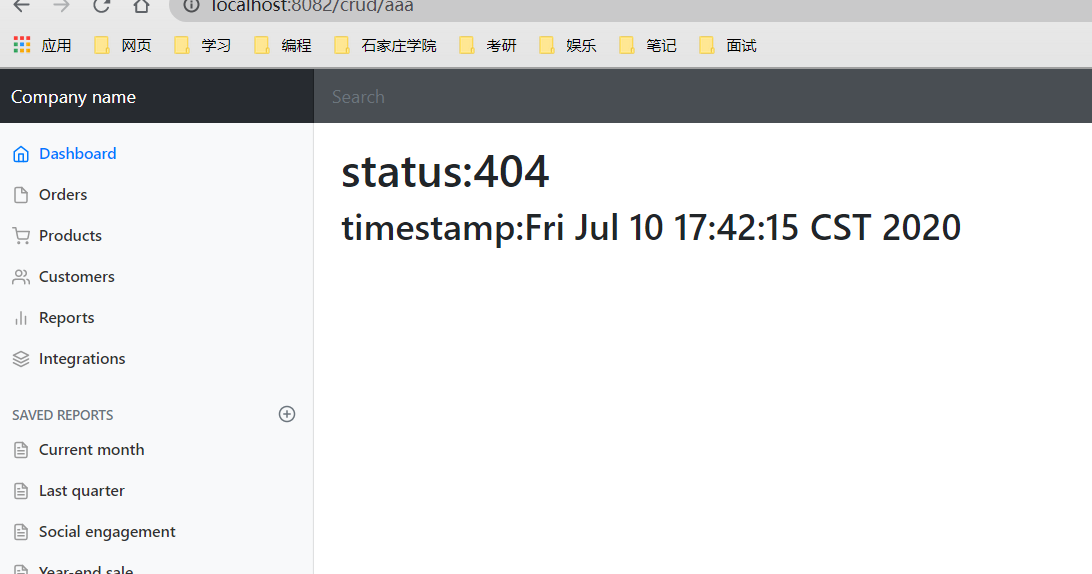
七、SpringBoot错误页面
7.1 错误页面处理原理

可以参照ErrorMvcAutoConfiguration;错误处理的自动配置类;
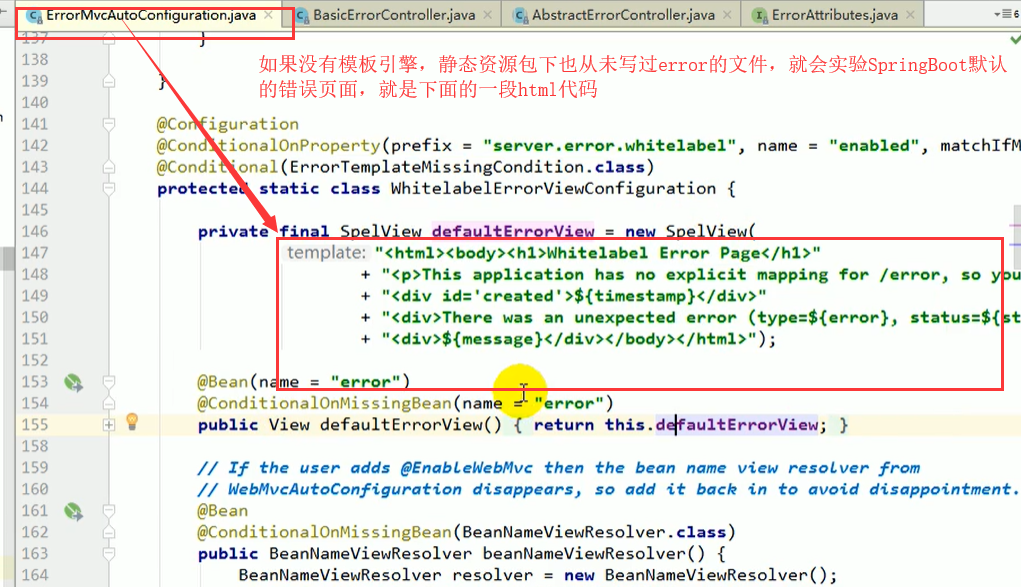
原理如下(觉得麻烦可以跳过)
1、DefaultErrorAttributes:帮我们在页面共享信息;
@Override
public Map<String, Object> getErrorAttributes(RequestAttributes requestAttributes,
        boolean includeStackTrace) {
        Map<String, Object> errorAttributes = new LinkedHashMap<String, Object>();
        errorAttributes.put("timestamp", new Date());
        addStatus(errorAttributes, requestAttributes);
        addErrorDetails(errorAttributes, requestAttributes, includeStackTrace);
        addPath(errorAttributes, requestAttributes);
        return errorAttributes;
}
2、BasicErrorController:处理默认/error请求
@Controller
@RequestMapping("${server.error.path:${error.path:/error}}")
public class BasicErrorController extends AbstractErrorController {

    @RequestMapping(produces = "text/html")//产生html类型的数据;浏览器发送的请求来到这个方法处理
public ModelAndView errorHtml(HttpServletRequest request,    HttpServletResponse response) {
        HttpStatus status = getStatus(request);
        Map<String, Object> model = Collections.unmodifiableMap(getErrorAttributes(
        request, isIncludeStackTrace(request, MediaType.TEXT_HTML)));
        response.setStatus(status.value());

        //去哪个页面作为错误页面;包含页面地址和页面内容
ModelAndView modelAndView = resolveErrorView(request, response, status, model);
return (modelAndView == null ? new ModelAndView("error", model) : modelAndView);
}
@RequestMapping
@ResponseBody    //产生json数据,其他客户端来到这个方法处理;

public ResponseEntity<Map<String, Object>> error(HttpServletRequest request) {
        Map<String, Object> body = getErrorAttributes(request,
        isIncludeStackTrace(request, MediaType.ALL));
        HttpStatus status = getStatus(request);
        return new ResponseEntity<Map<String, Object>>(body, status);
}
3、ErrorPageCustomizer:
@Value("${error.path:/error}")
private String path = "/error";  系统出现错误以后来到error请求进行处理;(web.xml注册的错误页
面规则)
4、DefaultErrorViewResolver:
@Override
public ModelAndView resolveErrorView(HttpServletRequest request, HttpStatus status, Map<String, Object> model) {
        ModelAndView modelAndView = resolve(String.valueOf(status), model);
        if (modelAndView == null && SERIES_VIEWS.containsKey(status.series())) {
        modelAndView = resolve(SERIES_VIEWS.get(status.series()), model);
        }
		return modelAndView;
}
private ModelAndView resolve(String viewName, Map<String, Object> model) {
                //默认SpringBoot可以去找到一个页面?  error/404
        String errorViewName = "error/" + viewName;

                //模板引擎可以解析这个页面地址就用模板引擎解析
        TemplateAvailabilityProvider provider = this.templateAvailabilityProviders
        .getProvider(errorViewName, this.applicationContext);
        if (provider != null) {
                    //模板引擎可用的情况下返回到errorViewName指定的视图地址
        return new ModelAndView(errorViewName, model);
        }
        //模板引擎不可用,就在静态资源文件夹下找errorViewName对应的页面   error/404.html
	return resolveResource(errorViewName, model);
}
步骤:
一但系统出现4xx或者5xx之类的错误;ErrorPageCustomizer就会生效(定制错误的响应规则);就会来到/error
请求;就会被BasicErrorController处理;
1)响应页面;去哪个页面是由DefaultErrorViewResolver解析得到的;
protected ModelAndView resolveErrorView(HttpServletRequest request,
      HttpServletResponse response, HttpStatus status, Map<String, Object> model) {
    //所有的ErrorViewResolver得到ModelAndView
   for (ErrorViewResolver resolver : this.errorViewResolvers) {
      ModelAndView modelAndView = resolver.resolveErrorView(request, status, model);
      if (modelAndView != null) {
         return modelAndView;
      }
   }
   return null;
}
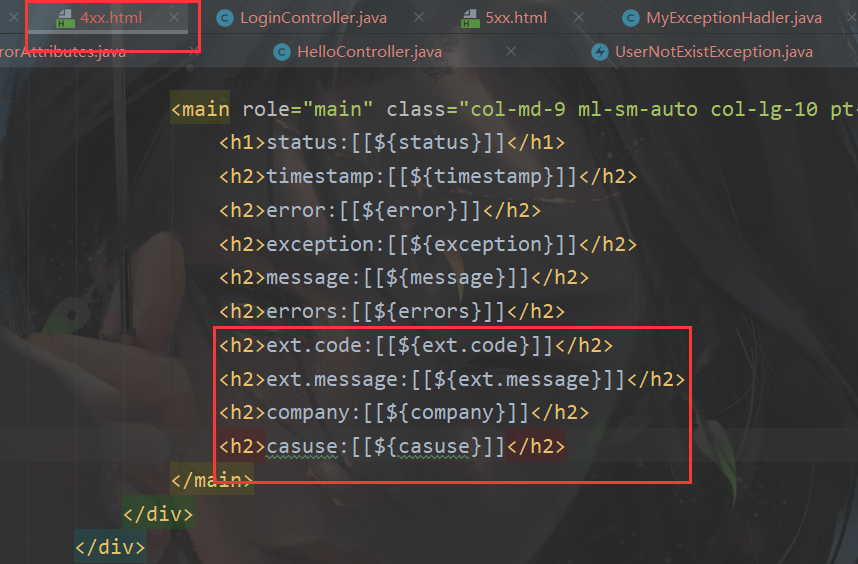
7.2 如何定制错误的页面
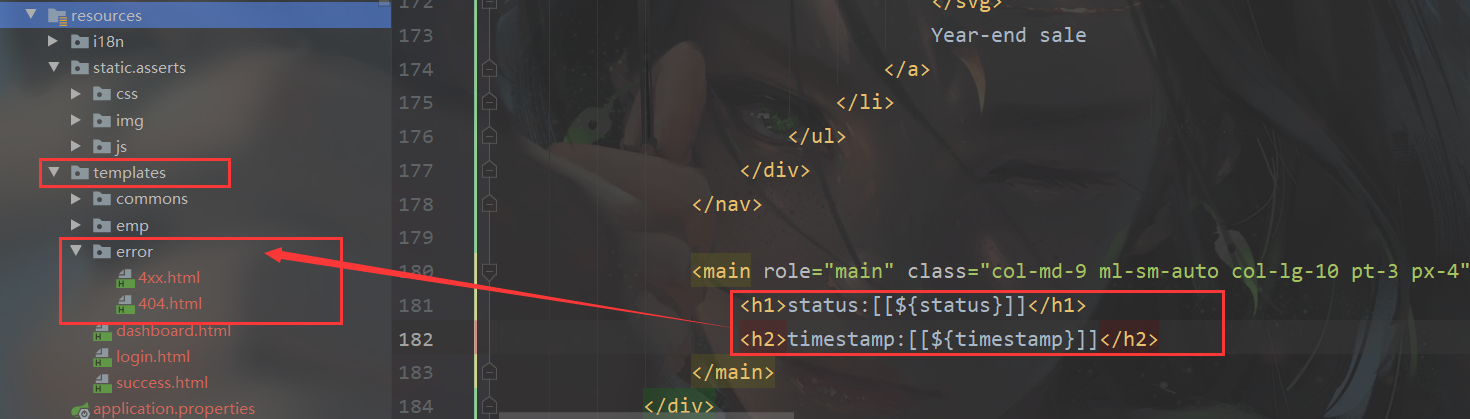
1)、有模板引擎的情况下;error/状态码;
【将错误页面命名为 错误状态码.html 放在模板引擎文件夹里面的error文件夹下】,发生此状态码的错误就会来到 对应的页面;
我们可以使用4xx和5xx作为错误页面的文件名来匹配这种类型的所有错误,精确优先(优先寻找精确的状态码.html);
页面能获取的信息;
- timestamp:时间戳
- status:状态码
- error:错误提示
- exception:异常对象
- message:异常消息
- errors:JSR303数据校验的错误都在这里
2)、没有模板引擎(模板引擎找不到这个错误页面),静态资源文件夹下找;
3)、以上都没有错误页面,就是默认来到SpringBoot默认的错误提示页面;
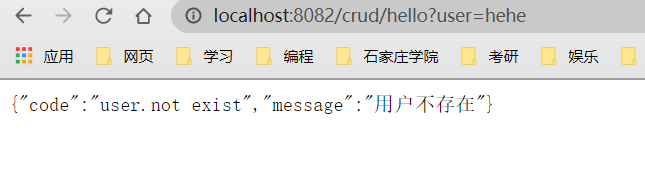
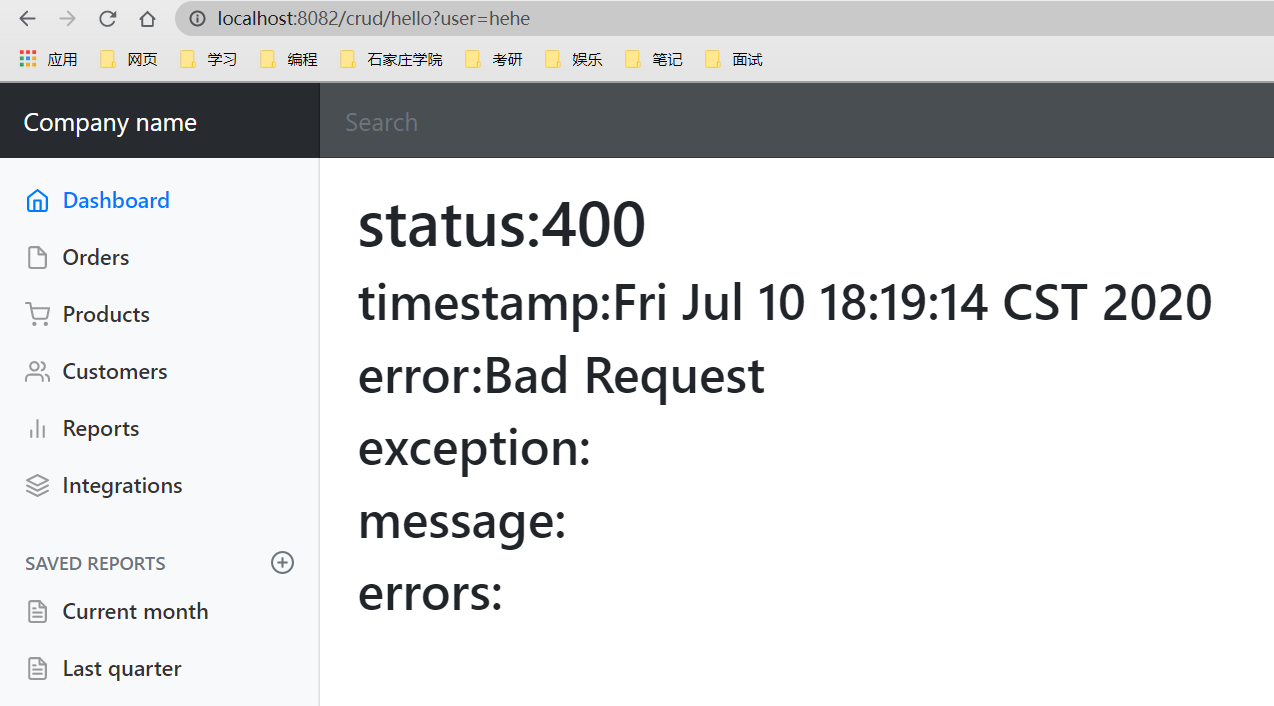
2)当返回json数据格式时,自己定义异常处理器,将异常数据返回给客户端
@Controller
public class HelloController {

    @ResponseBody
    @RequestMapping("/hello")
    public String hello(@RequestParam("user") String user){

        if (user.equals("hehe")){
            throw new UserNotExistException();
        }
        return "你好";
    }
}
public class UserNotExistException extends RuntimeException {


    public UserNotExistException() {
        super("用户不存在");
    }
}
/**
 * 自定义异常处理器
 */
@ControllerAdvice
public class MyExceptionHadler {

    @ResponseBody
    @ExceptionHandler(UserNotExistException.class)
    public Map<String,Object> hadlerExceprion(Exception e){
        Map<String,Object> map = new HashMap<>();
        map.put("code","user.not exist");
        map.put("message",e.getMessage());
        return map;
    }
}
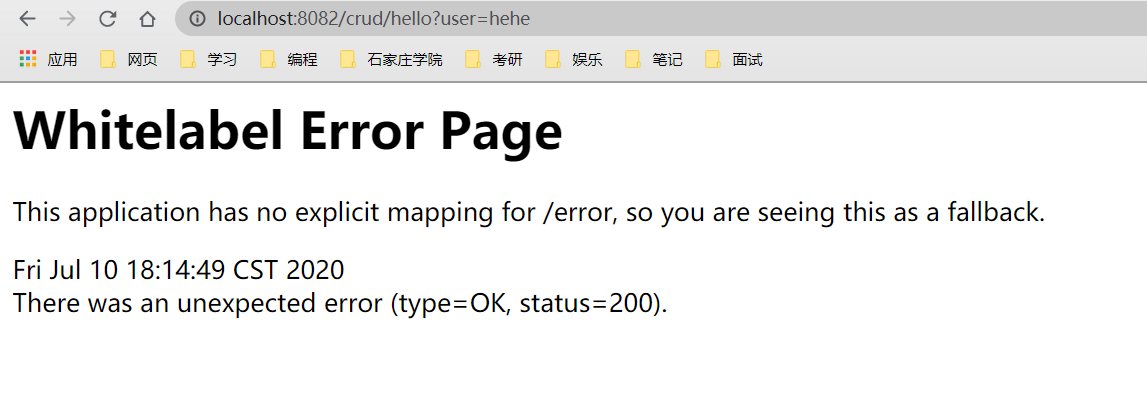
3)将异常结果转发到模板引擎的error,但是该异常状态码为200,我们这里假装它是400,手动设置一下这个异常的状态码是400
/**
 * 自定义异常处理器
 */
@ControllerAdvice
public class MyExceptionHadler {

    //@ResponseBody
    @ExceptionHandler(UserNotExistException.class)
    public String hadlerExceprion(Exception e, HttpServletRequest request){
        Map<String,Object> map = new HashMap<>();
        //传入我们自己的错误状态码  4xx 5xx,否则就不会进入定制错误页面的解析流程
            /**
                  * Integer statusCode = (Integer) request
                  .getAttribute("javax.servlet.error.status_code");
                  */
        request.setAttribute("javax.servlet.error.status_code",400);

        map.put("code","user.not exist");
        map.put("message",e.getMessage());
        //转发到静态资源下的error页面
        return "forward:/error";
    }
}
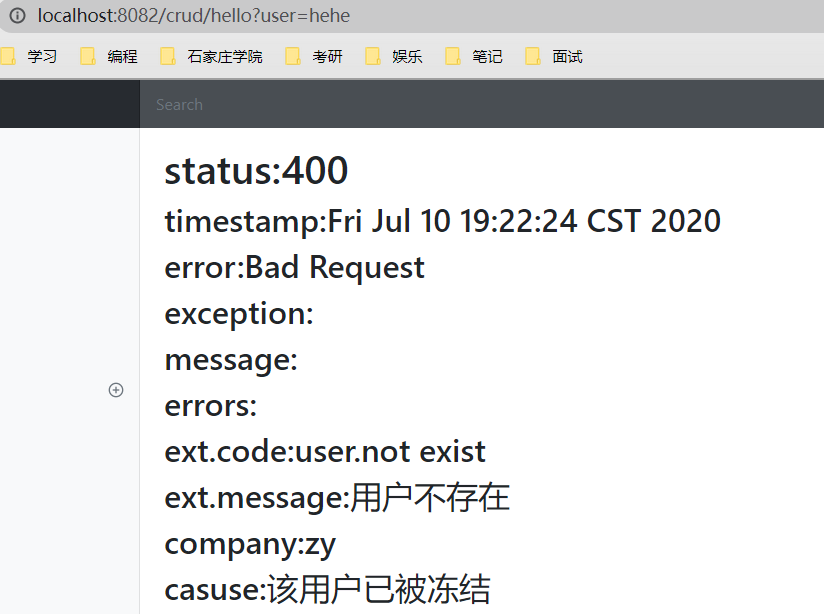
7.3 将我们的定制数据携带出去;
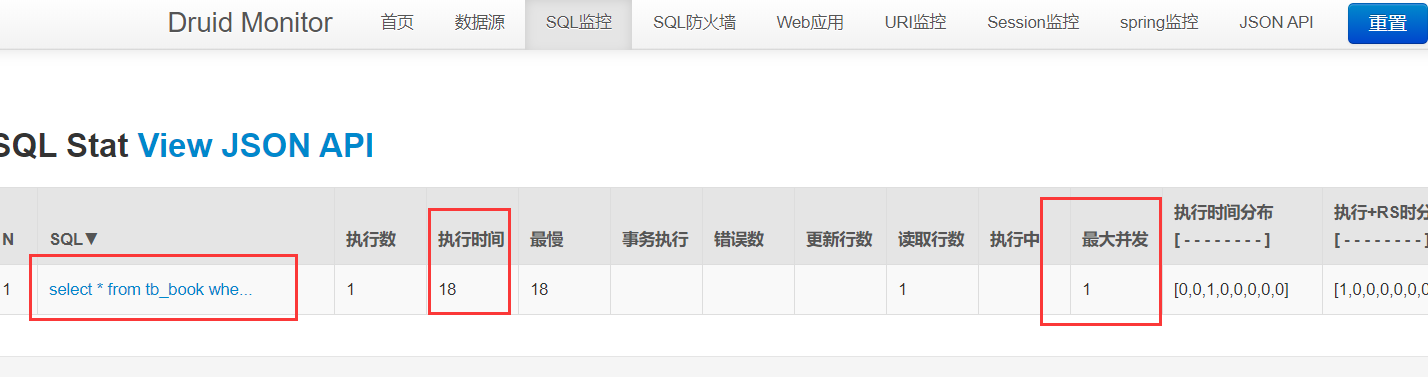
如上图所示,错误信息在页面上展示了,但是错误信息使用的都是默认6项,如果我们要自定义出错类型呢?
比如出错时,加上出错的url、出错的原因等。
回想错误响应的原理:
错误被BasicErrorController处理,响应出去可以获取的数据(Messages\errors\时间戳等待项)是由
getErrorAttributes得到的(是AbstractErrorController(ErrorController)规定的方法);
1、完全来编写一个ErrorController的实现类【或者是编写AbstractErrorController的子类】,放在容器中;
2、页面上能用的数据,或者是json返回能用的数据都是通过errorAttributes.getErrorAttributes得到;
容器中DefaultErrorAttributes.getErrorAttributes();默认进行数据处理的;
自定义ErrorAttributes
@Component
public class MyErrorAttributes extends DefaultErrorAttributes {

    @Override
    public Map<String, Object> getErrorAttributes(WebRequest webRequest, boolean includeStackTrace) {
        Map<String,Object> map =  super.getErrorAttributes(webRequest, includeStackTrace);
        map.put("company","zy");
        map.put("casuse","该用户已被冻结");

        //异常处理器携带的数据
        Map<String, Object> ext = ( Map<String, Object>)webRequest.getAttribute("ext", 0);

        map.put("ext",ext);
        return  map;
    }
}

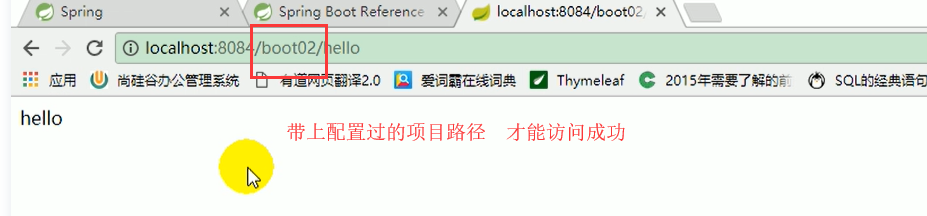
八、嵌入式servlet
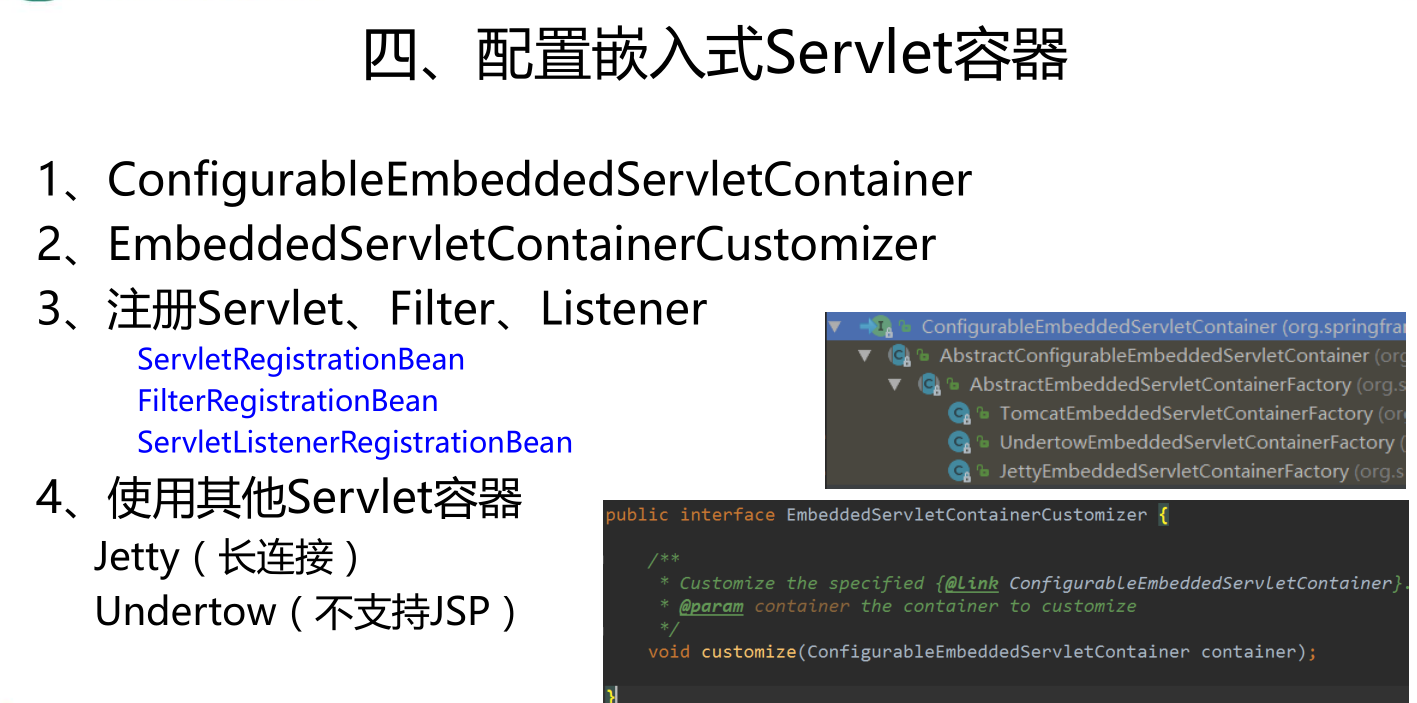
8.1 servlet容器配置
SpringBoot默认使用Tomcat作为嵌入式的Servlet容器;
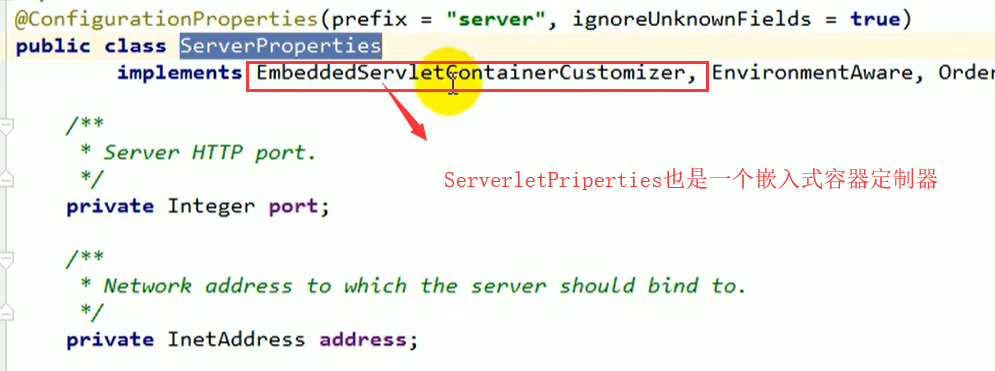
1、修改和server有关的配置(ServerProperties【也是EmbeddedServletContainerCustomizer】);
server.port=8081
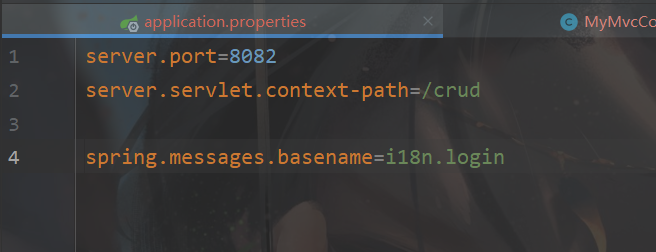
server.context‐path=/crud
server.tomcat.uri‐encoding=UTF‐8
//通用的Servlet容器设置
server.xxx
//Tomcat的设置
server.tomcat.xxx
2、在配置类中编写一个EmbeddedServletContainerCustomizer:嵌入式的Servlet容器的定制器;来修改Servlet容器的配置
@Bean  //一定要将这个定制器加入到容器中
public EmbeddedServletContainerCustomizer embeddedServletContainerCustomizer(){
    return new EmbeddedServletContainerCustomizer() {
        //定制嵌入式的Servlet容器相关的规则
        @Override
        public void customize(ConfigurableEmbeddedServletContainer container) {
            container.setPort(8083);//设置服务器端口号
        }
    };
}
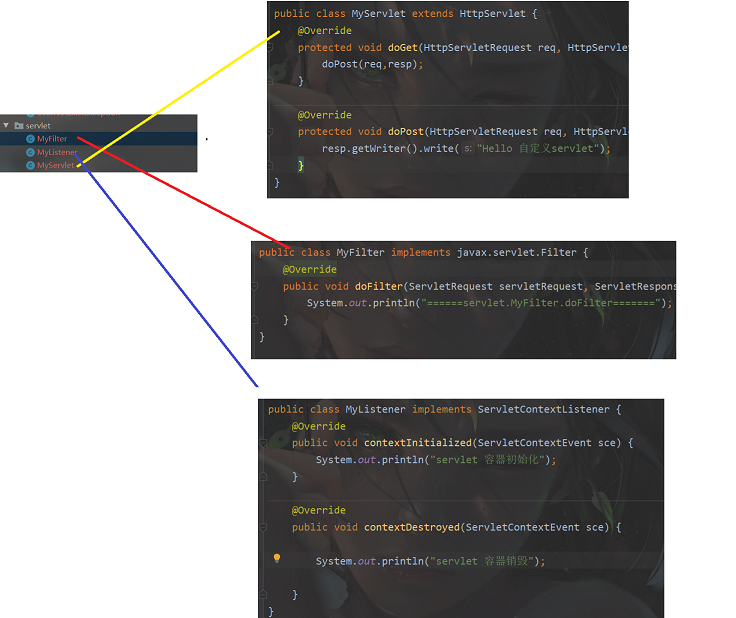
8.2 注册Servlet三大组件【Servlet、Filter、Listener】
首先自定义一个MyServlet
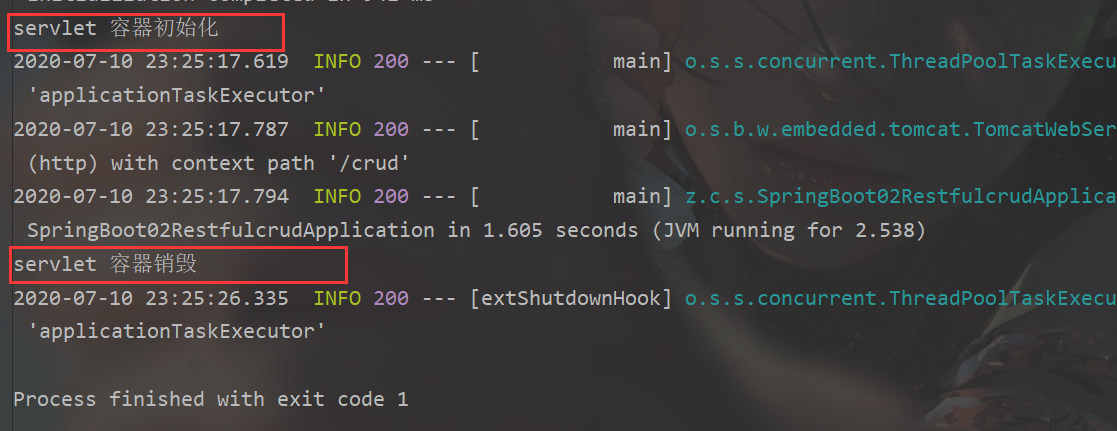
public class MyServlet extends HttpServlet {
    @Override
    protected void doGet(HttpServletRequest req, HttpServletResponse resp) throws ServletException, IOException {
        doPost(req,resp);
    }

    @Override
    protected void doPost(HttpServletRequest req, HttpServletResponse resp) throws ServletException, IOException {
        resp.getWriter().write("Hello 自定义servlet");
    }
}
然后自定义一个servlet的配置类
Spring Boot2.0以上版本EmbeddedServletContainerCustomizer被WebServerFactoryCustomizer替代
@Configuration
public class MyServletConfig {

    /**
     * 配置嵌入式servlet容器参数
     */
    @Bean
    public WebServerFactoryCustomizer<ConfigurableWebServerFactory> webServerFactoryCustomizer(){
        return new WebServerFactoryCustomizer<ConfigurableWebServerFactory>() {
            @Override
            public void customize(ConfigurableWebServerFactory factory) {
                factory.setPort(8083);
            }
        };
    }

    /**
     *
     * ServletRegistrationBean
     */
    @Bean
     public ServletRegistrationBean myServlet(){
         ServletRegistrationBean registrationBean = new ServletRegistrationBean<>(new MyServlet(),"/myservlet");
         registrationBean.setLoadOnStartup(1);//设置启动顺序
         return registrationBean;

     }

    /**
     *
     * FilterRegistrationBean过滤器
     */
    @Bean
     public FilterRegistrationBean myFilter(){
         FilterRegistrationBean<Filter> registrationBean = new FilterRegistrationBean<>();
         registrationBean.setFilter(new MyFilter());
         registrationBean.setUrlPatterns(Arrays.asList("/hello","/myservlet"));
         return registrationBean;
     }

    /**
     *
     * ServletListenerRegistrationBean监听器
     */

    @Bean
    public ServletListenerRegistrationBean myListener(){
         ServletListenerRegistrationBean<MyListener>  registrationBean= new ServletListenerRegistrationBean<>(new MyListener());
            return registrationBean;
     }


}
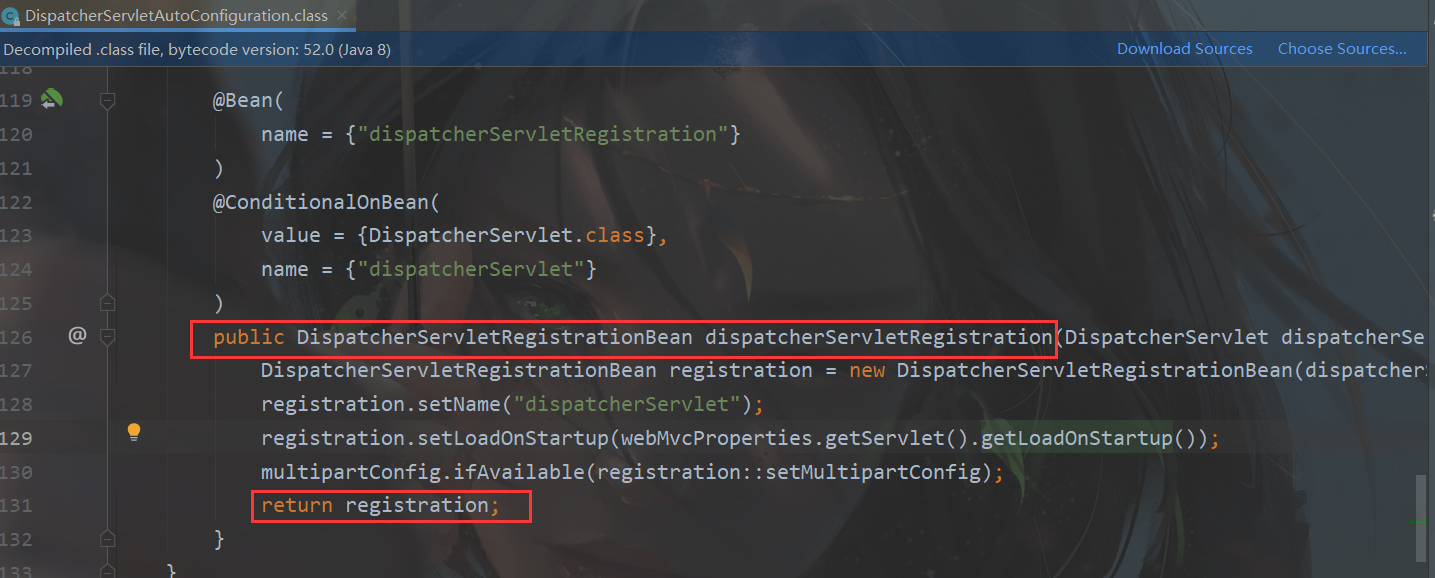
SpringBoot帮我们自动SpringMVC的时候,自动的注册SpringMVC的前端控制器;DIspatcherServlet;
DispatcherServletAutoConfiguration中:
默认拦截:
/ 所有请求;包静态资源,但是不拦截jsp请求;
/*会拦截jsp
可以通过server.servletPath来修改SpringMVC前端控制器默认拦截的请求路径
8.2 切换其他servlet容器
jetty
<!‐‐ 引入web模块 ‐‐>
<dependency>
   <groupId>org.springframework.boot</groupId>
   <artifactId>spring‐boot‐starter‐web</artifactId>

    <!‐‐ 排除 tomcat ‐‐>
   <exclusions>
      <exclusion>
         <artifactId>spring‐boot‐starter‐tomcat</artifactId>
         <groupId>org.springframework.boot</groupId>
      </exclusion>
   </exclusions>
</dependency>
<!‐‐引入其他的Servlet容器‐‐>
<dependency>
   <artifactId>spring‐boot‐starter‐jetty</artifactId>
   <groupId>org.springframework.boot</groupId>
</dependency>
Undertow
<!‐‐ 引入web模块 ‐‐>
<dependency>
   <groupId>org.springframework.boot</groupId>
   <artifactId>spring‐boot‐starter‐web</artifactId>
   <exclusions>
      <exclusion>
         <artifactId>spring‐boot‐starter‐tomcat</artifactId>
         <groupId>org.springframework.boot</groupId>
      </exclusion>
   </exclusions>
</dependency>
<!‐‐引入其他的Servlet容器‐‐>
<dependency>
   <artifactId>spring‐boot‐starter‐undertow</artifactId>
   <groupId>org.springframework.boot</groupId>
</dependency>
8.3 tomcat自动配置原理
==EmbeddedServletContainerAutoConfiguration:==嵌入式的Servlet容器自动配置?
@AutoConfigureOrder(Ordered.HIGHEST_PRECEDENCE)
@Configuration
@ConditionalOnWebApplication
@Import(BeanPostProcessorsRegistrar.class)
//导入BeanPostProcessorsRegistrar:Spring注解版;给容器中导入一些组件
//导入了EmbeddedServletContainerCustomizerBeanPostProcessor:
//后置处理器:bean初始化前后(创建完对象,还没赋值赋值)执行初始化工作
public class EmbeddedServletContainerAutoConfiguration {
@Configuration
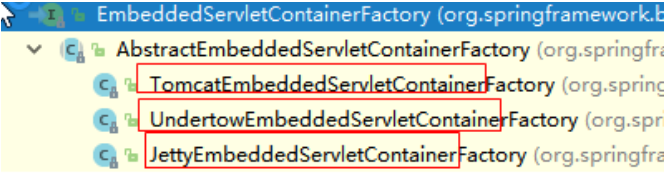
@ConditionalOnClass({ Servlet.class, Tomcat.class })//判断当前是否引入了Tomcat依赖;
@ConditionalOnMissingBean(value = EmbeddedServletContainerFactory.class, search =SearchStrategy.CURRENT)//判断当前容器没有用户自己定义EmbeddedServletContainerFactory:嵌入式的Servlet容器工厂;作用:创建嵌入式的Servlet容器
/**
* 嵌入式的Tomcat
*/
public static class EmbeddedTomcat {
@Bean
public TomcatEmbeddedServletContainerFactory tomcatEmbeddedServletContainerFactory()
{
return new TomcatEmbeddedServletContainerFactory(); //返回Tomcat嵌入式工厂
}
}
/**
* Nested configuration if Jetty is being used.
* 引入 Jetty
*/
@Configuration
@ConditionalOnClass({ Servlet.class, Server.class, Loader.class,
WebAppContext.class })
@ConditionalOnMissingBean(value = EmbeddedServletContainerFactory.class, search =SearchStrategy.CURRENT)
public static class EmbeddedJetty {
@Bean
public JettyEmbeddedServletContainerFactory jettyEmbeddedServletContainerFactory() {
return new JettyEmbeddedServletContainerFactory(); //返回一个Jetty嵌入式的工厂
}
}
/**
* Nested configuration if Undertow is being used.
* 引入 Undertow
*/
@Configuration
@ConditionalOnClass({ Servlet.class, Undertow.class, SslClientAuthMode.class })
@ConditionalOnMissingBean(value = EmbeddedServletContainerFactory.class, search =SearchStrategy.CURRENT)
public static class EmbeddedUndertow {
@Bean
public UndertowEmbeddedServletContainerFactory
undertowEmbeddedServletContainerFactory() {
return new UndertowEmbeddedServletContainerFactory();
}
}
1)、EmbeddedServletContainerFactory(嵌入式Servlet容器工厂)
public interface EmbeddedServletContainerFactory {
   //获取嵌入式的Servlet容器,根据我们的依赖配置,导入对应的Servlet容器,拨入Tomact、Jetty
   EmbeddedServletContainer getEmbeddedServletContainer(
         ServletContextInitializer... initializers);
}
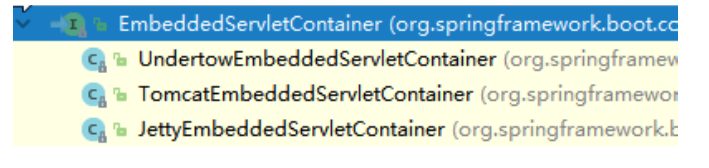
2)、EmbeddedServletContainer:(嵌入式的Servlet容器)
3)、以TomcatEmbeddedServletContainerFactory为例
tomcat嵌入式servlet的工程容器,作用是会创建Tomcat对象,然后放入到容器中。由工厂管理容器。
@Override
public EmbeddedServletContainer getEmbeddedServletContainer(
      ServletContextInitializer... initializers) {
    //创建一个Tomcat
   Tomcat tomcat = new Tomcat();

    //配置Tomcat的基本环节
   File baseDir = (this.baseDirectory != null ? this.baseDirectory: createTempDir("tomcat"));
   tomcat.setBaseDir(baseDir.getAbsolutePath());//路径
   Connector connector = new Connector(this.protocol);
   tomcat.getService().addConnector(connector);
   customizeConnector(connector);
   tomcat.setConnector(connector);//设置tomcat连接
   tomcat.getHost().setAutoDeploy(false);
   configureEngine(tomcat.getEngine());
   for (Connector additionalConnector : this.additionalTomcatConnectors) {
      tomcat.getService().addConnector(additionalConnector);
   }
   prepareContext(tomcat.getHost(), initializers);

    //将配置好的Tomcat传入进去,返回一个EmbeddedServletContainer;并且启动Tomcat服务器
   return getTomcatEmbeddedServletContainer(tomcat);
}
4)、我们对嵌入式容器的配置修改是怎么生效?
ServerProperties、EmbeddedServletContainerCustomizer
//ServerProperties 封装了配置文件中可以对server修改的属性
//EmbeddedServletContainerCustomizer:定制器帮我们修改了Servlet容器的配置?
//怎么修改的原理?
5)、容器中导入了EmbeddedServletContainerCustomizerBeanPostProcessor
定制器后置处理器 嵌入式servlet中可自定义Bean组件
//初始化之前
@Override
public Object postProcessBeforeInitialization(Object bean, String beanName)
      throws BeansException {
    //如果当前初始化的是一个ConfigurableEmbeddedServletContainer类型的组件
   if (bean instanceof ConfigurableEmbeddedServletContainer) {
       //调用下一个方法,往下看
      postProcessBeforeInitialization((ConfigurableEmbeddedServletContainer) bean);
   }
   return bean;
}
//初始化之前
private void postProcessBeforeInitialization(ConfigurableEmbeddedServletContainer bean) {
    //获取所有的定制器,调用每一个定制器的customize方法来给Servlet容器进行属性赋值;
    for (EmbeddedServletContainerCustomizer customizer : getCustomizers()) {
        customizer.customize(bean);
    }
}

//获取定制器
private Collection<EmbeddedServletContainerCustomizer> getCustomizers() {
    if (this.customizers == null) {
        // Look up does not include the parent context
        this.customizers = new ArrayList<EmbeddedServletContainerCustomizer>(this.beanFactory
            //从容器中获取所有这个类型的组件:EmbeddedServletContainerCustomizer
            //定制Servlet容器,给容器中可以添加一个EmbeddedServletContainerCustomizer类型的组件
            .getBeansOfType(EmbeddedServletContainerCustomizer.class, false, false)
            .values());
        Collections.sort(this.customizers, AnnotationAwareOrderComparator.INSTANCE);
        this.customizers = Collections.unmodifiableList(this.customizers);
    }
    return this.customizers;
}
//ServerProperties也是定制器
总结该原理的步骤:
EmbeddedServletContainerAutoConfiguration:嵌入式的Servlet容器自动配置类
1)、SpringBoot根据导入的依赖情况,给容器中添加相应的(嵌入式Servlet容器工厂)
EmbeddedServletContainerFactory【TomcatEmbeddedServletContainerFactory】嵌入式的Servlet容器工厂;作用:创建嵌入式的Servlet容器
EmbeddedServletContainer 嵌入式servlet容器,将一个配置好的Tomcat对象放到容器中,供外部使用
2)、Container容器中某个组件要创建对象就会惊动后置处理器;
EmbeddedServletContainerCustomizerBeanPostProcessor;只要是嵌入式的Servlet容器工厂,后置处理器就工作;
后置处理器包含定制器,调用定制方法完成定制
3)、后置处理器,
从容器中获取所有的EmbeddedServletContainerCustomizer,并调用定制器的定制方法
8.4 嵌入式Servlet容器启动原理
什么时候创建嵌入式的Servlet容器工厂?什么时候获取嵌入式的Servlet容器并启动Tomcat;
获取嵌入式的Servlet容器工厂:
1)、SpringBoot应用启动运行run方法
2)、refreshContext(context);SpringBoot刷新IOC容器【创建IOC容器对象,并初始化容器,创建容器中的每一
个组件】;如果是web应用创建AnnotationConfigEmbeddedWebApplicationContext,否则:
AnnotationConfigApplicationContext
3)、refresh(context);刷新刚才创建好的ioc容器;
public void refresh() throws BeansException, IllegalStateException {
   synchronized (this.startupShutdownMonitor) {
      // Prepare this context for refreshing.
      prepareRefresh();
      // Tell the subclass to refresh the internal bean factory.
      ConfigurableListableBeanFactory beanFactory = obtainFreshBeanFactory();
      // Prepare the bean factory for use in this context.
      prepareBeanFactory(beanFactory);
      try {
         // Allows post‐processing of the bean factory in context subclasses.
         postProcessBeanFactory(beanFactory);
         // Invoke factory processors registered as beans in the context.
         invokeBeanFactoryPostProcessors(beanFactory);
         // Register bean processors that intercept bean creation.
         registerBeanPostProcessors(beanFactory);
         // Initialize message source for this context.
         initMessageSource();
         // Initialize event multicaster for this context.
         initApplicationEventMulticaster();
         // Initialize other special beans in specific context subclasses.
         onRefresh();
         // Check for listener beans and register them.
         registerListeners();
         // Instantiate all remaining (non‐lazy‐init) singletons.
         finishBeanFactoryInitialization(beanFactory);
         // Last step: publish corresponding event.
         finishRefresh();
      }
      catch (BeansException ex) {
         if (logger.isWarnEnabled()) {
            logger.warn("Exception encountered during context initialization ‐ " +
                  "cancelling refresh attempt: " + ex);
         }
         // Destroy already created singletons to avoid dangling resources.
         destroyBeans();
         // Reset 'active' flag.
         cancelRefresh(ex);
         // Propagate exception to caller.
         throw ex;
      }
      finally {
         // Reset common introspection caches in Spring's core, since we
         // might not ever need metadata for singleton beans anymore...
         resetCommonCaches();
      }
   }
}
4)、 onRefresh(); web的ioc容器重写了onRefresh方法
5)、webioc容器会创建嵌入式的Servlet容器;createEmbeddedServletContainer();
6)、获取嵌入式的Servlet容器工厂:
EmbeddedServletContainerFactory containerFactory = getEmbeddedServletContainerFactory();
从ioc容器中获取EmbeddedServletContainerFactory 组件;TomcatEmbeddedServletContainerFactory创建
对象,后置处理器一看是这个对象,就获取所有的定制器来先定制Servlet容器的相关配置;
7)、使用容器工厂获取嵌入式的Servlet容器:this.embeddedServletContainer = containerFactory
.getEmbeddedServletContainer(getSelfInitializer());
8)、嵌入式的Servlet容器创建对象并启动Servlet容器;
先启动嵌入式的Servlet容器,再将ioc容器中剩下没有创建出的对象获取出来;
总结:IOC容器启动创建嵌入式的Servlet容器
8.3 使用外置的Servlet容器
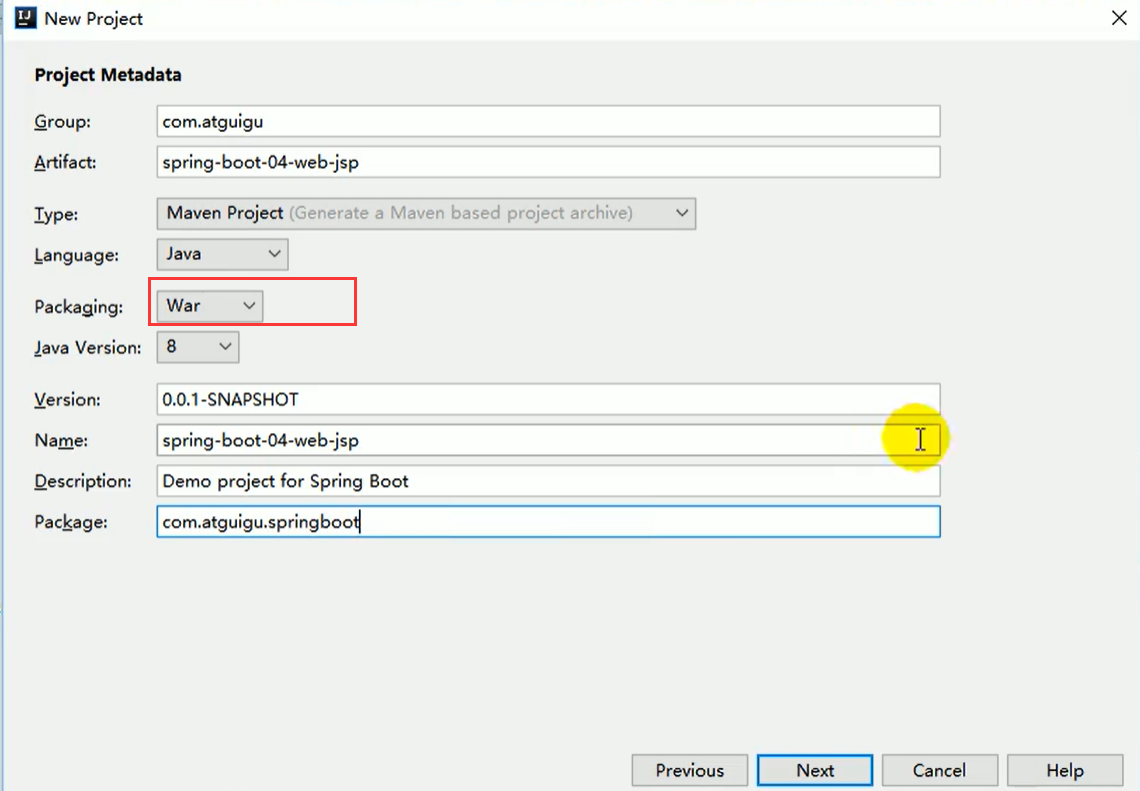
嵌入式Servlet容器:应用打成可执行的jar
优点:简单、便携;
缺点:默认不支持JSP、优化定制比较复杂(使用定制器【ServerProperties、自定义
EmbeddedServletContainerCustomizer】,自己编写嵌入式Servlet容器的创建工厂
【EmbeddedServletContainerFactory】);
外置的Servlet容器:外面安装Tomcat—应用war包的方式打包;
步骤
1)、必须创建一个war项目;(利用idea创建好目录结构)
2)、将嵌入式的Tomcat指定为provided;
<dependency>
   <groupId>org.springframework.boot</groupId>
   <artifactId>spring‐boot‐starter‐tomcat</artifactId>
   <scope>provided</scope>
</dependency>
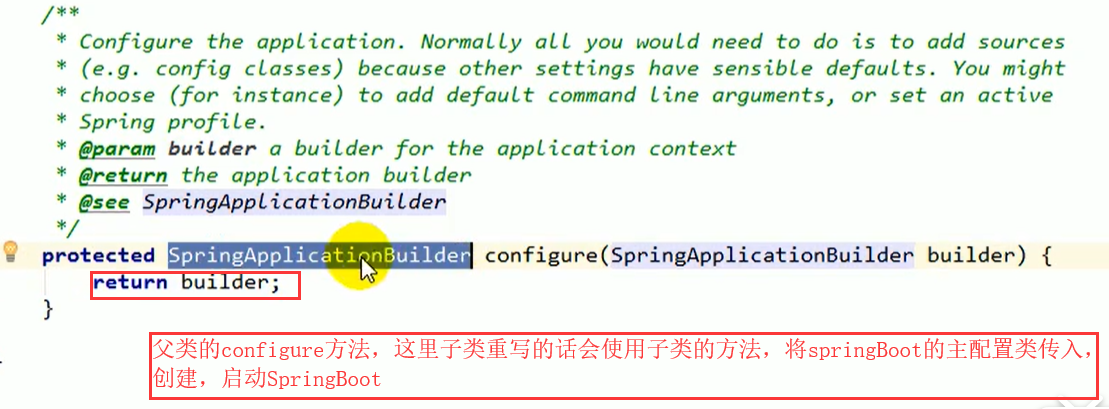
3)、必须编写一个SpringBootServletInitializer的子类,并调用configure方法
public class ServletInitializer extends SpringBootServletInitializer {
   @Override
   protected SpringApplicationBuilder configure(SpringApplicationBuilder application) {
       //传入SpringBoot应用的主程序
       //SpringBoot04WebJspApplication是主程序的主配置类
      return application.sources(SpringBoot04WebJspApplication.class);

   }
}
4)、启动服务器就可以使用;
原理解析
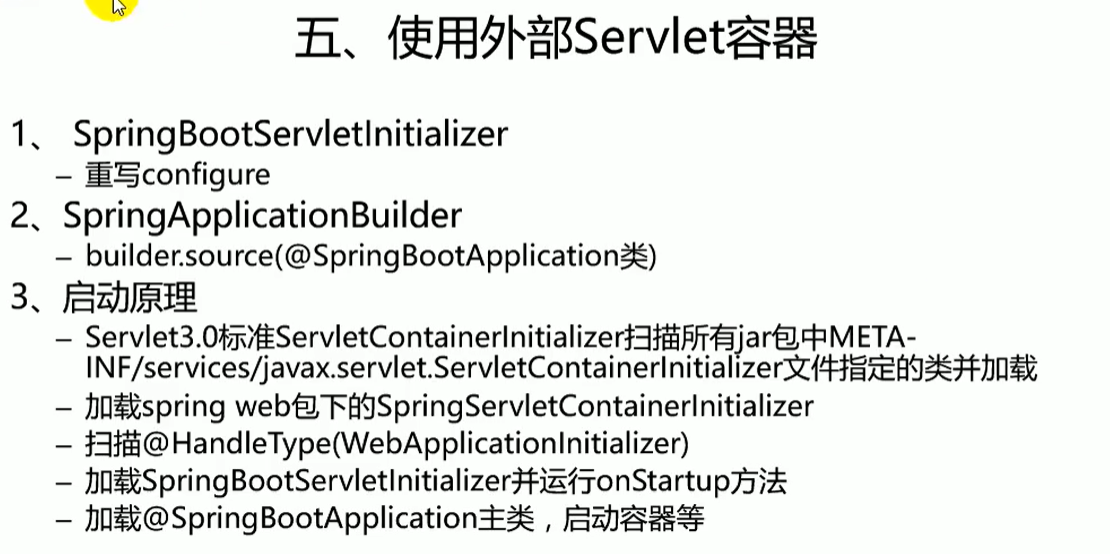
使用嵌入式servlet容器和使用外部的servlet容器,创建过程不同:
- jar包:先执行SpringBoot主类的main方法,启动ioc容器,创建嵌入式的Servlet容器;
- war包:先启动服务器,服务器启动SpringBoot应用【SpringBootServletInitializer】,启动ioc容器;
启动Servlet容器,再启动SpringBoot应用
流程:
1)、启动Tomcat
2)、在该路径下:
org\springframework\spring-web\4.3.14.RELEASE\spring-web-4.3.14.RELEASE.jar!\META-
INF\services\javax.servlet.ServletContainerInitializer:
Spring的web模块里面有这个文件:org.springframework.web.SpringServletContainerInitializer
3)、SpringServletContainerInitializer将 @HandlesTypes(WebApplicationInitializer.class) 标注的所有这个类型
的类都传入到onStartup方法的Set>;为这些 WebApplicationInitializer类型的类创建实例;
4)、每一个WebApplicationInitializer都调用自己的onStartup;
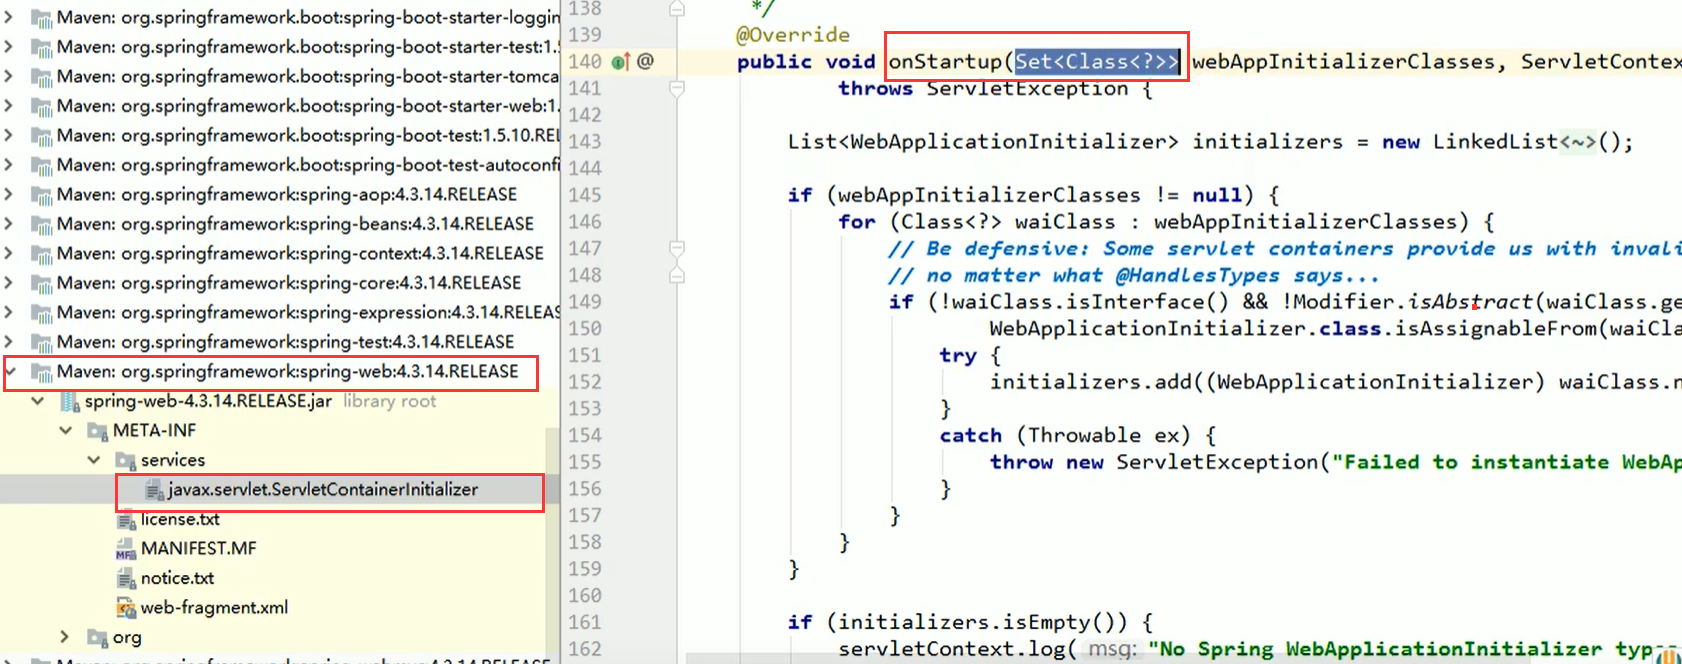
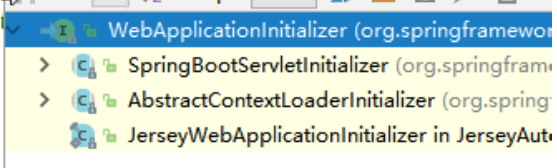
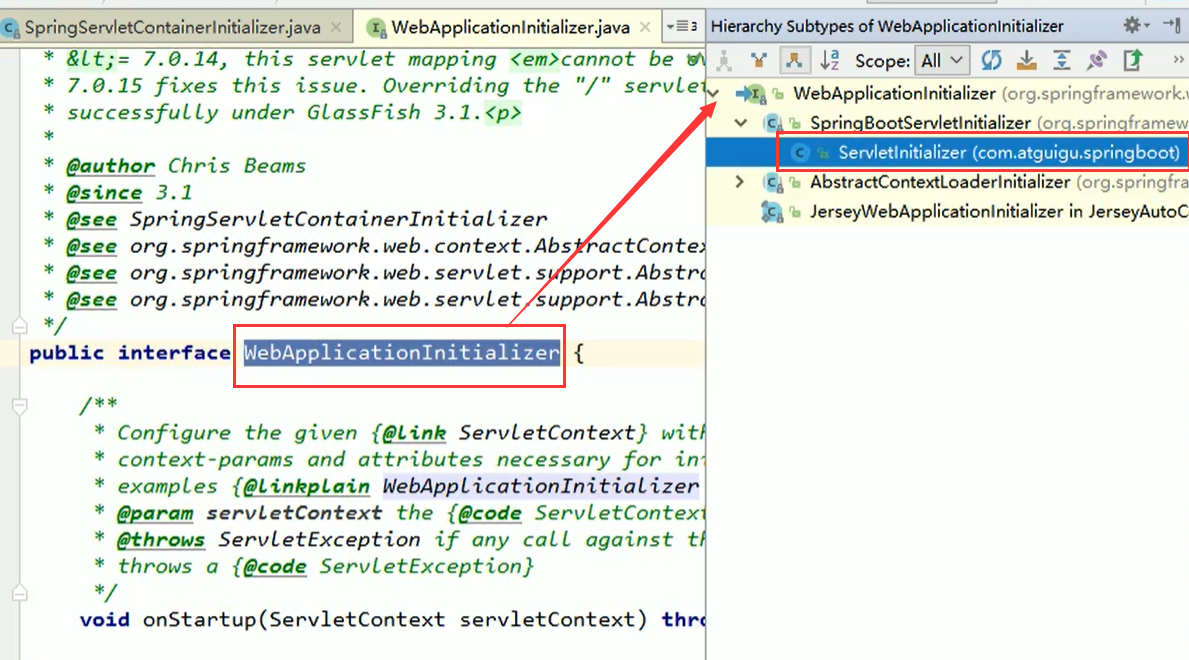
//我们的程序中有这样一个类,注意它继承的这个父类
public class ServletInitializer extends SpringBootServletInitializer {
   @Override
   protected SpringApplicationBuilder configure(SpringApplicationBuilder application) {
       //传入SpringBoot应用的主程序
       //SpringBoot04WebJspApplication是主程序的主配置类
      return application.sources(SpringBoot04WebJspApplication.class);

   }
}
5)、相当于我们的SpringBootServletInitializer的类会被创建对象,并执行onStartup方法
6)、SpringBootServletInitializer实例执行onStartup的时候会createRootApplicationContext;创建容器
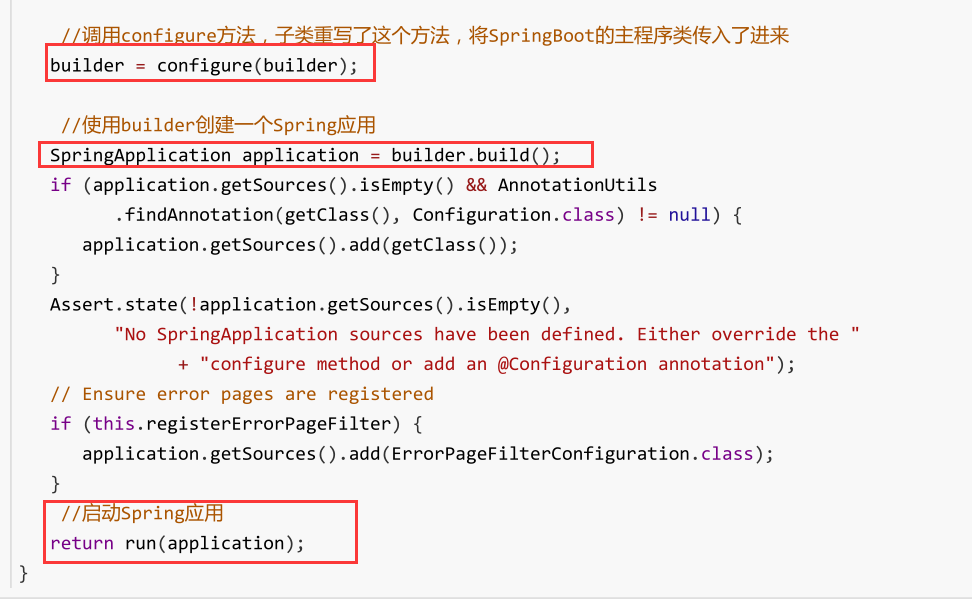
九、Docker容器
9.1 Docker的概念
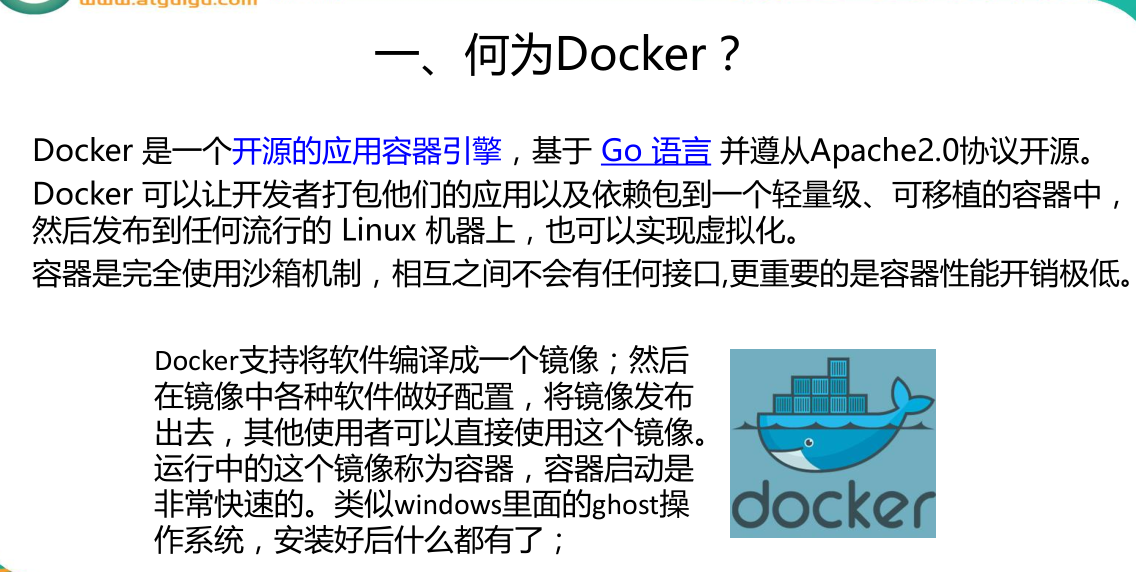
-
docker镜像(Images):Docker 镜像是用于创建 Docker 容器的模板。
-
docker容器(Container):容器是独立运行的一个或一组应用。
-
例如,仓库中有Tomcat镜像,我可以在主机上创建5个tomcat容器,就可以实现有5个tomcat服务器应用。
-
docker客户端(Client):客户端通过命令行或者其他工具使用Docker与 Docker 的守护进程通信
- API(https://docs.docker.com/reference/api/docker_remote_api)
-
**docker主机(Host):**安装了Docker的一台操作系统,一个物理或者虚拟的机器用于执行Docker 守护进程和容器。
-
**docker仓库(Registry):**Docker 仓库用来保存镜像,可以理解为代码控制中的代码仓库。
- DockerHub(https://hub.docker.com) 提供了庞大的镜像集合供使用。
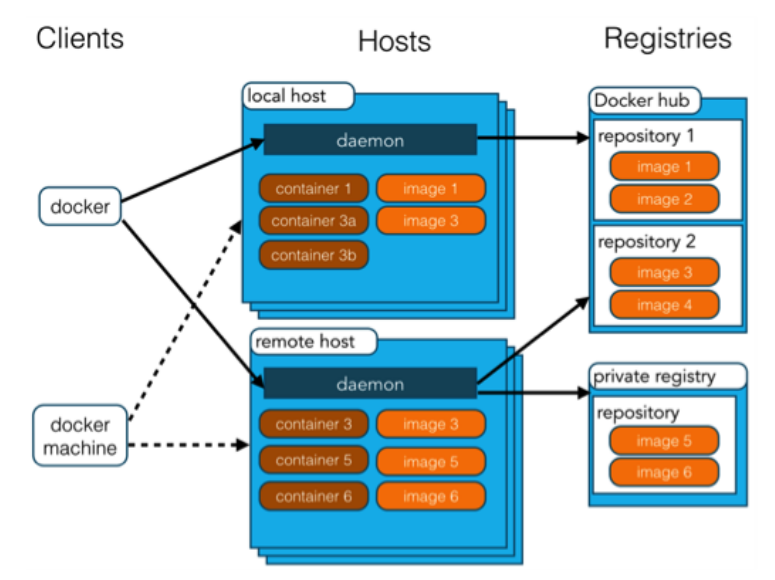
使用Docker的步骤:
1)、安装Docker
2)、去Docker仓库找到这个软件对应的镜像;
3)、使用Docker运行这个镜像,这个镜像就会生成一个Docker容器;
4)、对容器的启动停止就是对软件的启动停止;
Docker容器是由镜像运行而来的,其实这个Docker容器就相当于我们安装并配置了这个软件服务在我们的操作系统中,因为有了docker可以让我们更快速的使用该软件,还可以在各种操作系统切换不需要再配置那么多东西了。
十、数据访问
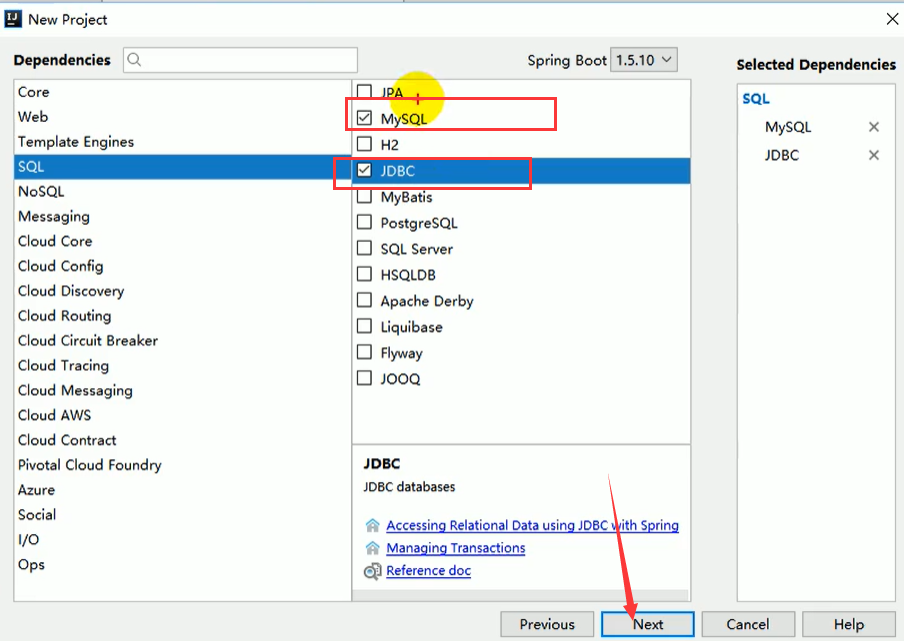
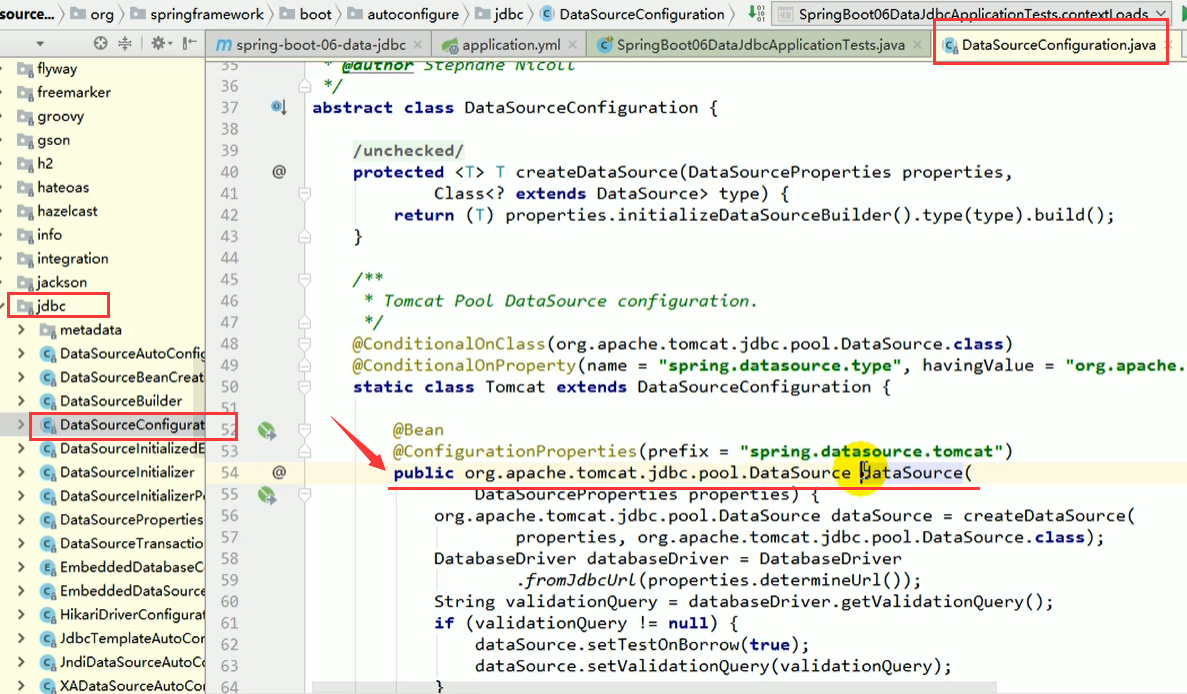
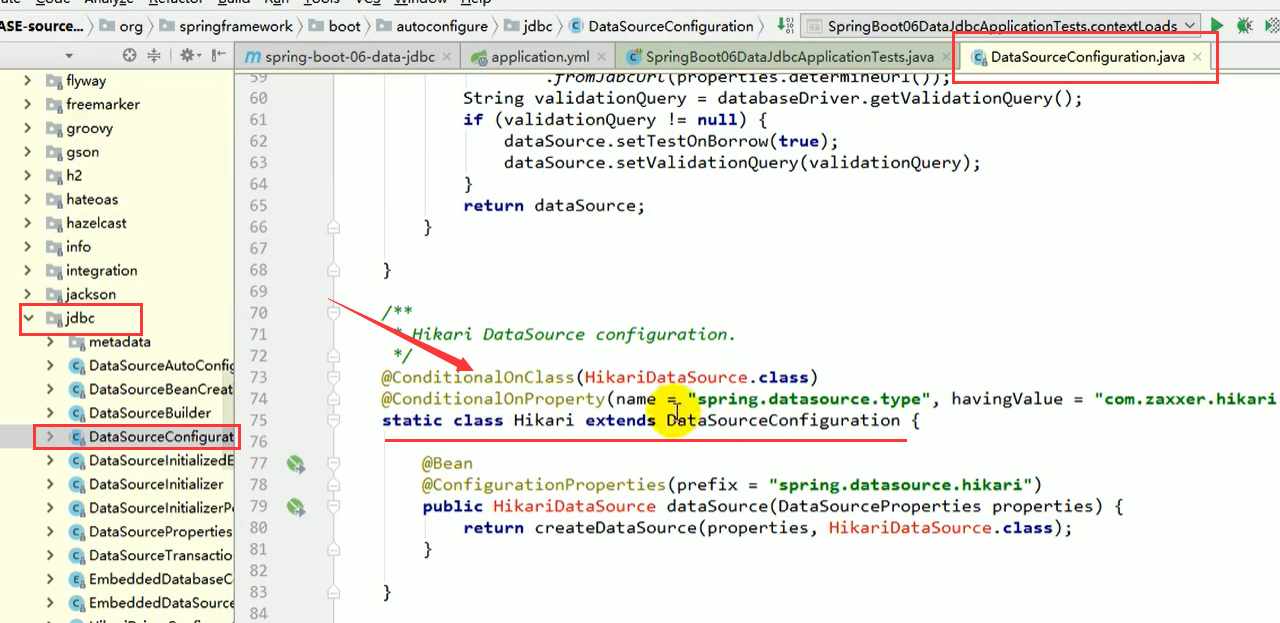
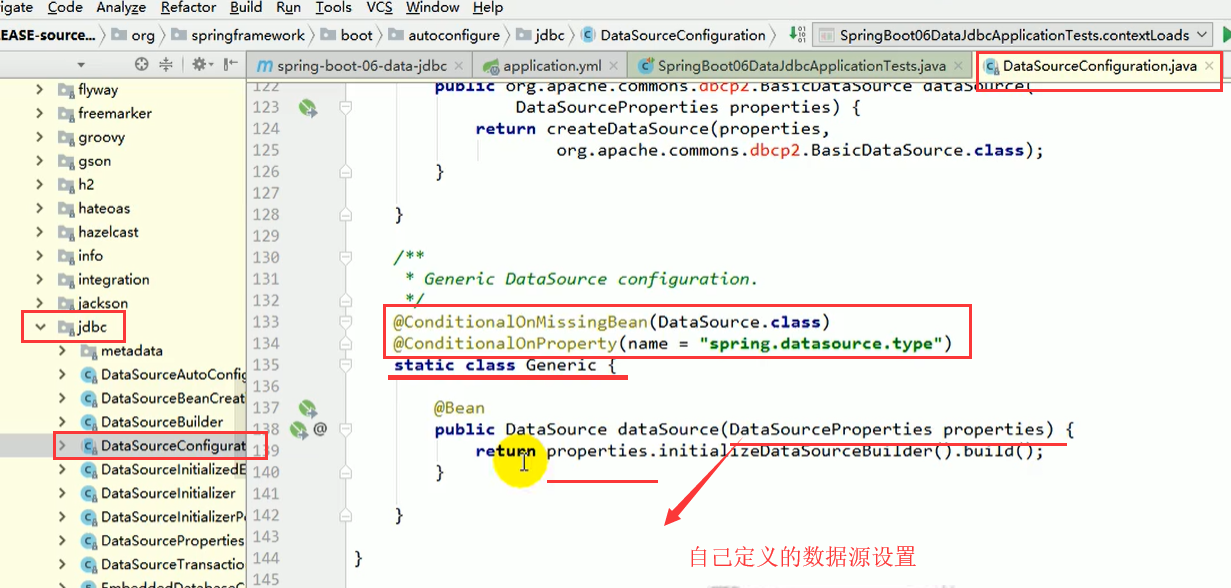
10.1 整合JDBC

10.2 整合Mybatis
 <dependency>
            <groupId>org.mybatis.spring.boot</groupId>
            <artifactId>mybatis-spring-boot-starter</artifactId>
            <version>2.1.3</version>
        </dependency>
<!--      druid  数据源-->
        <dependency>
            <groupId>com.alibaba</groupId>
            <artifactId>druid</artifactId>
            <version>1.1.8</version>
        </dependency>
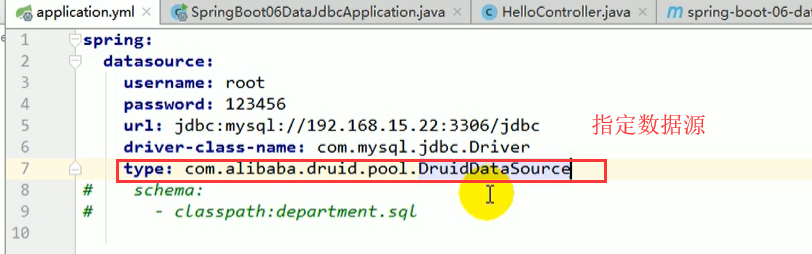
druid 数据源配置,在主配置文件yml文件中编写如下配置
spring:
datasource:
# 数据源基本配置
username: root
password: 123456
driver-class-name: com.mysql.cj.jdbc.Driver
url: jdbc:mysql://192.168.40.132:3306/db01
type: com.alibaba.druid.pool.DruidDataSource
# 数据源其他配置
initialSize: 5
minIdle: 5
maxActive: 20
maxWait: 60000
timeBetweenEvictionRunsMillis: 60000
minEvictableIdleTimeMillis: 300000
validationQuery: SELECT 1 FROM DUAL
testWhileIdle: true
testOnBorrow: false
testOnReturn: false
poolPreparedStatements: true
# 配置监控统计拦截的filters,去掉后监控界面sql无法统计,'wall'用于防火墙
filters: stat,wall,log4j
maxPoolPreparedStatementPerConnectionSize: 20
useGlobalDataSourceStat: true
connectionProperties: druid.stat.mergeSql=true;druid.stat.slowSqlMillis=500
# 使用xml文件配置时使用下面的配置映射到mybatis的配置文件位置
mybatis:
# 指定全局配置文件位置
config-location: classpath:mybatis/mybatis-config.xml
# 指定sql映射文件位置
mapper-locations: classpath:mybatis/mapper/*.xml
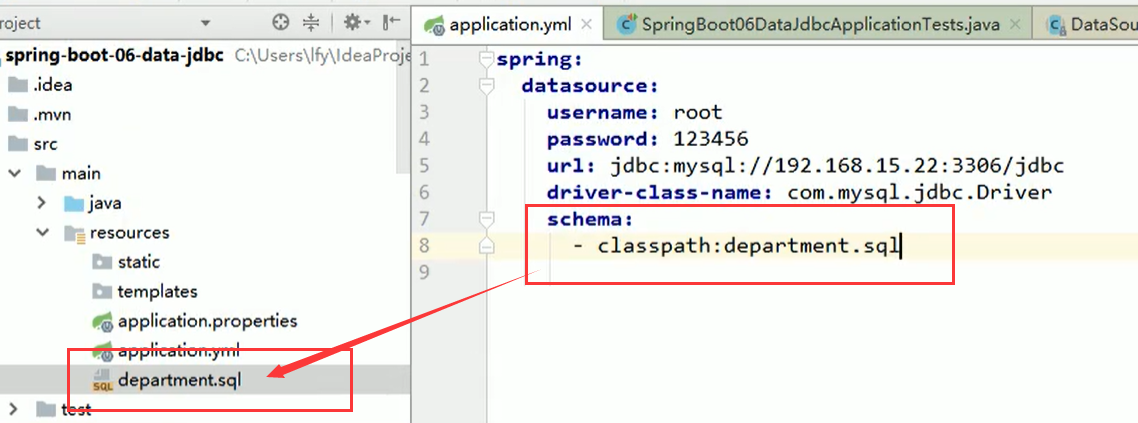
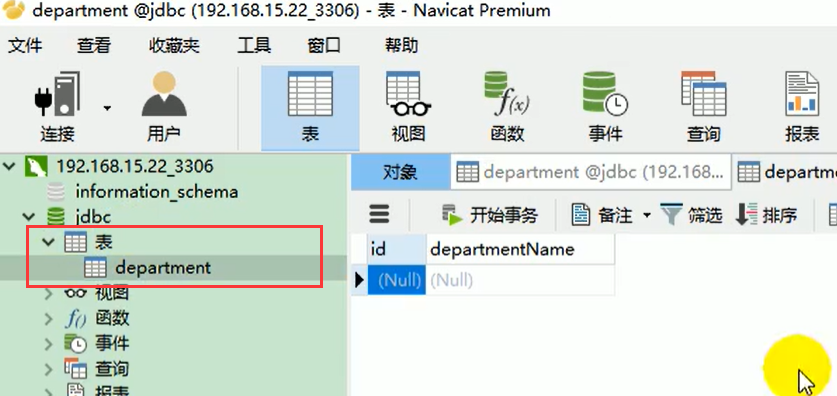
# 会自动加载该路径下得sql
# schema:
# - classpath:sql/department.sql
# - classpath:sql/employee.sql
编写druid配置类
@Configuration
public class DruidConfig {
@ConfigurationProperties(prefix = "spring.datasource")
@Bean
public DataSource druid(){
return new DruidDataSource();
}
//配置Druid的监控
//1、配置一个管理后台的Servlet
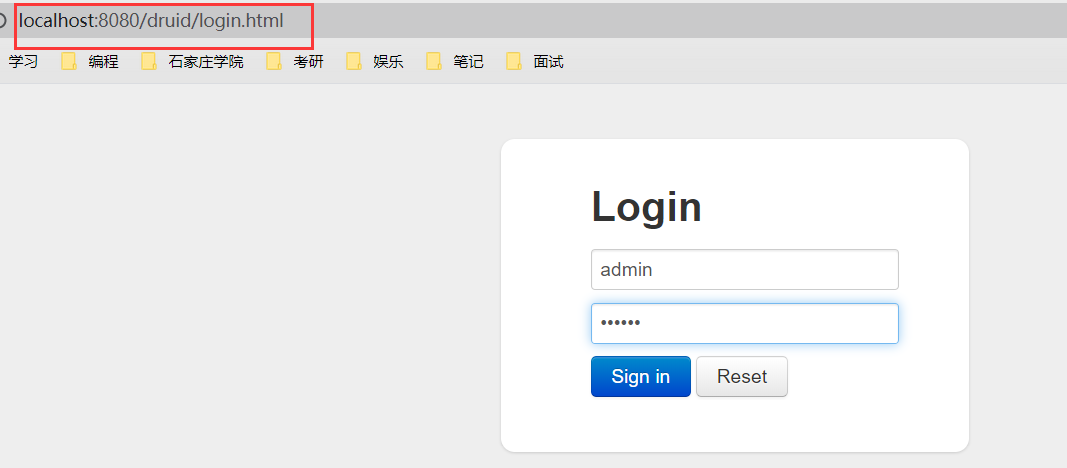
@Bean
public ServletRegistrationBean statViewServlet(){
ServletRegistrationBean bean = new ServletRegistrationBean(new StatViewServlet(), "/druid/*");
Map<String,String> initParams = new HashMap<>();
initParams.put("loginUsername","admin");
initParams.put("loginPassword","123456");
initParams.put("allow","");//默认就是允许所有访问
initParams.put("deny","192.168.15.21");
bean.setInitParameters(initParams);
return bean;
}
//2、配置一个web监控的filter
@Bean
public FilterRegistrationBean webStatFilter(){
FilterRegistrationBean bean = new FilterRegistrationBean();
bean.setFilter(new WebStatFilter());
Map<String,String> initParams = new HashMap<>();
initParams.put("exclusions","*.js,*.css,/druid/*");
bean.setInitParameters(initParams);
bean.setUrlPatterns(Arrays.asList("/*"));
return bean;
}
}
注解版
加入domain类
编写dao层
@Mapper
public interface BookDao {

    @Select("select * from tb_book")
    public List<Book> findAll();

    @Select("select * from tb_book where id=#{id}")
    public Book findById(int id);

    @Options(useGeneratedKeys = true,keyProperty = "id")//主键自增长
    @Insert("insert into tb_book(id,name)values(#{id},#{name})")
    public void insert(Book book);

    @Delete("delete from tb_book where id=#{id} and name=#{name}")
    public void delete(Book book);

    @Update("update tb_book set name=#{name} where id=#{id}")
    public void update(Book book);

}
编写service层,此处省略,自行添加
编写controller层
@RestController
public class BookController {
@Autowired
BookService bookService;
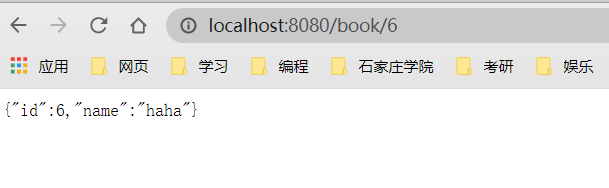
@GetMapping("/book/{id}")
public Book findById(@PathVariable("id") int id){
return bookService.findById(1);
}
@GetMapping("/book")
public Book insert(Book book){
bookService.insert(book);
return book;
}
// @GetMapping("/book")
// public void delete(Book book){
// bookService.delete(book);
// }
}
启动服务器

踩坑
如果启动程序时有如下报错,说明缺少log4j,导入依赖即可
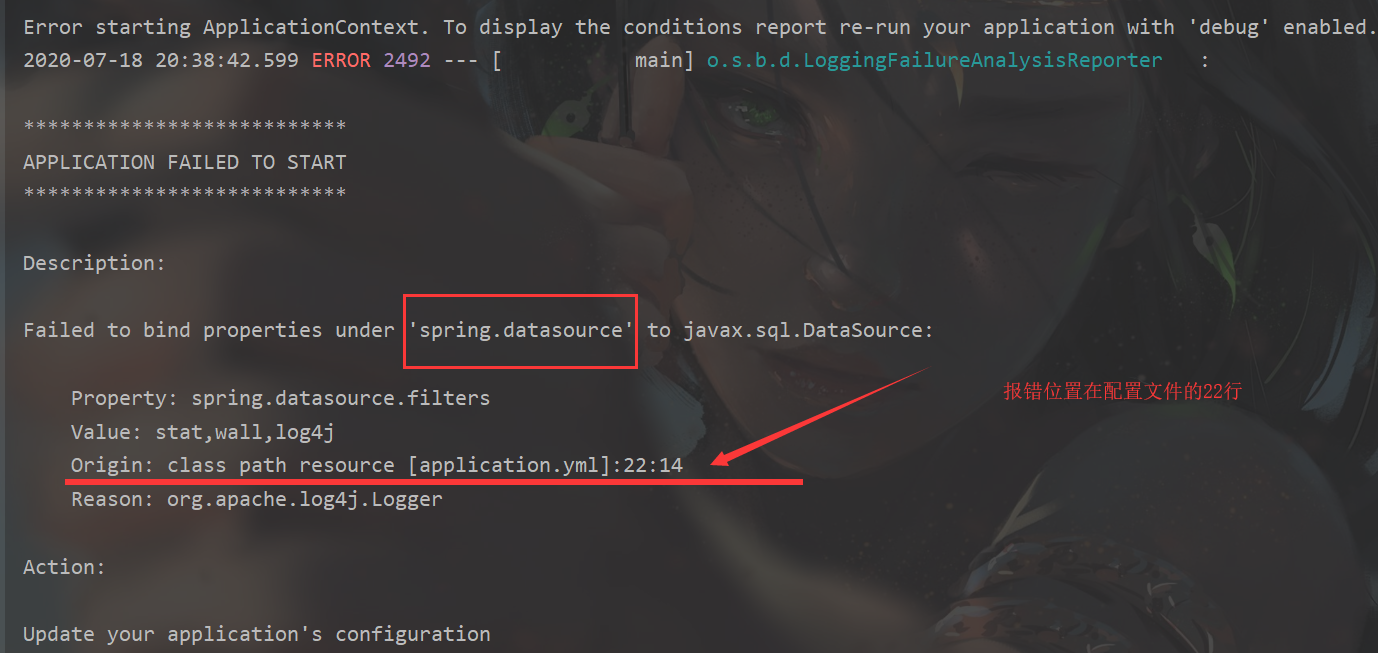
<!-- https://mvnrepository.com/artifact/log4j/log4j -->
		<dependency>
		    <groupId>log4j</groupId>
		    <artifactId>log4j</artifactId>
		    <version>1.2.17</version>
		</dependency>
导入依赖后还出现警告,那就自己手动在resources目录下创建一个 log4j。properties文件

log4j.rootLogger=DEBUG, stdout
log4j.appender.stdout=org.apache.log4j.ConsoleAppender
log4j.appender.stdout.layout=org.apache.log4j.PatternLayout
log4j.appender.stdout.layout.ConversionPattern=%5p [%t] - %m%n
xml版
mybatis-3的官方文档,找到全局配置文件:https://mybatis.org/mybatis-3/getting-started.html
由于数据库的驱动链接等配置信息在yml主配置文件中都写完了,这里的配置就不用加了
<?xml version="1.0" encoding="UTF-8" ?>
<!DOCTYPE configuration
        PUBLIC "-//mybatis.org//DTD Config 3.0//EN"
        "http://mybatis.org/dtd/mybatis-3-config.dtd">
<configuration>
 <settings>
     驼峰命名法的配置开启
     <setting name="mapUnderscoreToCamelCase" value="true"/>
 </settings>
</configuration>

设置一个全局配置文件,和一个mapper映射配置文件
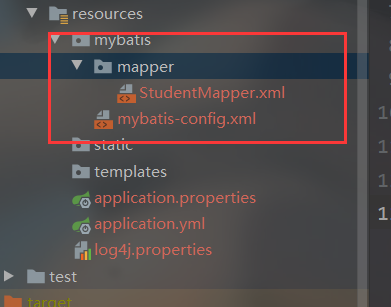
编写dao层接口,和对应接口的mapper映射配置文件
//@Mapper 或者 @MapperScan 将接口扫描并装配到容器中
public interface StudentDao {

    public Student findById(Integer id);

    public void  insert(Student student);

}
<?xml version="1.0" encoding="UTF-8" ?>
<!DOCTYPE mapper
        PUBLIC "-//mybatis.org//DTD Mapper 3.0//EN"
        "http://mybatis.org/dtd/mybatis-3-mapper.dtd">
<mapper namespace="zy.code.springboot06mybatis.dao.StudentDao">
    <select id="findById" parameterType="int" resultType="zy.code.springboot06mybatis.domain.Student">
    select * from student where id = #{id}
  </select>

    <insert id="insert" parameterType="zy.code.springboot06mybatis.domain.Student">
        insert into student(id,name) values (#{id},#{name})
    </insert>
</mapper>
编写测试controller层,直接调用dao层,测试是否能够操作数据库成功
@RestController
public class StudentController {
@Autowired
StudentDao studentDao;
@GetMapping("/stu/{id}")
public Student findById(@PathVariable("id") Integer id){
Student stu = studentDao.findById(id);
return stu;
}
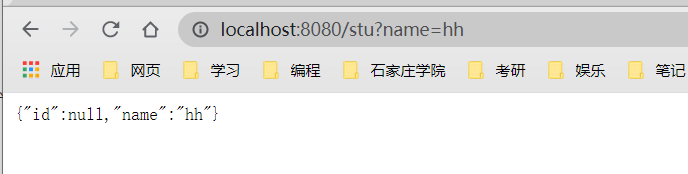
@GetMapping("/stu")
public Student insert(Student student){
studentDao.insert(student);
return student;
}
}