模板
一、定义模板
1、变量:
- 视图传递给模板的数据,
- 要遵守标识符规则
- 语法:{{var}} 计算以下var的值
- 注意:如果使用的变量不存在,则插入的是空字符串
- 在模板中使用点语法
<h1>{{grade.gname}}</h1>
字典查询
属性或者方法
数字 - 在模板中调用对象的方法
<h1>{{grade.getName}</h1>getName是models.py的函数名(不能传递参数)
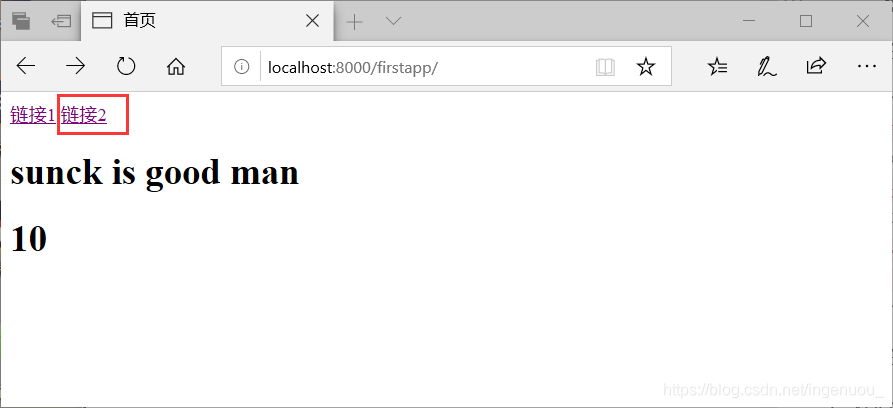
在templates/firstapp中的index.html下面第九行添加<h1>{{num}}</h1>
<!DOCTYPE html>
<html lang="en">
<head>
<meta charset="UTF-8">
<title>首页</title>
</head>
<hody>
<h1>sunck is good man</h1>
<h1>{{num}}</h1>
</hody>
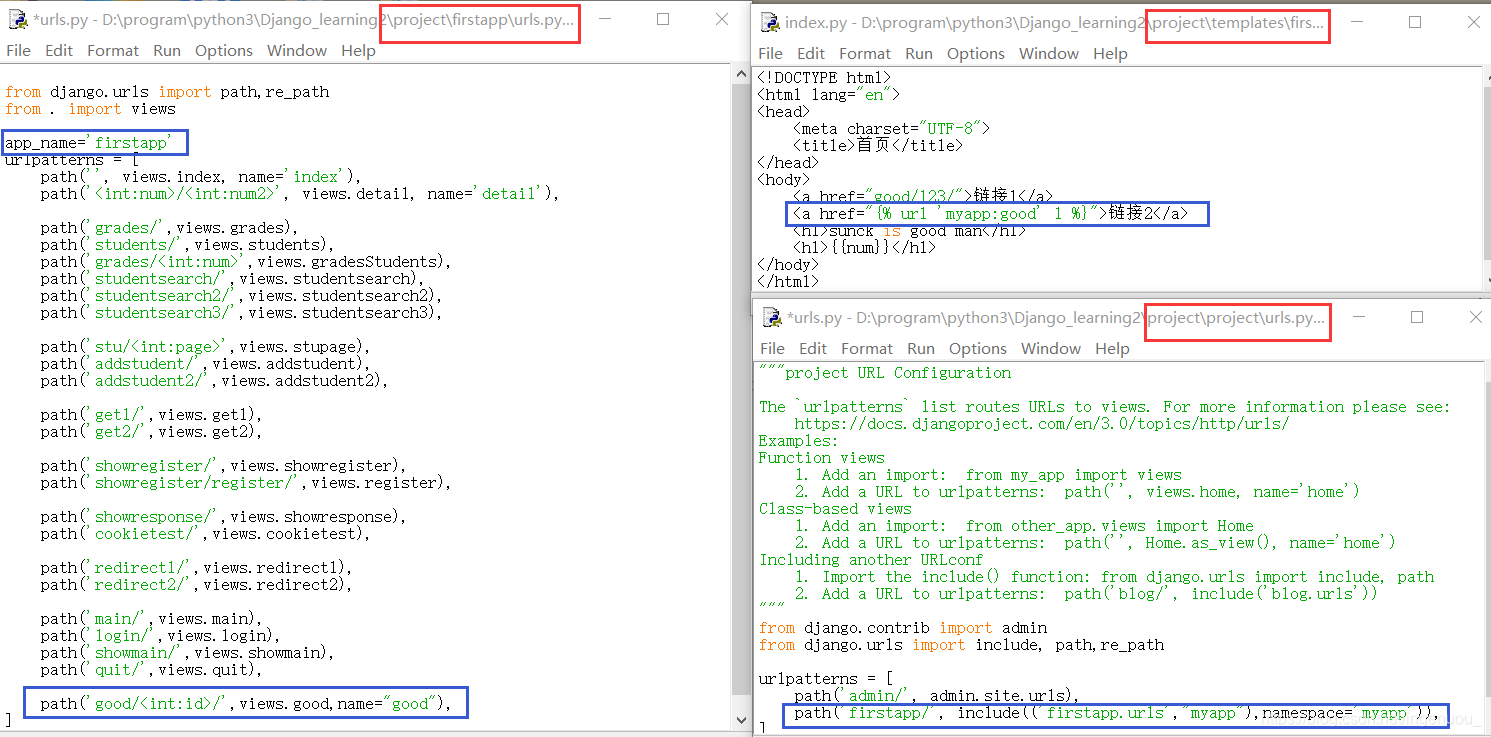
</html>在firstapp/views.py更改index函数
def index(request):
    return render(request,'firstapp/index.html',{"num":10})
2、标签
1、语法{% tag %}
2、作用
- 在输出中创建文本
- 控制逻辑和循环
3、标签
- if 格式:
{% if 表达式 %} 语句 {% endif %}
{% if 表达式1 %} 语句1 {% else 表达式2 %} 语句2 {% endif %}
{% if 表达式1 %} 语句1 {% elif 表达式2 %} 语句2 ... {% elif 表达式n %} 语句n {% endif %}
{% if 表达式1 %} 语句1 {% elif 表达式2 %} 语句2 ... {% elif 表达式n %} 语句n {% else %} 语句 {% endif %}
{%if num%}
    <h1>sunck is good man</h1>
{%endif%}- for 格式:
{%for 变量 in 列表%} 语句 {%endfor%}
{%for 变量 in 列表%} 语句1 {%empty%} 语句2 {%endfor%}注意:列表为空或者列表不存在时执行语句2
{{forloop.counter}}表示当前是第几次循环,不是标签
#templates/firstapp/students.html
<!DOCTYPE html>
<html lang="en">
<head>
    <meta charset="UTF-8">
    <title>学生信息</title>
</head>
<hody>
    <h1>学生信息列表</h1>
    <ul>
        {%for stu in students%}
        <li>
            {{forloop.counter}}--{{stu.sname}}--{{stu.scontend}}--{{stu.sgrade}}
        </li>
        {%empty%}
            <li>目前没有学生</li>
        {%endfor%}
    </ul>
</hody>
</html>
#firstapp/views.py
def students(request):
list=Students.stuObj2.all()
return render(request,'firstapp/students.html',{"students":list})#firstapp/urls.py
path('students/', views.students),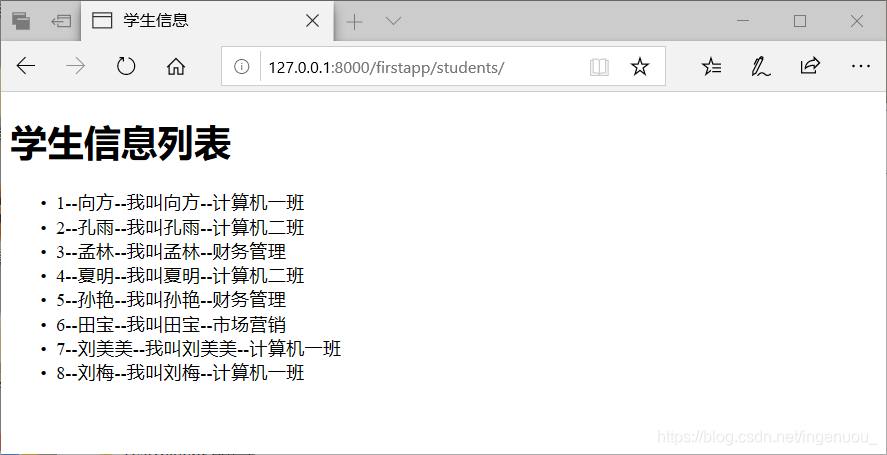
3. comment-----作用:注释多行
{% comment %} 注释的内容 {% endcomment %}
4. ifequal。ifnotequal 作用:判断是否相等或者不相等
格式:{%ifequal '值1' '值2' %} 语句 {% endifequal %} 如果值1等于值2,则执行语句
5. include
作用:加载模板并以标签内的参数渲染
格式:{% include '模板目录‘ 参数1 参数2...%}
6. url
作用:反向解析
格式:{% url 'namespace:name' p1 p2%}
7. csrf_token
作用:用于跨站请求伪造保护的
格式:{% csrf_token %}
8. block/extends
作用:用于模板的继承
9. autoescape
作用:用于HTML转义
3、过滤器
1、语法:{{ var|过滤器 }} 和 {{ 变量|过滤器 }}一样,<h1>{{str|upper}}</h1>,字符串显示之前,修改成大写,str本身不变
2、作用:在变量被显示前修改它
3、
- lower
<h1>{{str|lower}}</h1> - upper
<h1>{{str|upper}}</h1> - 过滤器可以传递参数,参数用引号引起来
join 格式:<h1>{{列表|join:'#'}}</h1> - 如果一个变量没有被提供,或者值为false或者为空,可以使用默认值
default 格式:<h1>{{var|default:'good'}}</h1>
<h1>{{test|default:'没有'}}</h1>test有值,返回值,没有值,返回default - 根据给定格式转换日期为字符串
date-----格式:{{dateval | date:'y-m-d'}}dateval–日期的变量 - HTML转义----
escape - 加减乘除
<h1>num={{num | add :10}}</h1>
<h1>num={{num | add :-5}}</h1>
标签
<h1>{% widthratio num 1 5 %}</h1>------><!--num/1*5-->----->num*5
<h1>{% widthratio num 2 1 %}</h1>------><!--num/5*1-->------>num/5
4、注释
1、单行注释
语法:{#注释的内容#}
多行注释
comment-----作用:注释多行
{% comment %} 注释的内容 {% endcomment %}
二、反向解析
第一部分
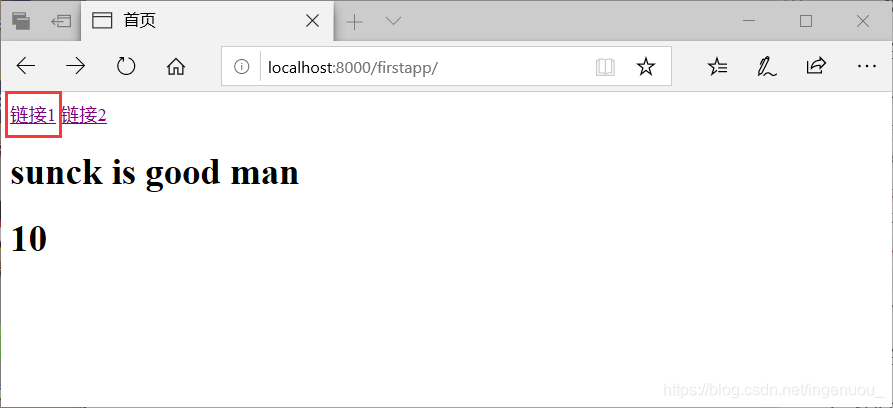
1、在templates/firstapp/index.html里面加一个<a href="good/">链接</a>,
<a href="/good/">表示从头开始
2、点击链接,转到good的页面,需要firstapp/urls.py配置路由path('good/',views.good),
3、然后在firstapp/views.py中创建一个good视图
def good(request):
return render(request,'firstapp/good.html')
4、在templates/firstapp中创建一个good.html,填写上内容<h1>good</h1>
第二部分,传递一个数字123
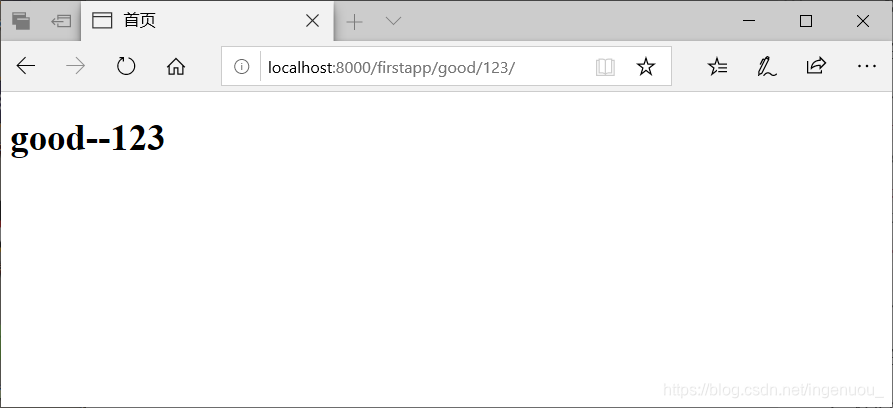
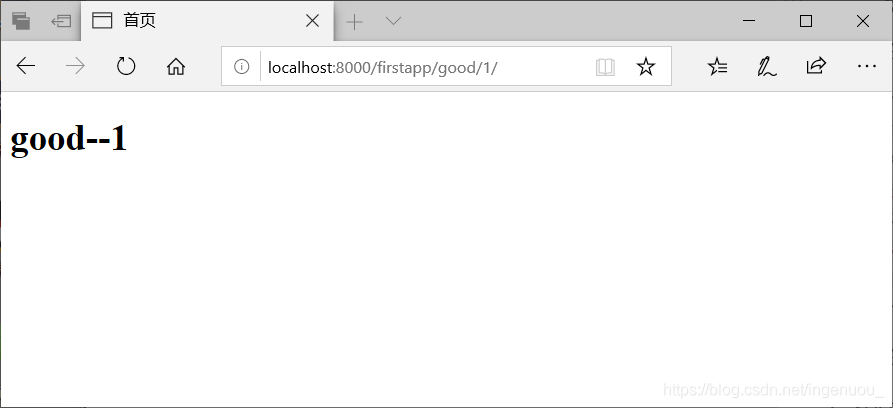
1、在templates/firstapp/index.html里面加一个<a href="good/123/">链接</a>,
2、点击链接,转到good的页面,需要firstapp/urls.py配置路由path('good/<int:id>/',views.good),,
注意:路径里id是视图函数定义时的id
3、然后在firstapp/views.py中创建一个good视图
def good(request,id):
return render(request,'firstapp/good.html',{"num":id})
4、在templates/firstapp中创建一个good.html,填写上内容<h1>good--{{num}}</h1>
注意:这里的num是将id赋给了num
第三部分,动态生成匹配的网址
(1)、project.urls.py
path('firstapp/', include(('firstapp.urls',"myapp"),namespace='myapp')),
(2)、firstapp.urls.py
app_name='firstapp'
path('good/<int:id>/',views.good,name="good"),
(3)、动态生成要匹配的网址
<a href="{% url 'myapp:good' 1 %}">链接2</a>注意: ‘myapp:good’ 和1之间有空格,可以自定义是1还是别的
myapp拿的是(1)的地址,good拿的是(2)的good的地址,有几个<int:id>,后面跟几个参数,上面就一个,所以就跟一个参数值
三、模板继承
1、作用:模板继承可以减少页面内用的重复定义,实现页面的重用
2、block标签:
- 在父模板中预留区域,子模版去填充
- 语法:
{% block 标签名%} {%enderblock 标签名%}
3、extends标签:
- 继承模板,需要写在模板文件的第一行
- 语法:
{% extends '父模板路径'%}
4、示例
定义父模板(基础模板)
定义子模板(主页模板)
基础模板1 一个block标签
{% block main%} {%endblock main%}
#base.html
<!DOCTYPE html>
<html lang="en">
<head>
    <meta charset="UTF-8">
    <title>首页</title>
    <style>
        #header{
            width:100%;
            height:100px;
            background-color:red;
        }
        #footer{
            width:100%;
            height:100px;
            background-color:blue;
        }
    </style>
</head>
<hody>
    <div id="header">header</div>
    <div id="main">
        {% block main%}
        {%endblock main%}
    </div>
    <div id="footer">footer</div>
</hody>
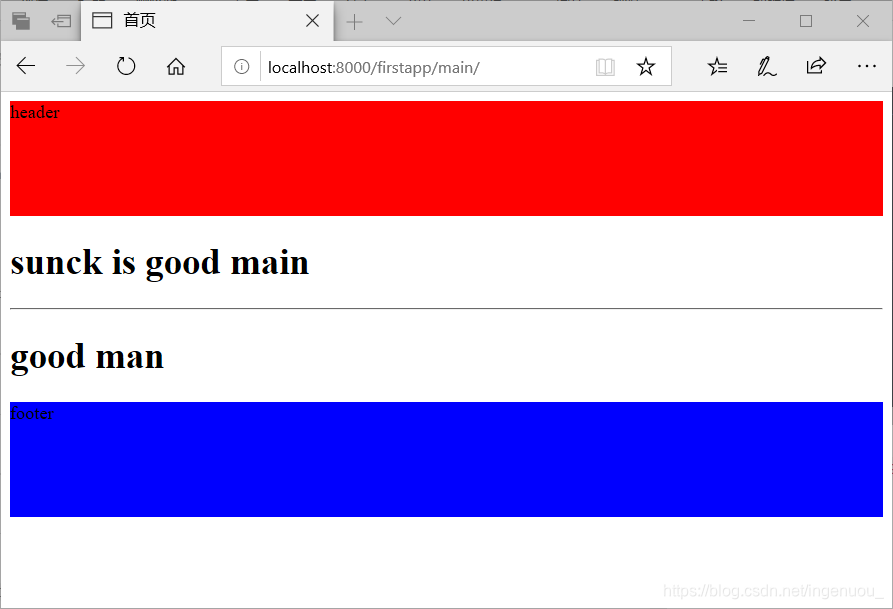
主页模板1
#templates/firstapp/main.html,继承base.html,只需要填充{% block main%}  {%endblock main%},中间部分

{%extends 'firstapp/base.html'%}

{% block main %}
    <h1>sunck is good main</h1>
{% endblock main%}
#firstapp/urls.py
path('main/',views.main),
#firstapp/views.py
def main (request):
return render(request,'firstapp/main.html')http://localhost:8000/firstapp/main/
主页模板2
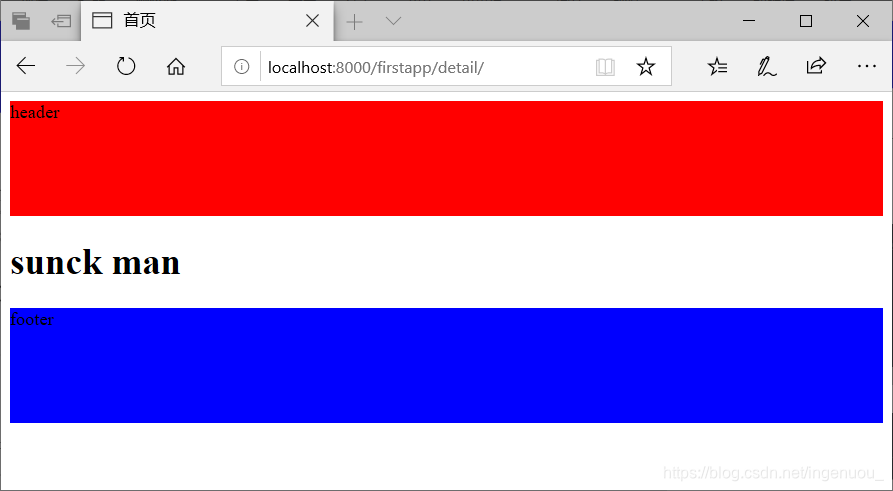
#templates/firstapp/detail.html,继承base.html,只需要填充{% block main%}  {%endblock main%},中间部分
{%extends 'firstapp/base.html'%}
{% block main %}
    <h1>sunck  man</h1>
{% endblock main%}
#firstapp/urls.py
path('detail/',views.detail),#firstapp/views.py
def detail(request):
return render(request,'firstapp/detail.html')http://localhost:8000/firstapp/detail/
基础模板2 两个block标签
{% block main%} {%endblock main%}
<hr/>
{% block main2%} {%endblock main2%}
#templates/firstapp/main.html
<!DOCTYPE html>
<html lang="en">
<head>
    <meta charset="UTF-8">
    <title>首页</title>
    <style>
        #header{
            width:100%;
            height:100px;
            background-color:red;
        }
        #footer{
            width:100%;
            height:100px;
            background-color:blue;
        }
    </style>
</head>
<hody>
    <div id="header">header</div>
    <div id="main">
        {% block main%}
        {%endblock main%}
        <hr/>
        % block main2%}
        {%endblock main2%}
    </div>
    <div id="footer">footer</div>
</hody>
</html>
主页模板
#templates/firstapp/main.html,继承base.html,只需要填充{% block main%}  {%endblock main%},中间部分,
#{% block main2 %}   {% endblock main2%}

{%extends 'firstapp/base.html'%}

{% block main %}
    <h1>sunck is good main</h1>
{% endblock main%}

{% block main2 %}
    <h1> good man</h1>
{% endblock main2%}
http://localhost:8000/firstapp/main/
四、HTML转义
1、问题
#firstapp/views.py
def index(request):
    return render(request,'firstapp/index.html',{"num":10,"code":"<h1>sunck is a very good man</h1>"})
#在templates/firstapp/index.html里面添加下面代码
{{code}}将接受到的code当成普通字符串渲染
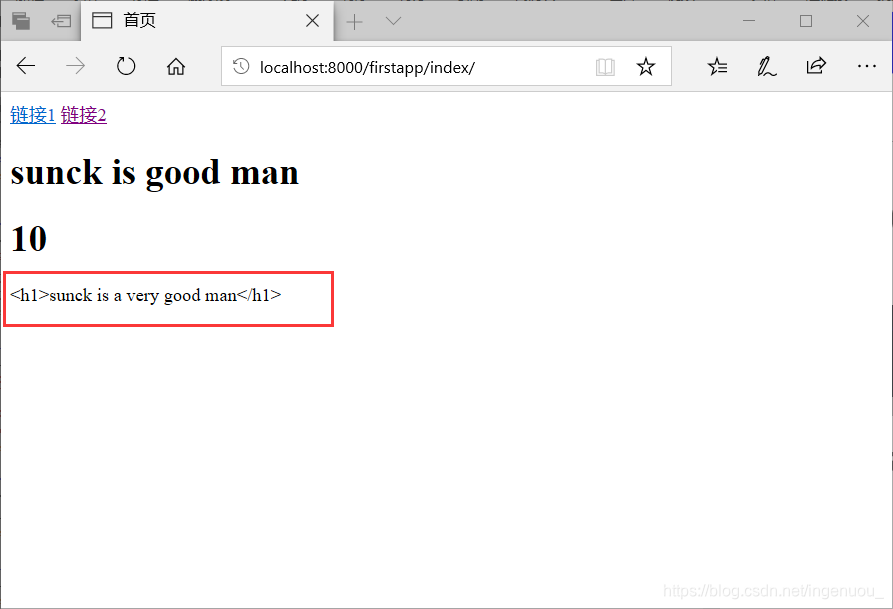
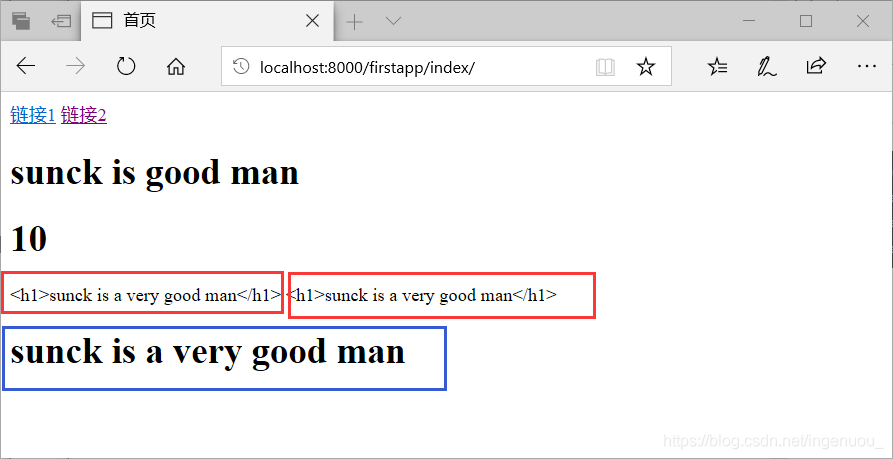
将接受到的字符串当成HTML渲染,解决一个
#在templates/firstapp/index.html里面添加下面代码
{{code}}#转成字符串
{{code|escape}}#----->转成字符串
{{code|safe}}#字符串当成HTML渲染localhost:8000/firstapp/index/
将接受到的字符串当成HTML渲染,解决一堆
#在templates/firstapp/index.html里面添加下面代码
{% autoescape off %}#off 关闭自动转义,当HTML渲染
{{code}}
{% endautoescape %}{% autoescape on %}#on 打开自动转义,还是字符串
{{code}}
{% endautoescape %}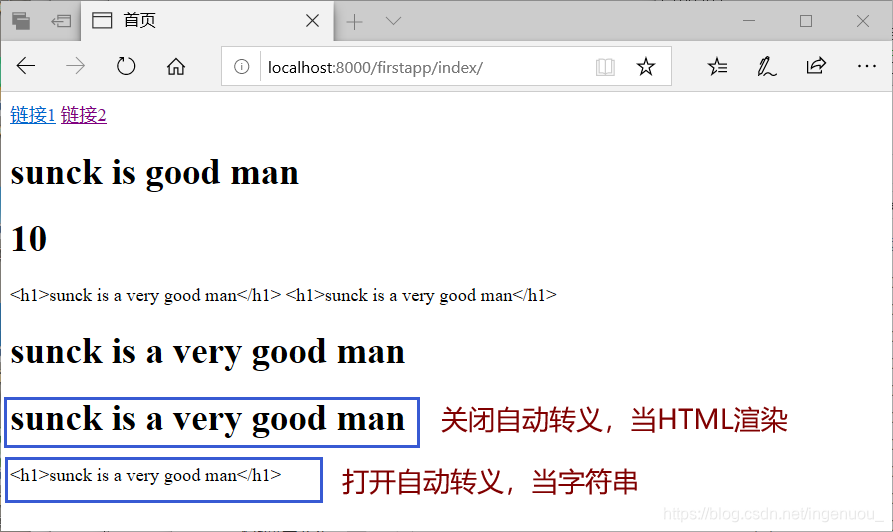
五、CSRF
- 跨站请求伪造: 某些恶意网站包含链接,表单,按钮,JS,利用登录的用户在浏览器中认证,从而攻击服务
- 防止CSRF:在setting.py文件中的
MIDDLEWARE,#'django.middleware.csrf.CsrfViewMiddleware', {% csrf_token %},加一个验证
六、验证码
1、作用:
- 在用户注册,登录页面的时候使用,为了防止暴力请求,减轻服务器的压力
- 也是防止csrf一种方式
2、