本文讲解 LiveData 用法,以及 LiveData 源码解析。
官方文档:https://developer.android.google.cn/topic/libraries/architecture/livedata
一句话介绍 LiveData :LiveData 是一种可观察的数据存储器类。
与常规的可观察类不同,LiveData 具有生命周期感知能力,意指它遵循其他应用组件(如 Activity、Fragment 或 Service)的生命周期。这种感知能力可确保 LiveData 仅更新处于活跃生命周期状态的应用组件观察者。
为什么需要 LiveData:
- 能够保证数据和 UI 统一(跟 LiveData 采用观察者模式有关,LiveData 是被观察的,当数据有变化时它会通知 UI 界面来更新数据。)
- 减少内存泄漏(在 LiveData 中,能够感知到组件的生命周期,当组件的生命周期处于未激活状态或已经处于 Destroy 状态的时候,观察者就会被清理掉。)
- 当 Activity 停止时不会引起崩溃(因为 Stop 时就已经变成非激活状态,在 LiveData 分发数据的过程中此时这个组件是非激活状态,LiveData 就不会给它分发数据,其实在组件处于 Pause 时就已经不给他分发数据了,只有它再次 Resume 的时候会重新灌入数据。)
- 不需要额外的手动处理来响应生命周期的变化(因为它内部有观察生命周期 Lifecycle 的组件)
- 组件和数据相关的内容能实时更新(当组件从后台来到前台时,LiveData 能够将最新的数据通知组件,灌入到组件里面,保证了组件和数据相关的内容能够实时的更新。)
- 针对 Configuration Change 时,不需要额外的处理来保存数据(因为在屏幕发生改变时,ViewModel 不会变,当它重建的时候会取得上一次的 ViewModel ,ViewModel 对应的也是之前的 LiveData 。LiveData 中的数据没有变,自然的它在重建过程中 LiveData 数据会时时的再次通知到已经重建的新组件中。)
- 资源共享(通过继承 LiveData ,将类定义成单例模式,在该类封装一些监听系统属性变化,然后通知 LiveData 的观察者。)
注:本文使用 Kotlin 编写。
导入 LiveData 库:implementation "androidx.lifecycle:lifecycle-livedata-ktx:2.2.0"
一、用法
1. 自定义布局,一个 TextView ,两个 Button
<?xml version="1.0" encoding="utf-8"?>
<androidx.constraintlayout.widget.ConstraintLayout xmlns:android="http://schemas.android.com/apk/res/android"
    xmlns:app="http://schemas.android.com/apk/res-auto"
    xmlns:tools="http://schemas.android.com/tools"
    android:layout_width="match_parent"
    android:layout_height="match_parent"
    tools:context=".MainActivity">

    <TextView
        android:id="@+id/tv_content"
        android:layout_width="wrap_content"
        android:layout_height="wrap_content"
        app:layout_constraintBottom_toBottomOf="parent"
        app:layout_constraintLeft_toLeftOf="parent"
        app:layout_constraintRight_toRightOf="parent"
        app:layout_constraintTop_toTopOf="parent"
        tools:text="@string/app_name" />

    <Button
        android:id="@+id/btn_start"
        android:layout_width="wrap_content"
        android:layout_height="wrap_content"
        android:text="Start"
        app:layout_constraintBottom_toBottomOf="parent"
        app:layout_constraintStart_toStartOf="parent" />

    <Button
        android:id="@+id/btn_stop"
        android:layout_width="wrap_content"
        android:layout_height="wrap_content"
        android:text="Stop"
        app:layout_constraintBottom_toBottomOf="parent"
        app:layout_constraintEnd_toEndOf="parent" />

</androidx.constraintlayout.widget.ConstraintLayout>
2. 自定义 ViewModel 类,在 ViewModel 中改变 LiveData 数据的值。
class MainViewModel : ViewModel() {

    val TAG = "MainViewModel"

    val liveData = MutableLiveData<Int>()
    var stop = false

    fun start() {
        liveData.postValue(0)
        object : Thread() {
            override fun run() {
                while (!stop) {
                    sleep(1000)
                    val value = liveData.value
                    liveData.postValue(value?.plus(1))
                    Log.d(TAG, "run: " + liveData.value.toString())
                }
            }
        }.start()
    }

    fun stop() {
        stop = true
    }
}
3. 在 Activity 里观察 LiveData
class MainActivity : AppCompatActivity() {

    lateinit var mainViewModel: MainViewModel

    override fun onCreate(savedInstanceState: Bundle?) {
        super.onCreate(savedInstanceState)
        setContentView(R.layout.activity_main)

        mainViewModel = ViewModelProvider(this).get<MainViewModel>(MainViewModel::class.java)

        mainViewModel.liveData.observe(this, Observer {
            tv_content.text = it.toString()
        })

        btn_start.setOnClickListener {
            mainViewModel.start()
        }

        btn_stop.setOnClickListener {
            mainViewModel.stop()
        }
    }
}
4. 执行程序,点击 Start Button ,每隔1s,数据会发生改变;点击 Stop Button ,线程关闭,数据不再发生改变。
二、源码解析
1. MutableLiveData 源码:
public class MutableLiveData<T> extends LiveData<T> {

    public MutableLiveData(T value) {
        super(value);
    }

    public MutableLiveData() {
        super();
    }

    @Override
    public void postValue(T value) {
        super.postValue(value);
    }

    @Override
    public void setValue(T value) {
        super.setValue(value);
    }
}
MutableLiveData 是对 LiveData 的拓展。因为 LiveData 是一个 abstract 的 class ,并不能直接使用。
2. LiveData 类图:
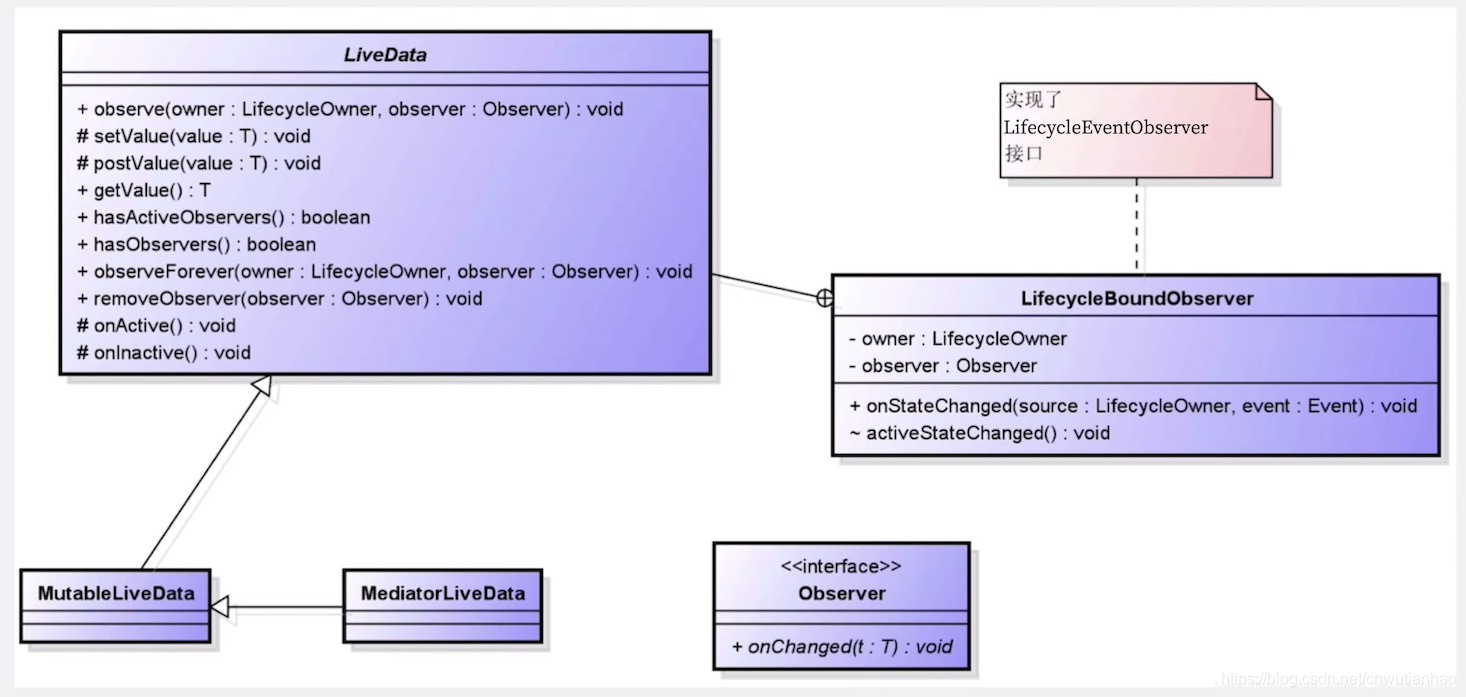
观察上面的类图,它有两个实现类,一个是 MutableLiveData ,另一个是 MediatorLiveData 。内部包含了一个 LifecycleBoundObsOvserver ,它实现了 Lifecycle 的 Observer ,它里面的 Observer 进行了对组件生命周期的观察。所以 LiveData 才有了观察组件生命周期的能力。
LiveData 函数说明:
- observe() 观察函数
- setValue() 设置值,必须在主线程调用,直接去改变 UI 界面
- postValue() 设置值,主线程或子线程都可以使用,不需要手动切换线程
- getValue() 取值
- hasActiveObservers() 是否有激活状态下的组件
- hasObservers() 是否有观察者
- observeForever() 不管 Lifecycle 是不是激活状态,永远都去观察
- removeObserver() 移除观察者
- onActive() 激活回调
- onInactive() 解除激活回调,也就是非激活状态
实现了 LifecycleEventObserver 接口,用来观察组件生命周期。
<<interface>> Observer 用来观察 LiveData 内部 value 的一个观察者。
大体流程:LiveData post 或 set value 的时候,首先通过 hasObservers 判断是否有观察者,如果没有就不进行分发,如果有就通过 onActive 遍历是否是激活状态,如果是激活状态就会去调用 <<interface>> Observer 的回调方式,通知它去更新 UI 界面。
3. LiveData.observe() 源码
public void observe(LifecycleOwner owner, Observer < ?super T > observer) {
    assertMainThread("observe");
    if (owner.getLifecycle().getCurrentState() == DESTROYED) {
        // ignore
        return;
    }
    LifecycleBoundObserver wrapper = new LifecycleBoundObserver(owner, observer);
    ObserverWrapper existing = mObservers.putIfAbsent(observer, wrapper);
    if (existing != null && !existing.isAttachedTo(owner)) {
        throw new IllegalArgumentException("Cannot add the same observer" + " with different lifecycles");
    }
    if (existing != null) {
        return;
    }
    owner.getLifecycle().addObserver(wrapper);
}
传进来的 owner 是 Activity 或 Fragment ,然后把 observer 观察者也传进来。
首先判断是否是 DESTROYED 状态,如果是就 return 。
然后会 new 一个 LifecycleBoundObserver ,用来处理生命周期。
把 wrapper put 到 mObservers 容器里面,这个容器是用来遍历用的。
owner 获取 getLifecycle ,添加生命周期观察者 addObserver 。
4. LiveData.postValue() 源码
protected void postValue(T value) {
    ...
    ArchTaskExecutor.getInstance().postToMainThread(mPostValueRunnable);
}
因为它可以在子线程进行分发,所以它要 postToMainThread 到主线程去:
private final Runnable mPostValueRunnable = new Runnable() {
    @Override
    public void run() {
        ...
        setValue((T) newValue);
    }
};
它最终调的还是 setValue() 。所以说 setValue() 是在主线程进行调用。
5. LiveData.setValue() 源码
protected void setValue(T value) {
    assertMainThread("setValue");
    mVersion++;
    mData = value;
    dispatchingValue(null);
}
在 set 或 post 时,它的 mVersion 会更新一下,内部的 mData 会被赋值新的 value 。
6. LiveData.dispatchingValue() 源码
void dispatchingValue(ObserverWrapper initiator) {
    // 判断是否正在进行分发动作,如果正在进行就直接 return 。
    if (mDispatchingValue) {
        mDispatchInvalidated = true;
        return;
    }
    mDispatchingValue = true;

    // 执行 do while 循环
    do {
        mDispatchInvalidated = false;
        if (initiator != null) {
            considerNotify(initiator);
            initiator = null;
        } else {
            // 遍历,通过 Map 进行存储
            for (Iterator < Map.Entry < Observer < ?super T > , ObserverWrapper >> iterator = mObservers.iteratorWithAdditions(); iterator.hasNext();) {
                // 这里的 iterator.next() 对应的是 ObserverWrapper 。
                considerNotify(iterator.next().getValue());
                if (mDispatchInvalidated) {
                    break;
                }
            }
        }
    } while ( mDispatchInvalidated );
    mDispatchingValue = false;
}
7. LiveData.considerNotify() 源码
private void considerNotify(ObserverWrapper observer) {

    // 判断是否是激活状态,如果是非激活状态直接 return 。
    if (!observer.mActive) {
        return;
    }

    // 判断是否是激活状态,如果是非激活状态直接 return 。
    if (!observer.shouldBeActive()) {
        observer.activeStateChanged(false);
        return;
    }

    // 判断 当前版本 大于等于 LiveData 总的版本号,就不会继续分发。
    if (observer.mLastVersion >= mVersion) {
        return;
    }

    // 把当前的 Version 赋值给 observer 。
    observer.mLastVersion = mVersion;

    observer.mObserver.onChanged((T) mData);
}
这个函数解释了 Activity 不会被重复回调的原因。
把 mData 传给当前的 observer 。比如我们的 MainActivity 里面的代码:
mainViewModel.liveData.observe(this, Observer {
    ...
})
public interface Observer<T> {
void onChanged(T t);
}最终会回调到 Observer {} 里去执行 tv_content.text = it.toString() 。
如果本文对你有帮助,请点赞支持!!!