1 安装前准备
1) 将 Azkaban Web 服务器、Azkaban 执行服务器、Azkaban 的 sql 执行脚本及 MySQL 安装包拷贝到 hadoop102 虚拟机/opt/software 目录下
a) azkaban-web-server-2.5.0.tar.gz
b) azkaban-executor-server-2.5.0.tar.gz
c) azkaban-sql-script-2.5.0.tar.gz
d) mysql-libs.zip
2) 选择 Mysql 作为 Azkaban 数据库,因为 Azkaban 建立了一些 Mysql 连接增强功能,以方便 Azkaban 设置。并增强服务可靠性。(参见 hive 文档 2.4)
2 安装 Azkaban
1) 在/opt/module/目录下创建 azkaban 目录
[atguigu@hadoop102 module]$ mkdir azkaban
2) 解压 azkaban-web-server-2.5.0.tar.gz、azkaban-executor-server-2.5.0.tar.gz、azkaban-sql-script-2.5.0.tar.gz 到/opt/module/azkaban 目录下
[atguigu@hadoop102 software]$ tar -zxvf azkaban-web-server-2.5.0.tar.gz
-C /opt/module/azkaban/
[atguigu@hadoop102 software]$ tar -zxvf azkaban-executor-server-
2.5.0.tar.gz -C /opt/module/azkaban/
[atguigu@hadoop102 software]$ tar -zxvf azkaban-sql-script-2.5.0.tar.gz
-C /opt/module/azkaban/
3) 对解压后的文件重新命名
[atguigu@hadoop102 azkaban]$ mv azkaban-web-2.5.0/ server
[atguigu@hadoop102 azkaban]$ mv azkaban-executor-2.5.0/ executor
4) azkaban 脚本导入
进入 mysql,创建 azkaban 数据库,并将解压的脚本导入到 azkaban 数据库。
[atguigu@hadoop102 azkaban]$ mysql -uroot -p000000
mysql> create database azkaban;
mysql> use azkaban;
mysql> source /opt/module/azkaban/azkaban-2.5.0/create-all-sql-2.5.0.sql
注:source 后跟.sql 文件,用于批量处理.sql 文件中的 sql 语句。
3 生成密钥对和证书
Keytool 是 java 数据证书的管理工具,使用户能够管理自己的公/私钥对及相关证书。
-keystore 指定密钥库的名称及位置(产生的各类信息将存在.keystore 文件中)
-genkey(或者-genkeypair) 生成密钥对
-alias 为生成的密钥对指定别名,如果没有默认是 mykey
-keyalg 指定密钥的算法 RSA/DSA 默认是 DSA
1)生成 keystore 的密码及相应信息的密钥库
[atguigu@hadoop102 azkaban]$ keytool -keystore keystore -alias jetty -
genkey -keyalg RSA
输入密钥库口令:
再次输入新口令:
您的名字与姓氏是什么?
 [Unknown]:
您的组织单位名称是什么?
 [Unknown]:
您的组织名称是什么?
 [Unknown]:
您所在的城市或区域名称是什么?
 [Unknown]:
您所在的省/市/自治区名称是什么?
 [Unknown]:
该单位的双字母国家/地区代码是什么?
 [Unknown]:
CN=Unknown, OU=Unknown, O=Unknown, L=Unknown, ST=Unknown, C=Unknown 是否
正确?
 [否]: y
输入 <jetty> 的密钥口令
 (如果和密钥库口令相同, 按回车):
再次输入新口令:
注意:
密钥库的密码至少必须 6 个字符,可以是纯数字或者字母或者数字和字母的组合等等
密钥库的密码最好和<jetty> 的密钥相同,方便记忆
2)将 keystore 拷贝到 azkaban web 服务器根目录中
[atguigu@hadoop102 azkaban]$ mv keystore /opt/module/azkaban/server/
4 时间同步配置
先配置好服务器节点上的时区
1) 如果在/usr/share/zoneinfo/这个目录下不存在时区配置文件 Asia/Shanghai,就要用tzselect 生成。
[atguigu@hadoop102 azkaban]$ tzselect
Please identify a location so that time zone rules can be set correctly.
Please select a continent or ocean.
1) Africa
2) Americas
3) Antarctica
4) Arctic Ocean
5) Asia
6) Atlantic Ocean
7) Australia
8) Europe
9) Indian Ocean
10) Pacific Ocean
11) none - I want to specify the time zone using the Posix TZ format.
#? 5
Please select a country.
1) Afghanistan 18) Israel 35) Palestine
2) Armenia 19) Japan 36) Philippines
3) Azerbaijan 20) Jordan 37) Qatar
4) Bahrain 21) Kazakhstan 38) Russia
5) Bangladesh 22) Korea (North) 39) Saudi Arabia
6) Bhutan 23) Korea (South) 40) Singapore
7) Brunei 24) Kuwait 41) Sri Lanka
8) Cambodia 25) Kyrgyzstan 42) Syria
9) China 26) Laos 43) Taiwan
10) Cyprus 27) Lebanon 44) Tajikistan
11) East Timor 28) Macau 45) Thailand
12) Georgia 29) Malaysia 46) Turkmenistan
13) Hong Kong 30) Mongolia 47) United Arab Emirates
14) India 31) Myanmar (Burma) 48) Uzbekistan
15) Indonesia 32) Nepal 49) Vietnam
16) Iran 33) Oman 50) Yemen
17) Iraq 34) Pakistan
#? 9
Please select one of the following time zone regions.
1) Beijing Time
2) Xinjiang Time
#? 1
The following information has been given:
 China
 Beijing Time
Therefore TZ='Asia/Shanghai' will be used.
Local time is now: Thu Oct 18 16:24:23 CST 2018.
Universal Time is now: Thu Oct 18 08:24:23 UTC 2018.
Is the above information OK?
1) Yes
2) No
#? 1
You can make this change permanent for yourself by appending the line
 TZ='Asia/Shanghai'; export TZ
to the file '.profile' in your home directory; then log out and log in
again.
Here is that TZ value again, this time on standard output so that you
can use the /usr/bin/tzselect command in shell scripts:
Asia/Shanghai
2)拷贝该时区文件,覆盖系统本地时区配置
[atguigu@hadoop102 azkaban]$ cp /usr/share/zoneinfo/Asia/Shanghai /etc/localtime
3)集群时间同步(同时发给三个窗口)
[atguigu@hadoop102 azkaban]$ sudo date -s '2018-10-18 16:39:30'
5 配置文件
2.5.1 Web 服务器配置
1)进入 azkaban web 服务器安装目录 conf 目录,打开 azkaban.properties 文件
[atguigu@hadoop102 conf]$ pwd
/opt/module/azkaban/server/conf
[atguigu@hadoop102 conf]$ vim azkaban.properties
2)按照如下配置修改 azkaban.properties 文件。
#Azkaban Personalization Settings
#服务器 UI 名称,用于服务器上方显示的名字
azkaban.name=Test
#描述
azkaban.label=My Local Azkaban
#UI 颜色
azkaban.color=#FF3601
azkaban.default.servlet.path=/index
#默认 web server 存放 web 文件的目录
web.resource.dir=/opt/module/azkaban/server/web/
#默认时区,已改为亚洲/上海 默认为美国
default.timezone.id=Asia/Shanghai
#Azkaban UserManager class
user.manager.class=azkaban.user.XmlUserManager
#用户权限管理默认类(绝对路径)
user.manager.xml.file=/opt/module/azkaban/server/conf/azkaban-users.xml
#Loader for projects
#global 配置文件所在位置(绝对路径)
executor.global.properties=/opt/module/azkaban/executor/conf/global.pro
perties
azkaban.project.dir=projects
#数据库类型
database.type=mysql
#端口号
mysql.port=3306
#数据库连接 IP
mysql.host=hadoop102
#数据库实例名
mysql.database=azkaban
#数据库用户名
mysql.user=root
#数据库密码
mysql.password=000000
#最大连接数
mysql.numconnections=100
# Velocity dev mode
velocity.dev.mode=false
# Azkaban Jetty server properties.
# Jetty 服务器属性. #最大线程数
jetty.maxThreads=25
#Jetty SSL 端口
jetty.ssl.port=8443
#Jetty 端口
jetty.port=8081
#SSL 文件名(绝对路径)
jetty.keystore=/opt/module/azkaban/server/keystore
#SSL 文件密码
jetty.password=000000
#Jetty 主密码与 keystore 文件相同
jetty.keypassword=000000
#SSL 文件名(绝对路径)
jetty.truststore=/opt/module/azkaban/server/keystore
#SSL 文件密码
jetty.trustpassword=000000
# Azkaban Executor settings
executor.port=12321
# mail settings
mail.sender=
mail.host=
job.failure.email=
job.success.email=
lockdown.create.projects=false
cache.directory=cache
3)web 服务器用户配置
在 azkaban web 服务器安装目录 conf 目录,按照如下配置修改 azkaban-users.xml 文件,增加管理员用户。
[atguigu@hadoop102 conf]$ vim azkaban-users.xml
<azkaban-users>
<user username="azkaban" password="azkaban" roles="admin"
groups="azkaban" />
<user username="metrics" password="metrics" roles="metrics"/>
<user username="admin" password="admin" roles="admin,metrics"/>
<role name="admin" permissions="ADMIN" />
<role name="metrics" permissions="METRICS"/>
</azkaban-users>
5.2 执行服务器配置
1)进入执行服务器安装目录 conf,打开 azkaban.properties
[atguigu@hadoop102 conf]$ pwd
/opt/module/azkaban/executor/conf
[atguigu@hadoop102 conf]$ vim azkaban.properties
2) 按照如下配置修改 azkaban.properties 文件。
#Azkaban
#时区
default.timezone.id=Asia/Shanghai
# Azkaban JobTypes Plugins
#jobtype 插件所在位置
azkaban.jobtype.plugin.dir=plugins/jobtypes
#Loader for projects
executor.global.properties=/opt/module/azkaban/executor/conf/global.pro
perties
azkaban.project.dir=projects
database.type=mysql
mysql.port=3306
mysql.host=hadoop102
mysql.database=azkaban
mysql.user=root
mysql.password=000000
mysql.numconnections=100
# Azkaban Executor settings
#最大线程数
executor.maxThreads=50
#端口号(如修改,请与 web 服务中一致)
executor.port=12321
#线程数
executor.flow.threads=30
6 启动 Executor 服务器
在 executor 服务器目录下执行启动命令
[atguigu@hadoop102 executor]$ pwd
/opt/module/azkaban/executor
[atguigu@hadoop102 executor]$ bin/azkaban-executor-start.sh
7 启动 Web 服务器
在 azkaban web 服务器目录下执行启动命令
[atguigu@hadoop102 server]$ pwd
/opt/module/azkaban/server
[atguigu@hadoop102 server]$ bin/azkaban-web-start.sh
注意:
先执行 executor,再执行 web,避免 Web Server 会因为找不到执行器启动失败。
jps 查看进程
[atguigu@hadoop102 server]$ jps
3601 AzkabanExecutorServer
5880 Jps
3661 AzkabanWebServer
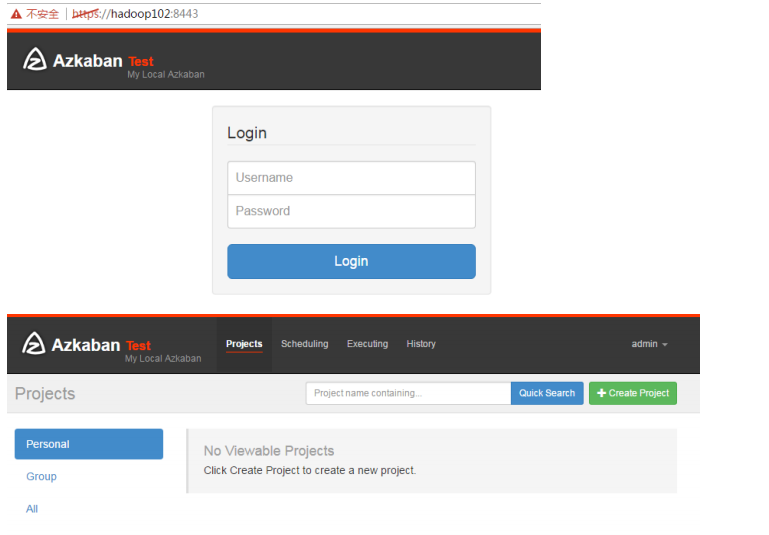
启动完成后,在浏览器(建议使用谷歌浏览器)中输入 https://服务器 IP 地址:8443,即可访问
azkaban 服务了。
在登录中输入刚才在 azkaban-users.xml 文件中新添加的户用名及密码,点击 login。