spring在早起的是时候是通过xml进行配置的bean的,但是发现所有的bean都放到xml中的时候,密密麻麻的xml配置非常混乱,乍眼一看一定很头晕。之后,spring引入了注解,只是需要在类上加上注解就可以了,非常的方便,但是这些注解又是如何解析的呢?spring是如何做到如此的方便的呢?注解解析的位置不同,这里只介绍@Controller,@Service,@Autowired等注解的解析过程。
那么什么是
BeanDefinition呢?
BeanDefinition可以看作是一个内部的配置文件,
spring通过注解或者xml等,把bean的信息存储到
BeanDefinition中,包括:
类名、
scope、
属性、
构造函数参数列表、
依赖的bean、
是否是单例类、
是否是懒加载等等。
1. xml文件解析过程
首先是要配置包的路径。
<?xml version="1.0" encoding="UTF-8"?>
<beans xmlns="http://www.springframework.org/schema/beans"
	xmlns:context="http://www.springframework.org/schema/context" xmlns:p="http://www.springframework.org/schema/p"
	xmlns:mvc="http://www.springframework.org/schema/mvc" xmlns:xsi="http://www.w3.org/2001/XMLSchema-instance"
	xmlns:aop="http://www.springframework.org/schema/aop" xsi:schemaLocation="http://www.springframework.org/schema/beans
      http://www.springframework.org/schema/beans/spring-beans-3.0.xsd
      http://www.springframework.org/schema/context
      http://www.springframework.org/schema/context/spring-context-3.1.xsd
      http://www.springframework.org/schema/mvc
      http://www.springframework.org/schema/mvc/spring-mvc-3.0.xsd
      http://www.springframework.org/schema/aop
      http://www.springframework.org/schema/aop/spring-aop-3.1.xsd"
	>
    <!-- 配置要扫描的路径-->
  	<context:component-scan base-package="com.controller"/>
</beans>
这段是说明spring要扫描com.controller路径下所有的类,然后把配置注解(spring管理的注解)类进行统一处理。
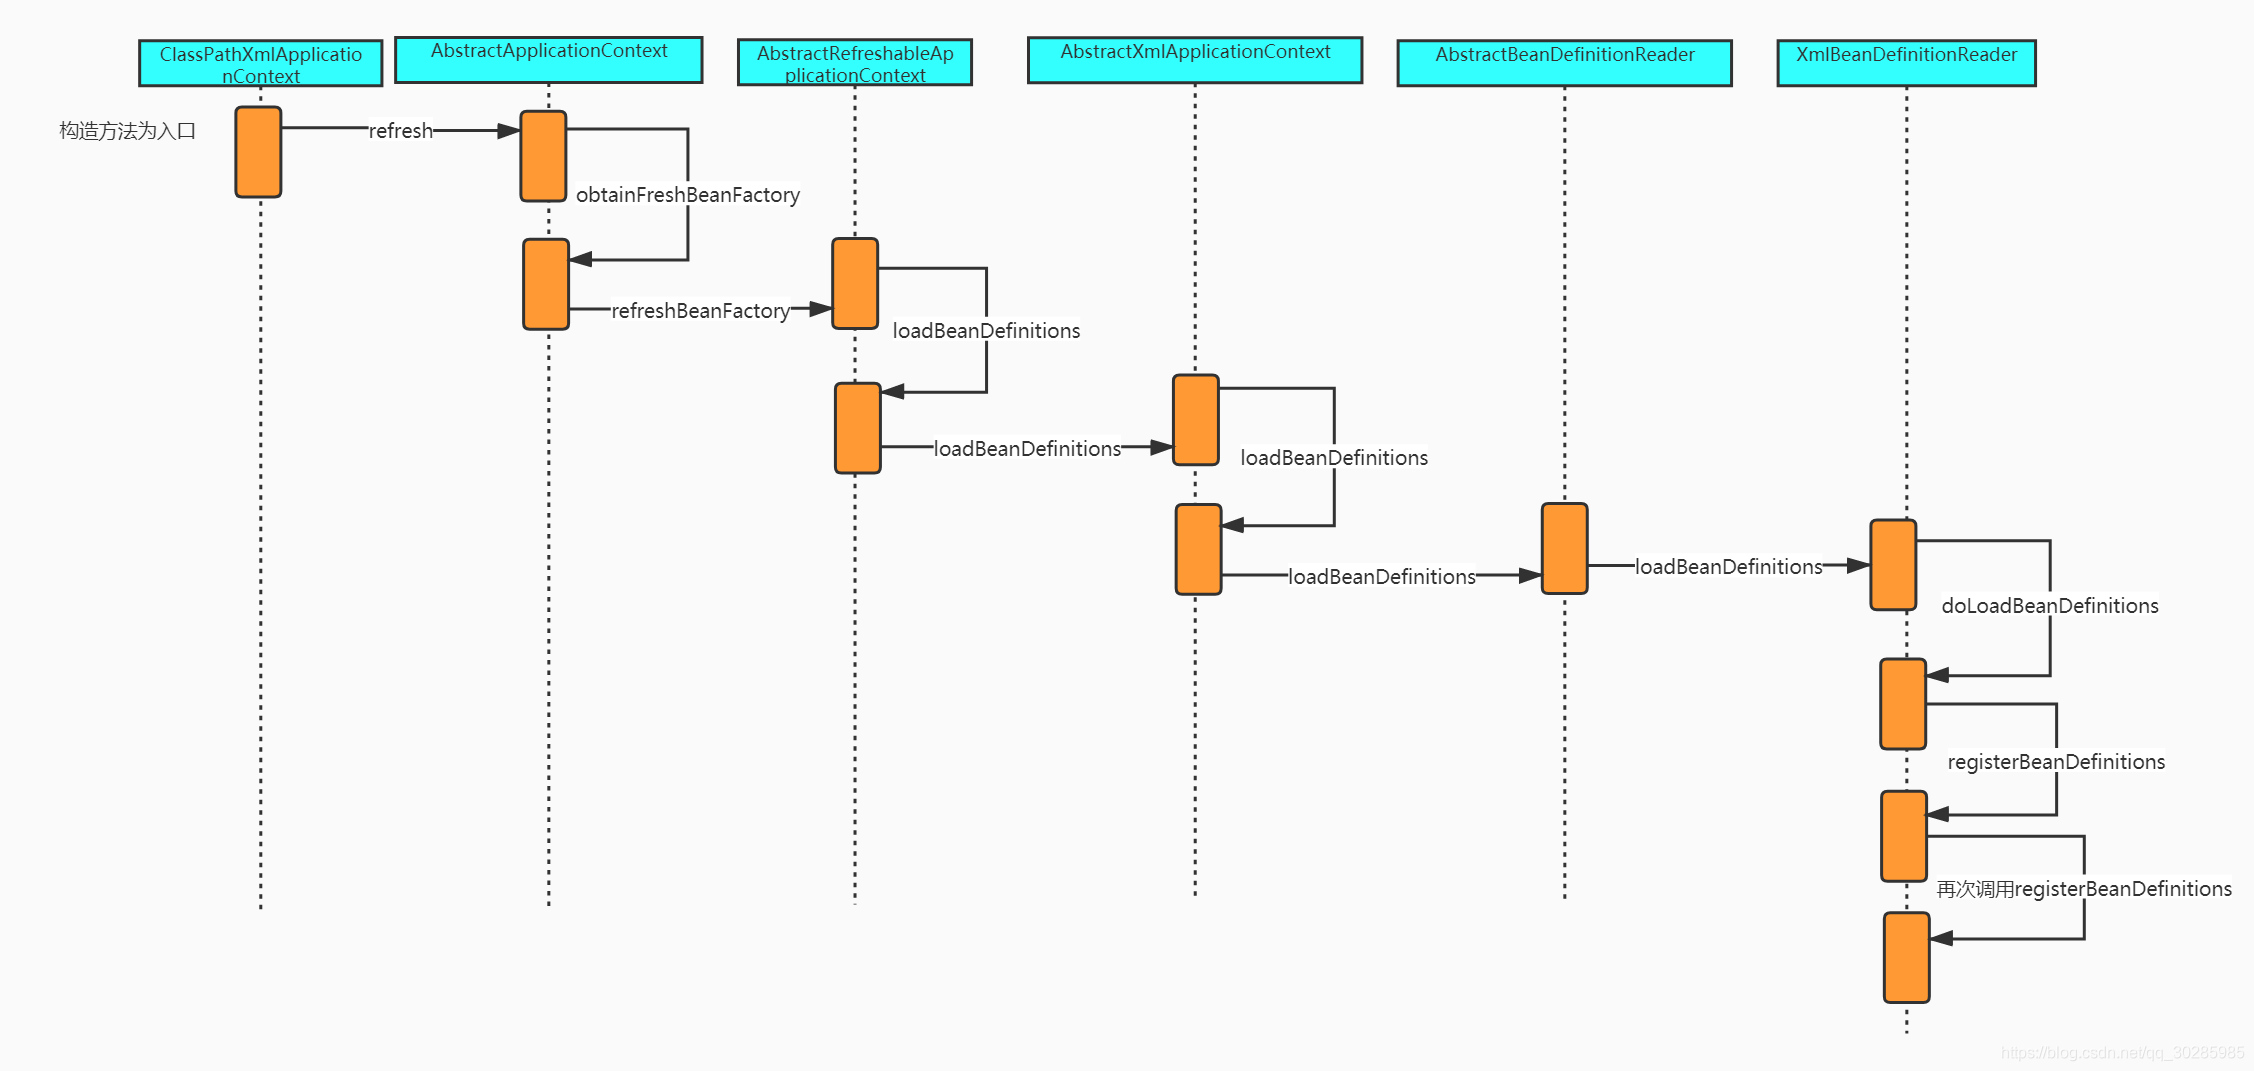
流程比较复杂,直接上图。。
-
此以ClassPathXmlApplicationContext的构造方法为入口,其实不管以哪为入口,容器初始化的时候一定会走
refresh方法,SpringMVC的初始化也是以refresh来进行初始化。 -
obtainFreshBeanFactory方法中包括有ioc容器的定位,加载,注册功能。spring扫描可进行管理的类,也是在这里。
-
obtainFreshBeanFactory方法中,使用委派模式,使IOC的初始化在子类中进行实现。
-
接下来一致按照流程走,在
AbstractXmlApplicationContext中的loadBeanDefinitions方法中获取Resource对象。-
	protected void loadBeanDefinitions(XmlBeanDefinitionReader reader) throws BeansException, IOException {
   		Resource[] configResources = getConfigResources();
   		if (configResources != null) {
   			reader.loadBeanDefinitions(configResources);
   		}
        // 配置文件这里根据路径进行处理
   		String[] configLocations = getConfigLocations();
   		if (configLocations != null) {
              //有时候配置文件路径要前缀有 classpath ,
            // 从这里进去 ,再进入((ResourcePatternResolver) resourceLoader).getResources(location); 方法
            // 找到 PathMatchingResourcePatternResolver.getResources方法,即可看到对此前缀的处理。
   			reader.loadBeanDefinitions(configLocations);
   		}
   	}
-
-
xml文件加载完成之后,就要进行读取了,
XmlBeanDefinitionReader.doLoadBeanDefinitions方法获取Document对象,然后进行解析。
至此,xml读取完成,接下来进行解析。
2. BeanDefinition解析
-
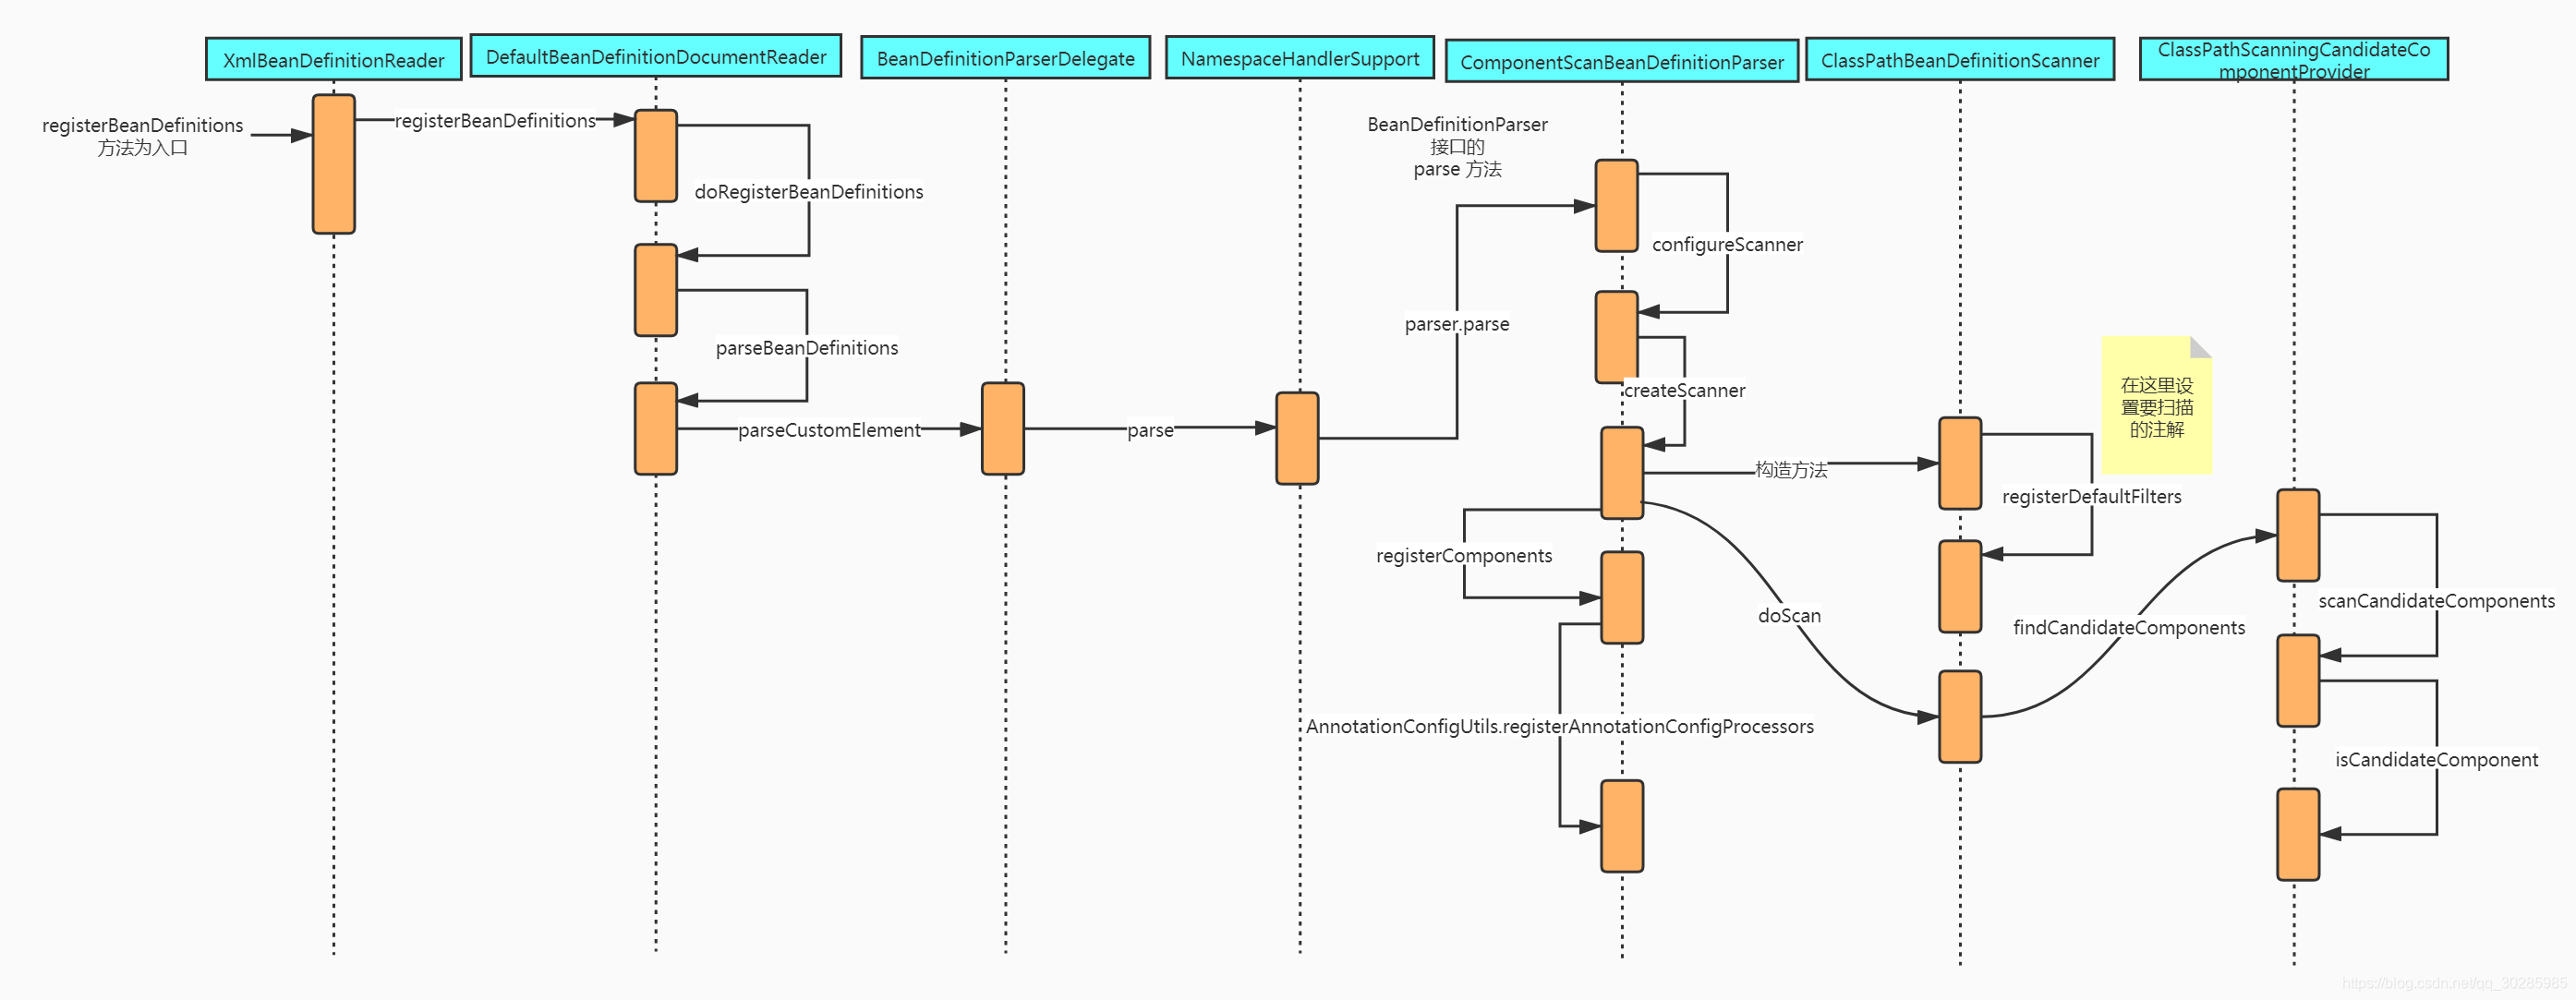
从
registerBeanDefinitions方法进入之后,就是获取doc的根节点进行遍历。 -
接着向下走进入
parseBeanDefinitions这个方法还是有点意思。如下-
	protected void parseBeanDefinitions(Element root, BeanDefinitionParserDelegate delegate) {
   		//Bean 定义的 Document 对象使用了 Spring 默认的 XML 命名空间
        // 那么啥是默认的呢?
   		if (delegate.isDefaultNamespace(root)) {
   			NodeList nl = root.getChildNodes();
   			for (int i = 0; i < nl.getLength(); i++) {
   				Node node = nl.item(i);
   				if (node instanceof Element) {
   					Element ele = (Element) node;
//					这个主要是看xml是否又 http://www.springframework.org/schema/beans 这段,可以留意下,一般spring的xml都有这个链接
					// 默认的是bean这个标签
					if (delegate.isDefaultNamespace(ele)) {
						parseDefaultElement(ele, delegate);
					}
					else {
						// 如果不是默认的,比如 xml 中有一段 <context:component-scan base-package="com.controller"/> ,则就走这段
						delegate.parseCustomElement(ele);
					}
				}
			}
		}
		else {
			delegate.parseCustomElement(root);
		}
	}
就如上的xml为例,
isDefaultNamespace方法进行判断是当前标签是普通bean标签。
-
-
如下,这里通过uri获取对应的命名空间处理器,然后进行解析
-
public BeanDefinition parseCustomElement(Element ele, @Nullable BeanDefinition containingBd) { String namespaceUri = getNamespaceURI(ele); if (namespaceUri == null) { return null; } // 根据命名空间,找到对应的处理器 // 这里应该是通过策略模式吧。。 省去了if /else NamespaceHandler handler = this.readerContext.getNamespaceHandlerResolver().resolve(namespaceUri); if (handler == null) { error("Unable to locate Spring NamespaceHandler for XML schema namespace [" + namespaceUri + "]", ele); return null; } // 进行解析 return handler.parse(ele, new ParserContext(this.readerContext, this, containingBd)); } -
顺着流程向下走,进入
ComponentScanBeanDefinitionParser.parse方法。-
	public BeanDefinition parse(Element element, ParserContext parserContext) {
   		String basePackage = element.getAttribute(BASE_PACKAGE_ATTRIBUTE);
   		basePackage = parserContext.getReaderContext().getEnvironment().resolvePlaceholders(basePackage);
   		String[] basePackages = StringUtils.tokenizeToStringArray(basePackage,
   				ConfigurableApplicationContext.CONFIG_LOCATION_DELIMITERS);

   		// Actually scan for bean definitions and register them.
   		// 这里面包括 设置上要扫描的注解 @Component 等等
        // 从ClassPathBeanDefinitionScanner类的构造方法进行设置注解的
   		ClassPathBeanDefinitionScanner scanner = configureScanner(parserContext, element);
   		// doscan 进行解析,扫描路径下所有的类,判断是否包括要过滤的注解
   		Set<BeanDefinitionHolder> beanDefinitions = scanner.doScan(basePackages);

   		// BeanDefinition是获取到了,但是类里面的@AutoWrite呢? @Value注解呢?
   		// 就是这里进行处理的,这里稍后说
   		registerComponents(parserContext.getReaderContext(), beanDefinitions, element);

   		return null;
   	}
-
-
最后
isCandidateComponent方法有点意思了,这里判断是否有交给spring管理的注解,如下:-
	protected boolean isCandidateComponent(MetadataReader metadataReader) throws IOException {
   		for (TypeFilter tf : this.excludeFilters) {
   			if (tf.match(metadataReader, getMetadataReaderFactory())) {
   				return false;
   			}
   		}
        // 一般情况下,此时includeFilters中有三个注解 @Component,@ManagedBean,@Named
   		for (TypeFilter tf : this.includeFilters) {
   			// 这里判断是否有注解
   			if (tf.match(metadataReader, getMetadataReaderFactory())) {
   				// 这里是是否跳过的,啥时候跳过呢? 为什么要跳过呢? 可以搜索下@Conditional 注解,在spring boot 使用的特别多。
   				// 参考 https://blog.csdn.net/qq_30285985/article/details/101637212
   				return isConditionMatch(metadataReader);
   			}
   		}
   		return false;
   	}
在ClassPathScanningCandidateComponentProvider.registerDefaultFilters进去,则看到includeFilters集合中如何进行设置值。
protected void registerDefaultFilters() {
		// 这里加载到这个 集合中  一共有三个注解 @Component,@ManagedBean,@Named ,也就是说,只要有这三个注解的类都会被spring所管理。
		// @Component 不用多说
		// @ManagedBean 是JSF中用到的
		// @Named 和@Commponent类似   说实话, 也没有百度出啥区别,总之很少用。
		this.includeFilters.add(new AnnotationTypeFilter(Component.class));
		ClassLoader cl = ClassPathScanningCandidateComponentProvider.class.getClassLoader();
		try {
			this.includeFilters.add(new AnnotationTypeFilter(
					((Class<? extends Annotation>) ClassUtils.forName("javax.annotation.ManagedBean", cl)), false));
			logger.debug("JSR-250 'javax.annotation.ManagedBean' found and supported for component scanning");
		}
		catch (ClassNotFoundException ex) {
			// JSR-250 1.1 API (as included in Java EE 6) not available - simply skip.
		}
		try {
			this.includeFilters.add(new AnnotationTypeFilter(
					((Class<? extends Annotation>) ClassUtils.forName("javax.inject.Named", cl)), false));
			logger.debug("JSR-330 'javax.inject.Named' annotation found and supported for component scanning");
		}
		catch (ClassNotFoundException ex) {
			// JSR-330 API not available - simply skip.
		}
	}
但是到这里有些疑问,这里的注解,在平时开发的时候,只用到了
@Component呀?那@Controller,@Service这些配置的类就不处理了么?后来发现,其实@Controller包含了@Component注解@Target({ElementType.TYPE}) @Retention(RetentionPolicy.RUNTIME) @Documented @Component // 这里包含了 public @interface Controller { /** * The value may indicate a suggestion for a logical component name, * to be turned into a Spring bean in case of an autodetected component. * @return the suggested component name, if any (or empty String otherwise) */ @AliasFor(annotation = Component.class) String value() default ""; } -
到此,spring扫描包,然后判断包上是否设置了对应的注解,生成了BeanDefinition,但是对应类下的属性,还需要解析。
3. Autowired等注解解析
-
ComponentScanBeanDefinitionParserr.egisterComponents方法是对@Autowired等注解进行处理的。 -
进入
AnnotationConfigUtils.registerAnnotationConfigProcessors方法,如下:-
	public static Set<BeanDefinitionHolder> registerAnnotationConfigProcessors(
			BeanDefinitionRegistry registry, @Nullable Object source) {

	 	//....省略前面代码

		if (!registry.containsBeanDefinition(AUTOWIRED_ANNOTATION_PROCESSOR_BEAN_NAME)) {
            //这里就是对Autowire注解进行处理的。
			RootBeanDefinition def = new RootBeanDefinition(AutowiredAnnotationBeanPostProcessor.class);
			def.setSource(source);
			beanDefs.add(registerPostProcessor(registry, def, AUTOWIRED_ANNOTATION_PROCESSOR_BEAN_NAME));
		}
 		//....省略后面代码
		return beanDefs;
	}
如上,刚刚开始看到,我也有些疑问,
AutowiredAnnotationBeanPostProcessor这个类是干啥的?看着好像是和@Autowired注解有一定的关系。但是这里又不是直接对@Autowired注解做处理。这里要对
InstantiationAwareBeanPostProcessor接口和BeanPostProcessor有一定的了解。不了解可以进去看下两个接口的介绍。
-
-
了解了两个接口的作用之后,就可以着重看下这两个接口主要实现了什么了。
     public AutowiredAnnotationBeanPostProcessor() {
        this.autowiredAnnotationTypes.add(Autowired.class);
        this.autowiredAnnotationTypes.add(Value.class);
        ClassLoader cl = AutowiredAnnotationBeanPostProcessor.class.getClassLoader();

        try {
            this.autowiredAnnotationTypes.add(cl.loadClass("javax.inject.Inject"));
            this.logger.info("JSR-330 'javax.inject.Inject' annotation found and supported for autowiring");
        } catch (ClassNotFoundException var3) {
            ;
        }

    }
AutowiredAnnotationBeanPostProcessor在初始化的时候,就会加载
@Autowired,@Value,@Inject这三个注解。 -
当bean设置值的时候,进行走如下方法:
-
    public PropertyValues postProcessPropertyValues(PropertyValues pvs, PropertyDescriptor[] pds, Object bean, String beanName) throws BeansException {
        //检索出带有注解的属性,这里的注解是初始化时加载的那三个注解
        InjectionMetadata metadata = this.findAutowiringMetadata(beanName, bean.getClass());

        try {
            // 进行注入
            metadata.inject(bean, beanName, pvs);
            return pvs;
        } catch (Throwable var7) {
            throw new BeanCreationException(beanName, "Injection of autowired dependencies failed", var7);
        }
    }
最后进入
AutowiredAnnotationBeanPostProcessor.inject。
protected void inject(Object bean, @Nullable String beanName, @Nullable PropertyValues pvs) throws Throwable { Field field = (Field) this.member; Object value; // 判断是否有缓存, // 就比如,有一个service,在多个地方进行自动注入的话,那么第二次注入的话,就是走缓存了。 if (this.cached) { value = resolvedCachedArgument(beanName, this.cachedFieldValue); } else { DependencyDescriptor desc = new DependencyDescriptor(field, this.required); desc.setContainingClass(bean.getClass()); Set<String> autowiredBeanNames = new LinkedHashSet<>(1); Assert.state(beanFactory != null, "No BeanFactory available"); TypeConverter typeConverter = beanFactory.getTypeConverter(); try { // 找到属性的值 value = beanFactory.resolveDependency(desc, beanName, autowiredBeanNames, typeConverter); } catch (BeansException ex) { throw new UnsatisfiedDependencyException(null, beanName, new InjectionPoint(field), ex); } // 进行缓存 synchronized (this) { if (!this.cached) { if (value != null || this.required) { this.cachedFieldValue = desc; registerDependentBeans(beanName, autowiredBeanNames); if (autowiredBeanNames.size() == 1) { String autowiredBeanName = autowiredBeanNames.iterator().next(); if (beanFactory.containsBean(autowiredBeanName) && beanFactory.isTypeMatch(autowiredBeanName, field.getType())) { this.cachedFieldValue = new ShortcutDependencyDescriptor( desc, autowiredBeanName, field.getType()); } } } else { this.cachedFieldValue = null; } this.cached = true; } } } if (value != null) { // 通过反射,进行赋值。 ReflectionUtils.makeAccessible(field); field.set(bean, value); } } } -
更多源码中文注释,有兴趣的直接拉去代码看把。