多数据源汇总案例
多 Source 汇总数据到单 Flume 如图 7-4 所示。

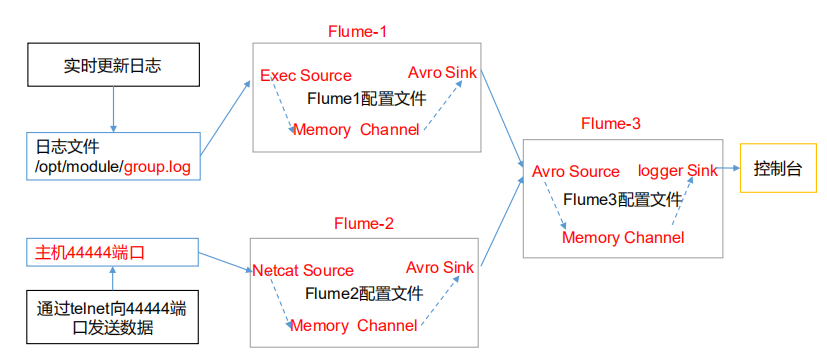
图 7-4 多 Flume 汇总数据到单 Flume
1) 案例需求:
hadoop103 上的 Flume-1 监控文件/opt/module/group.log,
hadoop102 上的 Flume-2 监控某一个端口的数据流,
Flume-1 与 Flume-2 将数据发送给 hadoop104 上的 Flume-3,Flume-3 将最终数据打印到控制台。
2)需求分析:
3)实现步骤:
0.准备工作
分发 Flume
[atguigu@hadoop102 module]$ xsync flume
在hadoop102、hadoop103以及hadoop104的/opt/module/flume/job目录下创建一个group3文件夹。
[atguigu@hadoop102 job]$ mkdir group3
[atguigu@hadoop103 job]$ mkdir group3
[atguigu@hadoop104 job]$ mkdir group3
1.创建 flume1-logger-flume.conf
配置 Source 用于监控 hive.log 文件,配置 Sink 输出数据到下一级 Flume。
在 hadoop103 上创建配置文件并打开
[atguigu@hadoop103 group3]$ touch flume1-logger-flume.conf
[atguigu@hadoop103 group3]$ vim flume1-logger-flume.conf
添加如下内容
# Name the components on this agent
a1.sources = r1
a1.sinks = k1
a1.channels = c1
# Describe/configure the source
a1.sources.r1.type = exec
a1.sources.r1.command = tail -F /opt/module/group.log
a1.sources.r1.shell = /bin/bash -c
# Describe the sink
a1.sinks.k1.type = avro
a1.sinks.k1.hostname = hadoop104
a1.sinks.k1.port = 4141
# Describe the channel
a1.channels.c1.type = memory
a1.channels.c1.capacity = 1000
a1.channels.c1.transactionCapacity = 100
# Bind the source and sink to the channel
a1.sources.r1.channels = c1
a1.sinks.k1.channel = c1
2.创建 flume2-netcat-flume.conf
配置 Source 监控端口 44444 数据流,配置 Sink 数据到下一级 Flume:
在 hadoop102 上创建配置文件并打开
[atguigu@hadoop102 group3]$ touch flume2-netcat-flume.conf
[atguigu@hadoop102 group3]$ vim flume2-netcat-flume.conf
添加如下内容
# Name the components on this agent
a2.sources = r1
a2.sinks = k1
a2.channels = c1
# Describe/configure the source
a2.sources.r1.type = netcat
a2.sources.r1.bind = hadoop102
a2.sources.r1.port = 44444
# Describe the sink
a2.sinks.k1.type = avro
a2.sinks.k1.hostname = hadoop104
a2.sinks.k1.port = 4141
# Use a channel which buffers events in memory
a2.channels.c1.type = memory
a2.channels.c1.capacity = 1000
a2.channels.c1.transactionCapacity = 100
# Bind the source and sink to the channel
a2.sources.r1.channels = c1
a2.sinks.k1.channel = c1
3.创建 flume3-flume-logger.conf
配置 source 用于接收 flume1 与 flume2 发送过来的数据流,最终合并后 sink 到控制台。
在 hadoop104 上创建配置文件并打开
[atguigu@hadoop104 group3]$ touch flume3-flume-logger.conf
[atguigu@hadoop104 group3]$ vim flume3-flume-logger.conf
添加如下内容
# Name the components on this agent
a3.sources = r1
a3.sinks = k1
a3.channels = c1
# Describe/configure the source
a3.sources.r1.type = avro
a3.sources.r1.bind = hadoop104
a3.sources.r1.port = 4141
# Describe the sink
# Describe the sink
a3.sinks.k1.type = logger
# Describe the channel
a3.channels.c1.type = memory
a3.channels.c1.capacity = 1000
a3.channels.c1.transactionCapacity = 100
# Bind the source and sink to the channel
a3.sources.r1.channels = c1
a3.sinks.k1.channel = c1
4.执行配置文件
分 别 开 启 对 应 配 置 文 件 : flume3-flume-logger.conf , flume2-netcat-flume.conf ,flume1-logger-flume.conf。
[atguigu@hadoop104 flume]$ bin/flume-ng agent --conf conf/ --name
a3 --conf-file job/group3/flume3-flume-logger.conf
-Dflume.root.logger=INFO,console
[atguigu@hadoop102 flume]$ bin/flume-ng agent --conf conf/ --name
a2 --conf-file job/group3/flume2-netcat-flume.conf
[atguigu@hadoop103 flume]$ bin/flume-ng agent --conf conf/ --name
a1 --conf-file job/group3/flume1-logger-flume.conf
5.在 hadoop103 上向/opt/module 目录下的 group.log 追加内容
[atguigu@hadoop103 module]$ echo 'hello' > group.log
6.在 hadoop102 上向 44444 端口发送数据
[atguigu@hadoop102 flume]$ telnet hadoop102 44444
7.检查 hadoop104 上数据
