在Android的开发中,用户界面的设计尤其重要,基本的一些组件非常简单,只要有过了解加上操作,就能熟练的运用,但是高级的组件还需要温故知新、查漏补缺。下面是我总结的属性及使用详例,快快收藏叭!
高级UI对应属性大全及使用详例
AutoCompleteTextView
AutoCompleteTextView用于输入一定字符后显示下拉列表框,供用户进行选择
| XML属性 | 功能 |
|---|---|
| android:completionHint | 设置文本框中的提示信息 |
| android:dropDownHeight | 设置提示框的高度单位dp |
| android:dropDownWidth | 设置提示框的宽度单位dp |
| android:popuPBackground | 为提示框设置背景 |
| android:completionThreshold | 设置输入几个字符串才会显示提示信息 |
| 其他 | 其他属性不常用,使用默认设置的就好 |
下面看看详例:

MXL文件布局:
<AutoCompleteTextView
    android:id="@+id/comtv"
    android:layout_weight="7"
    android:layout_width="wrap_content"
    android:layout_height="wrap_content"
    android:completionHint="输入查找内容"
    android:completionThreshold="1"
 />
Activity类代码,主要是为 AutoCompleteTextView配置一个适配器,具体请看代码:
import androidx.appcompat.app.AppCompatActivity;

import android.os.Bundle;
import android.widget.ArrayAdapter;
import android.widget.AutoCompleteTextView;

public class MainActivity extends AppCompatActivity {
private String[] str={"a","ab","abc","abcd"};
AutoCompleteTextView autoCompleteTextView;
    @Override
    protected void onCreate(Bundle savedInstanceState) {
        super.onCreate(savedInstanceState);
        setContentView(R.layout.activity_main);
        autoCompleteTextView=findViewById(R.id.comtv); //获取自动完成文本框
        ArrayAdapter arrayAdapter=new ArrayAdapter(this,android.R.layout.simple_dropdown_item_1line,str); //创建适配器
        autoCompleteTextView.setAdapter(arrayAdapter);             //加入适配器

    }
}
ProgressBar
ProgressBar就是我们常用的进度条
| XML属性 | 功能 |
|---|---|
| 可用 style | 设置进度条样式 |
| android:max | 设置进度条最大值 |
| android:progress | 设置进度条当前进度 |
| android:progressDrawable | 设置进度条轨道的绘制形式 |
style
| XML属性 | 功能 |
|---|---|
| ?android:attr/progressBarStyleHorizontal | 细长条进度条 |
| ?android:attr/progressBarStyleLarge | 大圆形进度条 |
| ?android:attr/progressBarStyleSmall | 小圆形进度条 |
| @android:style/Widget.ProgressBar.Horizontal | 粗长条进度条 |
| @android:style/Widget.ProgressBar.Large | 大跳跃旋转的进度条 |
| @android:style/Widget.ProgressBar.Small | 大跳跃旋转的进度条 |
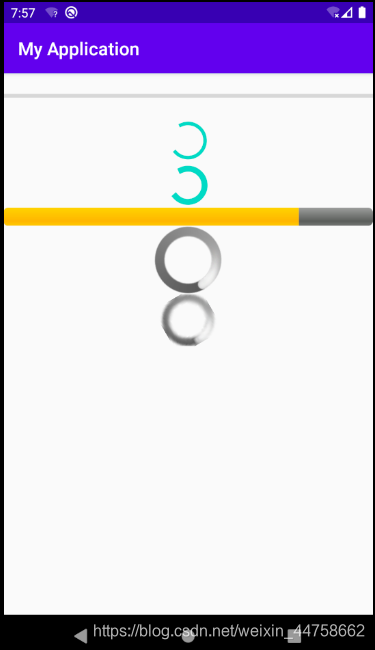
发挥进度条真正的作用,还需配合进程Thread和Handler使用,以更新进度条,起到提示作用。
添加圆形的进度条
<ProgressBar
    android:id="@+id/pbar"
    style="?android:attr/progressBarStyleLarge"
    android:layout_width="match_parent"
    android:layout_height="wrap_content"
     />
MainActivity代码
import android.os.Bundle;
import android.os.Handler;
import android.os.Message;
import android.view.View;
import android.widget.ProgressBar;
import android.widget.Toast;
import androidx.annotation.NonNull;
import androidx.appcompat.app.AppCompatActivity;


/**********************配合进程Thread和Handler对进度条进行更新**********************************************/
public class MainActivity extends AppCompatActivity {
    int m=0;
ProgressBar pbar;
private Handler handler;
    @Override
    protected void onCreate(Bundle savedInstanceState) {
        super.onCreate(savedInstanceState);
        setContentView(R.layout.activity_main);
        pbar=findViewById(R.id.pbar);
        handler=new Handler(){
            @Override
            public void handleMessage(@NonNull Message msg) {
                if (msg.what==0x1121)                      //0x1121,等于为其命名
                    // 假如为水平进度条,应在if下为其设置新进度,但我选择的是圆形加载进度条,不用为其设置新进度,
                Toast.makeText(MainActivity.this,"加载中...",Toast.LENGTH_SHORT).show();

                else{
                    Toast.makeText(MainActivity.this,"加载完成",Toast.LENGTH_LONG).show();

                    pbar.setVisibility(View.GONE);//关闭进度条释放内存
                }

            }
        };
new Thread(new Runnable() {
    @Override
    public void run() {

        while (true){
            Message message=new Message();
            m+= (int) (Math.random()*10);     //生成10内的随机数,模拟一个耗时操作
          if (m<100) {
              try {
                  Thread.sleep(1000);     //为体现效果,让线程休眠1秒
              } catch (InterruptedException e) {
                  e.printStackTrace();
              }
              message.what=0x1121;
              handler.sendMessage(message);      //发送信息
          }
            else {
              try {
                  Thread.sleep(1000);     //为体现效果,让线程休眠1秒
              } catch (InterruptedException e) {
                  e.printStackTrace();
              }
              message.what=0x110;
              handler.sendMessage(message);
              break;
          }
        }
    }
}).start();
    }
}
SeekBar
SeekBar是拖动条,用户可以进行拖动,用来改变某种数值
为其设置监听后并重写方法
3种常用方法如下
import android.os.Bundle;
import android.widget.SeekBar;
import androidx.appcompat.app.AppCompatActivity;
public class MainActivity extends AppCompatActivity {

SeekBar seekBar;
    @Override
    protected void onCreate(Bundle savedInstanceState) {
        super.onCreate(savedInstanceState);
        setContentView(R.layout.activity_main);
        seekBar=(SeekBar) findViewById(R.id.seek);
        seekBar.setOnSeekBarChangeListener(new SeekBar.OnSeekBarChangeListener() {
            @Override
            public void onProgressChanged(SeekBar seekBar, int i, boolean b) {    //进度改变时执行的方法,i为当前进度值

            }
            @Override
            public void onStartTrackingTouch(SeekBar seekBar) {   //拖动开始时的方法
            }

            @Override
            public void onStopTrackingTouch(SeekBar seekBar) {  //拖动结束时的方法
            }
        });
    }
}
RatingBar
RatingBar是星状的评分条,如淘宝的评价等
扫描二维码关注公众号,回复:
11430396 查看本文章

| XML属性 | 功能 |
|---|---|
| android:rating | 设置默认选择的星星数 |
| android:numStars | 设置评分条总星数 |
| android:stepSize | 设置评分条最少改变的星星数 |
| android:isIndicator | 设置评分条是否能改变,true为不能 |
下面是RatingBar的常用方法与实例
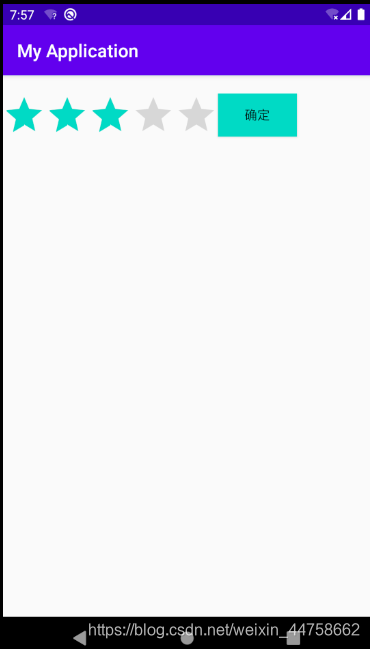
XML代码
 <RatingBar
       android:id="@+id/rating"
       android:layout_width="wrap_content"
       android:layout_height="wrap_content"
       android:numStars="5"
       android:rating="5"
       android:stepSize="1"
       />
<Button
    android:id="@+id/button1"
    android:layout_width="wrap_content"
    android:layout_height="wrap_content"
    android:text="确定"
    android:background="@color/colorAccent"
    />
MainActivity中主要代码:
import android.os.Bundle;
import android.util.Log;
import android.view.View;
import android.widget.Button;
import android.widget.RatingBar;
import androidx.appcompat.app.AppCompatActivity;
public class MainActivity extends AppCompatActivity {

RatingBar rating1;
Button button;

    @Override
    protected void onCreate(Bundle savedInstanceState) {
        super.onCreate(savedInstanceState);
        setContentView(R.layout.activity_main);
        rating1=findViewById(R.id.rating);
        button=findViewById(R.id.button1);
        button.setOnClickListener(new View.OnClickListener() {
            @Override
            public void onClick(View view) {
                int a=rating1.getProgress();//获取进度,为getRating()与getStepSize()的乘积
                float b=rating1.getRating();//获取获得的星数
                float c=rating1.getStepSize();//获取每次要改变的星数
                float d=rating1.getNumStars();//获取总星数
                Log.i("RatingBar", "进度为:"+a+",获得的星数为:"+b+",每次要改变的星数为:"+c+",评分条总星数为:"+d);
            }
        });
    }
}
TabHost
实现图:
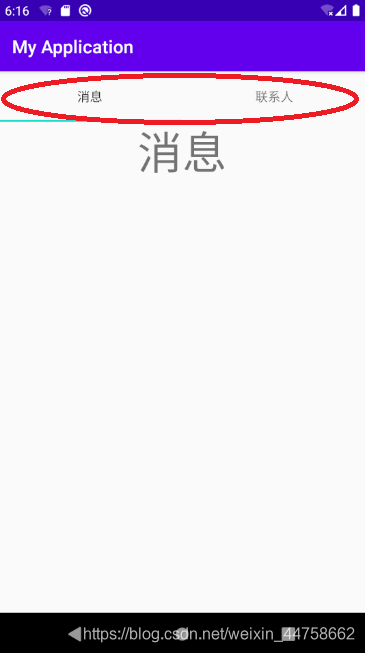
实现步骤
1、在布局文件中添加TabHost、TabWidget、FrameLayout组件(注意:TabHost、TabWidget、FrameLayout的id需要用系统指定的)
2、编写要显示的xml文件
3、在Activity中初始化TabHost并添加标签页
布局文件代码:
<?xml version="1.0" encoding="utf-8"?>
<TabHost xmlns:android="http://schemas.android.com/apk/res/android"
    xmlns:tools="http://schemas.android.com/tools"
    android:id="@android:id/tabhost"
    android:layout_width="match_parent"
    android:layout_height="wrap_content"
    tools:context=".MainActivity">
   <LinearLayout
       android:orientation="vertical"
       android:layout_width="match_parent"
       android:layout_height="match_parent">
<TabWidget
    android:id="@android:id/tabs"
    android:layout_width="match_parent"
    android:layout_height="match_parent"/>
      <FrameLayout
          android:id="@android:id/tabcontent"
          android:layout_width="match_parent"
          android:layout_height="match_parent"/>
   </LinearLayout>

</TabHost>
MainActivity中的代码:
import android.os.Bundle;
import android.view.LayoutInflater;
import android.widget.TabHost;

import androidx.appcompat.app.AppCompatActivity;
public class MainActivity extends AppCompatActivity {
TabHost tabHost;
    @Override
    protected void onCreate(Bundle savedInstanceState) {
        super.onCreate(savedInstanceState);
        setContentView(R.layout.activity_main);
        tabHost=findViewById(android.R.id.tabhost);
        tabHost.setup();                                         //初始化Tabhost
        LayoutInflater inflater= LayoutInflater.from(this);      //该对象用于加载标签页
        inflater.inflate(R.layout.contacts,tabHost.getTabContentView());
        inflater.inflate(R.layout.news,tabHost.getTabContentView());
        tabHost.addTab(tabHost.newTabSpec("news").setIndicator("消息").setContent(R.id.new_1));  //添加标签页    setContent(R.id.new_1)为布局文件的id
        tabHost.addTab(tabHost.newTabSpec("contacts").setIndicator("联系人").setContent(R.id.contacts_1));
    }
}