文章目录
- 一、开发环境
- 二、准备工作
- 三、配置 ubuntu
- 1、配置准备
- 2、安装 qemu 模拟器
- 3、iMX6Q Ubuntu16.04系统 配置 网络
- 4、iMX6Q Ubuntu16.04系统 配置 下载软件镜像源
- 5、模拟登陆 iMX6Q Ubuntu16.04 系统
- 6、iMX6Q Ubuntu16.04 系统 安装软件
- 7、iMX6Q Ubuntu16.04 系统 用户配置
- 8、iMX6Q Ubuntu16.04 系统 配置 调试串口
- 9、iMX6Q Ubuntu16.04 系统 配置 网络dhcp
- 10、iMX6Q Ubuntu16.04 系统 完成配置
- 四、制作 iMX6Q Ubuntu16.04 文件系统
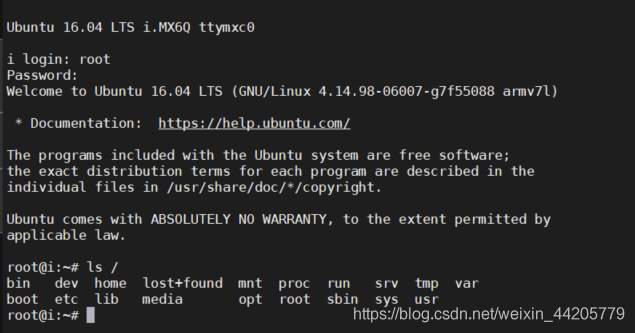
- 五、登录iMX6Q Ubuntu16.04
一、开发环境
开发环境:Ubuntu16.04
开发平台:iMX6Q
内核版本:4.14.98
二、准备工作
1、需要的软件
Ubuntu一个以桌面应用为主的开源GNU/Linux操作系统,ubuntu core是最小Ubuntu核心
Ubuntu官方提供了不同版本的ubuntu core,可以根据需要下载、移植。
选择版本下载的时候下载后缀是 core-armhf
选择版本下载的时候下载后缀是 core-armhf
选择版本下载的时候下载后缀是 core-armhf
2、ubuntu core版本
在这里我选择了Ubuntu16.04
ubuntu-base-16.04-core-armhf.tar.gz
三、配置 ubuntu
1、配置准备
新建文件夹存放 ubuntu core
mkdir ~/rootfs
拷贝 ubuntu core
cp /media/sf_share/6q/ubuntu-base-16.04-core-armhf.tar.gz ~/
解压 ubuntu core 到 rootfs
sudo tar xvf ubuntu-base-16.04-core-armhf.tar.gz -C rootfs/
进入rootfs查看文件

2、安装 qemu 模拟器
qemu 模拟器:
可扩展,可自定义新的指令集
开源,可移植,仿真速度快
在支持硬件虚拟化的x86构架上可以使用KVM加速配合内核ksm大页面备份内存,速度稳定远超过VMware ESX
增加了模拟速度,某些程序甚至可以实时运行
可以在其他平台上运行Linux的程序
可以储存及还原运行状态(如运行中的程序)
可以虚拟网络卡
qemu模拟器主要作用是:在主机的Ubuntu上 模拟登陆 要移植的 Ubuntu。
在模拟器上,运行的ubuntu系统,可以使用各种 Ubuntu命令来安装需要的软件。
sudo apt-get install qemu-user-static

拷贝 qemu-arm-static 到 ubuntu core 的 usr/bin/
sudo cp /usr/bin/qemu-arm-static ~/rootfs/usr/bin/
3、iMX6Q Ubuntu16.04系统 配置 网络
为了制作成功的根文件系统能够联网,可以直接拷贝本机的dns配置文件到根文件系统的相应位置
拷贝主机的 resolv.conf 到 ubuntu core的 etc 目录
sudo cp /etc/resolv.conf ~/rootfs/etc/
这一步不做的话会上不了网!!!
这一步不做的话会上不了网!!!
这一步不做的话会上不了网!!!
4、iMX6Q Ubuntu16.04系统 配置 下载软件镜像源
配置我们制作的 iMX6Q Ubuntu16.04系统 下载软件镜像源。
在这里我修改为阿里软件镜像源,也可以直接使用默认的。
sudo vim ~/rootfs/etc/apt/sources.list
这是原本的默认配置
# See http://help.ubuntu.com/community/UpgradeNotes for how to upgrade to
# newer versions of the distribution.

deb http://ports.ubuntu.com/ubuntu-ports/ xenial main restricted
deb-src http://ports.ubuntu.com/ubuntu-ports/ xenial main restricted

## Major bug fix updates produced after the final release of the
## distribution.
deb http://ports.ubuntu.com/ubuntu-ports/ xenial-updates main restricted
deb-src http://ports.ubuntu.com/ubuntu-ports/ xenial-updates main restricted

## Uncomment the following two lines to add software from the 'universe'
## repository.
## N.B. software from this repository is ENTIRELY UNSUPPORTED by the Ubuntu
## team. Also, please note that software in universe WILL NOT receive any
## review or updates from the Ubuntu security team.
# deb http://ports.ubuntu.com/ubuntu-ports/ xenial universe
# deb-src http://ports.ubuntu.com/ubuntu-ports/ xenial universe
# deb http://ports.ubuntu.com/ubuntu-ports/ xenial-updates universe
# deb-src http://ports.ubuntu.com/ubuntu-ports/ xenial-updates universe

## N.B. software from this repository may not have been tested as
## extensively as that contained in the main release, although it includes
## newer versions of some applications which may provide useful features.
## Also, please note that software in backports WILL NOT receive any review
## or updates from the Ubuntu security team.
# deb http://ports.ubuntu.com/ubuntu-ports/ xenial-backports main restricted
# deb-src http://ports.ubuntu.com/ubuntu-ports/ xenial-backports main restricted

deb http://ports.ubuntu.com/ubuntu-ports/ xenial-security main restricted
deb-src http://ports.ubuntu.com/ubuntu-ports/ xenial-security main restricted
# deb http://ports.ubuntu.com/ubuntu-ports/ xenial-security universe
# deb-src http://ports.ubuntu.com/ubuntu-ports/ xenial-security universe
# deb http://ports.ubuntu.com/ubuntu-ports/ xenial-security multiverse
# deb-src http://ports.ubuntu.com/ubuntu-ports/ xenial-security multiverse
我配置的 iMX6Q Ubuntu16.04系统 ARM 阿里软件镜像源
只要将ubuntu改成ubuntu-ports即可。清华软件镜像源、中科大软件镜像源、以及其他软件镜像源都可以这样改。
deb http://mirrors.aliyun.com/ubuntu-ports/ xenial main
deb-src http://mirrors.aliyun.com/ubuntu-ports/ xenial main

deb http://mirrors.aliyun.com/ubuntu-ports/ xenial-updates main
deb-src http://mirrors.aliyun.com/ubuntu-ports/ xenial-updates main

deb http://mirrors.aliyun.com/ubuntu-ports/ xenial universe
deb-src http://mirrors.aliyun.com/ubuntu-ports/ xenial universe
deb http://mirrors.aliyun.com/ubuntu-ports/ xenial-updates universe
deb-src http://mirrors.aliyun.com/ubuntu-ports/ xenial-updates universe

deb http://mirrors.aliyun.com/ubuntu-ports/ xenial-security main
deb-src http://mirrors.aliyun.com/ubuntu-ports/ xenial-security main
deb http://mirrors.aliyun.com/ubuntu-ports/ xenial-security universe
deb-src http://mirrors.aliyun.com/ubuntu-ports/ xenial-security universe
5、模拟登陆 iMX6Q Ubuntu16.04 系统
在这里使用模拟器登录 iMX6Q Ubuntu16.04 系统
①、创建模拟登陆脚本
在 rootfs 上一级目录 创建模拟登陆脚本
我的 iMX6Q Ubuntu16.04 系统文件 是放在 ~/rootfs/
所以我的 rootfs 上一级目录 就是主目录 ~
vim ~/ch-mount.sh
脚本内容
#!/bin/bash

function mnt() {
    echo "MOUNTING"
    sudo mount -t proc /proc ${2}proc
    sudo mount -t sysfs /sys ${2}sys
    sudo mount -o bind /dev ${2}dev

    sudo chroot ${2}
}

function umnt() {
    echo "UNMOUNTING"
    sudo umount ${2}proc
    sudo umount ${2}sys
    sudo umount ${2}dev

}

if [ "$1" == "-m" ] && [ -n "$2" ] ;
then
    mnt $1 $2
elif [ "$1" == "-u" ] && [ -n "$2" ];
then
    umnt $1 $2
else
    echo ""
    echo "Either 1'st, 2'nd or both parameters were missing"
    echo ""
    echo "1'st parameter can be one of these: -m(mount) OR -u(umount)"
    echo "2'nd parameter is the full path of rootfs directory(with trailing '/')"
    echo ""
    echo "For example: ch-mount -m /media/sdcard/"
    echo ""
    echo 1st parameter : ${1}
    echo 2nd parameter : ${2}
fi
增加可执行权限
chmod +x ch-mount.sh
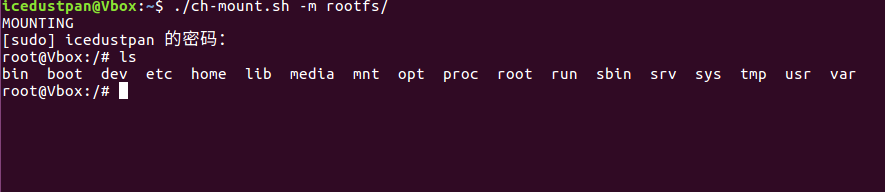
②、模拟登陆 iMX6Q Ubuntu16.04 系统
1、rootfs 这个是我存放 iMX6Q Ubuntu16.04 系统文件 的目录
2、-m 创建home目录 (不加这个要手动添加目录,不然开机时,会出现No directory,Logging in with HOME=/ )
3、rootfs 改成自己存放 Ubuntu系统文件的目录
./ch-mount.sh -m rootfs/
成功模拟登陆 iMX6Q Ubuntu16.04 系统
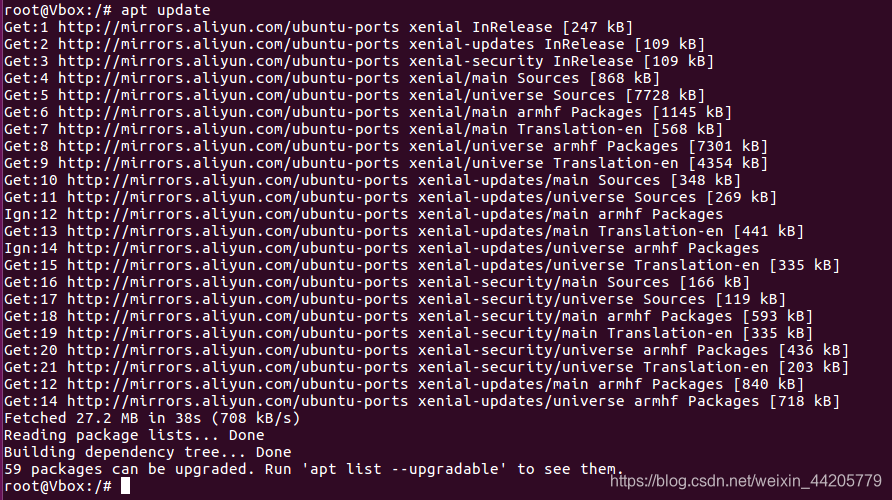
6、iMX6Q Ubuntu16.04 系统 安装软件
①、更新源
apt update
②、下载软件
这里根据自己的需求去下载就好了
这是我下载的软件:
apt-get install sudo                    sudo命令
apt-get install vim						vim编辑器
apt-get install net-tools               ifconfig,netstat,route,arp等
apt-get install dhcpcd5					dhcp服务
apt-get install iputils-ping            ping和ping6
apt-get install wireless-tools          iwconfig等,显示、修改无线设置
apt-get install htop                    htop工具,交互式进程查看器
apt-get install rsyslog                 系统log服务
apt-get install network-manager         Network Manager服务和框架,高级网络管理
apt-get install ifupdown                ifup,ifdown等工具
apt-get install ethtool                 ethtool命令,显示、修改以太网设置
一键安装全部命令:
apt-get install sudo vim net-tools dhcpcd5 iputils-ping wireless-tools htop rsyslog network-manager ifupdown ethtool
7、iMX6Q Ubuntu16.04 系统 用户配置
①、设置root密码
passwd root
②、设置主机名称
echo "i.MX6Q" > /etc/hostname
③、设置本机IP
echo "127.0.0.1 localhost" >> /etc/hosts
echo "127.0.1.1 i.MX6Q" >> /etc/hosts
8、iMX6Q Ubuntu16.04 系统 配置 调试串口
我用的是iMX6Q,iMX平台默认调试串口是ttymxc0
需要添加一个名为[email protected]的链接,连接到[email protected]服务。
ln -s /lib/systemd/system/getty@.service /etc/systemd/system/getty.target.wants/getty@ttymxc0.service
9、iMX6Q Ubuntu16.04 系统 配置 网络dhcp
配置DHCP,可以烧录到开发板之后在配置,但启动时会慢一点。
echo auto eth0 > /etc/network/interfaces.d/eth0
echo iface eth0 inet dhcp >> /etc/network/interfaces.d/eth0
使能配置DHCP
/etc/init.d/networking restart

10、iMX6Q Ubuntu16.04 系统 完成配置
现在我们退出模拟登录的iMX6Q Ubuntu16.04 系统
退出退出chroot
exit
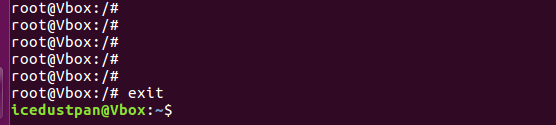
用脚本载缷载退出 模拟登录 文件系统
./ch-mount.sh -u rootfs/

现在已经退出模拟登录的iMX6Q Ubuntu16.04 系统
四、制作 iMX6Q Ubuntu16.04 文件系统
1、进入rootfs目录
cd ~/rootfs/
2、制作文件系统
因为iMX平台的文件系统是默认.bz2格式的
所以压缩生成.bz2格式的文件系统
sudo tar jcvf imx6q-ubuntu16.04.tar.bz2 *
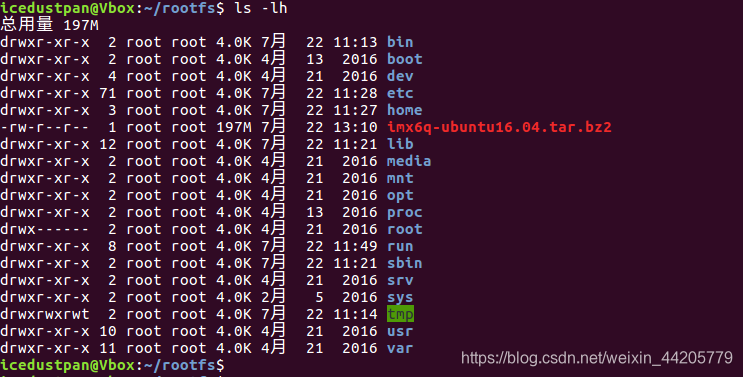
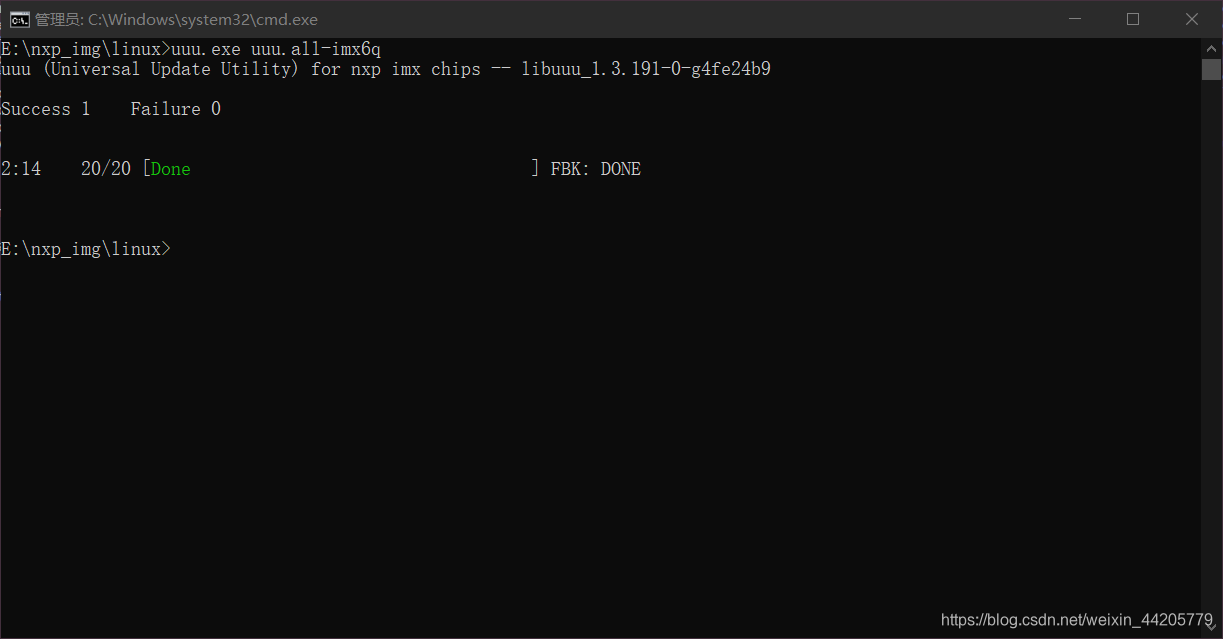
接下来把这个文件系统烧录进去就行了
使用uuu工具烧录系统
五、登录iMX6Q Ubuntu16.04