镇楼

一、概念
- 项目管理框架,也是一套JAVAEE解决方案;
- 优秀的设计模式组合;
- 是一款将众多框架整合的产品
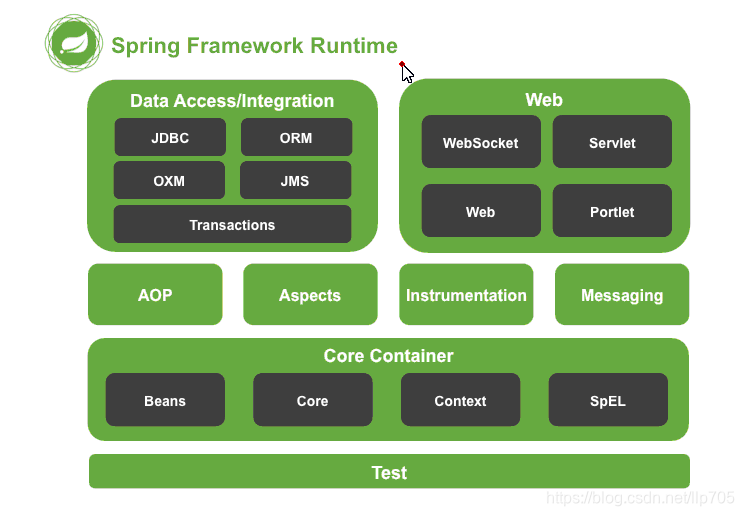
二、架构促成
- 核心技术:依赖注入,事件,资源,验证,数据绑定,类型转换,I18N(i开头,N结尾,中间18个字符), SpEL(Spring表达式语言),AOP(面向切面编程);
- 测试:模拟对象,TestContext框架,Spring MVC测试,WebTestClient。
- 数据访问:事物,DAO,JDBC,ORM
- 继承:远程处理,JMS,JCA,JMX,电子邮件,任务,调度,缓存。
- 语言:Kotlin,Groovy,动态语言
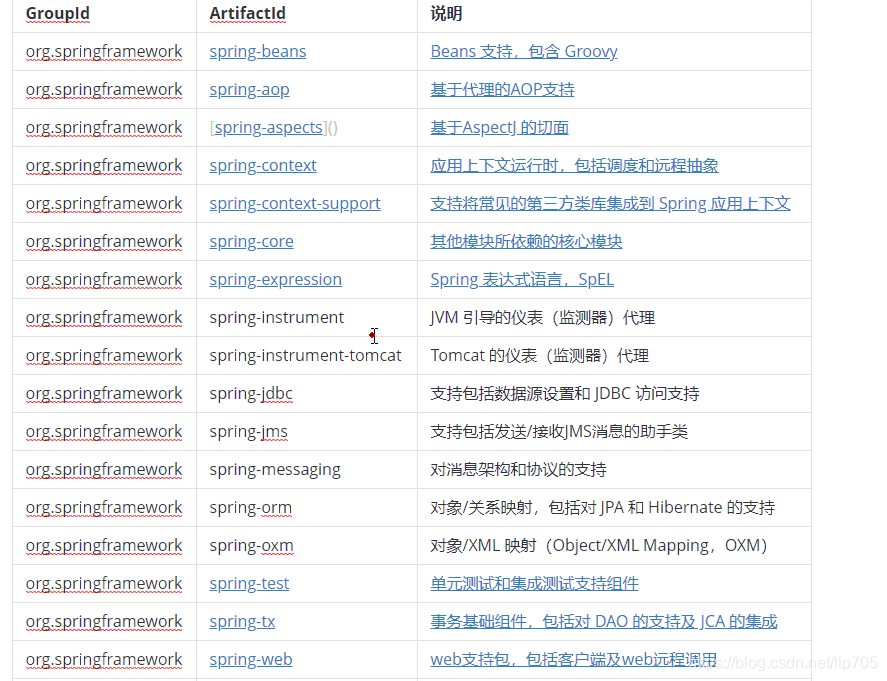

三、pom.xml配置
<?xml version="1.0" encoding="UTF-8"?>
<project xmlns="http://maven.apache.org/POM/4.0.0"
         xmlns:xsi="http://www.w3.org/2001/XMLSchema-instance"
         xsi:schemaLocation="http://maven.apache.org/POM/4.0.0 http://maven.apache.org/xsd/maven-4.0.0.xsd">
    <modelVersion>4.0.0</modelVersion>

    <groupId>org.example</groupId>
    <artifactId>SpringTest</artifactId>
    <version>1.0-SNAPSHOT</version>
    <dependencies>
        <dependency>
            <groupId>org.springframework</groupId>
            <artifactId>spring-context</artifactId>
            <version>5.1.6.RELEASE</version>
        </dependency>
    </dependencies>
</project>
四、(IOC &DI)控制反转&依赖注入:
bean节点:
- id:指定bean的id,可以通过该id得到该bean的对象。
- class:指明该类的路径,要求该bean类有 无参构造器。
- scope:特指作用范围:
1、singleton 单例模式(默认);
2、prototype 多实例模式;
3、request:web请求;
4、session:web会话。
第一种(利用name):
poto实体:
@Data
public class User {
    private int uid;
    private String username;
    private String password;
    private int age;
    private String telephone;
    private Brand brand;

    public User() {
    }

    public User(int uid, String username, String password, int age, String telephone) {
        this.uid = uid;
        this.username = username;
        this.password = password;
        this.age = age;
        this.telephone = telephone;
    }

    public User(int uid, String username, String password, int age, String telephone, Brand brand) {
        this.uid = uid;
        this.username = username;
        this.password = password;
        this.age = age;
        this.telephone = telephone;
        this.brand = brand;
    }

    public int getUid() {
        return uid;
    }

    public void setUid(int uid) {
        this.uid = uid;
    }

    public String getUsername() {
        return username;
    }

    public void setUsername(String username) {
        this.username = username;
    }

    public String getPassword() {
        return password;
    }

    public void setPassword(String password) {
        this.password = password;
    }

    public int getAge() {
        return age;
    }

    public void setAge(int age) {
        this.age = age;
    }

    public String getTelephone() {
        return telephone;
    }

    public void setTelephone(String telephone) {
        this.telephone = telephone;
    }

    public Brand getBrand() {
        return brand;
    }

    public void setBrand(Brand brand) {
        this.brand = brand;
    }

    @Override
    public String toString() {
        return "User{" +
                "uid=" + uid +
                ", username='" + username + '\'' +
                ", password='" + password + '\'' +
                ", age=" + age +
                ", telephone='" + telephone + '\'' +
                ", brand=" + brand +
                '}';
    }
}
beans.xml
<!--第一种 name-->
<bean id="user" class="pojo.User" scope="singleton">
    <property name="uid" value="1"/>
    <property name="username" value="明日花绮罗"/>
    <property name="password" value="123456"/>
    <property name="age" value="18"/>
    <property name="telephone" value="13355552222"/>
    <property name="brand" ref="brand"/>
</bean>
    <bean id="brand" class="pojo.Brand" scope="singleton">
        <constructor-arg name="bid" value="1"/>
        <constructor-arg name="bname" value="TokyoHot"/>
    </bean>
Test
 ApplicationContext applicationContext = new ClassPathXmlApplicationContext("Beans.xml");
        User user = applicationContext.getBean("user",User.class);
        System.out.println(user.toString());
        System.out.println();

- bean
- constructor-arg :调用带参构造器
- property :调用Set方法
- value:值
- ref :引用
第二种(直接创建):
<!--第二种 直接赋值-->
    <bean id="user2" class="pojo.User">
        <constructor-arg value="2"/>
        <constructor-arg value="橘梨纱"/>
        <constructor-arg value="123456"/>
        <constructor-arg value="21"/>
        <constructor-arg value="15122223333"/>
        <property name="brand" ref="brand"/>
    </bean>

- 代码简单
- 可读性较差
第三种( 利用下标):
<!--第三种 按下标-->
    <bean id="user3" class="pojo.User">
        <constructor-arg index="0" value="3"/>
        <constructor-arg index="1" value="三上悠亚"/>
        <constructor-arg index="2" value="123456"/>
        <constructor-arg index="3" value="25"/>
        <constructor-arg index="4" value="15122312232"/>
        <property name="brand" ref="brand"/>
    </bean>

第四种(利用类型):
<!--第四种 按类型-->
    <bean id="user4" class="pojo.User">
        <constructor-arg type="java.lang.String" value="樱井莉亚"/>
        <constructor-arg type="int" value="4"/>
        <constructor-arg type="int" value="27"/>
        <constructor-arg type="java.lang.String" value="12345"/>
        <constructor-arg type="java.lang.String" value="15199987777"/>
        <property name="brand" ref="brand"/>
    </bean>

- 相同类型 按先后顺序.
第五种(schema代理):
<?xml version="1.0" encoding="UTF-8" ?>

<beans xmlns="http://www.springframework.org/schema/beans"
       xmlns:xsi="http://www.w3.org/2001/XMLSchema-instance"
       xmlns:pp="http://www.springframework.org/schema/p"
       xsi:schemaLocation="http://www.springframework.org/schema/beans http://www.springframework.org/schema/beans/spring-beans.xsd">
<!--   第五种: 代理-->
    <bean id="user5" class="pojo.User" pp:uid="5" pp:username="深田咏美" pp:password="12345" pp:age="25" pp:telephone="13533229988"/>
</beans>

- 可读性较差
数组
实体类
package pojo;

import java.util.Arrays;
import java.util.List;
import java.util.Map;
import java.util.Set;

public class Array {
    private String[] array;
    private List<Object> list;
    private Set<Integer> set;
    private Map<Object, Object> map;

    @Override
    public String toString() {
        return "Array{" +
                "array=" + Arrays.toString(array) +
                ", list=" + list +
                ", set=" + set +
                ", map=" + map +
                '}';
    }

    public String[] getArray() {
        return array;
    }

    public void setArray(String[] array) {
        this.array = array;
    }

    public List<Object> getList() {
        return list;
    }

    public void setList(List<Object> list) {
        this.list = list;
    }

    public Set<Integer> getSet() {
        return set;
    }

    public void setSet(Set<Integer> set) {
        this.set = set;
    }

    public Map<Object, Object> getMap() {
        return map;
    }

    public void setMap(Map<Object, Object> map) {
        this.map = map;
    }
}
ArrayBean.xml
<!--        数组节点:可以重复-->
        <property name="array">
            <array>
                <value>苍井空</value>
                <value>小泽玛利亚</value>
                <value>泷泽萝拉</value>
                <value>武藤兰</value>
                <value>麻美由真</value>
            </array>
        </property>
test
ackage Test;

import org.junit.Test;
import org.springframework.context.ApplicationContext;
import org.springframework.context.support.ClassPathXmlApplicationContext;
import pojo.Array;

public class TestArray {
    @Test
    public void test(){
        ApplicationContext applicationContext = new ClassPathXmlApplicationContext("ArrayBean.xml");
        Array array = applicationContext.getBean("array",Array.class);
        System.out.println(array.toString());
        System.out.println();
    }
}
集合
- List 集合 (允许有重复)
<!--        list集合节点:可以重复-->
        <property name="list">
            <list>
                <value>东京热</value>
                <value>一本道</value>
                <value>加勒比</value>
            </list>
        </property>
- set集合(不允许重复)
<!--        set集合节点:不能重复-->
        <property name="set">
            <set>
                <value>1000</value>
                <value>2000</value>
                <value>1000</value>
                <value>3000</value>
            </set>
        </property>
- Map (允许value重复,不允许key重复)
   <property name="map">
            <map>
                <entry key="东京热" value="小泉彩"/>
                <entry key="加勒比"  value="樱空桃"/>
                <entry key="东京热" value="桥本有菜"/>
                <entry key="一本道" value="饭岛爱"/>
            </map>
        </property>

五、面向切面(AOP)
基本概念
1、Aspect(切面):通常是一个类,里面可以定义切入点和通知。
2、JointPoint(连接点):程序执行过程中明确的点,一般是方法的调用。
3、Advice(通知):AOP在特定的切入点上执行的增强处理,有before,after,afterReturning,afterThrowing,around。
4、Pointcut(切入点):就是带有通知的连接点,在程序中主要体现为书写切入点表达式。
5、AOP代理:AOP框架创建的对象,代理就是目标对象的加强。Spring中的AOP代理可以使JDK动态代理,也可以是CGLIB代理,前者基于接口,后者基于子类。
五个通知方法
1、前置通知(before):在我们执行目标方法之前运行
2、后置通知(after):在我们目标方法运行结束之后 ,不管有没有异常
3、返回通知(AfterReturning):在我们的目标方法正常返回值后运行
4、异常通知(AfterThrowing):在我们的目标方法出现异常后运行
5、环绕通知(around):动态代理, 需要手动执行joinPoint.procced()(其实就是执行我们的目标方法执行之前相当于前置通知, 执行之后就相当于我们后置通知
*实现方式
第一种 ( 使用Proxy的静态方法)
//实体类
package com.qfedu.aop01;

import lombok.Data;

@Data
public class User {

	private int uid;
	private String username;
	private String password;
	private String tel;
	private String addr;
}
//切面类
package com.qfedu.aop01;

public class MyAspect {

	public void before(){
		System.out.println("this is before");
	}

	public void after(){
		System.out.println("this is after");
	}
}
//业务
package com.qfedu.aop01;

import java.util.List;

public interface IUserService {

	List<User> getAllUsers();

	boolean saveUser(User u);

	boolean deleteUser(int uid);
}
//业务的实现
package com.qfedu.aop01;

import java.util.ArrayList;
import java.util.List;

public class UserServiceImpl implements IUserService {

	@Override
	public List<User> getAllUsers() {
		System.out.println("this is get all user method");
		return new ArrayList<>();
	}

	@Override
	public boolean saveUser(User u) {
		System.out.println("this is saveUser method");
		return false;
	}

	@Override
	public boolean deleteUser(int uid) {
		System.out.println("this is deleteUser method");
		return true;
	}

}
//
package com.qfedu.aop01;

import java.lang.reflect.InvocationHandler;
import java.lang.reflect.Method;
import java.lang.reflect.Proxy;

public class UserServiceFactory {

	public static IUserService getUserService(){

		IUserService us = new UserServiceImpl();

		MyAspect ma = new MyAspect();


		return (IUserService) Proxy.newProxyInstance(UserServiceFactory.class.getClassLoader(), us.getClass().getInterfaces(), new InvocationHandler() {


			@Override
			public Object invoke(Object proxy, Method method, Object[] args) throws Throwable {

				//System.out.println("proxy " + proxy);
				System.out.println("method " + method);
				System.out.println("args " + args);
				ma.before();

				//	使用反射来调用每个方法原本应该调用的代码
				Object objs = method.invoke(us, args);

				//System.out.println("this is after");
				ma.after();

				return objs;
			}
		});
	}
}
1、 Proxy的静态方法newProxyInstance()包含三个参数:
- 类的加载器
- 接口们 us.getClass().getInterfaces();
- InvocationHandler回调接口
2、invoke回调方法,包含三个参数:
- proxy:被代理的对象
- method: 被代理的对象中的所有的方法对象
- args:被代理的对象中的所有的方法对象的参数列表
第二种(使用Spring里面的一个API对象Enhancer)
package com.qfedu.aop02;

import java.lang.reflect.Method;

import org.springframework.cglib.proxy.Enhancer;
import org.springframework.cglib.proxy.MethodInterceptor;
import org.springframework.cglib.proxy.MethodProxy;

public class UserServiceFactory {

	public static IUserService getUserService(){
		Enhancer eh = new Enhancer();

		eh.setSuperclass(IUserService.class);

		IUserService us = new UserServiceImpl();

		MyAspect ma = new MyAspect();

		eh.setCallback(new MethodInterceptor() {

			@Override
			public Object intercept(Object arg0, Method arg1, Object[] arg2, MethodProxy arg3) throws Throwable {

				ma.before();

				Object obj = arg1.invoke(us, arg2);

				ma.after();

				return obj;
			}
		});

		return (IUserService)eh.create();
	}
}
- 创建Enhancer增项类对象
- 设置增强类对象的superClass
- 设置Enhancer增强类对象的回调
- 通过Enhancer对象的create()方法得到指定的对象
第三种:
package Aop03;
import org.aopalliance.intercept.MethodInterceptor;
import org.aopalliance.intercept.MethodInvocation;

public class Aspect3 implements MethodInterceptor {

    public void before(){
        System.out.println("开始");
    }

    public void after(){
        System.out.println("结束");
    }


    public Object invoke(MethodInvocation methodInvocation) throws Throwable {
        before();
        Object object = methodInvocation.proceed();
        after();
        return object;
    }
}
<?xml version="1.0" encoding="UTF-8"?>
<beans xmlns="http://www.springframework.org/schema/beans"
       xmlns:xsi="http://www.w3.org/2001/XMLSchema-instance"
       xsi:schemaLocation="http://www.springframework.org/schema/beans http://www.springframework.org/schema/beans/spring-beans.xsd">

    <bean id="us" class="Aop03.UserServiceImple3" />
    <bean id="ma" class="Aop03.Aspect3" />

    <!--
        ProxyFactoryBean代理的是FactoryBean,我们现在要做的事情是对于us实现代理
            该对象中包含了四个属性:
                target:目标对象,哪个对象将被以代理的方式创建
                interfaces:接口对象列表,注意使用的是value
                <list>
                    <value>com.qfedu.aop03.IUserService</value>
                    <value>com.qfedu.aop03.IUserService</value>
                    <value>com.qfedu.aop03.IUserService</value>
                </list>
                interceptorNames:拦截对象的名称,自定义的MyAspect类,实现了aopallianceb包下的MethodInterceptor接口,使用的是value
                optimize:boolean类型的值:
                    true:强制使用cglib的动态代理方式
                    false:使用JDK自带的动态代理方式

                    cglib:code generation library:代码生成仓库,效率相对于JDK的方式要更高一些
     -->
    <bean id="proxy" class="org.springframework.aop.framework.ProxyFactoryBean">
        <property name="target" ref="us" />
        <property name="interfaces" value="Aop03.UserService3" />
        <property name="interceptorNames" value="ma" />
        <property name="optimize" value="true"></property>
    </bean>
</beans>
    public  void test3(){
        ApplicationContext applicationContext = new ClassPathXmlApplicationContext("Aop03Bean.xml");
        UserService3 userService3 = applicationContext.getBean("proxy",UserService3.class);
        userService3.getAll();

    }
第四种
<?xml version="1.0" encoding="UTF-8"?>
<beans xmlns="http://www.springframework.org/schema/beans"
       xmlns:xsi="http://www.w3.org/2001/XMLSchema-instance"
       xmlns:aop="http://www.springframework.org/schema/aop"
       xsi:schemaLocation="http://www.springframework.org/schema/beans http://www.springframework.org/schema/beans/spring-beans.xsd
		http://www.springframework.org/schema/aop http://www.springframework.org/schema/aop/spring-aop-4.3.xsd">

    <bean id="user" class="Aop04.UserServiceImple4"/>
    <bean id="aspect" class="Aop04.Aspect4"/>

    <aop:config proxy-target-class="true">
    <aop:pointcut id="mpt" expression="(execution(java.util.List Aop04.*.*(..)) or execution(boolean Aop04.*.*(..)))"/>
        <aop:advisor advice-ref="aspect" pointcut-ref="mpt"/>
    </aop:config>
</beans>
package Aop04;
import org.aopalliance.intercept.MethodInterceptor;
import org.aopalliance.intercept.MethodInvocation;

public class Aspect4 implements MethodInterceptor {

    public void before(){
        System.out.println("开始");
    }

    public void after(){
        System.out.println("结束");
    }


    public Object invoke(MethodInvocation methodInvocation) throws Throwable {
        before();
        Object object = methodInvocation.proceed();
        after();
        return object;
    }
}
proxy-target-class设置为true,强制使用cglib动态代理方式
第五种
<?xml version="1.0" encoding="UTF-8"?>
<beans xmlns="http://www.springframework.org/schema/beans"
	xmlns:xsi="http://www.w3.org/2001/XMLSchema-instance"
	xmlns:aop="http://www.springframework.org/schema/aop"
	xsi:schemaLocation="http://www.springframework.org/schema/beans http://www.springframework.org/schema/beans/spring-beans.xsd
		http://www.springframework.org/schema/aop http://www.springframework.org/schema/aop/spring-aop-4.3.xsd">

	<bean id="us" class="com.qfedu.aop05.UserServiceImpl" />
	<bean id="ma" class="com.qfedu.aop05.MyAspect"></bean>

	<aop:config proxy-target-class="true">
		<aop:aspect ref="ma">
			<aop:pointcut expression="execution(* com.qfedu.aop05.*.*(..))" id="mpt"/>

			<!--
				method对应的都是ma所对应的切面类的方法名
			 -->
			<aop:before method="myBefore" pointcut-ref="mpt"/>
			<aop:after method="myAfter" pointcut-ref="mpt" />
			<aop:around method="myAround" pointcut-ref="mpt"/>
			<aop:after-returning method="myReturn" pointcut-ref="mpt" returning="obj"/>
			<aop:after-throwing method="myThrow" pointcut-ref="mpt" throwing="e"/>
		</aop:aspect>
	</aop:config>
</beans>
package com.qfedu.aop05;

import org.aspectj.lang.JoinPoint;
import org.aspectj.lang.ProceedingJoinPoint;

/**
 * 	五种通知方式:
 * 		1.	前置通知:在业务方法之前执行
 * 		2.	后置通知: 在业务方法之后执行
 * 		3.	环绕通知:同时在业务方法的前后执行
 * 		4.	带有返回值的通知:可以拿到业务方法的返回值
 * 		5.	带有异常抛出的通知:可以捕获业务方法的异常对象
 *
 * 	如果同时配置的所有通知方式:
 * 	before-around before - 业务方法 -after return - around after - after
 * @author james
 *
 */
public class MyAspect {

	public void myBefore(JoinPoint jp){

//		System.out.println("args:" + Arrays.toString(jp.getArgs()));
//		System.out.println(jp.toString());
//		System.out.println(jp.getTarget());
		System.out.println("this is before");
	}

	public void myAfter(){
		System.out.println("this is after");
	}

	public Object myAround(ProceedingJoinPoint pjp){
		try {
			System.out.println("this is around before");
			Object objs = pjp.proceed();
			System.out.println("this is around after");

			return objs;
		} catch (Throwable e) {
			e.printStackTrace();
		}

		return null;
	}

	public void myReturn(JoinPoint jp, Object obj){
		System.out.println("this is after returning " + obj);
	}

	public void myThrow(JoinPoint jp, Throwable e){
		System.out.println("this is after thrown " + e.getMessage());
	}
}
package com.qfedu.aop06;

import org.aspectj.lang.JoinPoint;
import org.aspectj.lang.ProceedingJoinPoint;
import org.aspectj.lang.annotation.After;
import org.aspectj.lang.annotation.AfterReturning;
import org.aspectj.lang.annotation.AfterThrowing;
import org.aspectj.lang.annotation.Around;
import org.aspectj.lang.annotation.Aspect;
import org.aspectj.lang.annotation.Before;
import org.aspectj.lang.annotation.Pointcut;
import org.springframework.stereotype.Component;

@Component		//	标注当前类为一个组件类
@Aspect			//	标注当前类为一个切面类
public class MyAspect {

	@Pointcut(value="execution(* com.qfedu.aop06.*.*(..))")
	public void all(){}

	@Before("all()")
	public void myBefore(){
		System.out.println("this is before");
	}

	@After("all()")
	public void myAfter(){
		System.out.println("this is after");
	}

	@Around("all()")
	public Object myAround(ProceedingJoinPoint pjp){
		try {

			System.out.println("this is around before");

			Object obj = pjp.proceed();

			System.out.println("this is around after");

			return obj;
		} catch (Throwable e) {
			e.printStackTrace();
		}
		return null;
	}

	@AfterReturning(value="all()", returning="obj")
	public void myAfterReturn(JoinPoint jp, Object obj){
		System.out.println("this is after retruning " + obj);
	}

	@AfterThrowing(value="all()", throwing="e")
	public void myAfterThrowing(JoinPoint jp, Throwable e){
		System.out.println("this is after throwing " + e.getMessage());
	}
}
package com.qfedu.aop06;

import java.util.ArrayList;
import java.util.List;

import org.springframework.stereotype.Component;

@Component("us")
public class UserServiceImpl implements IUserService {

	@Override
	public List<User> getAllUsers() {
		System.out.println("this is get all user method");
		return new ArrayList<>();
	}

	@Override
	public boolean saveUser(User u) {
		System.out.println("this is saveUser method");
		return false;
	}

	@Override
	public boolean deleteUser(int uid) {
		System.out.println("this is deleteUser method");
		System.out.println(1 / 0);
		return true;
	}

}
<?xml version="1.0" encoding="UTF-8"?>
<beans xmlns="http://www.springframework.org/schema/beans"
	xmlns:xsi="http://www.w3.org/2001/XMLSchema-instance"
	xmlns:aop="http://www.springframework.org/schema/aop"
	xmlns:context="http://www.springframework.org/schema/context"
	xsi:schemaLocation="http://www.springframework.org/schema/beans http://www.springframework.org/schema/beans/spring-beans.xsd
		http://www.springframework.org/schema/context http://www.springframework.org/schema/context/spring-context-4.3.xsd
		http://www.springframework.org/schema/aop http://www.springframework.org/schema/aop/spring-aop-4.3.xsd">

	<!--
		context:component-scan:组件扫描
			base-package:指定该包下的所有类将被自动扫描而实现自动代理
	 -->
	<context:component-scan base-package="com.qfedu.aop06"></context:component-scan>

	<!-- aop:aspectj-autoproxy标签可以实现自动代理 -->
	<aop:aspectj-autoproxy />
</beans>