| 分布式微服务认证授权参考: |
|---|
文章目录
| 本文章介绍session,jsp的spring mvc模式 和单体spring boot |
|---|
| 最后才会进入到分布式spring security,请选择性观看 |
| SpringSecurity |
|---|
| Spirng全家桶之一 |
| 主要用来认证和授权的框架,目前基于认证和授权衍生出多种功能,比如安全认证和权限控制等 |
| 认证 |
|---|
| 判断用户身份是否合法,不合法拒绝访问,常见认证有用户名密码,二维码,手机短信,指纹认证登陆等 |
| 会话 |
|---|
| 认证通过后,为了避免用户每次操作都重复认证,所以将认证信息保存在一次会话中,这样就无需重复做登陆认证操作 |
| 常见方式有session,token方式 |
| 授权 |
|---|
| 用户通过认证后,即可获得一个角色,不同角色有不同的权限,比如root用户认证通过获得权限是BOOS,那么他可以访问所有菜单列表,所有功能 |
| 然后另一个用户认证通过后获得员工的角色,那么他只能访问部分功能菜单,比如报表总结,签到 |
| Session认证 |
|---|
一、认证流程
	用户认证成功后,后台将用户数据保存到session中,然后每个session都有一个session_id,
	后台保存完数据后会将session_id返回给前端,前端将session_id存放到cookie中
	,这样前端每次请求都带上session_id,后端通过前端传过来的session_id查询数据,能查到
	就说明认证依旧合法不用二次登陆认证,当用户退出或者超过一个我们特定的时限,后台就会将session销毁
	,此时前端session_id就无法再次认证合法了。
二、servlet实现的SessionApi
	基于Session的认证机制有Servlet规范定制,Servlet容器已经实现,用户通过HttpSession的操作方式即可实现
	相关API如下:
		HttpSession getSession(Boolean create)
			获取当前HttpSession对象
		void setAttribute(String name,Object value)
			向session中存放对象
		Object getAttribute(String name)
			从session中获取对象
		void removeAttribute(String name)
			移除session中对象
		void invalidate()
			是HttpSession失效
一、Session认证(基于servlet3.0的spring MVC,只想学习前后端分离Spring Boot微服务架构认证的请跳过)
1、环境搭建
1、pom依赖
<packaging>war</packaging>
    <properties>
        <project.build.sourceEncoding>UTF-8</project.build.sourceEncoding>
        <maven.compiler.source>1.8</maven.compiler.source>
        <maven.compiler.target>1.8</maven.compiler.target>
    </properties>
    <dependencies>
        <dependency>
            <groupId>org.springframework</groupId>
            <artifactId>spring-webmvc</artifactId>
            <version>5.1.5.RELEASE</version>
        </dependency>

        <dependency>
            <groupId>javax.servlet</groupId>
            <artifactId>javax.servlet-api</artifactId>
            <version>3.0.1</version>
            <scope>provided</scope>
        </dependency>
        <dependency>
            <groupId>org.projectlombok</groupId>
            <artifactId>lombok</artifactId>
            <version>1.18.8</version>
        </dependency>
    </dependencies>
    <build>
        <finalName>security-springmvc</finalName>
        <pluginManagement>
            <plugins>
                <plugin>
                    <groupId>org.apache.tomcat.maven</groupId>
                    <artifactId>tomcat7-maven-plugin</artifactId>
                    <version>2.2</version>
                </plugin>
                <plugin>
                    <groupId>org.apache.maven.plugins</groupId>
                    <artifactId>maven-compiler-plugin</artifactId>
                    <configuration>
                        <source>1.8</source>
                        <target>1.8</target>
                    </configuration>
                </plugin>

                <plugin>
                    <artifactId>maven-resources-plugin</artifactId>
                    <configuration>
                        <encoding>utf-8</encoding>
                        <useDefaultDelimiters>true</useDefaultDelimiters>
                        <resources>
                            <resource>
                                <directory>src/main/resources</directory>
                                <filtering>true</filtering>
                                <includes>
                                    <include>**/*</include>
                                </includes>
                            </resource>
                            <resource>
                                <directory>src/main/java</directory>
                                <includes>
                                    <include>**/*.xml</include>
                                </includes>
                            </resource>
                        </resources>
                    </configuration>
                </plugin>
            </plugins>
        </pluginManagement>
    </build>

2、配置类

| spring 配置类 |
|---|
package com.yzpnb.config;

import org.springframework.context.annotation.ComponentScan;
import org.springframework.context.annotation.Configuration;
import org.springframework.context.annotation.FilterType;
import org.springframework.stereotype.Controller;

@Configuration//告诉spring这个是一个配置类
@ComponentScan(basePackages = "com.yzpnb",//配置自动扫描,但不扫描Controller,因为Controller单独用mvc扫描
        excludeFilters = {@ComponentScan.Filter(type = FilterType.ANNOTATION,value = Controller.class)})
                                                //排除的类型是注解,Controller
public class ApplicationConfig {//在此类中配置Controller以外的bean实例,这时java配置,不使用xml文件

}

| MVC配置类 |
|---|
package com.yzpnb.config;

import org.springframework.context.annotation.Bean;
import org.springframework.context.annotation.ComponentScan;
import org.springframework.context.annotation.Configuration;
import org.springframework.context.annotation.FilterType;
import org.springframework.stereotype.Controller;
import org.springframework.web.servlet.config.annotation.EnableWebMvc;
import org.springframework.web.servlet.config.annotation.WebMvcConfigurer;
import org.springframework.web.servlet.view.InternalResourceViewResolver;

@Configuration//告诉spring这个类是配置类
@EnableWebMvc//开启web Mvc
@ComponentScan(basePackages = "com.yzpnb",//配置自动扫描包,但是排除Controller以外的包,因为这个是mvc配置,只扫描Controller
                excludeFilters = {@ComponentScan.Filter(type = FilterType.ANNOTATION,value= Controller.class)})
                //排除Controller以外的类
public class webMvcConfig implements WebMvcConfigurer {//配置MVC 前端控制器
    /**
     * 视图解析器
     */
    @Bean
    public InternalResourceViewResolver viewResolver(){
        InternalResourceViewResolver viewResolver=new InternalResourceViewResolver();
        viewResolver.setPrefix("/WEB-INF/view/");
        viewResolver.setSuffix(".jsp");
        return viewResolver;
    }
    /**
     * 重写方法,添加一个视图
     * @param registry
     */
    @Override
    public void addViewControllers(ViewControllerRegistry registry) {
        registry.addViewController("/").setViewName("index");
    }
}

3、加载Spring容器
package com.yzpnb.init;

import com.yzpnb.config.ApplicationConfig;
import com.yzpnb.config.WebMvcConfig;
import org.springframework.web.servlet.support.AbstractAnnotationConfigDispatcherServletInitializer;

public class SpringApplicationInitializer extends
        AbstractAnnotationConfigDispatcherServletInitializer {
        //继承这个类,此类实现WebApplicationInitializer接口,
        //Spring容器启动时加载WebApplicationInitializer接口的所有实现类。

    /**
     * spirng容器的配置类,转换成xml方式就是加载applicationContext.xml
     */
    @Override
    protected Class<?>[] getRootConfigClasses() {
        return new Class[]{ApplicationConfig.class};//加载对应spring的配置类
    }

    /**
     * servletContext,相当于加载springMvc.xml
     * @return
     */
    @Override
    protected Class<?>[] getServletConfigClasses() {
        return new Class[]{WebMvcConfig.class};//加载对应springMVC配置类
    }

    /**
     * url-mapping,指定url路径配置
     * @return
     */
    @Override
    protected String[] getServletMappings() {
        return new String[]{"/"};//指定为根路径
    }
}

4、配置maven命令启动项目


    <form action="login" method="post">
        用户名:<input type="text" name="username"/><br/>
        密码:<input type="password" name="password"/><br/>
        <input type="submit" value="登陆"/>
    </form>


2、认证
1、实体类
| 用户身份信息 |
|---|
package com.yzpnb.entity;

import lombok.Data;

@Data
@AllArgsConstructor//生成有参构造
public class User {//用户身份信息
	private String id;//用户id
    private String username;//用户名
    private String password;//密码
    private String email;//邮箱
}

| 认证请求详细 |
|---|
package com.yzpnb.entity;

import lombok.Data;

/**
 * 用户认证请求实体类
 */
@Data
public class AuthenticationRequest {
    private String username;//用户名

    private String password;//密码
}

2、编写认证service接口
package com.yzpnb.service;

import com.yzpnb.entity.AuthenticationRequest;
import com.yzpnb.entity.User;

public interface AuthenticationService  {

    /**
     * 用户认证
     * @param authenticationRequest 用户认证请求,账号和密码
     * @return认证成功的用户信息
     */
    User authentication(AuthenticationRequest authenticationRequest);
}

3、service实现类
package com.yzpnb.service.impl;

import com.yzpnb.entity.AuthenticationRequest;
import com.yzpnb.entity.User;
import com.yzpnb.service.AuthenticationService;
import org.springframework.util.StringUtils;

import java.util.HashMap;
import java.util.Map;

public class AuthenticationServiceImpl implements AuthenticationService {
    /**
     * 模拟用户认证(用假数据,不连接数据库),校验用户身份信息合法性
     * @param authenticationRequest 用户认证请求,账号和密码
     * @return
     */
    @Override
    public User authentication(AuthenticationRequest authenticationRequest) {
        /*1、校验参数是否为空*/
        if(authenticationRequest==null
                || StringUtils.isEmpty(authenticationRequest.getUsername())
                || StringUtils.isEmpty(authenticationRequest.getPassword())
        ){
            throw new RuntimeException("账号和密码不能为空");
        }

        /*2、根据账号查询数据库(使用假数据模拟,就是下面的静态代码块)*/
        String username=authenticationRequest.getUsername();
        String password=authenticationRequest.getPassword();
        if(username!=userMap.get("张三").getUsername()
           ||username!=userMap.get("李四").getUsername()){
            throw new RuntimeException("此账号没有注册");
        }
        /*3、校验密码*/
        if(!password.equals("123456")){
            throw new RuntimeException("密码错误");
        }
        /*4、走到这一步,表示验证通过,返回用户数据*/
        return userMap.get(username);
    }

    /**
     * 静态代码块,生成假数据
     */
    private Map<String ,User> userMap=new HashMap<>();//新建一个Map集合存储假数据
    {//静态代码块
        userMap.put("张三",new User("1","张三","123456","[email protected]"));
        userMap.put("李四",new User("2","李四","123456","[email protected]"));
    }
}

3、Controller
package com.yzpnb.controller;

import com.yzpnb.entity.AuthenticationRequest;
import com.yzpnb.entity.User;
import com.yzpnb.service.AuthenticationService;
import org.springframework.beans.factory.annotation.Autowired;
import org.springframework.web.bind.annotation.*;

@RestController
public class SecurityController {

    @Autowired
    private AuthenticationService authenticationService;

    @PostMapping(value="login")
    public User login(@RequestBody AuthenticationRequest authenticationRequest){
        return authenticationService.authentication(authenticationRequest);
    }

}


| session到这里就结束了,因为本章主要讲解springSecurity,session说白了就是手写后台逻辑代码,servletApi已经帮我们封装好了session操作 |
|---|
| 对session感兴趣参考:https://www.bilibili.com/video/BV1VE411h7aL |
二、Spring boot 整合 spring Security
1、环境搭建
1、pom.xml 依赖
<?xml version="1.0" encoding="UTF-8"?>
<project xmlns="http://maven.apache.org/POM/4.0.0"
         xmlns:xsi="http://www.w3.org/2001/XMLSchema-instance"
         xsi:schemaLocation="http://maven.apache.org/POM/4.0.0 http://maven.apache.org/xsd/maven-4.0.0.xsd">
    <modelVersion>4.0.0</modelVersion>

    <groupId>com.yzpnb</groupId>
    <artifactId>spring-security</artifactId>
    <version>1.0-SNAPSHOT</version>
    <!--spring boot 父工程-->
    <parent>
        <groupId>org.springframework.boot</groupId>
        <artifactId>spring-boot-starter-parent</artifactId>
        <version>2.1.3.RELEASE</version>
    </parent>

    <properties>
        <project.build.sourceEncoding>UTF-8</project.build.sourceEncoding>
        <maven.compiler.source>1.8</maven.compiler.source>
        <maven.compiler.target>1.8</maven.compiler.target>
    </properties>

    <dependencies>
        <!--spring boot web-->
        <dependency>
            <groupId>org.springframework.boot</groupId>
            <artifactId>spring-boot-starter-web</artifactId>
        </dependency>
        <!--srping boot 整合 security包-->
        <dependency>
            <groupId>org.springframework.boot</groupId>
            <artifactId>spring-boot-starter-security</artifactId>
        </dependency>
        <!--jsp的servlet依赖-->
        <dependency>
            <groupId>javax.servlet</groupId>
            <artifactId>javax.servlet-api</artifactId>
            <scope>provided</scope>
        </dependency>
        <!--Jstl标签-->
        <dependency>
            <groupId>javax.servlet</groupId>
            <artifactId>jstl</artifactId>
        </dependency>
        <!--编译jsp-->
        <dependency>
            <groupId>org.apache.tomcat.embed</groupId>
            <artifactId>tomcat-embed-jasper</artifactId>
        </dependency>
        <!--lombok-->
        <dependency>
            <groupId>org.projectlombok</groupId>
            <artifactId>lombok</artifactId>
            <version>1.18.8</version>
        </dependency>
    </dependencies>
    <build>
        <finalName>security-springmvc</finalName>
        <pluginManagement>
            <plugins>
                <plugin>
                    <groupId>org.apache.tomcat.maven</groupId>
                    <artifactId>tomcat7-maven-plugin</artifactId>
                    <version>2.2</version>
                </plugin>
                <plugin>
                    <groupId>org.apache.maven.plugins</groupId>
                    <artifactId>maven-compiler-plugin</artifactId>
                    <configuration>
                        <source>1.8</source>
                        <target>1.8</target>
                    </configuration>
                </plugin>

                <plugin>
                    <artifactId>maven-resources-plugin</artifactId>
                    <configuration>
                        <encoding>utf-8</encoding>
                        <useDefaultDelimiters>true</useDefaultDelimiters>
                        <resources>
                            <resource>
                                <directory>src/main/resources</directory>
                                <filtering>true</filtering>
                                <includes>
                                    <include>**/*</include>
                                </includes>
                            </resource>
                            <resource>
                                <directory>src/main/java</directory>
                                <includes>
                                    <include>**/*.xml</include>
                                </includes>
                            </resource>
                        </resources>
                    </configuration>
                </plugin>
            </plugins>
        </pluginManagement>
    </build>
</project>

2、application.yaml
server:
  port: 8080 #端口
  servlet:
    context-path: /spring-security #url路径
spring:
  application:
    name: spring-security #微服务名字
  mvc:
    view:
      prefix: /WEB-INF/views/
      suffix: .jsp #MVC视图解析器
3、启动类
package com.yzpnb;

import org.springframework.boot.SpringApplication;
import org.springframework.boot.autoconfigure.SpringBootApplication;

@SpringBootApplication
public class Application {
    public static void main(String[] args) {
        SpringApplication.run(Application.class,args);
    }
}

4、配置类
| MVC配置 |
|---|
package com.yzpnb.config;

import org.springframework.context.annotation.Configuration;
import org.springframework.web.servlet.config.annotation.ViewControllerRegistry;
import org.springframework.web.servlet.config.annotation.WebMvcConfigurer;

@Configuration//告诉spring boot这是一个配置类
public class WebConfig implements WebMvcConfigurer {
    //配置重定向.由spring security的默认url路径跳转到/login
    @Override
    public void addViewControllers(ViewControllerRegistry registry) {
        registry.addViewController("/").setViewName("redirect:/login");//此重定向会定到security默认提供的登陆页面
    }
}

5、启动微服务测试

2、理论(引用黑马的笔记)
1、工作原理
| 结构 |
|---|
Spring Security所解决的问题就是安全访问控制,而安全访问控制功能其实就是对所有进入系统的请求进行拦截, 校验每个请求是否能够访问它所期望的资源。根据前边知识的学习,可以通过Filter或AOP等技术来实现,Spring Security对Web资源的保护是靠Filter实现的,所以从这个Filter来入手,逐步深入Spring Security原理。
当初始化Spring Security时,会创建一个名为 SpringSecurityFilterChain 的Servlet过滤器,类型为 org.springframework.security.web.FilterChainProxy,它实现了javax.servlet.Filter,因此外部的请求会经过此 类,下图是Spring Security过虑器链结构图:

FilterChainProxy是一个代理,真正起作用的是FilterChainProxy中SecurityFilterChain所包含的各个Filter,同时 这些Filter作为Bean被Spring管理,它们是Spring Security核心,各有各的职责,但他们并不直接处理用户的认证,也不直接处理用户的授权,而是把它们交给了认证管理器(AuthenticationManager)和决策管理器 (AccessDecisionManager)进行处理,下图是FilterChainProxy相关类的UML图示。

下面介绍过滤器链中主要的几个过滤器及其作用:
SecurityContextPersistenceFilter 这个Filter是整个拦截过程的入口和出口(也就是第一个和最后一个拦截 器),会在请求开始时从配置好的 SecurityContextRepository 中获取 SecurityContext,然后把它设置给 SecurityContextHolder。在请求完成后将 SecurityContextHolder 持有的 SecurityContext 再保存到配置好 的 SecurityContextRepository,同时清除 securityContextHolder 所持有的 SecurityContext;
UsernamePasswordAuthenticationFilter 用于处理来自表单提交的认证。该表单必须提供对应的用户名和密 码,其内部还有登录成功或失败后进行处理的 AuthenticationSuccessHandler 和 AuthenticationFailureHandler,这些都可以根据需求做相关改变;
FilterSecurityInterceptor 是用于保护web资源的,使用AccessDecisionManager对当前用户进行授权访问,前 面已经详细介绍过了;
ExceptionTranslationFilter 能够捕获来自 FilterChain所有的异常,并进行处理。但是它只会处理两类异常: AuthenticationException 和 AccessDeniedException,其它的异常它会继续抛出。
| 总结就是,spring security通过一系列过滤器链来拦截请求 |
|---|
开头有个守门员SecurityContextPersistenceFilter,结尾它也管 |
| 请求拦截过滤的两个c位 |
UsernamePasswordAuthenticationFilter:用户认证 |
FilterSecurityInterceptor:用户授权 |
| 但是真正最后工作的是 |
AccessDecisionManager:授权器 |
AuthenticationManager:认证器 |
2、认证流程


| UserDetailsService |
|---|


| PasswordEncoder |
|---|


3、授权流程


3、自定义认证
1、自定义登陆页面
<%--
  Created by IntelliJ IDEA.
  User: dell
  Date: 2020/7/19
  Time: 8:46
  To change this template use File | Settings | File Templates.
--%>
<%@ page contentType="text/html;charset=UTF-8" language="java" %>
<html>
<head>
    <title>Title</title>
</head>
<body>
    <form action="login" method="post" >
        <input type="text" name="username" placeholder="请输入用户名"><br/>
        <input type="password" name="password" placeholder="请输入密码"><br/>
        <input type="submit" value="登陆" placeholder="请输入密码"><br/>
    </form>
</body>
</html>

2、Controller
package com.yzpnb.controller;

import org.springframework.web.bind.annotation.GetMapping;
import org.springframework.web.bind.annotation.PostMapping;
import org.springframework.web.bind.annotation.RestController;

@RestController
public class SecurityController {

    @PostMapping(value = "/login-success")
    public String loginSuccess(){
        return "登陆成功";
    }

    /**
     * 以下两个是权限的两个测试资源
     */
    @GetMapping(value = "/r/r1")
    public String r1(){
        return "访问资源1";
    }
    @GetMapping(value = "/r/r2")
    public String r2(){
        return "访问资源2";
    }
}

3、配置url
package com.yzpnb.config;

import org.springframework.context.annotation.Configuration;
import org.springframework.web.servlet.config.annotation.ViewControllerRegistry;
import org.springframework.web.servlet.config.annotation.WebMvcConfigurer;

@Configuration//告诉spring boot这是一个配置类
public class WebConfig implements WebMvcConfigurer {

    //配置重定向.由spring security的默认url路径跳转到/login
    @Override
    public void addViewControllers(ViewControllerRegistry registry) {
        //这里原来是redirect:/login这个url是security默认url,那么我们想要改变就要重新指定,这里指定/login-view
        registry.addViewController("/").setViewName("redirect:/login-view");
        //这里/login-view不存在,肯定找不到,所以我们需要配置一下,指定其路径
        registry.addViewController("/login-view").setViewName("login");
    }
}

4、安全配置
package com.yzpnb.config;

import org.springframework.context.annotation.Bean;
import org.springframework.context.annotation.Configuration;
import org.springframework.security.config.annotation.web.builders.HttpSecurity;
import org.springframework.security.config.annotation.web.configuration.WebSecurityConfigurerAdapter;
import org.springframework.security.core.userdetails.User;
import org.springframework.security.core.userdetails.UserDetailsService;
import org.springframework.security.crypto.password.NoOpPasswordEncoder;
import org.springframework.security.crypto.password.PasswordEncoder;
import org.springframework.security.provisioning.InMemoryUserDetailsManager;

@Configuration//告诉spring boot 这是一个配置类
public class WebSecurityConfig extends WebSecurityConfigurerAdapter {
    //定义用户信息服务(查询用户信息)
    @Bean
    public UserDetailsService userDetailsService(){//理论篇讲过UserDetailsService的作用
        //因为是初学,这里就用一个基于内存方式认证
        InMemoryUserDetailsManager inMemoryUserDetailsManager = new InMemoryUserDetailsManager();
        //创建一个用户,用户名张三,密码123,权限为p1
        inMemoryUserDetailsManager.createUser(User.withUsername("张三").password("123").authorities("p1").build());
        //李四,权限为p2
        inMemoryUserDetailsManager.createUser(User.withUsername("李四").password("123").authorities("p2").build());
        /**
         * 注意上面两个用户是我们人为制作的,实际开发中,我们会通过数据库查询来获得用户数据
         * 上面两个是假数据,我们待会登陆时使用这两个账号可以登陆成功
         */
        return inMemoryUserDetailsManager;
    }
    //密码编码器
    @Bean
    public PasswordEncoder passwordEncoder(){
        return NoOpPasswordEncoder.getInstance();//因为初学,这里使用一种已经淘汰了的,不对密码进行加密的编码器
        //NoOpPasswordEncoder编码器是将密码原字符串进行比对的编码方式,就是不编码,用原本的
    }

    /**
     * 安全拦截机制
     */
    @Override
    protected void configure(HttpSecurity http) throws Exception {
        http.csrf().disable()//屏蔽csrf,就是spring security为了安全默认屏蔽了跨站请求,我们将这个屏蔽功能关掉
                .authorizeRequests()
                .antMatchers("/r/**").authenticated()//所有/r/**的请求都必须认证通过
                .anyRequest().permitAll()//除了/r/**以外,其他的请求可以访问
                .and()
                .formLogin()//运许使用form表单登陆
                .loginPage("/login-view")//自定义的登陆页面
                .loginProcessingUrl("/login")
                .successForwardUrl("/login-success");//自定义登陆成功的页面地址
    }
}

5、测试


6、总结


4、数据库认证
1、建立数据库
一、数据库
CREATE DATABASE `user_db` CHARACTER SET 'utf8' COLLATE 'utf8_general_ci';
二、表
CREATE TABLE `t_user` (
	`id` BIGINT ( 20 ) NOT NULL COMMENT '用户id',
	`username` VARCHAR ( 64 ) NOT NULL,
	`password` VARCHAR ( 64 ) NOT NULL,
	`fullname` VARCHAR ( 255 ) NOT NULL COMMENT '用户姓名',
	`mobile` VARCHAR ( 11 ) DEFAULT NULL COMMENT '手机号',
PRIMARY KEY ( `id` ) USING BTREE
) ENGINE = INNODB DEFAULT CHARSET = utf8 ROW_FORMAT = DYNAMIC

2、配置数据源,引入相关依赖
<!--mysql-->
<dependency>
     <groupId>mysql</groupId>
     <artifactId>mysql-connector-java</artifactId>
     <version>8.0.21</version>
 </dependency>
 <!--spring boot jdbc-->
 <dependency>
     <groupId>org.springframework.boot</groupId>
     <artifactId>spring-boot-starter-jdbc</artifactId>
 </dependency>

server:
  port: 8080 #端口
  servlet:
    context-path: /spring-security #url路径
spring:
  application:
    name: spring-security #微服务名字
  datasource: #数据源
    url: jdbc:mysql://localhost:3306/user_db?serverTimeZone=Asia/Shanghai&useUnicode=true&characterEncoding=utf-8&useSSL=false&allowPublicKeyRetrieval=true
    username: root
    password: 123456
    driver-class-name: com.mysql.cj.jdbc.Driver
  mvc:
    view:
      prefix: /WEB-INF/views/
      suffix: .jsp #MVC视图解析器

3、实体类
package com.yzpnb.entity;

import lombok.Data;

@Data
public class TUser {
    private String id;
    private String username;
    private String password;
    private String fullname;
    private String mobile;
}
4、mapper
package com.yzpnb.mapper;

import com.yzpnb.entity.TUser;
import org.springframework.beans.factory.annotation.Autowired;
import org.springframework.jdbc.core.BeanPropertyRowMapper;
import org.springframework.jdbc.core.JdbcTemplate;

import java.util.*;
@Repository
public class TUserMapper {
    @Autowired
    JdbcTemplate jdbcTemplate;

    /**
     * 根据用户名查找用户信息
     * @param username 用户名
     * @return 用户实体对象
     */
    public TUser selectTUserByUsername(String username){
        String sql="select id,username,password,fullname from t_user where username = ?";
        List<TUser> list = jdbcTemplate.query(sql, new Object[]{username}, new BeanPropertyRowMapper<>(TUser.class));
        if(list == null && list.size() <= 0)
        {
            return null;
        }
        return list.get(0);
    }
}

5、service
package com.yzpnb.service;

import com.yzpnb.entity.TUser;
import com.yzpnb.mapper.TUserMapper;
import org.springframework.beans.factory.annotation.Autowired;
import org.springframework.security.core.userdetails.User;
import org.springframework.security.core.userdetails.UserDetails;
import org.springframework.security.core.userdetails.UserDetailsService;
import org.springframework.security.core.userdetails.UsernameNotFoundException;

@Service
public class TUserServiceImpl implements UserDetailsService {

    @Autowired
    private TUserMapper tUserMapper;

    /**
     * 重写方法,根据账号查询用户信息
     * @param username
     * @return
     * @throws UsernameNotFoundException
     */
    @Override
    public UserDetails loadUserByUsername(String username) throws UsernameNotFoundException {
        /*调用mapper查询用户信息*/
        TUser tUser = tUserMapper.selectTUserByUsername(username);
        if(tUser == null){//如果为空则表示没有此用户
            return null;//这里不用我们抛异常,由provider来抛异常,具体看理论篇
        }
        //返回UserDetails对象,用户名密码使用查询到的,权限因为还没有做,所以继续写死用p1
        UserDetails userDetails = User.withUsername(tUser.getUsername()).password(tUser.getPassword()).authorities("p1").build();
        return userDetails;
    }
}

6、测试


5、会话
| 用户认证通过后,为了避免用户的每次操作都进行认证可将用户的信息保存在会话中。spring security提供会话管 理,认证通过后将身份信息放入SecurityContextHolder上下文,SecurityContext与当前线程进行绑定,方便获取 用户身份。 |
|---|
1、获取认证成功用户信息
1、编写Controller,获取用户名
package com.yzpnb.controller;
import org.springframework.security.core.Authentication;
import org.springframework.security.core.context.SecurityContextHolder;
import org.springframework.security.core.userdetails.UserDetails;
import org.springframework.web.bind.annotation.GetMapping;
import org.springframework.web.bind.annotation.PostMapping;
import org.springframework.web.bind.annotation.RestController;
@RestController
public class SecurityController {
@PostMapping(value = "/login-success")
public String loginSuccess(){
return getUsername()+"登陆成功";
}
/**
* 获取用户名
*/
private String getUsername(){
String username="1";
//获取当前认证通过的用户身份信息
Authentication authentication = SecurityContextHolder.getContext().getAuthentication();
//获取用户身份
Object principal = authentication.getPrincipal();//我们可以通过认证流程理论内一节知道,authentication主要封装UserDetails
if(principal == null){//判断是否为空
username="匿名";
}
if(principal instanceof UserDetails){//判断是否为UserDetails对象
UserDetails userDetails = (UserDetails) principal;//如果是,就将其强制转换为UserDetails
username=userDetails.getUsername();//因为我们实际用户信息是封装到UserDetails中的,详细看上节数据库认证,你会发现是封装为UserDetails对象
}else{
username=principal.toString();
}
return username;
}
/**
* 以下两个是权限的两个测试资源
*/
@GetMapping(value = "/r/r1")
public String r1(){
return this.getUsername()+"访问资源1";
}
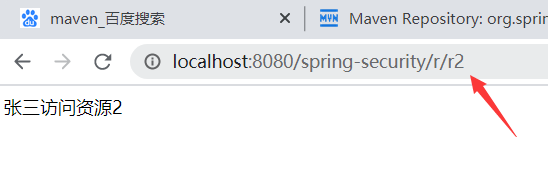
@GetMapping(value = "/r/r2")
public String r2(){
return this.getUsername()+"访问资源2";
}
}

2、测试


2、会话控制
| 我们可以通过以下选项准确控制会话何时创建以及Spring Security如何与之交互 |
|---|
| 机制 | 描述 |
|---|---|
| always | 如果没有session存在就创建一个 |
| ifRequired | 如果需要就创建一个Session(默认)登录时 |
| never | SpringSecurity将不会创建Session,但是如果应用中其他地方创建了Session,那么Spring Security将会使用它。 |
| stateless | SpringSecurity将绝对不会创建Session,也不使用Session |
 /**
     * 安全拦截机制
     */
    @Override
    protected void configure(HttpSecurity http) throws Exception {
        http.csrf().disable()//屏蔽csrf,就是spring security为了安全默认屏蔽了跨站请求,我们将这个屏蔽功能关掉
                .authorizeRequests()
                .antMatchers("/r/**").authenticated()//所有/r/**的请求都必须认证通过
                .anyRequest().permitAll()//除了/r/**以外,其他的请求可以访问
                .and()
                .formLogin()//运许使用form表单登陆
                .loginPage("/login-view")//自定义的登陆页面
                .loginProcessingUrl("/login")
                .successForwardUrl("/login-success")//自定义登陆成功的页面地址
                .and()
                .sessionManagement()
                .sessionCreationPolicy(SessionCreationPolicy.NEVER);
    }

记住将NEVER改回IF_REQUIRED,我们后面还用session

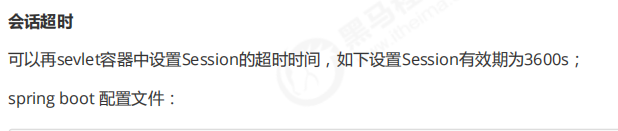
server:
	servlet:
		session:
			timeout: 3600s

http.sessionManagement()
	.expiredUrl("/login‐view?error=EXPIRED_SESSION")
	.invalidSessionUrl("/login‐view?error=INVALID_SESSION");

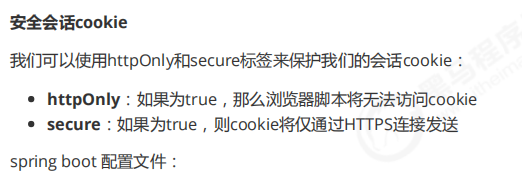
server:
	servlet:
		session:
			cookie:
				http‐only: true
				secure: true
6、自定义退出
| 和登陆一样,spring security为我们提供了默认的退出登陆页面,我们同样需要自定自己的退出页面 |
|---|
/**
 * 安全拦截机制
 */
@Override
protected void configure(HttpSecurity http) throws Exception {
    http.csrf().disable()//屏蔽csrf,就是spring security为了安全默认屏蔽了跨站请求,我们将这个屏蔽功能关掉
            .authorizeRequests()
            .antMatchers("/r/**").authenticated()//所有/r/**的请求都必须认证通过
            .anyRequest().permitAll()//除了/r/**以外,其他的请求可以访问
            .and()
            .formLogin()//运许使用form表单登陆
            .loginPage("/login-view")//自定义的登陆页面
            .loginProcessingUrl("/login")
            .successForwardUrl("/login-success")//自定义登陆成功的页面地址
            .and()
            .sessionManagement()
            .sessionCreationPolicy(SessionCreationPolicy.IF_REQUIRED)//会话控制
            .and()
            .logout()
            .logoutUrl("/logout")//设置退出的url地址
            .logoutSuccessUrl("/login-view?logout");//设置退出成功后的页面地址
}
| 上例子中退出完成会发生 |
|---|
| session无效 |
| 清除securityContextHolder |
| 跳转到/login-view?logout |


7、授权

1、搭建数据库(不要把一、角色表,二、…也复制到查询中执行哦)
一、角色表
	CREATE TABLE `t_role` (
		`id` VARCHAR ( 32 ) NOT NULL,
		`role_name` VARCHAR ( 255 ) DEFAULT NULL,
		`description` VARCHAR ( 255 ) DEFAULT NULL,
		`create_time` datetime DEFAULT NULL,
		`update_time` datetime DEFAULT NULL,
		`status` CHAR ( 1 ) NOT NULL,
		PRIMARY KEY ( `id` ),
		UNIQUE KEY `unique_role_name` ( `role_name` )
	) ENGINE = INNODB DEFAULT CHARSET = utf8;

	INSERT INTO `t_role` ( `id`, `role_name`, `description`, `create_time`, `update_time`, `status` )
	VALUES
		( '1', '管理员', NULL, NULL, NULL, '' );
二、用户角色关系表
	CREATE TABLE `t_user_role` (
		`user_id` VARCHAR ( 32 ) NOT NULL,
		`role_id` VARCHAR ( 32 ) NOT NULL,
		`create_time` datetime DEFAULT NULL,
		`creator` VARCHAR ( 255 ) DEFAULT NULL,
		PRIMARY KEY ( `user_id`, `role_id` )
	) ENGINE = INNODB DEFAULT CHARSET = utf8;

	INSERT INTO `t_user_role` ( `user_id`, `role_id`, `create_time`, `creator` )
	VALUES
		( '1', '1', NULL, NULL );
三、权限表
	CREATE TABLE `t_permission` (
		`id` VARCHAR ( 32 ) NOT NULL,
		`code` VARCHAR ( 32 ) NOT NULL COMMENT '权限标识符',
		`description` VARCHAR ( 64 ) DEFAULT NULL COMMENT '描述',
		`url` VARCHAR ( 128 ) DEFAULT NULL COMMENT '请求地址',
		PRIMARY KEY ( `id` )
	) ENGINE = INNODB DEFAULT CHARSET = utf8;
	INSERT INTO `t_permission` ( `id`, `code`, `description`, `url` )
	VALUES
		( '1', 'p1', '测试资源 1', '/r/r1' ),
		( '2', 'p3', '测试资源2', '/r/r2'  );
四、角色权限关系表
	CREATE TABLE `t_role_permission`
		( `role_id` VARCHAR ( 32 ) NOT NULL,
		`permission_id` VARCHAR ( 32 ) NOT NULL,
		PRIMARY KEY ( `role_id`, `permission_id` ) ) ENGINE = INNODB DEFAULT CHARSET = utf8;

	INSERT INTO `t_role_permission` ( `role_id`, `permission_id` )
	VALUES
		( '1', '1' ),( '1', '2' );


# 查询张三的权限
	select
		*
	from
		t_user_role as tur
	left join
		t_role_permission as trp
	on
		trp.role_id=tur.role_id
	left join
		t_permission as tp
	on
		tp.id=trp.permission_id
	where
		tur.user_id='1'
# 查询李四的权限
	select
		*
	from
		t_user_role as tur
	left join
		t_role_permission as trp
	on
		trp.role_id=tur.role_id
	left join
		t_permission as tp
	on
		tp.id=trp.permission_id
	where
		tur.user_id='2'


2、权限实体类
package com.yzpnb.entity;

import lombok.Data;

@Data
public class TPermission {
    private String id;          //权限id
    private String code;        //权限表示符
    private String description; //描述
    private String url;         //请求地址
}

3、mapper
 /**
     * 根据用户id查询用户权限
     * @param userId 用户id
     * @return
     */
    public List<String> selectPermissionByUserId(String userId){
        String sql="select \n" +
                "\t*\n" +
                "from\n" +
                "\tt_user_role as tur\n" +
                "left join\n" +
                "\tt_role_permission as trp\n" +
                "on\n" +
                "\ttrp.role_id=tur.role_id\n" +
                "left join\n" +
                "\tt_permission as tp\n" +
                "on\n" +
                "\ttp.id=trp.permission_id\n" +
                "where \n" +
                "\ttur.user_id=?";
        List<TPermission> list=jdbcTemplate.query(sql, new Object[]{userId}, new BeanPropertyRowMapper<>(TPermission.class));
        List<String> permission=new ArrayList<>();
        list.forEach(c -> permission.add(c.getCode()));//遍历list集合,获取到每个对象中的Code存放到permission集合中
        return permission;
    }

4、设置权限
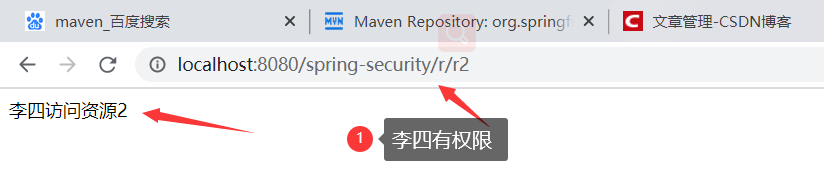
.antMatchers("/r/r1").hasAnyAuthority("p1")//设置访问/r/r1需要p1权限
.antMatchers("/r/r2").hasAnyAuthority("p3")//设置访问/r/r2需要p2权限

5、修改Service
/**
     * 重写方法,根据账号查询用户信息
     * @param username
     * @return
     * @throws UsernameNotFoundException
     */
    @Override
    public UserDetails loadUserByUsername(String username) throws UsernameNotFoundException {
        /*调用mapper查询用户信息*/
        TUser tUser = tUserMapper.selectTUserByUsername(username);

        if(tUser == null){//如果为空则表示没有此用户
            return null;//这里不用我们抛异常,由provider来抛异常,具体看理论篇
        }
        /*调用mapper查询用户权限*/
        List<String> list=tUserMapper.selectPermissionByUserId(tUser.getId());
        String[] permisstionArray=new String[list.size()];//创建一个数组
        list.toArray(permisstionArray);//将list中每个元素取出放在数组中
        //返回UserDetails对象,用户名密码使用查询到的,权限可以传入数组
        UserDetails userDetails = User.withUsername(tUser.getUsername()).password(tUser.getPassword()).authorities(permisstionArray).build();
        return userDetails;
    }

6、测试

8、web授权


9、方法授权
| 我们说过,web授权主要是针对url进行授权,而方法授权是针对方法授权 |
|---|
| 就是说,给某个方法加权限,没有权限就不能访问这个方法 |
| 所以给Controller层的方法添加权限是最好的 |
1、启动方法授权
| 启动方法 |
|---|
| 在任意一个@Configuration实例上添加@EnableGlobalMethodSecurity注解即可开启 |


@EnableGlobalMethodSecurity(securedEnabled = true)//开启spring security的@Secured注解

2、开启某一注解后使用方法
| 向方法(在类或接口上)添加注解就会限制对该方法的访问。 Spring Security的原生注释支持为该方法定义了 一组属性。 这些将被传递给AccessDecisionManager以供它作出实际的决定: |
|---|
public interface BankService {

	@Secured("IS_AUTHENTICATED_ANONYMOUSLY")//表示此方法可以匿名访问
	public Account readAccount(Long id);

	@Secured("IS_AUTHENTICATED_ANONYMOUSLY") //可以匿名访问
	public Account[] findAccounts();

	@Secured("ROLE_TELLER") //此方法必须是TELLET角色才能访问
	public Account post(Account account, double amount);
}
3、prePost注解支持(重点掌握)
1、启用prePost注解
@EnableGlobalMethodSecurity(prePostEnabled = true)

2、使用方法
| prePost注解有两个 |
|---|
| @PreAuthorize:请求之前拦截 |
| @PostAuthorize:请求之后拦截 |

    /**
     * 以下两个是权限的两个测试资源
     */
    @GetMapping(value = "/r/r1")
    @PreAuthorize("hasAuthority('p1')")//表示必须有p3权限才能访问
    public String r1(){
        return this.getUsername()+"访问资源1";
    }
    @GetMapping(value = "/r/r2")
    @PreAuthorize("hasAuthority('p3')")//表示必须有p3权限才能访问
    public String r2(){
        return this.getUsername()+"访问资源2";
    }

3、测试

