前言
数据存储可谓是Android中灰常灰常重要的一部分了。任何一个应用离不开数据的存储,有时需内存存储,有时需本地存储,还有时需要两个进程间传输数据,等等。那接下来介绍的五大存储中将包括了所有的应用中可能遇到的存储情况。
一、SharedPerference存储
(1)什么是SharedPerference存储
SP存储是一种轻量级的数据存储,通常做一些简单,单一数据的持久化缓存
(2)SharedPerference存储的特点
SharedPreference保存的数据是简单的key--value键值对。保存的数据是以xml文件的格式存储的。
可设置数据只能是当前应用读取,而别的应用不可以
应用卸载时会删除此数据
(3)SharedPerference的作用
SharedPreference存储倾向于保存用户偏好设置,比如某个Checkbox的选择状态,用户登录的状态,配置信息,实现记住密码功能等。
(4)SharedPerference存储的数据类型
boolean float int long String
(5)数据保存的路径
/data/data/packageName/shared_prefs/yyy.xml
(6)SharedPerference的使用
SharedPreferences只是个接口,而真正的实现是SharedPreferencesImpl,我们后续的get,put操作实际也是通过SharedPreferencesImpl对象完成的。
Editor也是一个接口,我们一系列的put操作,还有clear,remove,apply,commit都是在EditorImpl对象中。
①.获取SharedPreference的对象,通过getSharedPreference(String,int)方法。第一个参数用于指定该存储文件的名称,不用加后缀,第二个参数指定文件的操作模式。一般用MODE_PRIVATE 私有方式存储,其他应用无法访问。
②.设置参数,必须通过一个SharedPreference.Editor对象。存储键值对。只能存放Boolean,Float,Int,Long,String 五种类型。editor.putXxx("key","value")。
③.通过editor.commit()提交数据。也可以通过clean(),remove()清除。
④.数据存储在Android系统的 /data/data/"app package name"/shared_prefs 目录下的一个.xml文件。
(7)简单例子实现SharedPreference存储用户信息的代码:
布局:
<?xml version="1.0" encoding="utf-8"?>
<LinearLayout xmlns:android="http://schemas.android.com/apk/res/android"
    xmlns:app="http://schemas.android.com/apk/res-auto"
    xmlns:tools="http://schemas.android.com/tools"
    android:layout_width="match_parent"
    android:layout_height="match_parent"
    android:orientation="vertical"
    tools:context="com.example.wcystart.otherproject.MainActivity">

    <EditText
        android:id="@+id/et"
        android:layout_marginTop="20dp"
        android:layout_width="match_parent"
        android:layout_height="wrap_content"
        />
    <LinearLayout
        android:layout_width="match_parent"
        android:layout_height="wrap_content"
        android:gravity="center"
        android:layout_marginTop="20dp">
        <Button
            android:id="@+id/input"
            android:layout_width="wrap_content"
            android:layout_height="wrap_content"
            android:text="存储"
            android:onClick="writeInfo"/>
        <Button
            android:id="@+id/output"
            android:layout_marginLeft="10dp"
            android:layout_width="wrap_content"
            android:layout_height="wrap_content"
            android:text="读取"
            android:onClick="readInfo"/>
    </LinearLayout>
    <TextView
        android:id="@+id/showtext"
        android:layout_width="match_parent"
        android:layout_height="wrap_content"
        android:layout_marginTop="20dp"
        android:layout_marginLeft="15dp"
        android:text="存储的信息"
        android:textSize="25dp"/>

</LinearLayout>
Activity:
public class DataActivity extends AppCompatActivity {
    private EditText mEt;
    private Button mInput;
    private Button mOutput;
    private TextView mShowText;
    private SharedPreferences mSp;

    @Override
    protected void onCreate(Bundle savedInstanceState) {
        super.onCreate(savedInstanceState);
        setContentView(R.layout.activity_data);
        mEt = findViewById(R.id.et);
        mInput = findViewById(R.id.input);
        mOutput = findViewById(R.id.output);
        mShowText = findViewById(R.id.showtext);
        mSp=super.getSharedPreferences("yan",MODE_PRIVATE);

    }
    //存数据
    public void writeInfo(View view) {
      SharedPreferences.Editor editor=mSp.edit();
      editor.putString("name",mEt.getText().toString());
      editor.commit();
      //editor.apply();
        Toast.makeText(this,"存储数据成功",Toast.LENGTH_LONG).show();
    }
    //读数据
    public void readInfo(View view) {
        String info = mSp.getString("name", "");
        mShowText.setText(info);
        Toast.makeText(this,"读取数据成功",Toast.LENGTH_LONG).show();
    }
}
运行结果图:

(8)如何查看/data/data/应用包名/shared_prefs/yyy.xml呢?
之前我们查看Android手机中文件系统前提条件是root手机,然后去DDMS里边去看,觉得挺麻烦的。但是现在AndroidStudio大多都更新到3.0及以上版本之后,就非常简单了,还不用root手机。
补充:root的意思:root是手机系统的最高权限,这和我们电脑windows操作系统类似,我们知道电脑windows系统最高管理权限是用户管理员(administraror),而手机系统最高权限是root用户。有了root权限之后呢,可以轻松安装与卸载任何手机应用,包括系统原来厂商安装的,后期使用无法卸载的程序,获取到root权限之后全部均能卸载与删除。
查看步骤:
1、手机USB线连接手机,打开调试模式
2、打开AS,找到窗口右下角的Device File Explorer,如下图:


接下来我们查看下shared_prefs
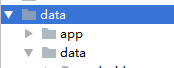
 看到没,yan.xml,就是SP存储是以xml文件的格式存储的数据,yan这个名字就是
![]()
即我们创建时传入的name,系统源码根据name去创建一个File
打开看看yan.xml中的内容是什么样的呢?
<?xml version='1.0' encoding='utf-8' standalone='yes' ?>
<map>
    <string name="name">wcystart</string>
</map>
看到这,我们大致了解,Sp存储的数据会在本地生成一个.xml文件,并将该文件的数据存储在一个map对象中。
(9)SharedPerference使用时应注意到的地方
在修改数据之后除了选择commit提交之外,还可以使用apply进行提交,那有什么区别呢?
commit提交发生在UI主线程,而apply发生在工作线程。但是apply也不一定是安全的
当我们首次创建SharedPreferences对象时,会根据文件名将文件下内容一次性加载到mMap容器中,每当我们edit都会创建一个新的EditorImpl对象,当修改或者添加数据时会将数据添加到mModifiled容器中,然后commit或者apply操作比较mMap与mModifiled数据修正mMap中最后一次提交数据然后写入到文件中。而get直接从mMap中读取。试想如果此时你存储了一些大型key或者value它们会一直存储在内存中得不到释放。
正确使用的建议:
1、不要存放大的key和value在SharedPreferences中,否则会一直存储在内存中得不到释放,内存使用过高会频发引发GC,导致界面丢帧甚至ANR。
2、不相关的配置选项最好不要放在一起,单个文件越大读取速度则越慢。
3、读取频繁的key和不频繁的key尽量不要放在一起(如果整个文件本身就较小则忽略,为了这点性能添加维护得不偿失)。
4、不要每次都edit,因为每次都会创建一个新的EditorImpl对象,最好是批量处理统一提交。
否则edit().commit每次创建一个EditorImpl对象并且进行一次IO操作,严重影响性能。
5、commit发生在UI线程中,apply发生在工作线程中,对于数据的提交最好是批量操作统一提交。虽然apply发生在工作线程(不会因为IO阻塞UI线程)但是如果添加任务较多也有可能带来其他严重后果(参照ActivityThread源码中handleStopActivity方法实现)。
6、尽量不要存放json和html,这种可以直接文件缓存。
7、不要指望这货能够跨进程通信 Context.PROCESS 。
8、最好提前初始化SharedPreferences,避免SharedPreferences第一次创建时读取文件线程未结束而出现等待情况。
参考文章链接https://www.jianshu.com/p/8eb2147c328b/ 从源码的角度去看SharedPerference
(10)不能滥用SharedPrefreence
一个默认的Sp有90K,所以不要在sp里边存储超级大的key,因为在getSharedPreference的时候会把所有的sp放到一个静态变量里边缓存起来:这个static的sSharedPrefsCache,它保存了你所有使用的sp,然后sp里面有一个成员mMap保存了所有的键值对;这样,你程序中使用到的那些个sp永远就呆在内存中。
存储json等特殊符号很多的value
如果在sp里边存json或者是Html,这么做也不是不可以,但是如果这个json串相对较大的话,也会引起sp读取速度下降~
JSON或者HTML格式存放在sp里面的时候,需要转义,这样会带来很多 & 这种特殊符号,sp在解析碰到这个特殊符号的时候会进行特殊的处理,引发额外的字符串拼接以及函数调用开销。而JSON本来就是可以用来做配置文件的,你干嘛又把它放在sp里面呢?多此一举。
多次edit 多次apply
多次edit的话会创建多个Editor对象,额外占用内存。如果多次apply的话会造成页面卡顿~
- 不要存放大的key和value!我就不重复三遍了,会引起界面卡、频繁GC、占用内存等等,好自为之!
- 毫不相关的配置项就不要丢在一起了!文件越大读取越慢,不知不觉就被猪队友给坑了;蓝后,放进defalut的那个简直就是愚蠢行为!
- 读取频繁的key和不易变动的key尽量不要放在一起,影响速度。(如果整个文件很小,那么忽略吧,为了这点性能添加维护成本得不偿失)
- 不要乱edit和apply,尽量批量修改一次提交!
- 尽量不要存放JSON和HTML,这种场景请直接使用json!
- 不要指望用这货进行跨进程通信!!!
(11)为什么说SP是一种轻量级数据存储呢?
由它的设计所决定;sp在创建的时候会把整个文件全部加载进内存,如果sp文件比较大,就会带来几个严重问题:
- 第一次从sp中获取值的时候,有可能阻塞主线程,使界面卡顿、掉帧。
- 解析sp的时候会产生大量的临时对象,导致频繁GC,引起界面卡顿。
- 这些key和value会永远存在于内存之中,占用大量内存。
sp加载的是子线程,怎么会卡住主线程呢?子线程IO就一定不会阻塞主线程吗?
下面是默认的sp实现SharedPreferenceImpl这个类的getString函数:
public String getString(String key, @Nullable String defValue) {
    synchronized (this) {
        awaitLoadedLocked();
        String v = (String)mMap.get(key);
        return v != null ? v : defValue;
    }
}
继续看看这个awaitLoadedLocked:
private void awaitLoadedLocked() {
    while (!mLoaded) {
        try {
            wait();
        } catch (InterruptedException unused) {
        }
    }
}
一把锁就是挂在那里!!这意味着,如果你直接调用getString,主线程会等待加载sp的那么线程加载完毕!这不就把主线程卡住了么?
二、文件存储
文件存储又分为手机内部存储和手机外部存储
1.手机内部文件存储
①.对于存储的文件的类型没有要求:.txt .doc .png .mp3 .avi
②.只要没有超出内部存储空间的大小即可
③.默认情况下,只能被当前应用读取.
④.存储的路径:data/data/应用包名/files/xxx.xx
⑤.会随着应用的卸载而被删除
ep:下面的例子是将assets目录下的文件读取出来保存到手机内部存储中,然后在将文件从手机内部存储中读取出来显示在ImageView控件上
布局
<?xml version="1.0" encoding="utf-8"?>
<LinearLayout xmlns:android="http://schemas.android.com/apk/res/android"
    xmlns:app="http://schemas.android.com/apk/res-auto"
    xmlns:tools="http://schemas.android.com/tools"
    android:layout_width="match_parent"
    android:layout_height="match_parent"
    android:orientation="vertical"
    tools:context="com.example.wcystart.otherproject.FileActivity">

    <TextView
        android:layout_width="match_parent"
        android:layout_height="wrap_content"
        android:padding="10dp"
        android:text="1.将assets下的logo.png保存到手机内部"
        android:textColor="@color/colorAccent"
        android:textSize="20sp" />

    <TextView
        android:layout_width="match_parent"
        android:layout_height="wrap_content"
        android:text="2.读取手机内部图片并显示"
        android:padding="10dp"
        android:textColor="@color/colorAccent"
        android:textSize="20sp" />

    <LinearLayout
        android:layout_width="match_parent"
        android:layout_height="wrap_content"
        android:layout_marginTop="10dp"
        android:orientation="horizontal">

        <Button
            android:layout_width="0dp"
            android:layout_height="wrap_content"
            android:layout_weight="1"
            android:onClick="save"
            android:text="保存"
            android:textSize="20dp" />

        <Button
            android:layout_width="0dp"
            android:layout_height="wrap_content"
            android:layout_weight="1"
            android:onClick="read"
            android:text="读取"
            android:textSize="20dp" />

    </LinearLayout>

    <ImageView
        android:id="@+id/image"
        android:layout_width="wrap_content"
        android:layout_gravity="center"
        android:src="@mipmap/ic_launcher"
        android:paddingTop="10dp"
        android:layout_height="wrap_content" />
</LinearLayout>
Activity:
public class FileActivity extends AppCompatActivity {
    private ImageView mImageView;

    @Override
    protected void onCreate(Bundle savedInstanceState) {
        super.onCreate(savedInstanceState);
        setContentView(R.layout.activity_file);
        mImageView = findViewById(R.id.image);
    }

    public void save(View view) {
        InputStream inputStream = null;
        FileOutputStream outputStream = null;
        //读取资产目录下的图片
        AssetManager assets = this.getAssets();
        try {
            inputStream = assets.open("logo.png");

            Log.i("TAG", this.getFilesDir().toString());

            outputStream = openFileOutput("logo.png", Context.MODE_PRIVATE);
            byte[] data = new byte[1024];
            int len;
            while ((len = inputStream.read(data)) != -1) {
                outputStream.write(data, 0, len);
            }
            Toast.makeText(this, "保存成功", Toast.LENGTH_SHORT).show();
        } catch (IOException e) {
            e.printStackTrace();
        } finally {
            if (outputStream != null) {
                try {
                    outputStream.close();
                } catch (IOException e) {
                    e.printStackTrace();
                }
            }
            if (inputStream != null) {
                try {
                    inputStream.close();
                } catch (IOException e) {
                    e.printStackTrace();
                }
            }
        }

    }

    public void read(View view) {
        Bitmap bitmap = null;
        try {
            bitmap = BitmapFactory.decodeStream(openFileInput("logo.png"));
        } catch (FileNotFoundException e) {
            e.printStackTrace();
        }
        mImageView.setImageBitmap(bitmap);
    }
android 中对文件的IO操作,OpenFileInput OpenFileOutput 返回对象为Java Io 的FileInputStream和FileOutputStream运行结果:

文件存储的位置在哪呢,还是在data/data/包名/files目录下找

2.手机外部存储
路径一:storage/sdcard/Android/data/package/files/xxx
路径二:storage/sdcard/xxx/xxx
①两个路径存储的文件,对文件类型没有要求。
②文件的大小只要不超出sd卡的存储空间即可
③两个路径下存储的文件不是私有的,其他应用可以访问。
④路径一:其下存储的文件会随着应用的卸载被删除
⑤路径二:其下存储的文件不会随着应用的卸载被删除
需注意,必须保证sd卡挂载在手机上才能读写,否则不能操作
ep:手机外部存储路径一 代码举例
布局:
<?xml version="1.0" encoding="utf-8"?>
<LinearLayout xmlns:android="http://schemas.android.com/apk/res/android"
    xmlns:app="http://schemas.android.com/apk/res-auto"
    xmlns:tools="http://schemas.android.com/tools"
    android:layout_width="match_parent"
    android:layout_height="match_parent"
    android:orientation="vertical"
    tools:context="com.example.wcystart.otherproject.SDCardActivity">

    <EditText
        android:id="@+id/et_fileName"
        android:layout_width="match_parent"
        android:layout_height="wrap_content"
        android:hint="输入文件名"
        android:padding="10dp"/>
    <EditText
        android:id="@+id/et_fileContent"
        android:layout_width="match_parent"
        android:layout_height="wrap_content"
        android:hint="输入文件内容"
        android:padding="10dp"/>
    <LinearLayout
    android:layout_width="match_parent"
    android:layout_height="wrap_content"
    android:orientation="horizontal">
    <Button
        android:id="@+id/save1"
        android:layout_width="0dp"
        android:layout_height="wrap_content"
        android:layout_weight="1"
        android:onClick="save1"
        android:text="路径一保存"/>
    <Button
        android:id="@+id/read1"
        android:layout_width="0dp"
        android:layout_height="wrap_content"
        android:layout_weight="1"
        android:onClick="read1"
        android:text="路径一读取"/>
</LinearLayout>

</LinearLayout>
Actiivty:
package com.example.wcystart.otherproject;

import android.os.Bundle;
import android.os.Environment;
import android.support.v7.app.AppCompatActivity;
import android.view.View;
import android.widget.EditText;
import android.widget.Toast;

import java.io.ByteArrayOutputStream;
import java.io.File;
import java.io.FileInputStream;
import java.io.FileNotFoundException;
import java.io.FileOutputStream;
import java.io.IOException;

public class SDCardActivity extends AppCompatActivity {
    private EditText mEtFileName;
    private EditText mEtFileContent;

    @Override
    protected void onCreate(Bundle savedInstanceState) {
        super.onCreate(savedInstanceState);
        setContentView(R.layout.activity_sdcard);
        mEtFileName = findViewById(R.id.et_fileName);
        mEtFileContent = findViewById(R.id.et_fileContent);
    }

    public void save1(View view) {
        if (Environment.getExternalStorageState().equals(Environment.MEDIA_MOUNTED)) { //sd卡处于挂载状态
            String fileName = mEtFileName.getText().toString();
            //获取要写入的文件目录  storage/sdcard/Android/data/包名/files/xxx
            File externalFilesDir = this.getExternalFilesDir(null);
            //创建指定目录下的文件
            File file = new File(externalFilesDir, fileName);
            //开始写文件
            FileOutputStream fos = null;
            try {
                fos = new FileOutputStream(file);
                //获取要写出的文件内容
                String content = mEtFileContent.getText().toString();
                fos.write(content.getBytes("UTF-8"));
                Toast.makeText(this, "文件保存成功", Toast.LENGTH_LONG).show();
            } catch (IOException e) {
                e.printStackTrace();
            } finally {
                if (fos != null) {
                    try {
                        fos.close();
                    } catch (IOException e) {
                        e.printStackTrace();
                    }
                }
            }
        } else {
            Toast.makeText(this, "找不到指定的SD卡", Toast.LENGTH_SHORT).show();
        }
    }

    public void read1(View view) {
        if (Environment.getExternalStorageState().equals(Environment.MEDIA_MOUNTED)) {
            String fileName = mEtFileName.getText().toString();
            File externalFilesDir = this.getExternalFilesDir(null);
            File file = new File(externalFilesDir, fileName);
            if (file.exists()) {
                //开始读
                FileInputStream fis;
                try {
                    fis = new FileInputStream(file);
                    //从输入流中读取内容
                    String content = readStringFromInputStream(fis);
                    mEtFileContent.setText(content);
                } catch (FileNotFoundException e) {
                    e.printStackTrace();
                }
            } else {
                Toast.makeText(this, "该文件不存在", Toast.LENGTH_SHORT).show();
            }
        }
    }

    private String readStringFromInputStream(FileInputStream fis) {
        //方式一 可能会出现乱码
//        String content = "";
//        byte[] buffer = new byte[1024];
//        int len;
//        try {
//            while ((len = fis.read(buffer)) != -1) {
//                content += new String(buffer);
//            }
//        } catch (IOException e) {
//            e.printStackTrace();
//        }
        //方式二 避免出现乱码
        ByteArrayOutputStream baos = new ByteArrayOutputStream();
        byte[] buffer = new byte[1024];
        int len;
        try {
            while ((len = fis.read(buffer)) != -1) {
                baos.write(buffer, 0, len);
            }
        } catch (IOException e) {
            e.printStackTrace();
        }

        return baos.toString();

    }
}
运行结果:

再来看下文件hello.txt文件所在的路径在哪呢? storage/sdcard/Android/data/包名/files/hello.txt

再来看下hello.txt的内容:直接双击就可以在AS中查看

读取的话:就是输入刚才保存的文件名,然后点击读取,就可以读取出hello.txt文件中的内容显示在EditText中了。
ep:路径二 代码演示:storage/sdcord/xxx
布局:
<?xml version="1.0" encoding="utf-8"?>
<LinearLayout xmlns:android="http://schemas.android.com/apk/res/android"
    xmlns:app="http://schemas.android.com/apk/res-auto"
    xmlns:tools="http://schemas.android.com/tools"
    android:layout_width="match_parent"
    android:layout_height="match_parent"
    android:orientation="vertical"
    tools:context="com.example.wcystart.otherproject.SDCardActivity">

    <EditText
        android:id="@+id/et_fileName"
        android:layout_width="match_parent"
        android:layout_height="wrap_content"
        android:hint="输入文件名"
        android:padding="10dp"/>
    <EditText
        android:id="@+id/et_fileContent"
        android:layout_width="match_parent"
        android:layout_height="wrap_content"
        android:hint="输入文件内容"
        android:padding="10dp"/>
    <LinearLayout
    android:layout_width="match_parent"
    android:layout_height="wrap_content"
    android:orientation="horizontal">
    <Button
        android:id="@+id/save1"
        android:layout_width="0dp"
        android:layout_height="wrap_content"
        android:layout_weight="1"
        android:onClick="save1"
        android:text="路径一保存"/>
    <Button
        android:id="@+id/read1"
        android:layout_width="0dp"
        android:layout_height="wrap_content"
        android:layout_weight="1"
        android:onClick="read1"
        android:text="路径一读取"/>
</LinearLayout>
    <LinearLayout
        android:layout_width="match_parent"
        android:layout_height="wrap_content"
        android:layout_marginTop="10dp"
        android:orientation="horizontal">
        <Button
            android:id="@+id/save2"
            android:layout_width="0dp"
            android:layout_height="wrap_content"
            android:layout_weight="1"
            android:onClick="save2"
            android:text="路径二保存"/>
        <Button
            android:id="@+id/read2"
            android:layout_width="0dp"
            android:layout_height="wrap_content"
            android:onClick="read2"
            android:layout_weight="1"
            android:text="路径二读取"/>
    </LinearLayout>

</LinearLayout>
Activity:
package com.example.wcystart.otherproject;

import android.os.Bundle;
import android.os.Environment;
import android.support.v7.app.AppCompatActivity;
import android.view.View;
import android.widget.EditText;
import android.widget.Toast;

import java.io.ByteArrayOutputStream;
import java.io.File;
import java.io.FileInputStream;
import java.io.FileNotFoundException;
import java.io.FileOutputStream;
import java.io.IOException;

public class SDCardActivity extends AppCompatActivity {
    private EditText mEtFileName;
    private EditText mEtFileContent;

    @Override
    protected void onCreate(Bundle savedInstanceState) {
        super.onCreate(savedInstanceState);
        setContentView(R.layout.activity_sdcard);
        mEtFileName = findViewById(R.id.et_fileName);
        mEtFileContent = findViewById(R.id.et_fileContent);
    }

    public void save2(View view) {
        if (Environment.getExternalStorageState().equals(Environment.MEDIA_MOUNTED)) { //sd卡处于挂载状态
            String fileName = mEtFileName.getText().toString();
            //获取要写入的文件目录  storage/sdcard/xxx
            String externalFilesDir = Environment.getExternalStorageDirectory().toString()+ "/wcystart";
            //创建文件目录
            File fileDir = new File(externalFilesDir);
            if (!fileDir.exists()) {
                fileDir.mkdirs();
                System.out.println("文件目录创建成功!!!");
            }
            //创建指定目录下的文件
            File file=new File(fileDir,fileName);
            //开始写文件
            FileOutputStream fos = null;
            try {
                fos = new FileOutputStream(file);
                //获取要写出的文件内容
                String content = mEtFileContent.getText().toString();
                fos.write(content.getBytes("UTF-8"));
                Toast.makeText(this, "文件保存成功", Toast.LENGTH_LONG).show();
            } catch (IOException e) {
                e.printStackTrace();
            } finally {
                if (fos != null) {
                    try {
                        fos.close();
                    } catch (IOException e) {
                        e.printStackTrace();
                    }
                }
            }
        } else {
            Toast.makeText(this, "找不到指定的SD卡", Toast.LENGTH_SHORT).show();
        }
    }

    public void read2(View view) {
        if (Environment.getExternalStorageState().equals(Environment.MEDIA_MOUNTED)) {
            String fileName = mEtFileName.getText().toString();
            String externalFilesDir = Environment.getExternalStorageDirectory().toString() + "datastorgae";
            File fileDir=new File(externalFilesDir);
            File file = new File(fileDir, fileName);
            if (file.exists()) {
                //开始读
                FileInputStream fis;
                try {
                    fis = new FileInputStream(file);
                    //从输入流中读取内容
                    String content = readStringFromInputStream(fis);
                    mEtFileContent.setText(content);
                } catch (FileNotFoundException e) {
                    e.printStackTrace();
                }
            } else {
                Toast.makeText(this, "该文件不存在", Toast.LENGTH_SHORT).show();
            }
        }
    }

    private String readStringFromInputStream(FileInputStream fis) {
        //方式一 可能会出现乱码
//        String content = "";
//        byte[] buffer = new byte[1024];
//        int len;
//        try {
//            while ((len = fis.read(buffer)) != -1) {
//                content += new String(buffer);
//            }
//        } catch (IOException e) {
//            e.printStackTrace();
//        }
        //方式二 避免出现乱码
        ByteArrayOutputStream baos = new ByteArrayOutputStream();
        byte[] buffer = new byte[1024];
        int len;
        try {
            while ((len = fis.read(buffer)) != -1) {
                baos.write(buffer, 0, len);
            }
        } catch (IOException e) {
            e.printStackTrace();
        }

        return baos.toString();

    }
}
运行结果报:

也就是说:Environment.getExternalStorageDirectory().toString()或者是Environment.getExternalStorageDirectory().getPath()打印出来的路径是:/storage/emulated/0是找不到的,是因为现在的手机内存都不带SD卡了所以才找不到的么,。。。只是猜想
如何使用手机内部存储和外部存储?
* 1.如果涉及到的数据是私有的,则选择手机内部存储
* 2.如果涉及到的数据不大,但是访问较频繁,则选择手机内部存储
* 3.如果涉及到的数据较大,则考虑使用外部存储
* 4.如果数据希望随着应用的卸载,而被删除,且不是私有的,则使用路径1
* 5.如果数据希望随着应用的卸载,而不被删除,则使用路径2
三、Sqlite数据库存储
1.什么是Sqlite存储
Sqlite:是一款嵌入式的轻型的关系型数据库
2.Sqlite的特点
①安装文件小,最小只有几百K,Android系统已经安装
②支持多操作系统:Android,IOS ,Window,Linux等
③支持多语言:比如Java,PHP,C#
④处理速度快:处理速度比MySql、Oracle、SqlServer都要快(数据量不是太大的时候)
⑤存储结构型、关系型数据,可使用Sql语言,支持事物处理、独立无需服务进程
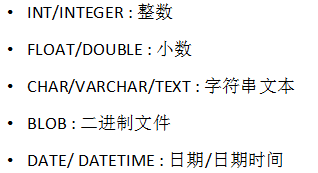
3.Sqlite支持的数据类型与Mysql相似,常用的数据类型有:
3.Sqlite的使用
(1)自定义SqLiteOpenHelper类
package com.example.wcystart.otherproject;

import android.content.Context;
import android.database.sqlite.SQLiteDatabase;
import android.database.sqlite.SQLiteOpenHelper;

/**
 * Created by ${wcystart}
 * date:on 2019/1/15
 * description:
 */

public class DBHelper extends SQLiteOpenHelper {

    public DBHelper(Context context,int version){
        super(context,"student.db",null,version);
    }
    /**
     *
     * @param context:用于创建数据库的上下文
     * @param name:创建数据库的名称
     * @param factory:用户创建Cursor的工厂
     * @param version:数据库的版本
     */
    public DBHelper(Context context, String name, SQLiteDatabase.CursorFactory factory, int version) {
        super(context, name, factory, version);
    }

    /**
     * 当数据库首次创建的时候调用
     * @param db 可用来创建表(table)视图(view)索引(index)序列(sequence)触发器(trigger)存储函数 function 存储过程  producer
     */
    @Override
    public void onCreate(SQLiteDatabase db) {
        String sql="create table user(_id integer primary key autoincrement,name varchar,balance double)";
        db.execSQL(sql);

        //给表中添加两条数据
        db.execSQL("insert into user(name,balance)values('Tom',1000)");
        db.execSQL("insert into user(name,balance)values('Jerry',1000)");

    }

    /***
     * 当数据库升级的时候回调的方法
     * @param db
     * @param oldVersion
     * @param newVersion
     */
    @Override
    public void onUpgrade(SQLiteDatabase db, int oldVersion, int newVersion) {

    }
}
在Activity中完成增删改查
布局:
<?xml version="1.0" encoding="utf-8"?>
<RelativeLayout xmlns:android="http://schemas.android.com/apk/res/android"
    xmlns:tools="http://schemas.android.com/tools"
    android:layout_width="match_parent"
    android:layout_height="match_parent"
    android:paddingTop="10dp"
    tools:context=".DBActivity">

    <Button
        android:id="@+id/upgrade"
        android:layout_width="wrap_content"
        android:layout_height="wrap_content"
        android:layout_centerHorizontal="true"
        android:text="更新数据库" />

    <Button
        android:id="@+id/insert"
        android:layout_width="wrap_content"
        android:layout_height="wrap_content"
        android:layout_below="@+id/upgrade"
        android:layout_centerHorizontal="true"
        android:text="插入数据" />

    <Button
        android:id="@+id/modify"
        android:layout_width="wrap_content"
        android:layout_height="wrap_content"
        android:layout_below="@+id/insert"
        android:layout_centerHorizontal="true"
        android:text="修改数据" />

    <Button
        android:id="@+id/query"
        android:layout_width="wrap_content"
        android:layout_height="wrap_content"
        android:layout_below="@+id/modify"
        android:layout_centerHorizontal="true"
        android:text="查询数据" />

    <Button
        android:id="@+id/delete"
        android:layout_width="wrap_content"
        android:layout_height="wrap_content"
        android:layout_below="@+id/query"
        android:layout_centerHorizontal="true"
        android:text="删除数据" />


    <Button
        android:id="@+id/delete_database"
        android:layout_width="wrap_content"
        android:layout_height="wrap_content"
        android:layout_below="@+id/delete"
        android:layout_centerHorizontal="true"
        android:text="删除数据库" />

</RelativeLayout>
public class DBActivity extends AppCompatActivity implements View.OnClickListener {
private Button insert;
private Button upgrade;
private Button modify;
private Button delete;
private Button query;
private Button delete_database;
@Override
protected void onCreate(Bundle savedInstanceState) {
super.onCreate(savedInstanceState);
setContentView(R.layout.activity_db);
insert = findViewById(R.id.insert);
upgrade = findViewById(R.id.upgrade);
modify = findViewById(R.id.modify);
delete = findViewById(R.id.delete);
query = findViewById(R.id.query);
delete_database =findViewById(R.id.delete_database);
insert.setOnClickListener(this);
upgrade.setOnClickListener(this);
modify.setOnClickListener(this);
delete.setOnClickListener(this);
query.setOnClickListener(this);
delete_database.setOnClickListener(this);
}
@Override
public void onClick(View v) {
switch (v.getId()){
case R.id.insert: //增
DBHelper dbHelper = new DBHelper(this, 4);
SQLiteDatabase database = dbHelper.getReadableDatabase();
String sql = "insert into user(name,balance)values('Jane',40000)";
database.execSQL(sql);
dbHelper.close();
Toast.makeText(DBActivity.this, "添加成功", Toast.LENGTH_SHORT).show();
break;
case R.id.upgrade://数据库升级
DBHelper upgrade_dbHelper = new DBHelper(this, 4);
SQLiteDatabase upgrade_database = upgrade_dbHelper.getReadableDatabase();
break;
case R.id.modify: //改
DBHelper modify_dbHelper = new DBHelper(this, 4);
SQLiteDatabase modify_database = modify_dbHelper.getReadableDatabase();
ContentValues values = new ContentValues();
values.put("balance", 800);
//这个updateCount的意思是修改了几条
int updateCount = modify_database.update("user", values, "_id=?", new String[]{6 + ""});
Toast.makeText(DBActivity.this, "修改成功,修改了" + updateCount + "几条", Toast.LENGTH_SHORT).show();
modify_dbHelper.close();
break;
case R.id.delete://删
DBHelper delete_dbHelper = new DBHelper(this, 4);
SQLiteDatabase delete_database = delete_dbHelper.getReadableDatabase();
int deleteCount = delete_database.delete("user", "_id=?", new String[]{"3"});
delete_dbHelper.close();
Toast.makeText(DBActivity.this, "删除成功,一共删除了" + deleteCount + "几条", Toast.LENGTH_SHORT).show();
break;
case R.id.query://查
DBHelper query_dbHelper = new DBHelper(this, 4);
SQLiteDatabase query_database = query_dbHelper.getReadableDatabase();
//select ... from ... where .. group by ... having ... order by ... limit...
//返回游标,类似于jdbc中的结果集:ResultSet
Cursor cursor = query_database.query("user", null, null, null, null, null, null, null);
while(cursor.moveToNext()){//①判断下一行是否还有数据②如果返回true,指针下移
int id = cursor.getInt(cursor.getColumnIndex("_id"));
String name = cursor.getString(cursor.getColumnIndex("name"));
double balance = cursor.getDouble(cursor.getColumnIndex("balance"));
Log.e("TAG", "id = " + id + ",name = " + name + ",balance = " + balance);
}
cursor.close();
query_database.close();
break;
case R.id.delete_database: //删除整个数据库
DBHelper delete_database_dbHelper = new DBHelper(this, 4);
SQLiteDatabase delete_database_database = delete_database_dbHelper.getReadableDatabase();
//删除名为user的数据库
deleteDatabase("student");
break;
}
}
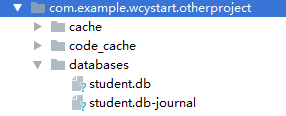
}在手机目录中找到相应的student.db数据库所在的位置:/data/data/包名/database/xxx.db

可以导出来数据库到桌面,下载个SQlite Expert Personal,然后直接拖动就可以查看。

当然数据库存储的操作远远不止这些,不过实际在项目中我们也经常使用第三方的,比如GreenDao、Litepal等
五、网络存储
也就是我们经常使用网络请求框架去请求服务器端的数据,把请求的数据临时存到内存中,需要的时候加载到指定的控件上。
在这里就不做演示了。这里的网络请求Android系统自带的有HttpUrlConnection、Volley不过现在都用第三方的,Okhhtp、Retrofit在后续的学习当中,我也会好好把这些优秀的框架学习下。
六、总结
