文章目录
NFS服务介绍
NFS,是Network File System的简写,即网络文件系统。网络文件系统是FreeBSD支持的文件系统中的一种,NFS允许一个系统在网络上与他人共享目录和文件。
它的主要功能是通过网络(一般是局域网)让不同的主机系统之间可以共享文件或目录
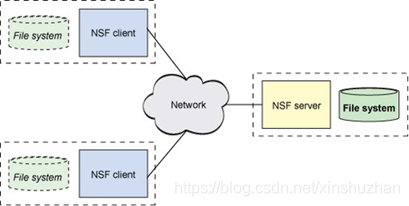
通过使用NFS,用户和程序可以像访问本地文件一样访问远端系统上的文件,如图:
NFS的模式: C/S 模式
NFS监听的端口: 2049
RHEL7是以NFSv4作为默认版本,NFSv4使用TCP协议(端口号是2049)和NFS服务器建立连接。
在/etc/services里定义了nfs的端口号

NFS存储服务作用
- 实现数据的共享存储
- 编写数据操作管理
- 节省购买服务器磁盘开销 淘宝–上万 用电开销
安装NFS:
1) yum安装nfs
[root@gaosh-64 ~]# yum install rpcbind nfs-utils
2) 配置文件位置
[root@gaosh-64 ~]# ls /etc/exports
/etc/exports
3) 启动NFS服务
[root@gaosh-64 ~]# systemctl restart rpcbind
[root@gaosh-64 ~]# systemctl start nfs-server.service
[root@gaosh-64 ~]#
[root@gaosh-64 ~]# netstat -antup |grep 2049
tcp        0      0 0.0.0.0:2049            0.0.0.0:*               LISTEN      -
tcp6       0      0 :::2049                 :::*                    LISTEN      -
udp        0      0 0.0.0.0:2049            0.0.0.0:*                           -
udp6       0      0 :::2049                 :::*                                -
使用方法
1) 创建共享目录
[root@gaosh-64 ~]# mkdir -p /share/{dir1,dir2}
[root@gaosh-64 ~]# chmod -R 777 /share/   #给共享目录写的权限
[root@gaosh-64 ~]# ll /share/
总用量 0
drwxrwxrwx 2 root root 6 7月  18 20:42 dir1
drwxrwxrwx 2 root root 6 7月  18 20:42 dir2
2) 设置配置文件并查看
[root@gaosh-64 ~]# cat /etc/exports
/share/dir1  *(ro)   #只读
/share/dir2  192.168.1.0/24(rw,sync)  #读写
[root@gaosh-64 ~]# systemctl restart nfs.service   #启动
[root@gaosh-64 ~]# exportfs -v    #检查当前主机的NFS输出(共享)
/share/dir2     192.168.1.0/24(sync,wdelay,hide,no_subtree_check,sec=sys,rw,secure,root_squash,no_all_squash)
/share/dir1     <world>(sync,wdelay,hide,no_subtree_check,sec=sys,ro,secure,root_squash,no_all_squash)
[root@gaosh-64 ~]#
3) 客户端测试
[root@gaosh-17 ~]# showmount -e 192.168.1.64   #查看存储端共享
Export list for 192.168.1.64:
/share/dir1 *
/share/dir2 192.168.1.0/24
[root@gaosh-17 ~]#
挂载测试:
[root@gaosh-17 ~]# showmount -e 192.168.1.64
[root@gaosh-17 ~]# mkdir /mnt/test1
[root@gaosh-17 ~]# mkdir /mnt/test2
[root@gaosh-17 ~]# mount -t nfs 192.168.1.64:/share/dir1 /mnt/test1
[root@gaosh-17 ~]# mount -t nfs 192.168.1.64:/share/dir2 /mnt/test2
[root@gaosh-17 ~]# df -h
192.168.1.64:/share/dir1            17G  4.7G   13G   28% /mnt/test1
192.168.1.64:/share/dir2            17G  4.7G   13G   28% /mnt/test2
在上文中我们设置的test1 为只读,test2 为可读写
为了验证这一点,我们只需要复制一个文件过去查看即可
[root@gaosh-17 ~]# cp /etc/passwd /mnt/test1/    #只读文件系统,无法复制文件进去
cp: 无法创建普通文件"/mnt/test1/passwd": 只读文件系统
[root@gaosh-17 ~]# cp /etc/passwd /mnt/test2/
NFS共享的常用参数
我们已经使用过ro和rw,sync, 三个参数,除此之外还有很多,如下表:
| 参数 | 作用 |
|---|---|
| ro | 只读访问。 |
| rw | 读写访问。 |
| sync | 资料同步写入到内存与硬盘当中。 |
| async | 资料会先暂存于内存当中,而非直接写入硬盘。 |
| secure | NFS通过1024以下的安全TCP/IP端口发送。 |
| insecure | NFS通过1024以上的端口发送。 |
| wdelay | 如果多个用户要写入NFS目录,则归组写入(默认)。 |
| no_wdelay | 如果多个用户要写入NFS目录,则立即写入,当使用async时,无需此设置。 |
| hide | 在NFS共享目录中不共享其子目录。 |
| no_hide | 共享NFS目录的子目录。 |
| subtree_check | 如果共享/usr/bin之类的子目录时,强制NFS检查父目录的权限(默认)。 |
| no_subtree_check | 和上面相对,不检查父目录权限。 |
| all_squash | 共享文件的UID和GID映射匿名用户anonymous,适合公用目录。 |
| no_all_squash | 保留共享文件的UID和GID(默认)。 |
| root_squash | root用户的所有请求映射成如anonymous用户一样的权限(默认)。、 |
| no_root_squash | root用户具有根目录的完全管理访问权限。 |
设置自动挂载NFS
直接在配置文件 /etc/fstab里设置
[root@gaosh-17 ~]# grep '192.168.1.64' /etc/fstab
192.168.1.64:/share/dir1 /mnt/test1 nfs deaults 0  0
总结
本文主要探讨了NFS的安装,及使用,实现的NFS开机自动挂载。 为了防止单点NFS,也是可以使用keepalived做高可用的。当你当前的服务器硬盘不够用的时候,你可以使用NFS服务,分享一个硬盘过来使用。