没有特别的幸运,那么就特别的努力!!!
既然没有优人的天赋,那就拼吧!
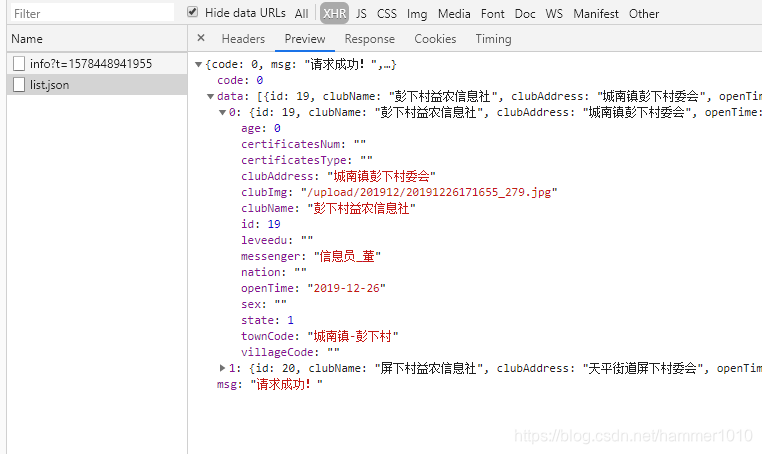
先看下效果:
接口封装:
第一步:解决跨域
接口请求,一般都会碰到跨域问题,在vue项目中,我们采用页面代理的方法解决跨域问题:
文件config——index.js文件
index.js
'use strict'
// Template version: 1.2.7
// see http://vuejs-templates.github.io/webpack for documentation.

const path = require('path');

module.exports = {
  dev: {
    // Paths
    assetsSubDirectory: 'static',
    assetsPublicPath: '/',
      proxyTable: {

          '/api': {
            target:'https://www.XXX.com/jcrh', // 请求的第三方接口  或 后端,线上接口
            // target:'http://localhost:8081/api', //      本地
            changeOrigin:true, // 在本地会创建一个虚拟服务端,然后发送请求的数据,并同时接收请求的数据,这样服务端和服务端进行数据的交互就不会有跨域问题
            secure: true,  //true是https     false是http
            pathRewrite:{  // 路径重写,
              '^/api': ''  // 替换target中的请求地址,也就是说以后你在请求http://api.douban.com/v2/XXXXX这个地址的时候直接写成/api即可。
            }
          },
          //物联网气泡接口代理
        '/web': {
            target: 'http://api.XXX.com/rest',//微后端服务地址
            changeOrigin: true,
            pathRewrite: {
                '^/web': ''
            }
          }

      },
    // Various Dev Server settings
    host: '0.0.0.0', // can be overwritten by process.env.HOST
    port: 8080, // can be overwritten by process.env.PORT, if port is in use, a free one will be determined
    autoOpenBrowser: false,   //是否默认,启动项目自动打开页面 true自动打开  false手动
    errorOverlay: true,
    notifyOnErrors: true,
    poll: false, // https://webpack.js.org/configuration/dev-server/#devserver-watchoptions-


    /**
     * Source Maps
     */

    // https://webpack.js.org/configuration/devtool/#development
    devtool: 'eval-source-map',


    cacheBusting: true,

    cssSourceMap: false,
  },

  build: {
    // Template for index.html
    index: path.resolve(__dirname, '../dist/index.html'),

    // Paths
    assetsRoot: path.resolve(__dirname, '../dist'),
    assetsSubDirectory: 'static',
    assetsPublicPath: './',

    /**
     * Source Maps
     */

    productionSourceMap: false,

    devtool: '#source-map',


    productionGzip: false,
    productionGzipExtensions: ['js', 'css'],

    bundleAnalyzerReport: process.env.npm_config_report
  }
}
第二步:接口封装
我们约定俗成 一般会在src文件下建立一个api文件
这个api文件,就相当于一个管理接口的仓库
api——index.js
安装
npm install vue-axios --save
npm install qs.js --save
import axios from 'axios'
import qs from 'qs'

//立即支付
export const paycode = params => {
     return axios.post('recharge/payCode.do',qs.stringify(params)).then(res=>res.data)
}
//地区接口
export const  list = params => {
     return axios.get('/api/wechat/club/list.json',qs.stringify(params)).then(res => res.data).catch((response)=>{
          console.log(response);
      })
}
第三步:接口运用
index.vue
<template>
  <div class="container"></div>
</template>

<script>
import { list } from '../../../src/api';

export default {
  data() {
    return {
        value1: 0,
        }
  },
   created() {
     this.test()
   },
  methods: {
	//接口测试
    test(){
      var param = {"areaCodeParent":"331081000000"}
      list(param).then(res => {
        console.log(res)
      })
    }
  },

}
</script>
希望能帮助到大家,同时祝愿大家在开发旅途中愉快!!!