微服务部署实现nginx+tomcat+redis单点登录(session共享):
达到的效果
当客户端访问Nginx服务器时,Nginx负载均衡会自动将请求转发到Tomcat1或Tomcat2或Tomcat3服务器,以减轻Tomcat压力,从而达到Tomcat集群化部署,为了使各Tomcat之间共享同一个Session,将采用Redis缓存服务来集中管理Session存储。
配置文件
- 文件目录


部署过程:
- nginx和tomcat的部署可以看第四次博客作业
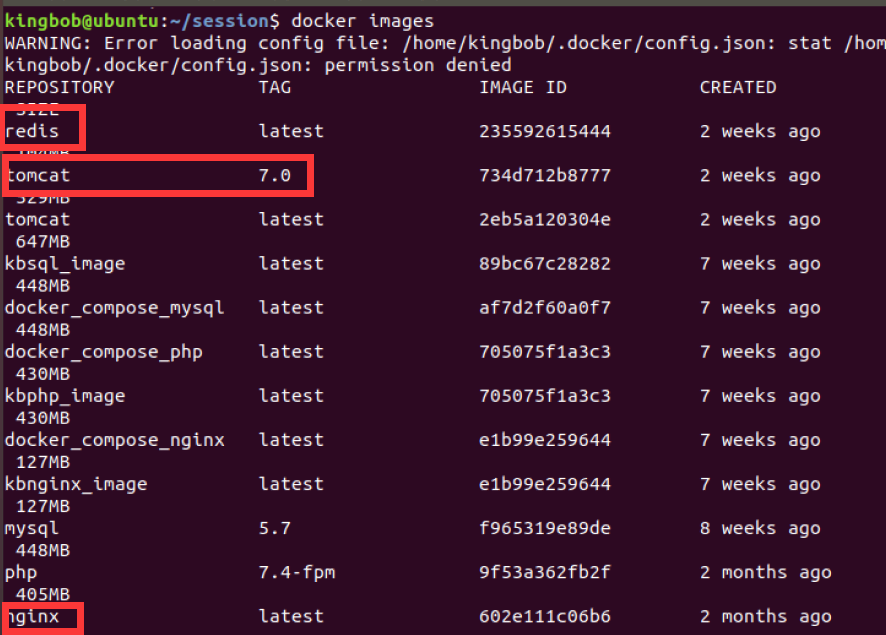
- 先把redis和nginx还有tomcat:7.0从docker上pull下来,查看镜像如下
- 配置nginx配置文件,nginx default.conf
upstream tomcats{
server ctc1:8080;
server ctc2:8080;
server ctc3:8080;
}

server {
listen 2420;
server_name localhost;

location / {
             root html;
             index index.html index.htm;

             proxy_pass http://tomcats;

             proxy_set_header Host $host;
             proxy_set_header X-Real-IP $remote_addr;
             proxy_set_header X-Forwarded-For $proxy_add_x_forwarded_for;
	}
}
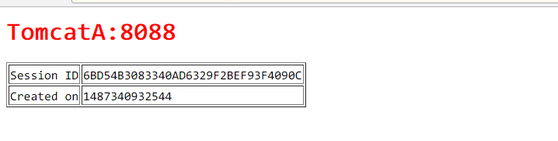
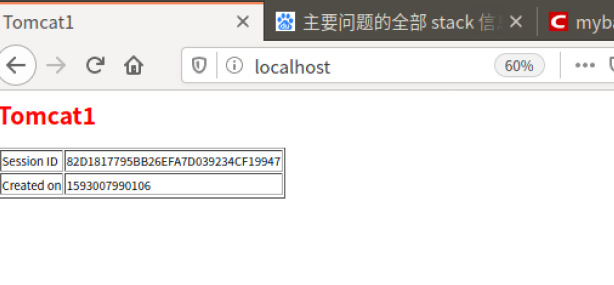
- 接下来部署要显示的网页上要显示的页面文件,即下面的tomcat文件夹里的index.jsp,显示的效果如下
- tomcat index.jsp
<%@ page pageEncoding="UTF-8" contentType="text/html; charset=UTF-8" %>

<html>
<head><title>Tomcat1</title></head>
<body>
<h1><font color="red">Tomcat1</font></h1>
<table align="centre" border="1">
	<tr>
		<td>Session ID</td>
		<% session.setAttribute("abc", "abc"); %>
		<td><%= session.getId() %>
		</td>
	</tr>
	<tr>
		<td>Created on</td>
		<td><%= session.getCreationTime() %>
		</td>
	</tr>
</table>
</body>
</html>
- 这里用的docker-compose.yml
ersion: "3.8"
services:
    nginx:
        image: nginx
        container_name: cngx
        ports:
            - 80:2420
        volumes:
            - ./nginx/default.conf:/etc/nginx/conf.d/default.conf # 挂载配置文件
        depends_on:
            - tomcat1
            - tomcat2
            - tomcat3
    tomcat1:
        image: tomcat:7.0
        container_name: ctc1
        volumes:
            - ./tomcat1:/usr/local/tomcat/webapps/ROOT # 挂载web目录

    tomcat2:
        image: tomcat:7.0
        container_name: ctc2
        volumes:
            - ./tomcat2:/usr/local/tomcat/webapps/ROOT

    tomcat3:
        image: tomcat:7.0
        container_name: ctc3
        volumes:
            - ./tomcat3:/usr/local/tomcat/webapps/ROOT
- 运行docker-compose,运行完后在浏览器上输入端口查看
sudo docker-compose up -d --build

这里可以看到不同tomcat的session会发生变化

- 接下来和redis配合使用实现session共享
先准备配置文件 - redis.conf
#bind 127.0.0.1


protected-mode no


port 6379


tcp-backlog 511


timeout 0


tcp-keepalive 300

daemonize no

supervised no

pidfile /var/run/redis_6379.pid

loglevel notice

logfile ""

databases 16

always-show-logo yes

save 900 1
save 300 10
save 60 10000

stop-writes-on-bgsave-error yes

rdbcompression yes

rdbchecksum yes

# The filename where to dump the DB
dbfilename dump.rdb

rdb-del-sync-files no

dir ./

replica-serve-stale-data yes

replica-read-only yes

repl-diskless-sync no

repl-diskless-sync-delay 5

repl-diskless-load disabled

repl-disable-tcp-nodelay no

replica-priority 100

acllog-max-len 128

lazyfree-lazy-eviction no
lazyfree-lazy-expire no
lazyfree-lazy-server-del no
replica-lazy-flush no

lazyfree-lazy-user-del no

appendonly no

# The name of the append only file (default: "appendonly.aof")

appendfilename "appendonly.aof"

appendfsync everysec

no-appendfsync-on-rewrite no


auto-aof-rewrite-percentage 100
auto-aof-rewrite-min-size 64mb

aof-load-truncated yes

aof-use-rdb-preamble yes

lua-time-limit 5000

notify-keyspace-events ""

hash-max-ziplist-entries 512
hash-max-ziplist-value 64

list-max-ziplist-size -2

list-compress-depth 0

set-max-intset-entries 512

zset-max-ziplist-entries 128
zset-max-ziplist-value 64

hll-sparse-max-bytes 3000

stream-node-max-bytes 4096
stream-node-max-entries 100

activerehashing yes

client-output-buffer-limit normal 0 0 0
client-output-buffer-limit replica 256mb 64mb 60
client-output-buffer-limit pubsub 32mb 8mb 60

hz 10

dynamic-hz yes

aof-rewrite-incremental-fsync yes

rdb-save-incremental-fsync yes

jemalloc-bg-thread yes
- tomcat context.xml
<?xml version='1.0' encoding='utf-8'?>
<!--
  Licensed to the Apache Software Foundation (ASF) under one or more
  contributor license agreements.  See the NOTICE file distributed with
  this work for additional information regarding copyright ownership.
  The ASF licenses this file to You under the Apache License, Version 2.0
  (the "License"); you may not use this file except in compliance with
  the License.  You may obtain a copy of the License at

      http://www.apache.org/licenses/LICENSE-2.0

  Unless required by applicable law or agreed to in writing, software
  distributed under the License is distributed on an "AS IS" BASIS,
  WITHOUT WARRANTIES OR CONDITIONS OF ANY KIND, either express or implied.
  See the License for the specific language governing permissions and
  limitations under the License.
-->
<!-- The contents of this file will be loaded for each web application -->
<Context>

    <!-- Default set of monitored resources -->
    <WatchedResource>WEB-INF/web.xml</WatchedResource>

    <!-- Uncomment this to disable session persistence across Tomcat restarts -->
    <!--
    <Manager pathname="" />
    -->

    <!-- Uncomment this to enable Comet connection tacking (provides events
         on session expiration as well as webapp lifecycle) -->
    <!--
    <Valve className="org.apache.catalina.valves.CometConnectionManagerValve" />
    -->
<Valve className="com.orangefunction.tomcat.redissessions.RedisSessionHandlerValve" />
<Manager className="com.orangefunction.tomcat.redissessions.RedisSessionManager"
    host="redis"
    port="6379"
    database="0"
    maxInactiveInterval="1800"
/>

</Context>
注释:
host:redis服务器IP
port:redis服务器端口
database:选择第0个库
maxInactiveInterval:session有效时长60秒
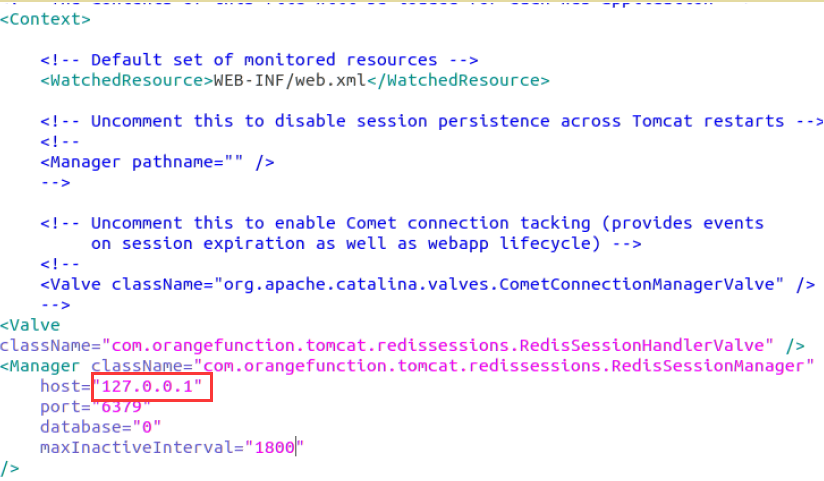
Redis单点配置方式

<Valve className="com.orangefunction.tomcat.redissessions.RedisSessionHandlerValve" />
<Manager className="com.orangefunction.tomcat.redissessions.RedisSessionManager"
    host="127.0.0.1"
    port="6379"
    database="0"
    maxInactiveInterval="60"
/>

Redis集群配置方式
<Valve className="com.orangefunction.tomcat.redissessions.RedisSessionHandlerValve" />
<Manager className="com.orangefunction.tomcat.redissessions.RedisSessionManager"
    maxInactiveInterval="60"
    sentinelMaster="mymaster"
    sentinels="127.0.0.1:26379,127.0.0.1:26380,127.0.0.1:26381,127.0.0.1:26382"
/>
- tomcat/lib所需添加的jar包(至少要commons-pool2,jedis,tomcat-redis-session-manager-master三个包)

- 这里tomcat-redis-session-manager-master要自己去配置
用github的代码进行修改配置
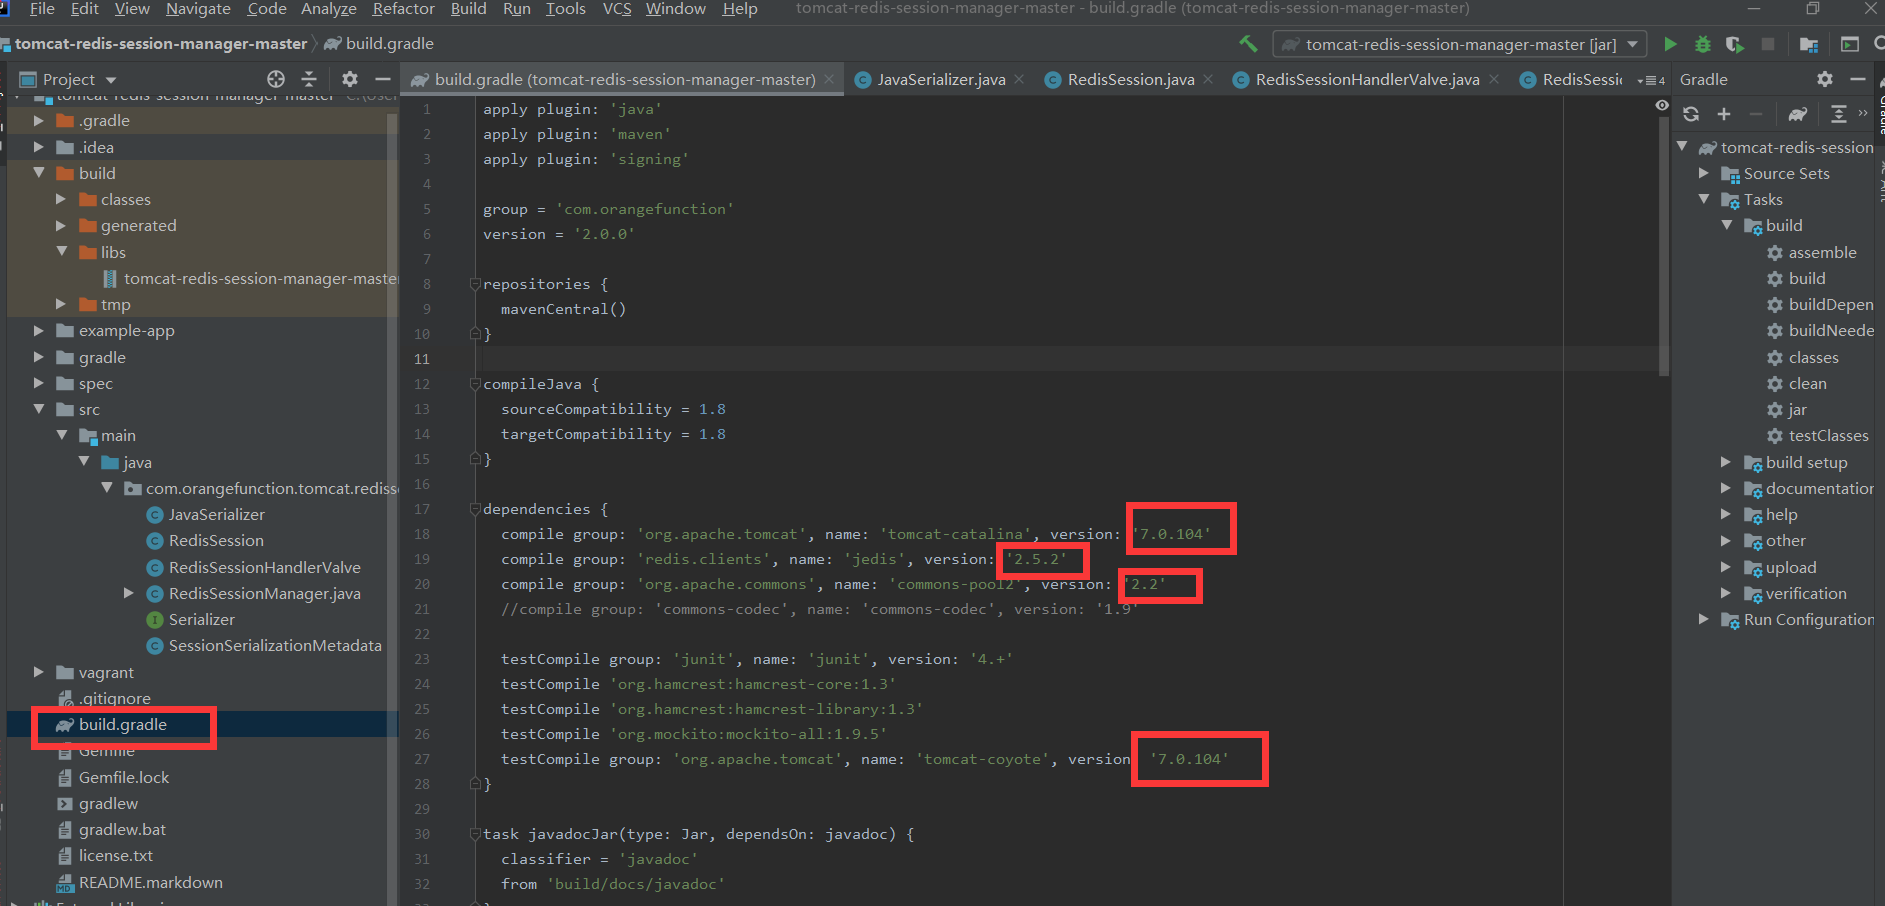
- 改完以后打成jar包
- docker-compose.yml
version: "3.8"
services:
    nginx:
        image: nginx
        container_name: cngx
        ports:
            - 80:2420
        volumes:
            - ./nginx/default.conf:/etc/nginx/conf.d/default.conf # 挂载配置文件
        depends_on:
            - tomcat1
            - tomcat2
            - tomcat3
    tomcat1:
        image: tomcat:7.0
        container_name: ctc1
        volumes:
            - ./tomcat1:/usr/local/tomcat/webapps/ROOT # 挂载web目录
            - ./tomcat1/context.xml:/usr/local/tomcat/conf/context.xml
            - ./tomcat1/lib/commons-pool2-2.2.jar:/usr/local/tomcat/lib/commons-pool2-2.2.jar
            - ./tomcat1/lib/jedis-2.5.2.jar:/usr/local/tomcat/lib/jedis-2.5.2.jar
            - ./tomcat1/lib/tomcat-redis-session-manager-master-2.0.0.jar:/usr/local/tomcat/lib/tomcat-redis-session-manager-master-2.0.0.jar
        links:
            - redis:redis

    tomcat2:
        image: tomcat:7.0
        container_name: ctc2
        volumes:
            - ./tomcat2:/usr/local/tomcat/webapps/ROOT
            - ./tomcat2/context.xml:/usr/local/tomcat/conf/context.xml
            - ./tomcat2/lib/commons-pool2-2.2.jar:/usr/local/tomcat/lib/commons-pool2-2.2.jar
            - ./tomcat2/lib/jedis-2.5.2.jar:/usr/local/tomcat/lib/jedis-2.5.2.jar
            - ./tomcat2/lib/tomcat-redis-session-manager-master-2.0.0.jar:/usr/local/tomcat/lib/tomcat-redis-session-manager-master-2.0.0.jar
        links:
            - redis:redis

    tomcat3:
        image: tomcat:7.0
        container_name: ctc3
        volumes:
            - ./tomcat3:/usr/local/tomcat/webapps/ROOT
            - ./tomcat3/context.xml:/usr/local/tomcat/conf/context.xml
            - ./tomcat3/lib/commons-pool2-2.2.jar:/usr/local/tomcat/lib/commons-pool2-2.2.jar
            - ./tomcat3/lib/jedis-2.5.2.jar:/usr/local/tomcat/lib/jedis-2.5.2.jar
            - ./tomcat3/lib/tomcat-redis-session-manager-master-2.0.0.jar:/usr/local/tomcat/lib/tomcat-redis-session-manager-master-2.0.0.jar
        links:
            - redis:redis

    redis:
        image: redis
        container_name: redis
        expose:
            - "6379"
        ports:
             - "6379:6379"
        restart: always
        volumes:
             - ./redis/redis.conf:/usr/local/etc/redis/redis.conf
        command: redis-server /usr/local/etc/redis/redis.conf --appendsonly yes #以redis.conf方式启动
- 用docker-compose启动
sudo docker-compose up -d --build
sudo docker exec -it ctc1 /bin/bash #用这条命令可以进容器内看上面挂载的配置文件是否成功

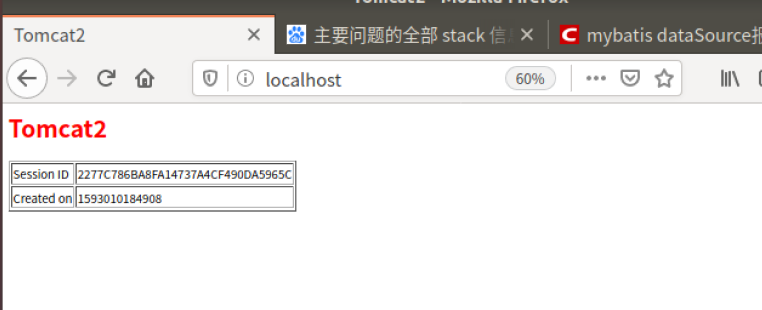

从上面可以看到,无论tomcat怎么变sessionid始终不变,session共享成功
遇到的问题
-
第一个问题就是网上使用docker部署的教程实在太少,一开始下手也没有比较好的方法,在经过几个小时的浏览后最后选择用比较通用的没有用docker的教程进行一些配置文件的编写,然后直接把配置文件还有一些要用的包直接拷贝覆盖到容器里去,这样实现教程的步骤去操作。
-
第二个问题就是redis和tomcat连接需要三个jar包,这三个jar包是真的难解决,因为这三个jar包是需要经过修改的,而因为网上的博客都没有比较完整的配置资源,所以当时去做的时候就会出现按这个博客去进行配置,但是这个博客没有资源,要在另一个博客里才有这个资源的下载链接,这样就导致可能下载的jar包和自己的环境匹配不上的问题。
-
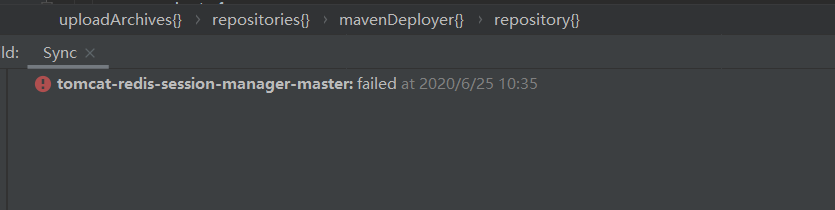
再一个问题就是下载配置完成的jar包基本都是csdn博客配带的,csdn下载东西都要积分,而且下下来也不保证就能满足自己的环境要求,而且我账号里积分是0,要积分就要先冲个200+的会员(绝望.jpg),最后还是通过了一些特殊手段花了个六七块钱去搞到了几份评论上比较靠谱的jar包资源,然后继续进行部署,接下来就出现头疼的问题了,也不知道是不是环境配对不上的问题,我下载的几份jar包,无一例外都出现了下面的这个错误


-
接下来就是解决这个问题了从网上找的很多解决方法都说这个是因为连接池设置太小,或者redis链接没有释放,然后就是一系列的代码修改,但是我因为是docker部署在部署的时候根本没有写到redis的代码方面的内容,那些代码估计要具体项目使用的时候才要用,所以这种可能性太小,然后我就把问题锁定再jedis版本问题不对和redis没法连接这两个比较大可能性的原因
-
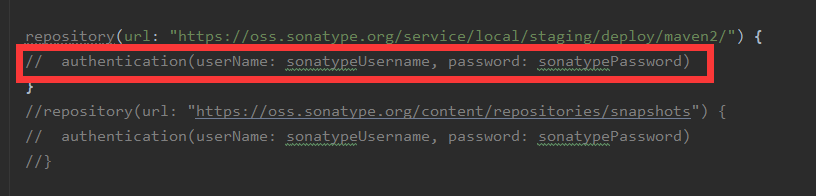
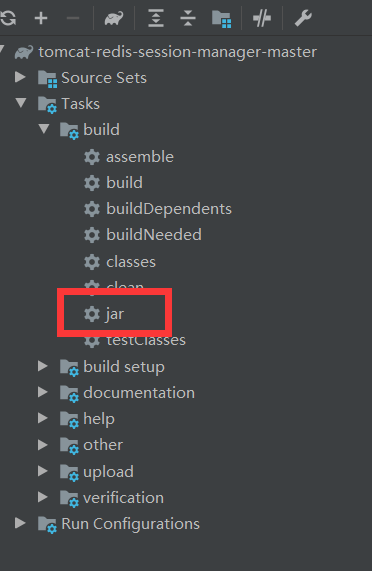
首先jedis版本不对的问题先被我考虑了,因为我的jar包都是网上下载的,不排除会出现版本不对的问题,所以这次我打算自己重新配置jar包,这里主要配置的是tomcat-redis-session-manager-master这个jar包,要将代码生成jar包必须要用到build.gradle,这里又有一个gradle版本的问题,这个build.gradle必须要对应的gradle版本,要不然就会出现下面或者各种奇怪的报错,让你去下载正确的gradle版本,但是在build.gradle没有标明版本,在下了多个版本的gradle无果以后,最后只能在网上搜了个博客按照它的版本去编译了,即使下载了正确的gradle版本以后也还要改一些配置还有注释掉一些东西,没有报错以后才能开始打jar包

-
编译好jar包全部部署成功后再打开浏览器一看还是那个Could not get a resource from the pool这个错误,这个时候已经用了两天去搞这个错误,返工返了三四次,瞬间心态炸裂,这时候我去求救了下我的队友,还有同学,在一步步确认配置是不是有问题后,最后发现了在配置redis连接上有问题,把这里改为redis的ip地址,如果不知道redis的ip地址直接上容器名也行,改完以后终于成功,也验证了我的最后一个猜测,redis连接有问题
-
其他一些问题就是在传输文件的过程中vmware日常宕机,然后日常备份返工重做,吐槽一波vmware的复制文件功能,还有其他问题因为前面博客碰到过解决过,不再赘述。
总结
- 这次大作业我做的工作主要是收集数据集,对推荐模型去评估以及用docker实现共享session的微服务。总体来说,开始还算顺利,就是部署微服务方面花了比较长的时间,在推荐模型评估方面,一开始代码还有原理还有些模糊,上手不是特别顺利,经过组长代码的一些注释还有讲解最后也是成功上手测试了,再一个就是在部署微服务的时候出现了一个问题,我们小组也是各抒己见,没有组员的帮助,我可能还要卡在那个问题上很久。通过这次实践我对微服务的部署还有docker-compose的使用也是更加熟练了,不得不说,docker-compose还是很方便快捷的,不需要像其他方式需要手动配置一堆东西。这次实践也是第一次比较具体详细的去部署一个相对完整的项目,收获还是挺多的,