大家好,我是不温卜火,是一名计算机学院大数据专业大二的学生,昵称来源于成语—
不温不火,本意是希望自己性情温和。作为一名互联网行业的小白,博主写博客一方面是为了记录自己的学习过程,另一方面是总结自己所犯的错误希望能够帮助到很多和自己一样处于起步阶段的萌新。但由于水平有限,博客中难免会有一些错误出现,有纰漏之处恳请各位大佬不吝赐教!暂时只有csdn这一个平台,博客主页:https://buwenbuhuo.blog.csdn.net/
此篇为大家带来的是CM的简单介绍及环境准备。
搭建CDH所需要的各种文件博主已经打包上传了,如有需要,可自行下载:
链接:https://pan.baidu.com/s/1DlDy36BxdLHjyNxar-vZTQ
提取码:bmtm
目录

一. Cloudera Manager
1.1 cloudera manager的概念
简单来说,Cloudera Manager是一个拥有集群自动化安装、中心化管理、集群监控、报警功能的一个工具(软件),使得安装集群从几天的时间缩短在几个小时内,运维人员从数十人降低到几人以内,极大的提高集群管理的效率。
1.2 cloudera manager的功能
- 1.管理:对集群进行管理,如添加、删除节点等操作。
- 2.监控:监控集群的健康情况,对设置的各种指标和系统运行情况进行全面监控。
- 3.诊断:对集群出现的问题进行诊断,对出现的问题给出建议解决方案。
- 4.集成:多组件进行整合。

1.3 cloudera manager的架构

- 1.Server:负责软件安装、配置,启动和停止服务,管理服务运行的群集。
- 2.Agent:安装在每台主机上。负责启动和停止的过程,配置,监控主机。
- 3.Management Service:由一组执行各种监控,警报和报告功能角色的服务。
- 4.Database:存储配置和监视信息。
- 5.Cloudera Repository:软件由Cloudera 管理分布存储库。(有点类似Maven的中心仓库)
- 6.Clients:是用于与服务器进行交互的接口(API和Admin Console)
二. 配置环境
2.1 开始准备
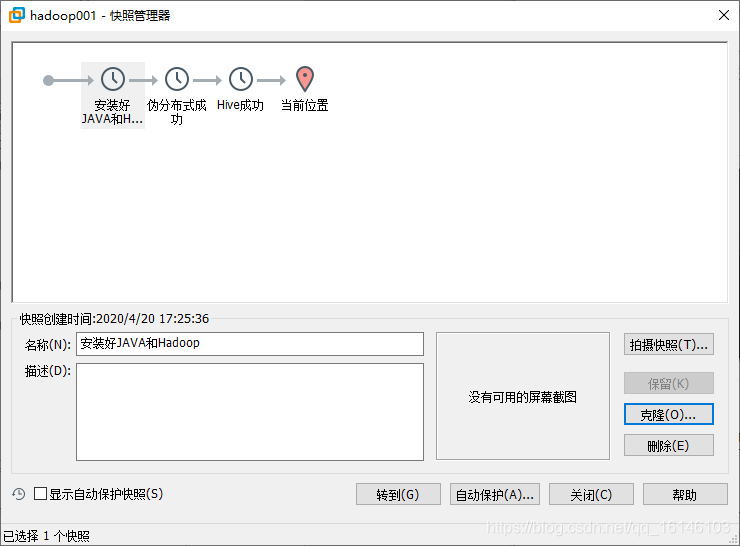
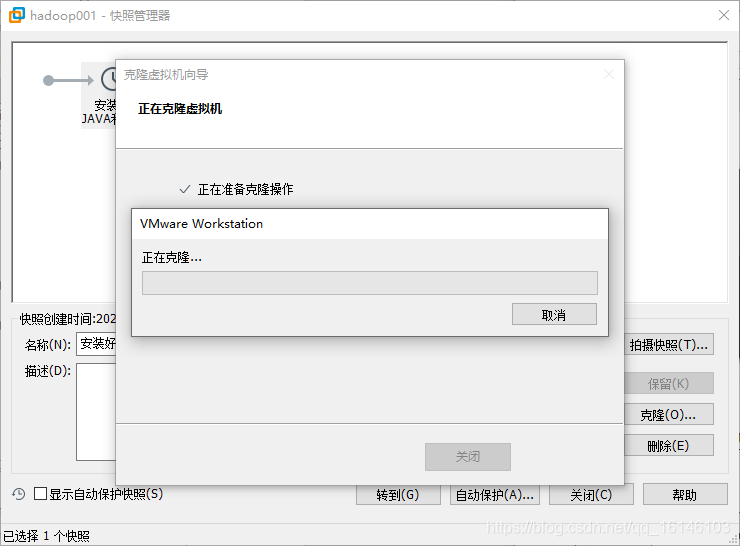
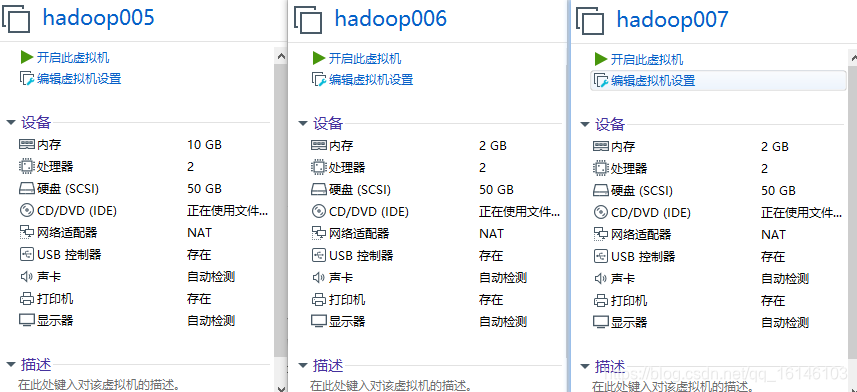
1 克隆三台虚拟机
- 1. 开始克隆

2 内存分配(16G内存版本)
| hadoop005 | hadoop006 | hadoop007 | |
|---|---|---|---|
| 内存分配 | 10G | 2G | 2G |
3 修改IP(都需修改)
[root@hadoop001 ~]# vim /etc/sysconfig/network-scripts/ifcfg-eth0
// 修改为下列格式
DEVICE=eth0
TYPE=Ethernet
ONBOOT=yes
BOOTPROTO=static
NAME="eth0"
IPADDR=192.168.2.115
PREFIX=24
GATEWAY=192.168.2.2
DNS1=192.168.2.2

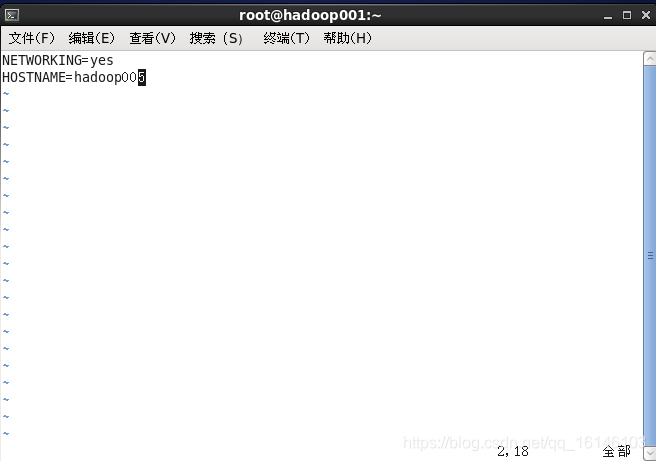
4 修改主机名
[root@hadoop001 ~]# vim /etc/sysconfig/network

改HOSTNAME=那一行
5 配置hosts文件
[root@hadoop001 ~]# vim /etc/hosts

6 更改系统的mac地址
[root@hadoop001 ~]# vim /etc/udev/rules.d/70-persistent-net.rules

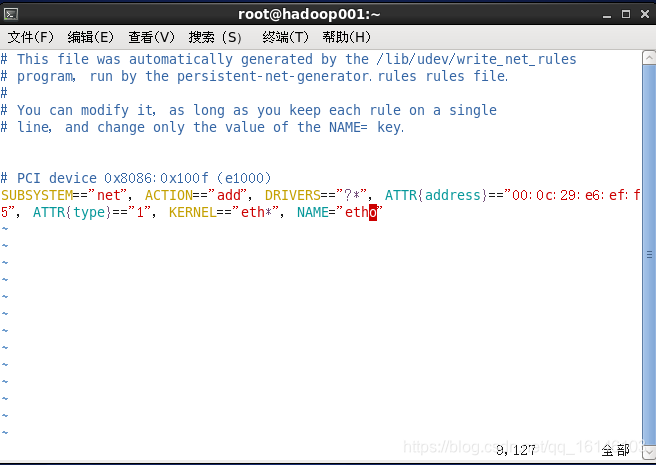
修改完毕后,重新启动
7 配置时间同步
先配置好服务器节点上的时区
- 1.如果在/usr/share/zoneinfo/这个目录下不存在时区配置文件Asia/Shanghai,就要用 tzselect 生成。
[root@hadoop005 ~]# tzselect
Please identify a location so that time zone rules can be set correctly.
Please select a continent or ocean.
 1) Africa
 2) Americas
 3) Antarctica
 4) Arctic Ocean
 5) Asia
 6) Atlantic Ocean
 7) Australia
 8) Europe
 9) Indian Ocean
10) Pacific Ocean
11) none - I want to specify the time zone using the Posix TZ format.
#? 5
Please select a country.
 1) Afghanistan           18) Israel                35) Palestine
 2) Armenia               19) Japan                 36) Philippines
 3) Azerbaijan            20) Jordan                37) Qatar
 4) Bahrain               21) Kazakhstan            38) Russia
 5) Bangladesh            22) Korea (North)         39) Saudi Arabia
 6) Bhutan                23) Korea (South)         40) Singapore
 7) Brunei                24) Kuwait                41) Sri Lanka
 8) Cambodia              25) Kyrgyzstan            42) Syria
 9) China                 26) Laos                  43) Taiwan
10) Cyprus                27) Lebanon               44) Tajikistan
11) East Timor            28) Macau                 45) Thailand
12) Georgia               29) Malaysia              46) Turkmenistan
13) Hong Kong             30) Mongolia              47) United Arab Emirates
14) India                 31) Myanmar (Burma)       48) Uzbekistan
15) Indonesia             32) Nepal                 49) Vietnam
16) Iran                  33) Oman                  50) Yemen
17) Iraq                  34) Pakistan
#? 9
Please select one of the following time zone regions.
1) Beijing Time
2) Xinjiang Time
#? 1

The following information has been given:

        China
        Beijing Time

Therefore TZ='Asia/Shanghai' will be used.
Local time is now:      Thu Oct 18 16:24:23 CST 2018.
Universal Time is now:  Thu Oct 18 08:24:23 UTC 2018.
Is the above information OK?
1) Yes
2) No
#? 1

You can make this change permanent for yourself by appending the line
        TZ='Asia/Shanghai'; export TZ
to the file '.profile' in your home directory; then log out and log in again.

Here is that TZ value again, this time on standard output so that you
can use the /usr/bin/tzselect command in shell scripts:
Asia/Shanghai
- 2. 拷贝该时区文件,覆盖系统本地时区配置
[root@hadoop005 ~]# cp /usr/share/zoneinfo/Asia/Shanghai /etc/localtime
- 3. 集群时间同步(同时发给三个窗口)
[root@hadoop005 ~]# sudo date -s '2020-05-22 13:14:00'

8 关闭SELINUX
- 1.临时关闭:
[root@hadoop005 ~] setenforce 0
- 2.修改配置文件/etc/selinux/config(重启生效)
[root@hadoop005 ~] vim /etc/selinux/config

将SELINUX=enforcing 改为SELINUX=disabled
9 ssh免密登录
将hadoop105,hadoop106,hadoop107相互之间配置免密登陆。
[bigdata@hadoop005 software]$ ssh-keygen -t rsa
[bigdata@hadoop005 software]$ ssh-copy-id hadoop005

2.3 JDK(由于克隆时已经安装配置完成此步可以省略)
安装JDK配置环境变量
2.4 安装配置mysql(建议三台都装)
在hadoop105上安装mysql,配置相应的用户权限。
- 1. 上传所需文件到指定虚拟机上

2.5 安装mysql
- 1. 卸载原有mysql
// 1.卸载原有mysql
[bigdata@hadoop005 software]$ rpm -qa | grep mysql
[bigdata@hadoop005 software]$ rpm -qa | grep mysql | xargs sudo rpm -e --nodeps

- 2. 安装mysql
// 1.安装客户端
[bigdata@hadoop005 software]$ sudo rpm -ivh MySQL-client-5.6.24-1.el6.x86_64.rpm

// 2.安装服务器
[bigdata@hadoop005 software]$ sudo rpm -ivh MySQL-server-5.6.24-1.el6.x86_64.rpm

// 3. 安装shared
[bigdata@hadoop005 software]$ sudo rpm -ivh MySQL-shared-compat-5.6.41-1.el6.x86_64.rpm
- 3. 启动mysql并设置密码
// 1.启动Mysql
[bigdata@hadoop005 software]$ sudo service mysql start

// 2.查看现密码
[bigdata@hadoop005 software]$ sudo cat /root/.mysql_secret
# The random password set for the root user at Fri May 22 18:15:02 2020 (local time): FRFHhxua231egPGW

[bigdata@hadoop005 software]$ mysql_secure_installation

// 具体步骤如下
NOTE: RUNNING ALL PARTS OF THIS SCRIPT IS RECOMMENDED FOR ALL MySQL
      SERVERS IN PRODUCTION USE!  PLEASE READ EACH STEP CAREFULLY!

In order to log into MySQL to secure it, we'll need the current
password for the root user.  If you've just installed MySQL, and
you haven't set the root password yet, the password will be blank,
so you should just press enter here.

Enter current password for root (enter for none): `FRFHhxua231egPGW`
OK, successfully used password, moving on...

Setting the root password ensures that nobody can log into the MySQL
root user without the proper authorisation.

You already have a root password set, so you can safely answer 'n'.

Change the root password? [Y/n]
New password:
Re-enter new password:
Password updated successfully!
Reloading privilege tables..
 ... Success!


By default, a MySQL installation has an anonymous user, allowing anyone
to log into MySQL without having to have a user account created for
them.  This is intended only for testing, and to make the installation
go a bit smoother.  You should remove them before moving into a
production environment.

Remove anonymous users? [Y/n]
 ... Success!

Normally, root should only be allowed to connect from 'localhost'.  This
ensures that someone cannot guess at the root password from the network.

Disallow root login remotely? [Y/n] n
 ... skipping.

By default, MySQL comes with a database named 'test' that anyone can
access.  This is also intended only for testing, and should be removed
before moving into a production environment.

Remove test database and access to it? [Y/n]
 - Dropping test database...
 ... Success!
 - Removing privileges on test database...
 ... Success!

Reloading the privilege tables will ensure that all changes made so far
will take effect immediately.

Reload privilege tables now? [Y/n]
 ... Success!

All done!  If you've completed all of the above steps, your MySQL
installation should now be secure.

Thanks for using MySQL!

Cleaning up...
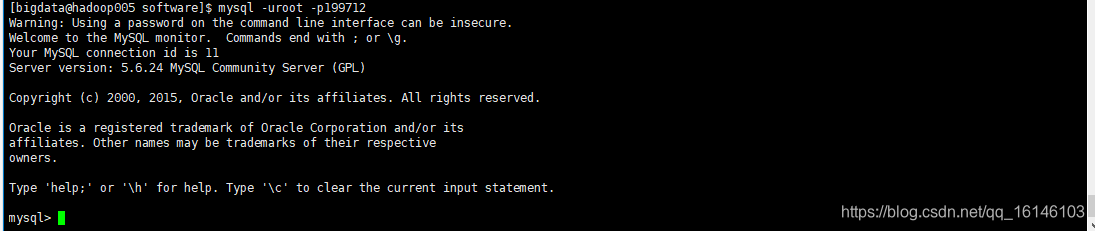
- 4. 启动mysql
[bigdata@hadoop005 software]$ mysql -uroot -p199712
- 5.删除所需要删除的
mysql> use mysql
// 查看
mysql> select user,host,password from user;

// 删除对应的
mysql> delete from user where host='::1';
mysql> delete from user where host='127.0.0.1';
mysql> delete from user where host='hadoop005';

mysql> update user set host="%";
mysql> select user,host,password from user;
mysql> flush privileges;
本次的分享就到这里了,

好书不厌读百回,熟读课思子自知。而我想要成为全场最靓的仔,就必须坚持通过学习来获取更多知识,用知识改变命运,用博客见证成长,用行动证明我在努力。
如果我的博客对你有帮助、如果你喜欢我的博客内容,请“点赞” “评论”“收藏”一键三连哦!听说点赞的人运气不会太差,每一天都会元气满满呦!如果实在要白嫖的话,那祝你开心每一天,欢迎常来我博客看看。
码字不易,大家的支持就是我坚持下去的动力。点赞后不要忘了关注我哦!