零、前言
spring boot进行定时任务一共有三种方式,第一种也就是最简单的一种:基于注解 (@Scheduled)的方式;第二种:基于接口 (SchedulingConfigurer);第三种:基于注解设定多线程定时任务。
一、基于注解的方式
首先,打开idea,创建springboot项目,无需引入任何jar,springboot自带定时。
然后,在启动类中用注解@EnableScheduling进行标注,表明此类 存在定时任务。在定时执行的方法之上添加注解
@Scheduled(cron ="*/6 * * * * ?")。package com.example.demo;
import org.springframework.boot.SpringApplication;
import org.springframework.boot.autoconfigure.SpringBootApplication;
import org.springframework.scheduling.annotation.EnableScheduling;
import org.springframework.scheduling.annotation.Scheduled;
@SpringBootApplication
@EnableScheduling
public class DemoApplication {
public static void main(String[] args) {
SpringApplication.run(DemoApplication.class, args);
}
@Scheduled(cron ="*/6 * * * * ?")
public void sayHello() {
System.out.println("hello");
}
}
点击启动,即可看到控制台6秒输出一次“hello”。
当然,定时任务也可以放在其他类中。例如创建类Task1。
package com.example.task;

import org.springframework.scheduling.annotation.Scheduled;
import org.springframework.stereotype.Component;

/**
 * @Description
 * @ClassName Task1
 * @Author User
 * @date 2020.06.07 12:24
 */
@Component
public class Task1 {

    @Scheduled(cron ="*/1 * * * * ?")
    public void sayWord() {
        System.out.println("world");
    }
}
然后可以看到控制台的输出结果:

这里有个要注意的细节,就是启动类需要能扫描到定时任务类,否则定时任务启动不起来。不仅需要@Component注解,也需要将启动类位置位于定时任务类之上。如下图:

笔者就是犯了这样的错,一直没启动起来。
@Scheduled除过cron还有三种方式:fixedRate,fixedDelay,initialDelay
cron:表达式可以定制化执行任务,但是执行的方式是与fixedDelay相近的,也是会按照上一次方法结束时间开始算起。
fixedRate:控制方法执行的间隔时间,是以上一次方法执行完开始算起,如上一次方法执行阻塞住了,那么直到上一次执行完,并间隔给定的时间后,执行下一次。
@Configuration
@EnableScheduling    //开启定时任务
public class ScheduleTask1 {
    //每3秒执行一次
    @Scheduled(fixedDelay = 3000)
    private void myTasks() {
        System.out.println("I do myself per third seconds");
    }
}fixedRate:是按照一定的速率执行,是从上一次方法执行开始的时间算起,如果上一次方法阻塞住了,下一次也是不会执行,但是在阻塞这段时间内累计应该执行的次数,当不再阻塞时,一下子把这些全部执行掉,而后再按照固定速率继续执行。
@Component
@EnableScheduling    //开启定时任务
public class ScheduleTask2 {
    //每10秒执行一次
    @Scheduled(fixedRate = 10000)
    private void myTasks2() {
        System.out.println("我是一个定时任务");
    }
}initialDelay:initialDelay = 10000 表示在容器启动后,延迟10秒后再执行一次定时器。
@Component
@EnableScheduling    //开启定时任务
public class ScheduleTask {
    //容器启动后,延迟10秒后再执行一次定时器,以后每10秒再执行一次该定时器。
    @Scheduled(initialDelay = 10000, fixedRate = 10000)
    private void myTasks3() {
        System.out.println("我是一个定时任务3");
    }
}
二、cron解释
cron
cron 用法跟linux下是一摸一样的,如果你搞过linux下的定时,那么必然很熟悉。
结构
cron表达式是一个字符串,分为6或7个域,每两个域之间用空格分隔,
其语法格式为:"秒域 分域 时域 日域 月域 周域 年域"
取值范围
| 域名 | 可取值 | 可取符号(仅列部分常用) |
|---|---|---|
| 秒域 | 0~59的整数 | * - , / |
| 分域 | 0~59的整数 | * - , / |
| 时域 | 0~23的整数 | * - , / |
| 日域 | 1~31的整数 | * - , / ? L |
| 月域 | 1~12的整数或JAN~DEC | * - , / |
| 周域 | 1~7的整数或SUN~SAT | * - , / ? L # |
| 年域 | 1970~2099的整数 | * - , / |
常例
| 表达式 | 意义 |
|---|---|
| 每隔5秒钟执行一次 | */5 * * * * ? |
| 每隔1分钟执行一次 | 0 * /1 * * * ? |
| 每天1点执行一次 | 0 0 1 * * ? |
| 每天23点55分执行一次 | 0 55 23 * * ? |
| 每月最后一天23点执行一次 | 0 0 23 L * ? |
| 每周六8点执行一次 | 0 0 8 ? * L |
| 每月最后一个周五,每隔2小时执行一次 | 0 0 */2 ? * 6L |
| 每月的第三个星期五上午10:15执行一次 | 0 15 10 ? * 5#3 |
| 在每天下午2点到下午2:05期间的每1分钟执行 | 0 0-5 14 * * ? |
| 表示周一到周五每天上午10:15执行 | 0 15 10 ? * 2-6 |
| 每个月的最后一个星期五上午10:15执行 | 0 15 10 ? * 6L |
| 每天上午10点,下午2点,4点执行一次 | 0 0 10,14,16 * * ? |
| 朝九晚五工作时间内每半小时执行一次 | 0 0/30 9-17 * * ? |
| 每个星期三中午12点执行一次 | 0 0 12 ? * 4 |
| 每年三月的星期三的下午2:10和2:44各执行一次 | 0 10,44 14 ? 3 4 |
| 每月的第三个星期五上午10:15执行一次 | 0 15 10 ? * 6#3 |
| 每月一日凌晨2点30执行一次 | 0 30 2 1 * ? |
| 每分钟的第10秒与第20秒都会执行 | 10,20 * * * * ? |
| 每月的第2个星期的周5,凌晨执行 | 0 0 0 ? * 6#2 |
本方法的demo地址: https://github.com/SUST-MaZhen/scheduledTask.git
三、基于接口的方式
使用@Scheduled 注解很方便,但缺点是当我们调整了执行周期的时候,需要重启应用才能生效,这多少有些不方便。为了达到实时生效的效果,那么可以使用接口来完成定时任务,统一将定时器信息存放在数据库中。
在mysql中执行一下脚本插入定时任务:
drop table if exists `scheduled`;
create table `scheduled` (
 `cron_id` varchar(30) NOT NULL primary key,
 `cron_name` varchar(30) NULL,
 `cron` varchar(30) NOT NULL
);
insert into `scheduled` values ('1','定时器任务一','0/6 * * * * ?');
创建一个springboot 项目:我们这里只添加一个mapper,不要bean也不要service以及controller,只是为了演示定时功能而已。demo结构:

数据源基本配置:application.properties
## mysql数据源配置
spring.datasource.url=jdbc:mysql://host:3306/dbname?useUnicode=true&serverTimezone=Asia/Shanghai
spring.datasource.username=root
spring.datasource.password=123456
spring.datasource.driver-class-name=com.mysql.cj.jdbc.Driver

## Mybatis 配置
# 配置为 com.example.bean 指向实体类包路径
#mybatis.typeAliasesPackage=com.zhenma.bean
mapper也就是dao:
package com.zhenma.mapper;

import org.apache.ibatis.annotations.Mapper;
import org.apache.ibatis.annotations.Select;
import org.springframework.stereotype.Repository;

@Repository
@Mapper
public interface CronMapper {
    @Select("select cron from scheduled where cron_id = #{id}")
    public String getCron(int id);
}
task类:
package com.zhenma.scheduled;

import com.zhenma.mapper.CronMapper;
import org.springframework.beans.factory.annotation.Autowired;
import org.springframework.scheduling.annotation.EnableScheduling;
import org.springframework.scheduling.annotation.SchedulingConfigurer;
import org.springframework.scheduling.config.ScheduledTaskRegistrar;
import org.springframework.scheduling.support.CronTrigger;
import org.springframework.stereotype.Component;

/**
 * @Description
 * @ClassName MyTask
 * @Author User
 * @date 2020.06.07 15:23
 */
@Component
@EnableScheduling
public class MyTask implements SchedulingConfigurer {

    @Autowired
    protected CronMapper cronMapper;

    @Override
    public void configureTasks(ScheduledTaskRegistrar scheduledTaskRegistrar) {
        scheduledTaskRegistrar.addTriggerTask(() -> process(),
                triggerContext -> {
                    String cron = cronMapper.getCron(1);
                    if (cron.isEmpty()) {
                        System.out.println("cron is null");
                    }
                    return new CronTrigger(cron).nextExecutionTime(triggerContext);
                });
    }

    private void process() {
        System.out.println("基于接口定时任务");
    }
}
运行结果:

从结果中可以看出,是按照每6秒也就是数据库中查询的结果来进行的。
需求:我现在需要每10秒执行一次定时任务,该怎么办呢?对!只需要修改数据库值即可,server无需重启。观察修改后的结果。

感觉好(。・∀・)ノ゙嗨哦。
demo地址:https://github.com/SUST-MaZhen/scheduledtask2.git
四、 基于注解设定多线程定时任务
前面讲到了@Scheduled执行周期任务会受到上次一个任务的执行时间影响。那么可以开启多线程执行周期任务。
创建springboot项目,创建一个多线程定时任务类如下:
package com.example.task;

import org.springframework.scheduling.annotation.Async;
import org.springframework.scheduling.annotation.EnableAsync;
import org.springframework.scheduling.annotation.EnableScheduling;
import org.springframework.scheduling.annotation.Scheduled;
import org.springframework.stereotype.Component;

import java.time.LocalDateTime;

/**
 * @Description
 * @ClassName MultiThreadTask
 * @Author User
 * @date 2020.06.07 18:56
 */
@EnableScheduling   // 1.开启定时任务
@EnableAsync        // 2.开启多线程
@Component
public class MultiThreadTask {

    @Async
    @Scheduled(fixedDelay = 1000)  //间隔1秒
    public void first() throws InterruptedException {
        System.out.println("第一个定时任务开始 : " + LocalDateTime.now().toLocalTime() + "\r\n线程 : " + Thread.currentThread().getName());
        Thread.sleep(1000 * 10);
    }

    @Async
    @Scheduled(fixedDelay = 2000)
    public void second() {
        System.out.println("第二个定时任务开始 : " + LocalDateTime.now().toLocalTime() + "\r\n线程 : " + Thread.currentThread().getName());
    }
}
执行结果如下:
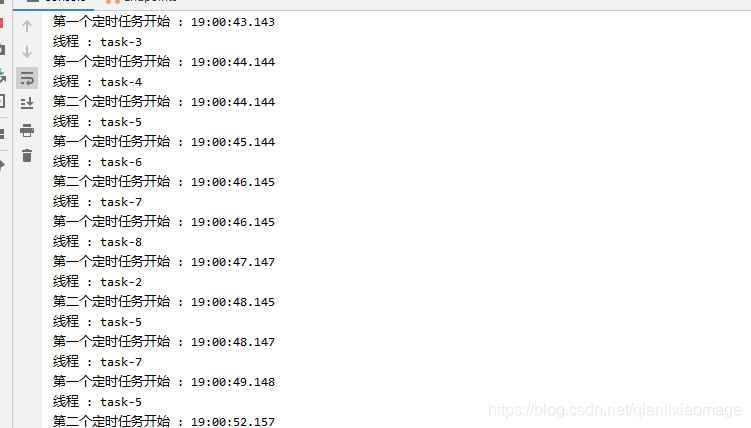
从结果可以看出:第一个任务的执行时间也不受其本身执行时间的限制。两个任务也互不影响。
demo地址: https://github.com/SUST-MaZhen/scheduledtash3.git
五、总结
本文介绍了spring boot创建定时任务的三种方式,当然还有其他方式,例如最近本的定时器来进行等等。记录为了使用,多使用便会记忆,便会理解。 写个博客真费劲,卡在demo上...。