同源政策
1.Ajax请求限制
Ajax 只能向自己的服务器发送请求。比如现在有一个A网站、有一个B网站,A网站中的 HTML 文件只能向A网站服务器中发送 Ajax 请求,B网站中的 HTML 文件只能向 B 网站中发送 Ajax 请求,但是 A 网站是不能向 B 网站发送 Ajax请求的,同理,B 网站也不能向 A 网站发送 Ajax请求。
2.什么是同源
如果两个页面拥有相同的协议、域名和端口,那么这两个页面就属于同一个源,其中只要有一个不相同,就是不同源。
http://www.example.com/dir/page.html
例子:
http://www.example.com/dir2/other.html:同源
http://example.com/dir/other.html:不同源(域名不同)
http://v2.www.example.com/dir/other.html:不同源(域名不同)
http://www.example.com:81/dir/other.html:不同源(端口不同)
https://www.example.com/dir/page.html:不同源(协议不同)
3.同源政策的目的
- 同源政策是为了保证用户信息的安全,防止恶意的网站窃取数据。最初的同源政策是指 A 网站在客户端设置的 Cookie,B网站是不能访问的。
- 随着互联网的发展,同源政策也越来越严格,在不同源的情况下,其中有一项规定就是无法向非同源地址发送Ajax 请求,如果请求,浏览器就会报错。
同源问题案例:
注意:此处两个服务器包含全文
服务器A
//引入express框架
const express = require('express');
//引入路径模块
const path = require('path');
// 引入允许其他服务器访问数据的request模块
const request = require('request');
//搭建服务器
const app = express();

//静态页面访问功能
app.use(express.static(path.join(__dirname, 'public')));

//!访问非同源服务器数据,服务器端的配置
app.get('/server', (req, res) => {
    request('http://localhost:4000/cross', (err, response, body) => {
        res.send(body);
    })
})
//监听端口
app.listen(3000);
console.log('服务器启动成功,端口3000');
服务器B
//引入express框架
const express = require('express');
//引入路径模块
const path = require('path');
// 引入formidable表单解析模块
const formidable = require('formidable');
//实现session功能
const session = require('express-session');
//搭建服务器
const app = express();
app.use(session({
secret: 'keyboard cat',
resave: false,
saveUninitialized: false
}))
//静态页面访问功能
app.use(express.static(path.join(__dirname, 'public')));
//!中间件来处理所有非同源Ajax请求
app.use((req, res, next) => {
//设置响应头,哪些请求允许访问
//'*'代表允许所有客户端访问
//注意如果信息中涉及到cookie信息的传递,值不可以为'*'号,比如具体的域名信息
res.header('Access-Control-Allow-Origin', 'http://localhost:3000');
res.header('Access-Control-Allow-Methods', 'get,post');
// 允许客户端发送跨域请求携带cookie信息
res.header('Access-Control-Allow-Credentials', true);
next();
});
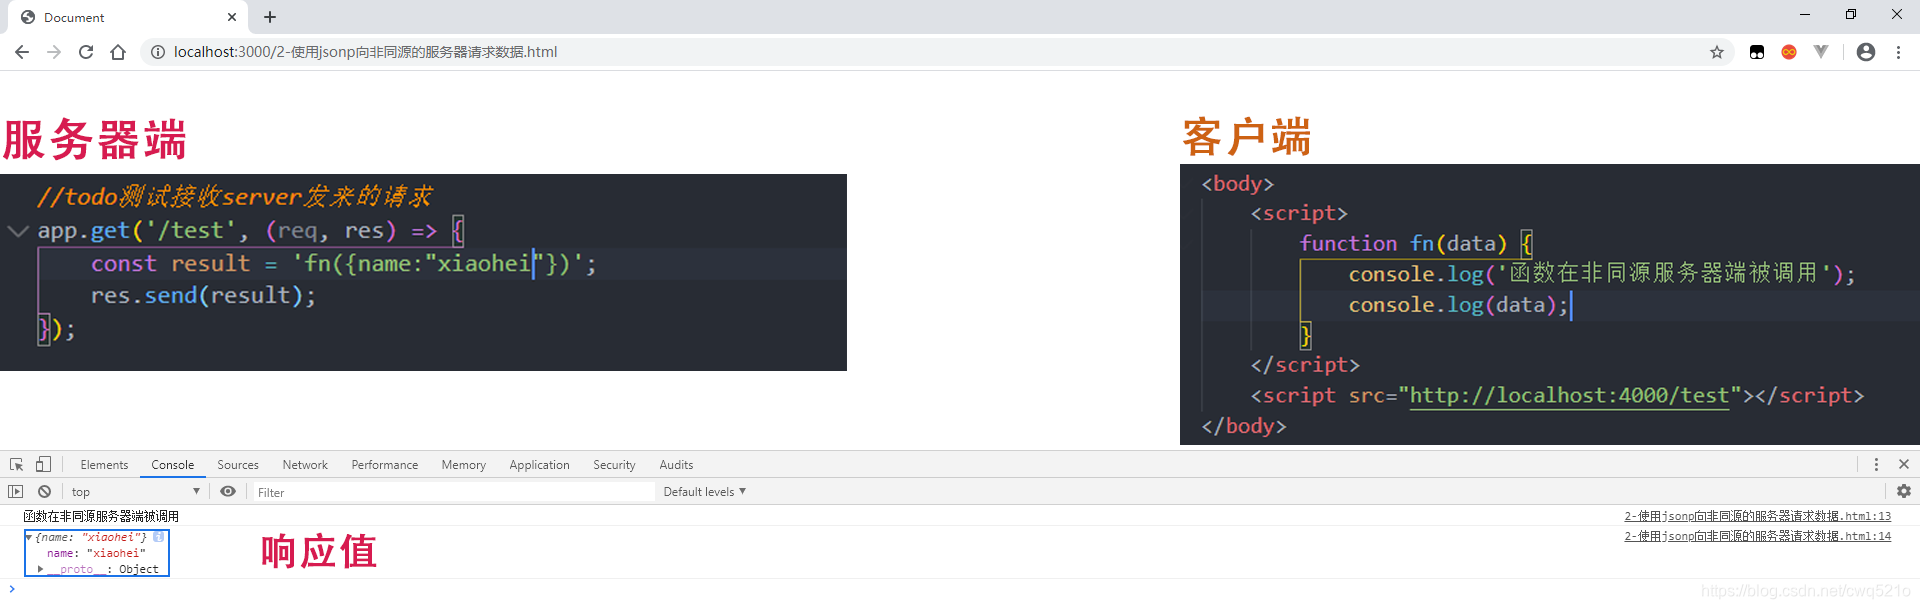
//todo测试接收server发来的请求
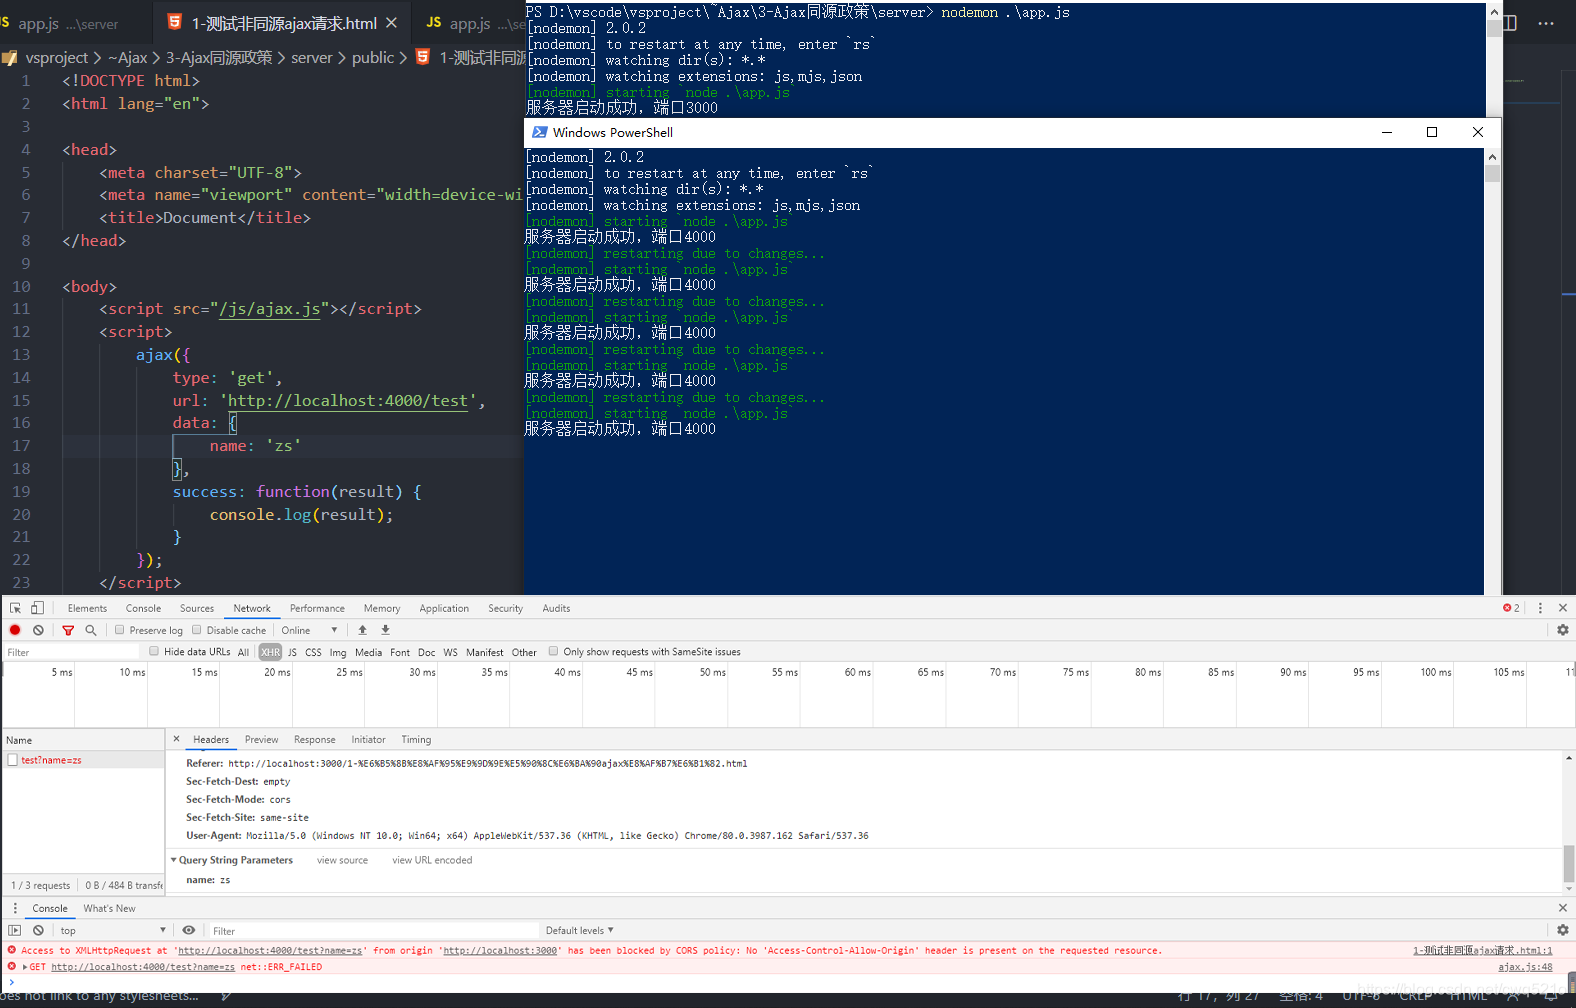
app.get('/test', (req, res) => {
const result = 'fn({name:"xiaohei"})';
res.send(result);
});
//! jsonp函数名优化
app.get('/better', (req, res) => {
// 接收客户端传递过来的函数名称
// const fuName = req.query.callback;
// 将函数名称对应的函数调用代码返回给客户端
// const data = JSON.stringify({ name: "xiaohei" });
// const result = fuName + '(' + data + ')';
// setTimeout(() => {
// res.send(result);
// }, 1000);
// express框架提供了jsonp方法,为我们做了上面的事情
res.jsonp({ name: 'lisi', age: 19 });
});
//!CROS响应非同源请求
app.get('/cross', (req, res) => {
//设置响应头,哪些请求允许访问
//*代表允许所有客户端访问
// res.header('Access-Control-Allow-Origin', '*');
// res.header('Access-Control-Allow-Methods', 'get,post');
res.send('ok');
});
//!实现跨域登录功能
app.post('/login', (req, res) => {
//创建formidable解析表单对象
const form = formidable.IncomingForm();
//解析传过来的表单
form.parse(req, (err, fields, files) => {
// 接收客户端传递过来的用户名and密码
const { username, password } = fields;
if (username == 'cwen' && password == '666') {
// 设置session
req.session.isLogin = true;
res.send('登录成功');
} else {
res.send('登陆失败');
}
})
});
//!实现验证登录功能
app.get('/checkLogin', (req, res) => {
// 判断登录状态
if (req.session.isLogin) {
res.send('陈稳在线');
} else {
res.send('登陆失败');
}
});
//监听端口
app.listen(4000);
console.log('服务器启动成功,端口4000');
解释:此处开启两台服务器模拟非同源数据访问(此时服务器还不具备跨域等非同源访问)
4.使用 JSONP 解决同源限制问题(+)
jsonp 是 json with padding 的缩写,它不属于 Ajax 请求,但它可以模拟 Ajax 请求(原理就是用script标签来调用函数)。
- 将不同源的服务器端请求地址写在 script 标签的 src 属性中
<script src="www.example.com"></script>
<script src=“https://cdn.bootcss.com/jquery/3.3.1/jquery.min.js"></script>
- 服务器端响应数据必须是一个函数的调用,真正要发送给客户端的数据需要作为函数调用的参数。
const data = 'fn({name: "张三", age: "20"})';
 res.send(data);
- 在客户端全局作用域下定义函数 fn
function fn (data) { }
- 在 fn 函数内部对服务器端返回的数据进行处理
function fn (data) { console.log(data); }
实例:
4-1.JSONP 代码优化
- 客户端需要将函数名称传递到服务器端。
- 将 script 请求的发送变成动态请求。
- 封装 jsonp 函数,方便请求发送。
- 服务器端代码优化之 res.jsonp 方法。
优化后代码:
客户端:
<!DOCTYPE html>
<html lang="en">

<head>
    <meta charset="UTF-8">
    <meta name="viewport" content="width=device-width, initial-scale=1.0">
    <title>Document</title>
</head>

<body>
    <button id="btn1">点击发送1</button>
    <button id="btn2">点击发送2</button>
    <script>
        var btn1 = document.querySelector('#btn1');
        var btn2 = document.querySelector('#btn2');
        btn1.onclick = function() {
            jsonp({
                url: 'http://localhost:4000/better',
                data: {
                    name: 'cwen',
                    age: 18
                },
                success: function(data) {
                    console.log(123);
                    console.log(data);
                }
            });
        };
        btn2.onclick = function() {
            jsonp({
                url: 'http://localhost:4000/better',
                success: function(data) {
                    console.log(456);
                    console.log(data);
                }
            });
        };
        //封装jsonp函数
        function jsonp(options) {
            //先创建script标签
            var script = document.createElement('script');
            //创建接收参数的变量
            var params = '';
            for (let attr in options.data) {
                params += '&' + attr + '=' + options.data[attr];
            };
            //生成随机访问函数名,防止覆盖问题
            const fnNmae = 'myJsonp' + Math.random().toString().replace('.', '');
            //把success函数变为全局函数
            window[fnNmae] = options.success;
            //给标签添加src属性
            script.src = options.url + '?callback=' + fnNmae + params;
            //把标签追加到页面
            document.body.appendChild(script);
            //及时删除无用标签,防止代码冗余
            script.onload = function() {
                document.body.removeChild(script);
            }
        }
    </script>

</body>

</html>
服务器端:
//! jsonp函数名优化
app.get('/better', (req, res) => {
    // 接收客户端传递过来的函数名称
    // const fuName = req.query.callback;
    // 将函数名称对应的函数调用代码返回给客户端
    // const data = JSON.stringify({ name: "xiaohei" });
    // const result = fuName + '(' + data + ')';
    // setTimeout(() => {
    //     res.send(result);
    // }, 1000);

    // express框架提供了jsonp方法,为我们做了上面的事情
    res.jsonp({ name: 'lisi', age: 19 });
});
案例(使用jsonp获取天气信息)
预览:

代码:
<!DOCTYPE html>
<html lang="en">

<head>
    <meta charset="UTF-8">
    <title>使用jsonp获取腾讯天气信息</title>
    <link rel="stylesheet" href="/assets/bootstrap/dist/css/bootstrap.min.css">
    <style type="text/css">
        .container {
            padding-top: 60px;
        }
    </style>
</head>

<body>
    <div class="container">
        <table class="table table-striped table-hover" align="center" id="box"></table>
    </div>
    <script src="/js/jsonp.js"></script>
    <script src="/js/template-web.js"></script>
    <script type="text/html" id="tpl">
        <tr>
            <th>时间</th>
            <th>温度</th>
            <th>天气</th>
            <th>风向</th>
            <th>风力</th>
        </tr>
        {{each info}}
        <tr>
            <td>{{dateFormat($value.update_time)}}</td>
            <td>{{$value.degree}}</td>
            <td>{{$value.weather}}</td>
            <td>{{$value.wind_direction}}</td>
            <td>{{$value.wind_power}}</td>
        </tr>
        {{/each}}
    </script>

    <script>
        //获取装数据的盒子
        var box = document.querySelector('#box');

        function dateFormat(date) {
            var year = date.substr(0, 4);
            var month = date.substr(4, 2);
            var day = date.substr(6, 2);
            var hour = date.substr(8, 2);
            var minute = date.substr(10, 2);
            var seconds = date.substr(12, 2);

            return year + '年' + month + '月' + day + '日' + hour + '时' + minute + '分' + seconds + '秒';
        }
        // 向模板中开放外部变量
        template.defaults.imports.dateFormat = dateFormat;
        //向服务器端获取天气信息
        jsonp({
            url: 'https://wis.qq.com/weather/common',
            data: {
                source: 'pc',
                weather_type: 'forecast_1h',
                province: '河南省',
                city: '洛阳市'
            },
            success: function(data) {

                //把返回数据拼接在模板中
                var html = template('tpl', {
                    info: data.data.forecast_1h
                });
                box.innerHTML = html;
            }
        });
    </script>

</body>

</html>
5.CORS 跨域资源共享(+)
Node 服务器端设置响应头示例代码:
app.use((req, res, next) => {
     res.header('Access-Control-Allow-Origin', '*');
     res.header('Access-Control-Allow-Methods', 'GET, POST');
     next();
 })
预览:

代码:
扫描二维码关注公众号,回复:
11314509 查看本文章

 <button id="btn">发送请求</button>
    <script src="/js/ajax.js"></script>
    <script>
        //点击发送非同源请求
        btn.onclick = function() {
            ajax({
                url: 'http://localhost:4000/cross',
                success: function(data) {
                    console.log(data);
                }
            });
        }
    </script>
6.访问非同源数据 服务器端解决方案(+)
同源政策是浏览器给予Ajax技术的限制,服务器端是不存在同源政策限制。
原理:

Node服务器请求如下(模拟A请求B)
app.get('/server', (req, res) => {
    request('http://localhost:4000/cross', (err, response, body) => {
        res.send(body);
    })
})
注意:此处需要第三方模块request
7.Ajax请求携带cookie的问题
- 服务器由之前的无状态,发展到今天的含cookie访问,cookie固然重要
7-1withCredentials属性
- 在使用Ajax技术发送跨域请求时,默认情况下不会在请求中携带cookie信息。
- withCredentials:指定在涉及到跨域请求时,是否携带cookie信息,默认值为false(Ajax请求体中)
- Access-Control-Allow-Credentials:true 允许客户端发送请求时携带cookie(服务器端)
案例(实现跨域登录功能)
预览:


代码:
<!DOCTYPE html>
<html lang="en">

<head>
    <meta charset="UTF-8">
    <title>实现跨域功能</title>
    <link rel="stylesheet" href="/assets/bootstrap/dist/css/bootstrap.min.css">
    <style type="text/css">
        .container {
            padding-top: 60px;
        }
    </style>
</head>

<body>
    <div class="container">
        <form id="loginForm">
            <div class="form-group">
                <label>用户名</label>
                <input type="text" name="username" class="form-control" placeholder="请输入用户名">
            </div>
            <div class="form-group">
                <label>密码</label>
                <input type="password" name="password" class="form-control" placeholder="请输入用密码">
            </div>
            <input type="button" class="btn btn-default" value="登录" id="loginBtn">
            <input type="button" class="btn btn-default" value="检测用户登录状态" id="checkLogin">
        </form>
    </div>

    <script>
        // 获取元素
        var loginBtn = document.querySelector('#loginBtn');
        var checkLogin = document.querySelector('#checkLogin');
        var loginForm = document.querySelector('#loginForm');

        // 给按钮绑定事件
        loginBtn.onclick = function() {
            //创建formData对象
            var formData = new FormData(loginForm);
            // 创建ajax请求对象
            var xhr = new XMLHttpRequest();
            //配置ajax请求对象
            xhr.open('post', 'http://localhost:4000/login');
            //发送请求时允许携带cookie
            xhr.withCredentials = true;
            //发送请求
            xhr.send(formData);
            //监听onload事件
            xhr.onload = function() {
                console.log(xhr.responseText);
            }
        };
        // 当检测用户按钮被点击时
        checkLogin.onclick = function() {
            // 创建ajax请求对象
            var xhr = new XMLHttpRequest();
            //发送请求时允许携带cookie
            xhr.withCredentials = true;
            //配置ajax请求对象
            xhr.open('get', 'http://localhost:4000/checkLogin');
            //发送请求
            xhr.send();
            //监听onload事件
            xhr.onload = function() {
                console.log(xhr.responseText);
            }
        }
    </script>

</body>

</html>
冲冲冲
下一篇:jQuery中的Ajax