shell的引入:
首先介绍一个简单的Shell脚本,来引入Shell的学习,这里我们使用Vim创建一个脚本文件01.sh,将下面写入下面内容:
#!/bin/bash             //这是相当于是一个声明,告诉系统用什么解释器来执行。如果要执行,删掉这一行的其他内容
# 这是注释               //我们知道Linux中#开头的都为注释行,不会被系统执行,这里就可以写一些关于脚本的信息
var1="welcome to use shell script!"
echo $var1
pwd
ls -l
执行方法 :
1.添加权限
[root@localhost test]# chmod 755 01.sh //给我们的脚本文件一个权限,名称一般以.sh结尾,提示这是一个shell脚本文件2.使用shell命令
[root@localhost test]# ./01.sh    //./开头加上脚本文件名
或者
[root@localhost test]# bash 01.sh
解析过程:
首先我们定义了一个变量var1,将一句话赋给了var1后面又引用这个var1,用echo将其输出到终端,所以执行脚本之后第一行出现的是var1变量的值,最后才输出pwd、ls -l的结果。这就是一个简单shell脚本。
变量
用户自定义的变量,不能使用系统中存在变量名
变量命名:字符或下划线开始,其余部分可为字母数字下划线
变量名=变量值 //变量值如果为多个字符串,可以使用""进行
变量引用: $变量名
清除变量内容:unset 变量名
查看变量的值:set
练习:
[root@rhel8 shell]# var1=123
[root@rhel8 shell]# str1="welcome to shell"
[root@rhel8 shell]# echo $var1
[root@rhel8 shell]# echo $str1
[root@rhel8 shell]# unset var1
[root@rhel8 shell]# echo $var1
[root@rhel8 shell]# set | grep var1
[root@rhel8 shell]# set | grep str1

环境变量
环境变量又称全局变量,通常由系统在启动时设置,环境变量一般用大写字母表示,通过env命令可以查看环境变量
用户自定义变量可用export输出为环境变量
用户自定义变量输出为环境变量:
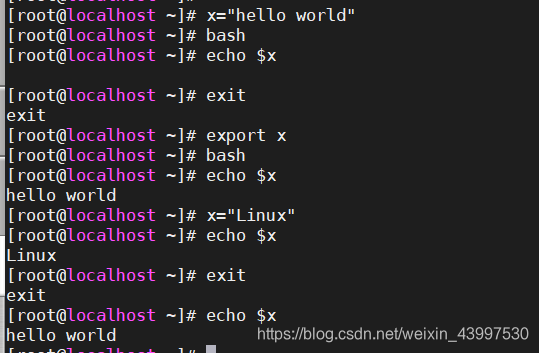
[root@rhel8 shell]# x="hello world" //赋值一个变量
[root@rhel8 shell]# bash //创建一个全新的bash,就相当于一个子bash,里面的变量与原来的不相通
[root@rhel8 shell]# echo $x //在这个子bash中,我们输出变量可以显示并没有赋值[root@rhel8 shell]# exit //退出这个bash
exit
[root@rhel8 shell]# export x //我们将这个赋值的x输出到全局变量中
[root@rhel8 shell]# bash //这次我们在创建一个新的bash
[root@rhel8 shell]# echo $x //我们再次输出x,可以看到这次的bash中存在赋值
hello world
[root@rhel8 shell]# x="Linux" //在这个bash中重新赋值
[root@rhel8 shell]# echo $x //可以看到改变了这个bash中的x变量的值
Linux
[root@rhel8 shell]# exit //退出当前的bash
exit
[root@rhel8 shell]# echo $x //可以看到并不影响我们最初的bash值
hello world
注:我们在赋值的时候需要关注我们当前在哪个bash中
几个特殊的环境变量:
HOME 当前用户的家目录
PATH 命令查找路径
LOGNAME 登录名
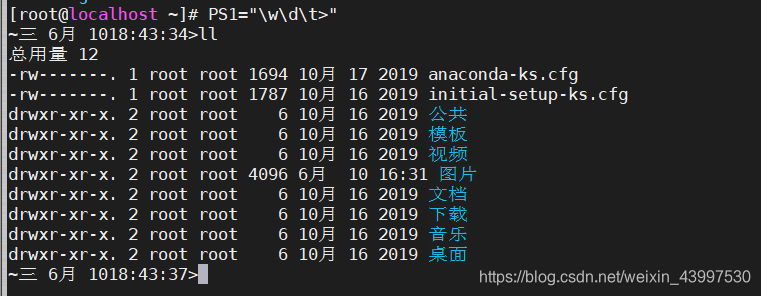
PS1 命令提示符
\w 当前工作目录
\h 主机名
\u 用户名
\d 日期
\t 时间
\a 响铃提示
PWD 用户当前目录
UID 当前用户标识符
PS2 用户在命令后输入空格+\符号时,表示命令没有输入结束并换新行继续输入[root@localhost ~]# PS1="\w\d\t>"
~三 6月 1018:43:34>ll
总用量 12
-rw-------. 1 root root 1694 10月 17 2019 anaconda-ks.cfg
-rw-------. 1 root root 1787 10月 16 2019 initial-setup-ks.cfg
drwxr-xr-x. 2 root root 6 10月 16 2019 公共
drwxr-xr-x. 2 root root 6 10月 16 2019 模板
drwxr-xr-x. 2 root root 6 10月 16 2019 视频
drwxr-xr-x. 2 root root 4096 6月 10 16:31 图片
drwxr-xr-x. 2 root root 6 10月 16 2019 文档
drwxr-xr-x. 2 root root 6 10月 16 2019 下载
drwxr-xr-x. 2 root root 6 10月 16 2019 音乐
drwxr-xr-x. 2 root root 6 10月 16 2019 桌面
[root@localhost ~]# ls \
> /test

位置变量
$0              //脚本程序的名字
$1,$2...        //传递给脚本的参数,$1表示第一个参数,$2表示第二个参数...
[root@localhost test]# vim 02.sh
#!/bin/bash
## 脚本名字查看#
## 脚本$1变量查看#
echo $0               //输出脚本程序的名字
ls $1                 //给ls传递一个参数
exit
[root@localhost test]# chmod 755 02.sh
[root@localhost test]# ./02.sh /root
./02.sh
anaconda-ks.cfg initial-setup-ks.cfg 公共 模板 视频 图片 文档 下载 音乐 桌面
预定义变量
$#    传递到脚本的参数数量
$*    传递到脚本的所有参数的内容
$?    命令执行后返回的状态码,0表示成功执行,其他值则表示执行发生了错误
$@    传递给脚本或函数的所有参数。被双引号(" ")包含时,与 $* 稍有不同
$$    当前进程的进程号
$!    后台运行的最后一个进程号
命令替换
var=$(command)
var=`command`
[root@localhost test]# echo "User $(whoami) is on $(hostname)"
User root is on localhost.localdomain
[root@localhost test]# echo "today is"'date'
today isdate
[root@localhost test]# echo "today is" 'date'
today is date
[root@localhost test]# echo "today is" `date`
today is 2020年 06月 11日 星期四 11:11:05 CST
输入输出
read 也算是一个赋值的操作[root@rhel8 ~]# read -s -n1 -p "Yes or Not?" answer //-s,输入为终端,则不显示;-n1,接收一个字符;-p,提示符
Yes or Not?[root@rhel8 ~]#
[root@rhel8 ~]# echo $answer
Y
[root@rhel8 ~]# read -s -n1 -p "Yes or Not?" answer
Yes or Not?[root@rhel8 ~]#
[root@rhel8 ~]# echo $answer
N[root@rhel8 ~]# read var1 var2
1 3
[root@rhel8 ~]# echo $var1
1
[root@rhel8 ~]# echo $var2
3
echo
            -n    不在最后自动换行
            -e    启用反斜线控制字符的转换,要使用下面的转义符,就要加该选项
            -E    不处理转义字符,默认选项

            转义符
            \a    从系统喇叭发送声音
            \b    向左删除
            \c    取消行末的换行符号
            \E    ESCAPE键
            \f    换页字符
            \n    换行字符
            \r    回车键
            \t    制表符
            \v    垂直制表符
            \\    反斜线本身
[root@rhel8 ~]# echo -e "a\tb\tc\nd\te\tf"
a b c
d e f[root@rhel8 shell]# echo -e "\e[1;31mThis is red text\e[0m"
This is red text\e[1;31m 将颜色设置为红色
\e[0m 将颜色重新置回颜色码:重置=0,黑色=30,红色=31,绿色=32,黄色=33,蓝色=34,洋红=35,青色=36,白色=37
[root@rhel8 shell]# echo -e "\033[37;31;5mMySQL Server Stop...\033[39;49;0m"
MySQL Server Stop...5mMySQL数字5还有其他参数:0 关闭所有属性、1 设置高亮度(加粗)、4 下划线、5 闪烁、7 反显、8 消隐
printf [root@rhel8 ~]# printf "hello world"
hello world[root@rhel8 ~]# printf "hello world\n"
hello world[root@localhost test]# vim 03.sh
#!/bin/bashprintf "%-5s %-10s %-4s\n" NO Name Mark
printf "%-5s %-10s %-4.2f\n" 01 Tom 90.3456
printf "%-5s %-10s %-4.2f\n" 02 Jack 89.2345
printf "%-5s %-10s %-4.2f\n" 03 Jeff 98.4323注:%-5s 格式为左对齐,宽度为5的字符串,- 表示左对齐,不使用则表示右对齐
%-4.2f 格式为左对齐,宽度为4,保留2位小数[root@localhost test]# chmod 755 03.sh
[root@localhost test]# ./03.sh
NO Name Mark
01 Tom 90.35
02 Jack 89.23
03 Jeff 98.43
格式替代符:
%b 相对应的参数被视为含有要被处理的转义序列之字符串
%c ASCII字符。显示相对应参数的第一个字符
%d, %i 十进制整数
%e, %E, %f 浮点格式
%g %e或%f转换,看哪一个较短,则删除结尾的零
%G %E或%f转换,看哪一个较短,则删除结尾的零
%o 不带正负号的八进制值
%s 字符串
%u 不带正负号的十进制值
%x 不带正负号的十六进制值,使用a至f表示10至15
%X 不带正负号的十六进制值,使用A至F表示10至15
%% 字面意义的%