一、Open OnDemand
Open OnDemand支持的功能
-
Graphical file management - Upload, download, move and delete files and folders through the web browser.
图形文件管理 - 通过网络浏览器上传,下载,移动和删除文件和文件夹 -
File editor - Edit and save files without the need to launch a shell session.
文件编辑器 - 编辑和保存文件,而无需启动Shell会话。 -
Shell Access - Pop into a command line shell straight from the web portal.
Shell访问 - 直接从Web门户弹出命令行Shell -
Queue Management - View up to date details of pending or running running on the cluster.
队列管理 - 查看群集上挂起或正在运行的最新详细信息 -
Job submission templates - Submit jobs from the web console using preset templates or customize your own. (Includes capability to edit job scripts and parameters on the fly).
作业提交模板 - 使用预设模板从Web控制台提交作业或自定义自己的模板。(包括动态编辑作业脚本和参数的功能) -
Full linux desktop streaming via web - Run a full low latency XFCE linux desktop on the compute nodes for GUI heavy jobs such as Matlab, Mathematica etc. Graphical jobs continue to run while disconnected from compute host.
通过Web的完整linux桌面流-在计算节点上运行完整的低延迟XFCE linux桌面,以处理诸如Matlab,Mathematica等之类的GUI繁重任务。图形任务在与计算主机断开连接的情况下继续运行。 -
No need to install a local xserver in order to run graphical jobs as all rendering is performed on the compute nodes.
由于所有渲染均在计算节点上执行,因此无需安装本地xserver即可运行图形作业。
Open OnDemand体系架构
总览
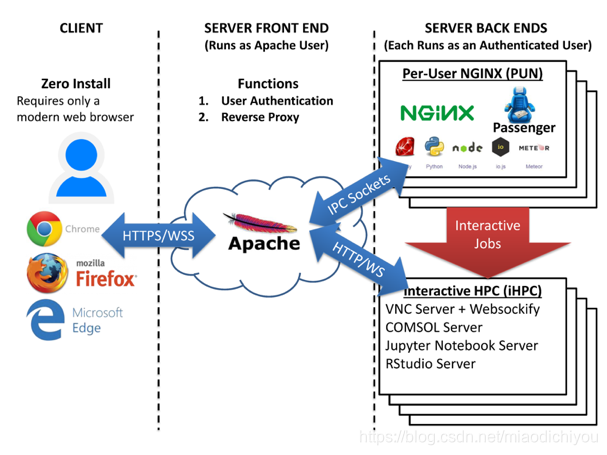
Apache是服务器前端,以Apache用户身份运行,并接受来自用户的所有请求,具有四个主要功能
- 验证用户
- 启动每个用户的NGINX进程(PUNs)
- 通过Unix域套接字将每个用户反向代理到其PUN
- 通过TCP套接字反向代理在计算节点(RStudio,Jupyter,VNC桌面)上运行的交互式应用程序
系统环境 System context
用户使用OnDemand通过Web浏览器与其HPC资源进行交互。
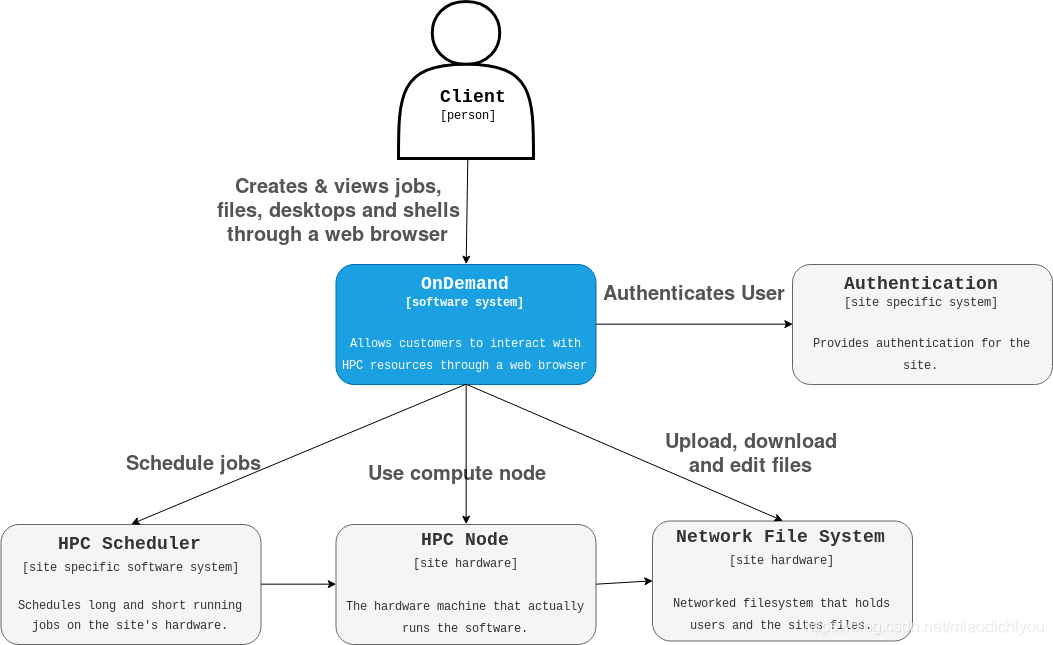
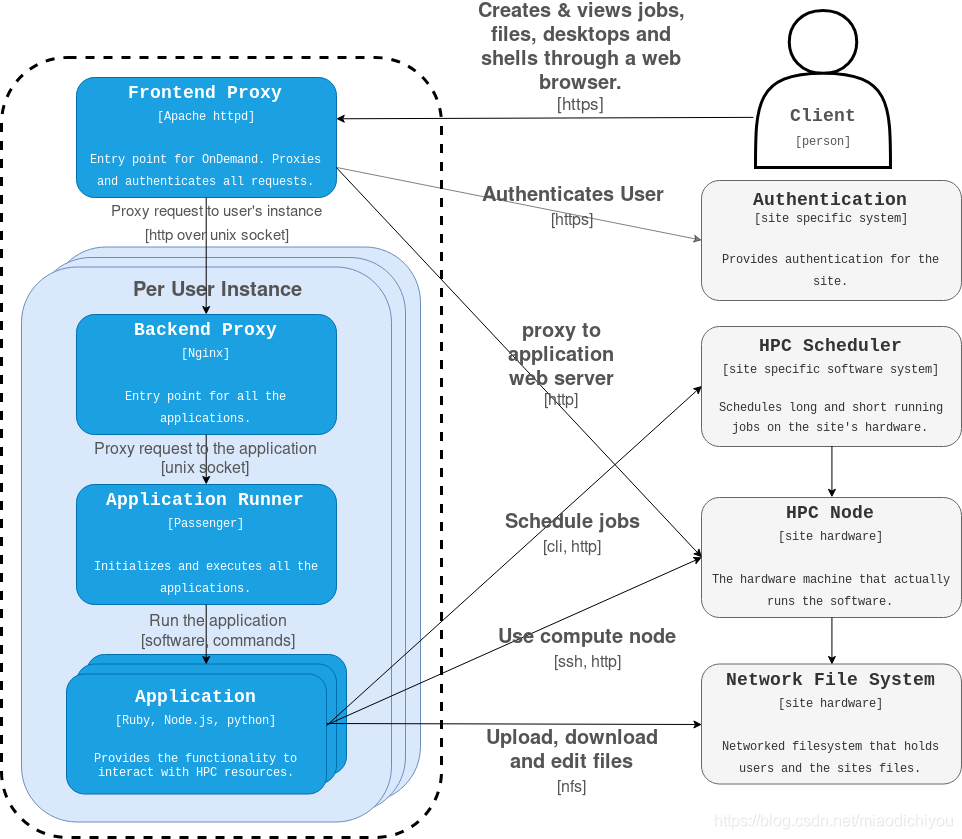
容器上下文 Container context
前端代理是与所有客户端共享的唯一组件。前端代理将为每个用户创建Nginx(PUN)进程。
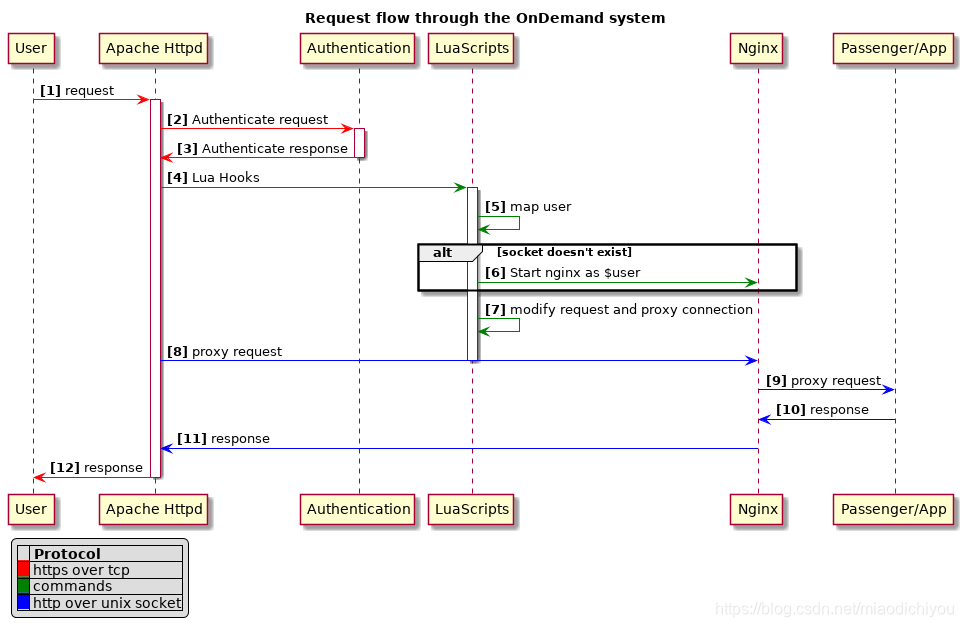
请求流程 Request Flow
用户通过浏览器发起请求,下图说明了该请求如何通过系统传播到特定应用程序(包括仪表板)。
二、Open OnDemand安装
- RedHat/CentOS 7+
- a common user/group database, e.g., LDAP + NSS
- a common host file list
- the resource manager (e.g., Torque, Slurm, or LSF) client binaries and libraries used by the batch servers installed
- configuration on both OnDemand node and batch servers to be able to submit, status, and delete jobs from command line
- signed SSL certificate with corresponding intermediate certificate for your advertised OnDemand host name (e.g., ondemand.my_center.edu)
- your LDAP URL, base DN, and attribute to search for (in some rare cases a bind DN and corresponding bind password)
安装系统依赖项
从常规RPM服务器安装软件包
sudo yum install centos-release-scl lsof sudo git
OSC提供的Deps
OnDemand的许多系统级依赖项都可以从
https://yum.osc.edu/ondemand/$ONDEMAND_RELEASE/web/$ENTERPRISE_LINUX_VERSION/x86_64/
节点上获得,并且需要将其安装到将成为OnDemand Web服务器的节点上。
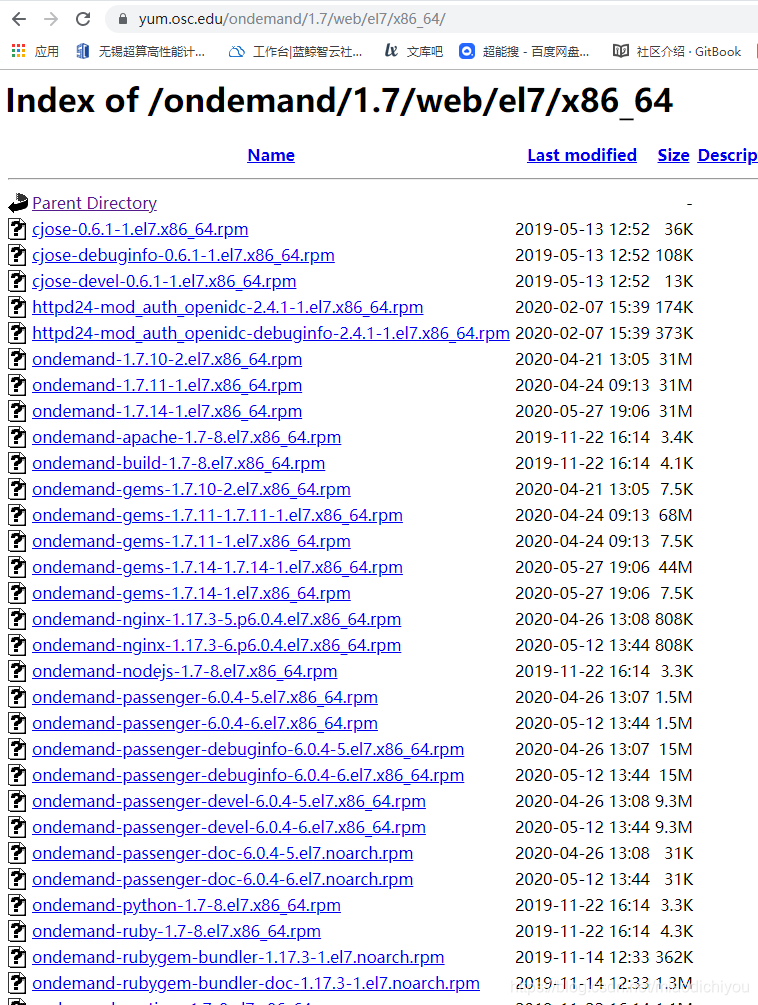
To install deps for OnDemand 1.7.x on CentOS 7
sudo yum install \
    https://yum.osc.edu/ondemand/1.7/web/el7/x86_64/cjose-0.6.1-1.el7.x86_64.rpm \
    https://yum.osc.edu/ondemand/1.7/web/el7/x86_64/cjose-devel-0.6.1-1.el7.x86_64.rpm \
    https://yum.osc.edu/ondemand/1.7/web/el7/x86_64/httpd24-mod_auth_openidc-2.4.1-1.el7.x86_64.rpm \
    https://yum.osc.edu/ondemand/1.7/web/el7/x86_64/ondemand-1.7.14-1.el7.x86_64.rpm \
    https://yum.osc.edu/ondemand/1.7/web/el7/x86_64/ondemand-apache-1.7-8.el7.x86_64.rpm \
    https://yum.osc.edu/ondemand/1.7/web/el7/x86_64/ondemand-build-1.7-8.el7.x86_64.rpm \
    https://yum.osc.edu/ondemand/1.7/web/el7/x86_64/ondemand-gems-1.7.14-1.7.14-1.el7.x86_64.rpm \
    https://yum.osc.edu/ondemand/1.7/web/el7/x86_64/ondemand-gems-1.7.14-1.el7.x86_64.rpm \
    https://yum.osc.edu/ondemand/1.7/web/el7/x86_64/ondemand-nginx-1.17.3-6.p6.0.4.el7.x86_64.rpm \
    https://yum.osc.edu/ondemand/1.7/web/el7/x86_64/ondemand-nodejs-1.7-8.el7.x86_64.rpm \
    https://yum.osc.edu/ondemand/1.7/web/el7/x86_64/ondemand-passenger-6.0.4-6.el7.x86_64.rpm \
    https://yum.osc.edu/ondemand/1.7/web/el7/x86_64/ondemand-passenger-devel-6.0.4-6.el7.x86_64.rpm \
    https://yum.osc.edu/ondemand/1.7/web/el7/x86_64/ondemand-python-1.7-8.el7.x86_64.rpm \
    https://yum.osc.edu/ondemand/1.7/web/el7/x86_64/ondemand-ruby-1.7-8.el7.x86_64.rpm \
    https://yum.osc.edu/ondemand/1.7/web/el7/x86_64/ondemand-rubygem-bundler-1.17.3-1.el7.noarch.rpm \
    https://yum.osc.edu/ondemand/1.7/web/el7/x86_64/ondemand-runtime-1.7-8.el7.x86_64.rpm \
    https://yum.osc.edu/ondemand/1.7/web/el7/x86_64/ondemand-scldevel-1.7-8.el7.x86_64.rpm \
    https://yum.osc.edu/ondemand/1.7/web/el7/x86_64/ondemand-selinux-1.7.14-1.el7.x86_64.rpm
安装OnDemand基础架构
OnDemand的核心基础结构存储在/opt/ood下:
- ondemand
- mod_ood_proxy
- nginx_stage
- ood_auth_map
- ood_portal_generator

安装OnDemand核心应用程序
OnDemand的核心应用程序存储在/var/www/ood/apps/sys/$APP下:
- ood-activejobs:/var/www/ood/apps/sys/activejobs
- ood-dashboard:/var/www/ood/apps/sys/dashboard
- ood-fileeditor:/var/www/ood/apps/sys/file-editor
- ood-fileexplorer:/var/www/ood/apps/sys/files
- ood-myjobs:/var/www/ood/apps/sys/myjobs
- ood-shell:/var/www/ood/apps/sys/shell

每个应用程序都有其自己的依赖关系,需要通过运行以下命令(从NPM或Ruby Gems)进行安装:
cd /var/www/ood/apps/sys/$APP
# We have both Node and Rails applications, let's cover both in a single command
sudo NODE_ENV=production RAILS_ENV=production scl enable ondemand -- bin/setup
构建配置
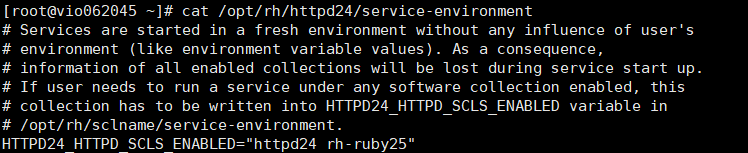
更新Apache服务环境
sudo sed -i 's/^HTTPD24_HTTPD_SCLS_ENABLED=.*/HTTPD24_HTTPD_SCLS_ENABLED="httpd24 rh-ruby25"/' \
/opt/rh/httpd24/service-environment
更新sudoers列表
sudo /etc/sudoers.d/ood << EOF
Defaults:apache !requiretty, !authenticate
apache ALL=(ALL) NOPASSWD: /opt/ood/nginx_stage/sbin/nginx_stage
EOF

为核心Web应用程序添加NGINX配置
touch /var/lib/ondemand-nginx/config/apps/sys/activejobs.conf
touch /var/lib/ondemand-nginx/config/apps/sys/dashboard.conf
touch /var/lib/ondemand-nginx/config/apps/sys/file-editor.conf
touch /var/lib/ondemand-nginx/config/apps/sys/files.conf
touch /var/lib/ondemand-nginx/config/apps/sys/myjobs.conf
touch /var/lib/ondemand-nginx/config/apps/sys/shell.conf
/opt/ood/nginx_stage/sbin/update_nginx_stage &>/dev/null || :

添加cronjob来删除长时间运行的PUN
每隔2个小时移除不活动的PUN。
sudo /etc/cron.d/ood << EOF
#!/bin/bash
PATH=/sbin:/bin:/usr/sbin:/usr/bin
0 */2 * * * root [ -f /opt/ood/nginx_stage/sbin/nginx_stage ] && /opt/ood/nginx_stage/sbin/nginx_stage nginx_clean 2>&1 | logger -t nginx_clean
EOF

添加Apache配置
此时,如果我们访问我们的Web节点,我们仍然看不到OnDemand页面,因为尚未生成ood-portal配置。现在生成一个通用的:
sudo /opt/ood/ood-portal-generator/sbin/update_ood_portal
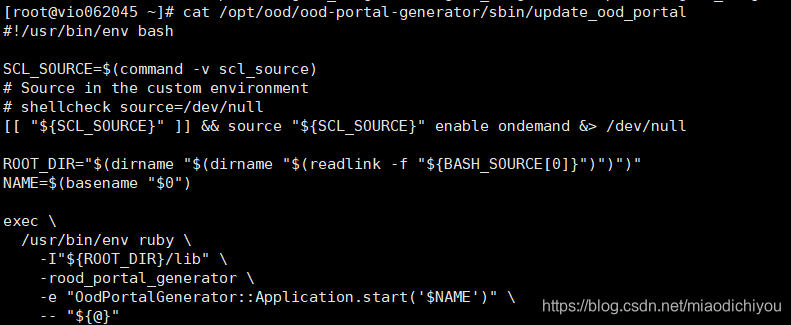
这是基本的OnDemand门户配置。
修改系统安全性
防火墙功能
打开防火墙中的端口80(http)和443(https),通常使用 firewalld或iptables完成。
防火墙示例:
$ sudo firewall-cmd --zone=public --add-port=80/tcp --permanent
$ sudo firewall-cmd --zone=public --add-port=443/tcp --permanent
$ sudo firewall-cmd --reload
iptables示例:
$ sudo iptables -I INPUT -p tcp -m tcp --dport 80 -j ACCEPT
$ sudo iptables -I INPUT -p tcp -m tcp --dport 443 -j ACCEPT
$ sudo iptables-save > /etc/sysconfig/iptables
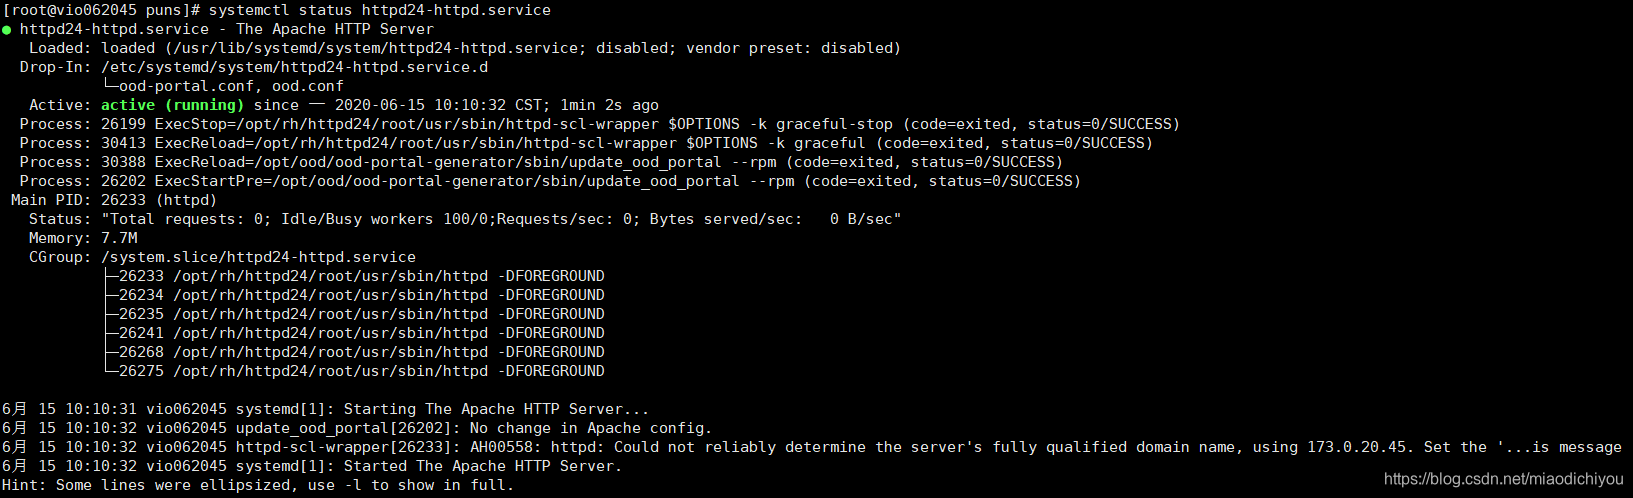
启动Apache服务
sudo systemctl start httpd24-httpd
将帐户添加到Apache使用的密码文件中
sudo scl enable ondemand -- htpasswd -c /opt/rh/httpd24/root/etc/httpd/.htpasswd $USER
# New password:
# Re-type new password:
# Adding password for user .......

添加LDAP支持
LDAP支持允许用户使用其本地用户名和密码登录。它还消除了系统管理员继续更新.htpasswd文件的需要。
- LDAP服务器(openldap.my_center.edu:636)
编辑Open OnDemand Portal 配置文件
/etc/ood/config/ood_portal.yml:
# /etc/ood/config/ood_portal.yml
---
# ...

auth:
  - 'AuthType Basic'
  - 'AuthName "private"'
  - 'AuthBasicProvider ldap'
  - 'AuthLDAPURL "ldaps://openldap.my_center.edu:636/ou=People,ou=hpc,o=my_center?uid"'
  - 'AuthLDAPGroupAttribute memberUid'
  - 'AuthLDAPGroupAttributeIsDN off'
  - 'RequestHeader unset Authorization'
  - 'Require valid-user'
构建/安装更新的Apache配置文件:
sudo /opt/ood/ood-portal-generator/sbin/update_ood_portal
重新启动Apache服务器以使更改生效:
sudo systemctl try-restart httpd24-httpd.service httpd24-htcacheclean.service
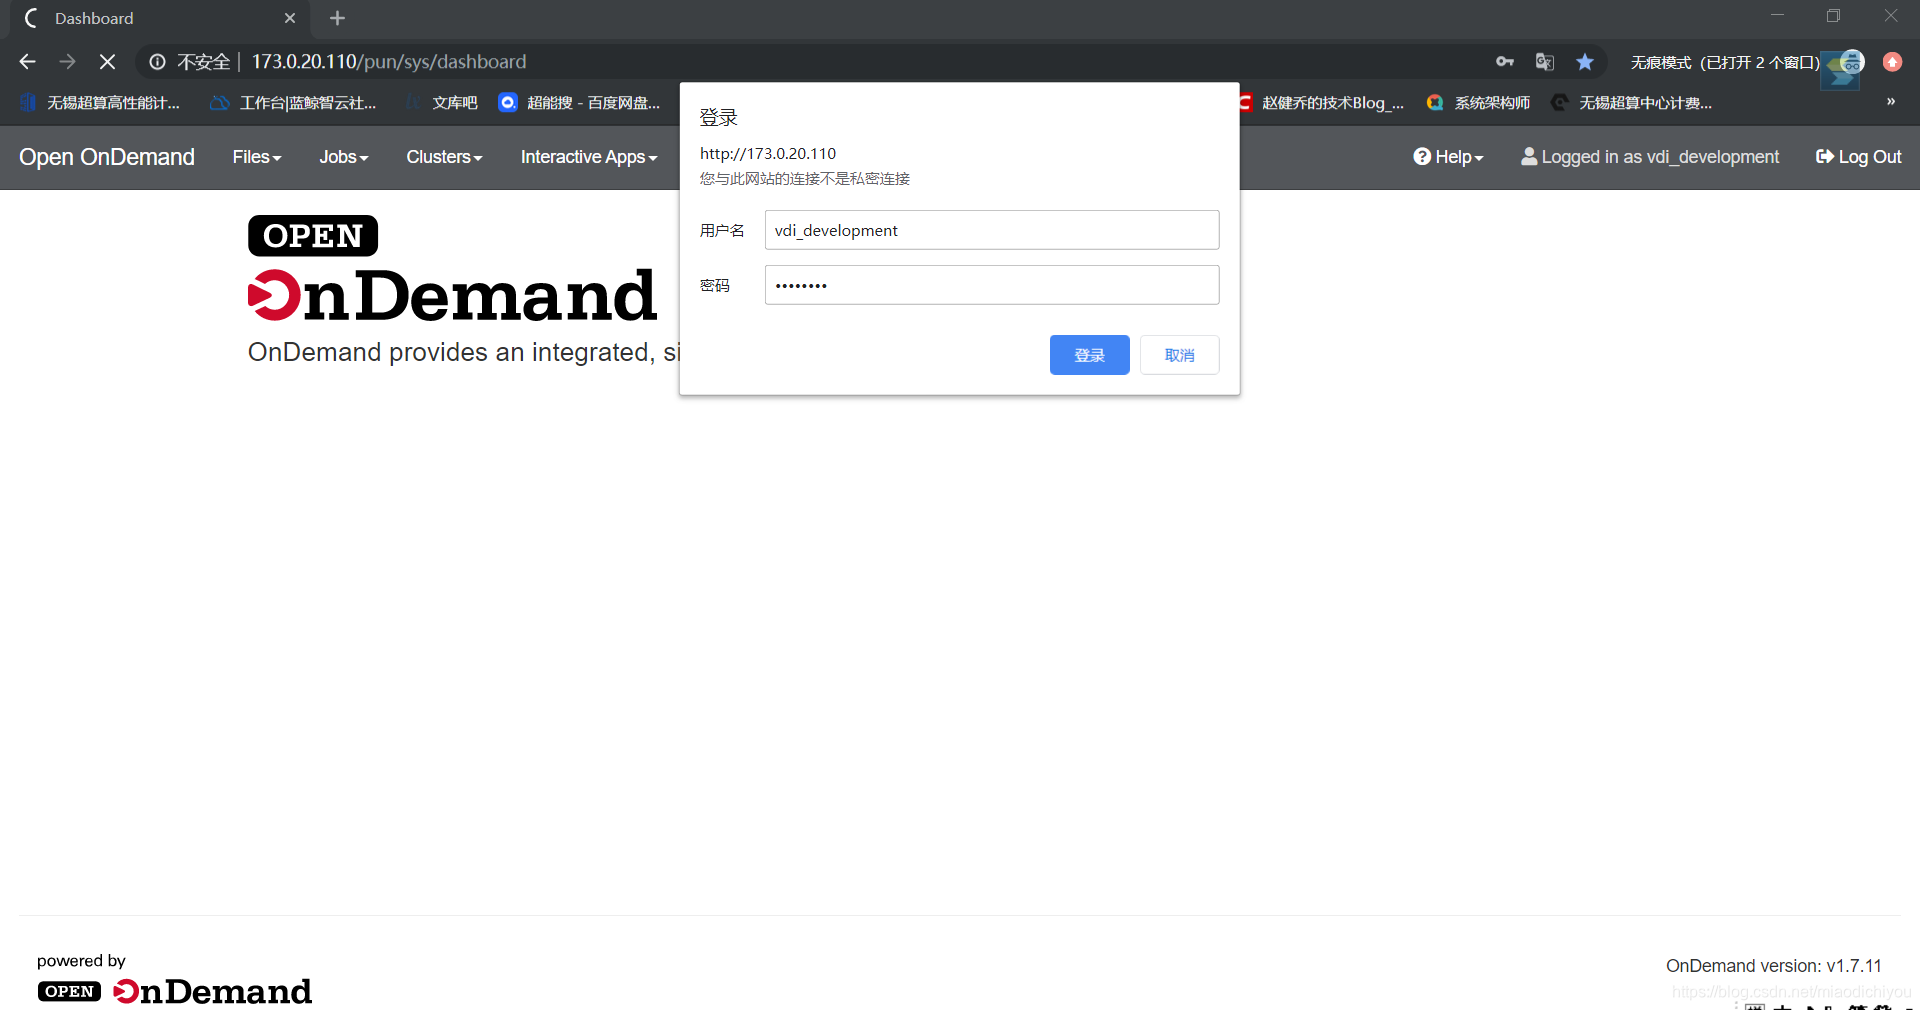
用户可以使用其本地用户名和密码登录。
三、资源管理器配置
Open OnDemand集群配置文件
集群配置文件描述了用户可以向其提交作业的每个集群以及用户可以ssh到的登录主机。
需要正确配置群集的应用包括:
- Shell App (connect to a cluster login node from the Dashboard App)
- Active Jobs App (view a list of active jobs for the various clusters)
- Job Composer App (submit jobs to various clusters)
- All interactive apps such as Jupyter and RStudio
创建群集配置文件所在的默认目录:
sudo mkdir -p /etc/ood/config/clusters.d
为要提供访问权限的每个HPC群集创建一个群集YAML配置文件。他们必须具有*.yml扩展名。
仅具有登录节点且没有资源管理器的HPC集群的最简单集群配置文件如下所示:
# /etc/ood/config/clusters.d/my_cluster.yml
---
v2:
  metadata:
    title: "My Cluster"
  login:
    host: "my_cluster.my_center.edu"
集群配置模式示例V2
---
v2:
  metadata:
    title: "Owens"
    url: "https://www.osc.edu/supercomputing/computing/owens"
    hidden: false
  login:
    host: "owens.osc.edu"
  job:
    adapter: "torque"
    host: "owens-batch.ten.osc.edu"
    lib: "/opt/torque/lib64"
    bin: "/opt/torque/bin"
    version: "6.0.1"
  acls:
  - adapter: "group"
    groups:
      - "cluster_users"
      - "other_users_of_the_cluster"
    type: "whitelist"
  custom:
    grafana:
          host: "https://grafana.osc.edu"
          orgId: 3
          dashboard:
            name: "ondemand-clusters"
            uid: "aaba6Ahbauquag"
            panels:
              cpu: 20
              memory: 24
          labels:
            cluster: "cluster"
            host: "host"
            jobid: "jobid"
  batch_connect:
      basic:
        script_wrapper: "module restore\n%s"
      vnc:
        script_wrapper: "module restore\nmodule load ondemand-vnc\n%s"
v2:
Version 2是当前模式示例,并且是集群配置的顶级映射
---
v2:
meta:
Meta描述了如何将集群显示给用户
metadata:
    # title: is the display label that will be used anywhere the cluster is referenced
    title: "Owens"
    # url: provides the ability to show a link to information about the cluster
    url: "https://www.osc.edu/supercomputing/computing/owens"
    # hidden: setting this to true causes OnDemand to not show this cluster to the user, the cluster is still available for use by other applications
    hidden: false
login:
Login控制尝试通过Shell应用程序进行SSH时的主机。由 Dashboard和Job Composer (MyJobs)使用。
login:
  host: "owens.osc.edu"
job:
job映射特定于群集的资源管理器。
job:
  adapter: "torque"
  host: "owens-batch.ten.osc.edu"
  lib: "/opt/torque/lib64"
  bin: "/opt/torque/bin"
  version: "6.0.1"
bin_overrides:
# An example in Slurm
job:
  adapter: "slurm"
  bin: "/opt/slurm/bin"
  conf: "/opt/slurm/etc/slurm.conf"
  bin_overrides:
      squeue: "/usr/local/slurm/bin/squeue_wrapper"
      # Override just want you want/need to
      # scontrol: "/usr/local/slurm/bin/scontrol_wrapper"
      sbatch: "/usr/local/slurm/bin/sbatch_wrapper"
      # Will be ignored because bsub is not a command used in the Slurm adapter
      bsub: "/opt/lsf/bin/bsub"
ACL:
ACL访问控制列表提供了一种通过组成员身份限制群集访问的方法。ACL是隐式白名单,但可以显式设置为白名单或黑名单。
acls:
- adapter: "group"
  groups:
    - "cluster_users"
    - "other_users_of_the_cluster"
  type: "whitelist"  # optional, one of "whitelist" or "blacklist"
要查找组成员身份,ood_core使用ood_support库,"id -G USERNAME"用于获取用户所在的列表组,"getgrgid"用于查找组的名称。
batch_connect:
batch_connect控制交互式应用程序(如Jupyter或交互式桌面)的默认设置。
batch_connect:
    basic:
      script_wrapper: "module restore\n%s"
    vnc:
      script_wrapper: "module restore\nmodule load ondemand-vnc\n%s"
配置Slurm
HPC群集上Slurm资源管理器的YAML群集配置文件如下所示:
# /etc/ood/config/clusters.d/my_cluster.yml
---
v2:
  metadata:
    title: "My Cluster"
  login:
    host: "my_cluster.my_center.edu"
  job:
    adapter: "slurm"
    cluster: "my_cluster"
    bin: "/path/to/slurm/bin"
    conf: "/path/to/slurm.conf"
    # bin_overrides:
      # sbatch: "/usr/local/bin/sbatch"
      # squeue: ""
      # scontrol: ""
      # scancel: ""
具有以下配置选项:
adapter:
设置为slurm
cluster:
Slurm集群名称
bin:
Slurm客户端安装二进制文件的路径
conf:
Slurm配置文件的路径
bin_overrides:
Replacements/wrappers for Slurm’s job submission and control clients.
Supports the following clients:
- sbatch
- squeue
- scontrol
- scancel
测试配置
对于所有rake任务,我们都需要位于 Dashboard App的根目录下:
cd /var/www/ood/apps/sys/dashboard
列出我们可以运行的所有可用任务:
scl enable ondemand -- bin/rake -T test:jobs

该列表是从驻留在下的所有可用群集配置文件动态生成的 。/etc/ood/config/clusters.d/*.yml

我的cluster集群的名字叫linux,所以我在此使用linux.yml
测试集群
sudo su $USER -c 'scl enable ondemand -- bin/rake test:jobs:$CLUSTER_NAME RAILS_ENV=production'

Rails Error: Unable to access log file. Please ensure that /var/www/ood/apps/sys/dashboard/log/production.log exists and is writable (ie, make it writable for user and group: chmod 0664 /var/www/ood/apps/sys/dashboard/log/production.log). The log level has been raised to WARN and the output directed to STDERR until the problem is fixed.
mkdir -p /home/export/base/systest/jiangyt/test_jobs
Testing cluster 'linux'...
Submitting job...
[2020-06-15 16:50:42 +0800 ]  INFO "execve = [{\"SLURM_CONF\"=>\"/usr/sw-slurm/slurm-16.05.3/etc/slurm.conf\"}, \"/usr/sw-slurm/slurm-16.05.3/bin/sbatch\", \"-D\", \"/home/export/base/systest/jiangyt/test_jobs\", \"-J\", \"test_jobs_linux\", \"-o\", \"/home/export/base/systest/jiangyt/test_jobs/output_linux_2020_06_15t16_50_42_08_00_log\", \"-t\", \"00:01:00\", \"--parsable\", \"-M\", \"linux\"]"
Got job id '9273109'
[2020-06-15 16:50:43 +0800 ]  INFO "execve = [{\"SLURM_CONF\"=>\"/usr/sw-slurm/slurm-16.05.3/etc/slurm.conf\"}, \"/usr/sw-slurm/slurm-16.05.3/bin/squeue\", \"--all\", \"--states=all\", \"--noconvert\", \"-o\", \"\\u001E%A\\u001F%i\\u001F%t\", \"-j\", \"9273109\", \"-M\", \"linux\"]"
Job has status of queued
[2020-06-15 16:50:48 +0800 ]  INFO "execve = [{\"SLURM_CONF\"=>\"/usr/sw-slurm/slurm-16.05.3/etc/slurm.conf\"}, \"/usr/sw-slurm/slurm-16.05.3/bin/squeue\", \"--all\", \"--states=all\", \"--noconvert\", \"-o\", \"\\u001E%A\\u001F%i\\u001F%t\", \"-j\", \"9273109\", \"-M\", \"linux\"]"
Job has status of completed
Test for 'linux' PASSED!
Finished testing cluster 'linux'
测试成功。
定制配置文件
配置文件根目录位于 /etc/ood。公共资产位于 /var/www/ood/public。
-
/etc/ood/profile
- If exists, this file is sourced instead of the default at /opt/ood/nginx_stage/etc/profile by /opt/ood/nginx_stage/sbin/nginx_stage script when running as root, prior to launching the PUN.
- You should source /opt/ood/nginx_stage/etc/profile in your custom /etc/ood/profile if you add one to load the correct software collections.
-
/etc/ood/config/nginx_stage.yml
- YAML file to override default configuration for the PUN. You can set environment variables via key-value pairs in the mapping pun_custom_env. You can specify a list of environment variables set in /etc/ood/profile to pass through to the PUN by defining the sequence pun_custom_env_declarations.
- An example of both of these uses may be found in nginx_stage_example.yml. Variables set here are set for all OnDemand applications.
-
/etc/ood/config/apps/$APP/env
- Used to provide application specific config
- env files do not override values set by prior methods.
-
/etc/ood/config/apps/$APP/initializers/ood.rb
- Modify Rails application behavior using Ruby code. Since this is application code environment variables can be set, removed.
- This method is specific to Ruby on Rails applications: Activejobs, Dashboard, File Editor, and Job Composer. You can add multiple initializer files in this directory and they will be loaded in alphabetical order
四、设置Interactive Apps
Interactive Apps 需要在计算节点上安装VNC服务器,而不是 OnDemand节点。
For VNC server support:
- nmap-ncat
- TurboVNC 2.1+
- websockify 0.8.0+


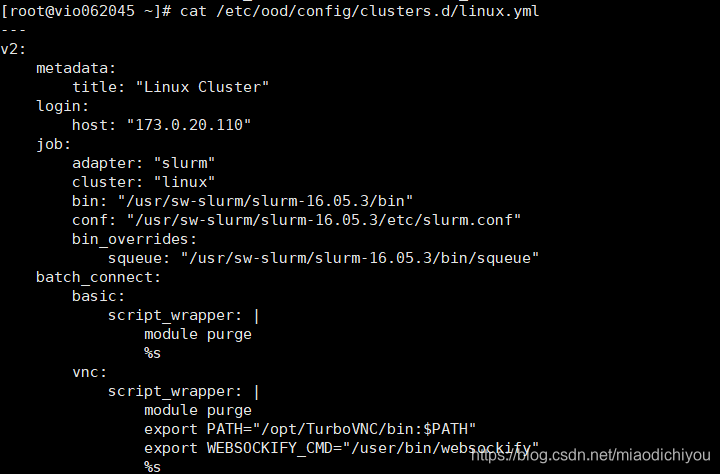
修改集群配置
---
v2:
    metadata:
        title: "Linux Cluster"
    login:
        host: "173.0.20.110"
    job:
        adapter: "slurm"
        cluster: "linux"
        bin: "/usr/sw-slurm/slurm-16.05.3/bin"
        conf: "/usr/sw-slurm/slurm-16.05.3/etc/slurm.conf"
        bin_overrides:
            squeue: "/usr/sw-slurm/slurm-16.05.3/bin/squeue"
    batch_connect:
        basic:
            script_wrapper: |
                module purge
                %s
        vnc:
            script_wrapper: |
                module purge
                export PATH="/opt/TurboVNC/bin:$PATH"
                export WEBSOCKIFY_CMD="/user/bin/websockify"
                %s