双链表的基本原理+
目录
一、双链表的基本原理
我们在前面的单链表的基本原理和实战中介绍了单链表。
单链接列表中的结点具有 val 字段,以及用于顺序链接结点的“Next”引用字段。
在本文中,我们将介绍另一种类型的链表:双链表。
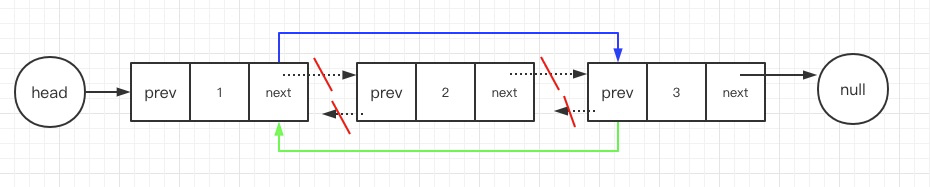
定义
双链表以类似的方式工作,但还有一个引用字段,称为“prev”字段。有了这个额外的字段,您就能够知道当前结点的前一个结点。

基本操作
与单链表类似,我们将介绍在双链表中如何访问数据、插入新结点或删除现有结点。
我们可以与单链表相同的方式访问数据:
- 我们不能在常量级的时间内访问随机位置。
- 我们必须从头部遍历才能得到我们想要的第一个结点。
- 在最坏的情况下,时间复杂度将是 O(N),其中 N 是链表的长度。
- 但是在增加和删除操作时,我们还要考虑到
prev节点
二、双链表的添加原理
- 节点1的
next指针重新指向添加的节点4 - 节点4的
next指向原下一个节点2 - 注意,节点4和节点2的prev要更新指向到对应的前节点

在头节点添加
- 新添加的节点
next指向头节点,并更新头节点的prev
在尾节点添加
- 尾节点的前一个节点
next清空
三、双链表的删除原理
如果我们想删除某一个节点cur,只需要知道当前节点即可,因为cur.prev节点就是前节点
cur.prev.next = cur.next
在头节点删除
- 清空头节点的
next节点所保存的头节点即可
在尾节点删除
- 清空尾节点的
prev节点所保存的尾节点即可
四、设计双链表+实现代码
我们先来看一下设计要求
可以选择使用单链表或双链表。单链表中的节点应该具有两个属性:val 和 next。val 是当前节点的值,next 是指向下一个节点的指针/引用。如果要使用双向链表,则还需要一个属性 prev 以指示链表中的上一个节点。假设链表中的所有节点都是 0-index 的。
在链表类中实现这些功能:
- get(index):获取链表中第 index 个节点的值。如果索引无效,则返回-1。
- addAtHead(val):在链表的第一个元素之前添加一个值为 val 的节点。插入后,新节点将成为链表的第一个节点。
- addAtTail(val):将值为 val 的节点追加到链表的最后一个元素。
- addAtIndex(index,val):在链表中的第 index 个节点之前添加值为 val 的节点。如果 index 等于链表的长度,则该节点将附加到链表的末尾。如果 index 大于链表长度,则不会插入节点。如果index小于0,则在头部插入节点。
- deleteAtIndex(index):如果索引 index 有效,则删除链表中的第 index 个节点。
function Node(val) {
    this.val = val //保存当前值
    this.prev = null //记录前节点
    this.next = null //记录后节点
}

/**
 * Initialize your data structure here.
 */
var MyLinkedList = function() {
    this.head = new Node('head') // 定义一个头节点,保证初始化时不为空
};

/**
 * Get the value of the index-th node in the linked list. If the index is invalid, return -1.
 * @param {number} index
 * @return {number}
 */
MyLinkedList.prototype.get = function(index) {
    var cur = this.head
    var count = -1 // 因为创建了head这个哨兵节点,所以count下标默认尾-1
    if(index < 0) return -1;
    while(cur){
        if(count == index){
            return cur.val
        }
        cur = cur.next
        count++
    }
    return -1
};

/**
 * Add a node of value val before the first element of the linked list. After the insertion, the new node will be the first node of the linked list.
 * @param {number} val
 * @return {void}
 */
MyLinkedList.prototype.addAtHead = function(val) {
    var cur = this.head
    var node = new Node(val)
    // 要注意head节点后是不是存在节点
    if(cur.next){
        node.next = cur.next
        node.prev = cur

        cur.next.prev = node
        cur.next = node
    }else{
        cur.next = node
        node.prev = cur
    }
};


/**
 * Append a node of value val to the last element of the linked list.
 * @param {number} val
 * @return {void}
 */
MyLinkedList.prototype.addAtTail = function(val) {
    var cur = this.head
    var node = new Node(val)
    // 只需要找到尾节点
    while(cur.next){
        cur = cur.next
    }
    cur.next = node
    node.prev = cur
};

/**
 * Add a node of value val before the index-th node in the linked list. If index equals to the length of linked list, the node will be appended to the end of linked list. If index is greater than the length, the node will not be inserted.
 * @param {number} index
 * @param {number} val
 * @return {void}
 */
MyLinkedList.prototype.addAtIndex = function(index, val) {
    var cur = this.head
    var node = new Node(val)
    var count = -1 // 因为创建了一个哨兵节点,所以记录下标
    if(index < 0){ // 插入位置<0时,直接加到头节点
        node.next = cur.next
        node.prev = cur

        cur.next.prev = node // 维护prev节点
        node.prev = cur //维护prev节点
        return;
    }
    while(cur){
        // 如果在链表中间匹配到
        if(count == index){
            node.next = cur // 添加节点next->当前节点
            node.prev = cur.prev // 添加节点prev-> 当前节点prev

            cur.prev.next = node // 前节点next->添加节点
            cur.prev = node // 前节点->添加节点
            return ;
        }
        // 如果走到了尾节点,且下标+1 = index = 数组长度
        if(!cur.next && count+1 == index){
            cur.next = node
            node.prev = cur
            return;
        }
        // 没走到尾节点 && 下标未匹配上,则向后跳
        cur = cur.next
        count++
    }
    return;
};

/**
 * Delete the index-th node in the linked list, if the index is valid.
 * @param {number} index
 * @return {void}
 */
MyLinkedList.prototype.deleteAtIndex = function(index) {
    var cur = this.head
    var count = -1
    if(index < 0) return -1; // 下标无效
    while(cur){
        if(count == index){
            // 如果不是尾节点,如果改变cur.prev节点next的指向
            // 同时更新cur.next节点prev的指向,做到忽略cur节点
            if(cur.next){
                cur.prev.next = cur.next
                cur.next.prev = cur.prev
            }else{
                cur.prev.next = null
            }
            return;
        }
        cur = cur.next
        count++
    }
};
注意
- 我们在创建实例时,默认创建了一个
head哨兵节点,为了防止初始化为空的情况,这导致之后涉及到下标的问题都需要多考虑一步 - 涉及到尾节点添加和删除时可以类比单链表,其他节点的增加和删除都要注意维护
前节点的next和后节点的prev
到这里涉及到链表的绝大部分基本原理就总结完了。之后我会继续讨论堆栈的原理和基本实现。
关于我
- 19年毕业的前端开发
- 沉迷Js、热衷开源(菜鸟一个)
- 邮箱:[email protected]
- VX:j565017805
- GitHub
- CSDN
既然已经读到末尾,不妨点个star鼓励一下吧。如果还想了解算法、LeetCode、前端方面的文章,不妨逛逛我的CSDN吧
瞧一瞧(求Star!!!)
- LeetCode题解Javascript版本:Gitbook版本传送门
- 前端进阶笔记:Gitbook传送门