一、准备工具
·adb驱动
·安卓手机
·打开手机调试模式
·USB线接好手机和电脑
·依赖安装包
二、实现原理
·获取手机实时的截图
·点击起始位置和落地位置
·计算两个点的距离
·计算按压时间
·发送按压指令
·重新刷新手机截图
三、abd驱动安装
配置成功如图所示:
四、安装微信跳一跳辅助所需的所有python模块
所需的模块有:
backports.functools-lru-cache==1.4
cycler==0.10.0
matplotlib==2.1.1
numpy==1.13.3
olefile==0.44
opencv-python==3.4.0.12
Pillow==4.3.0
pyparsing==2.2.0
python-dateutil==2.6.1
pytz==2017.3
six==1.11.0
tensorflow==1.4.0
pandas==0.22.0
scipy==1.0.0
scikit_learn==0.19.1
五、手机与电脑连接
将安卓手机用USB与电脑相连接,在安卓手机上打开开发者模式,并开启USB调试模式(如何开启开发者模式:在设置中找到手机版本号,连续点击5次即可开启开发者模式)
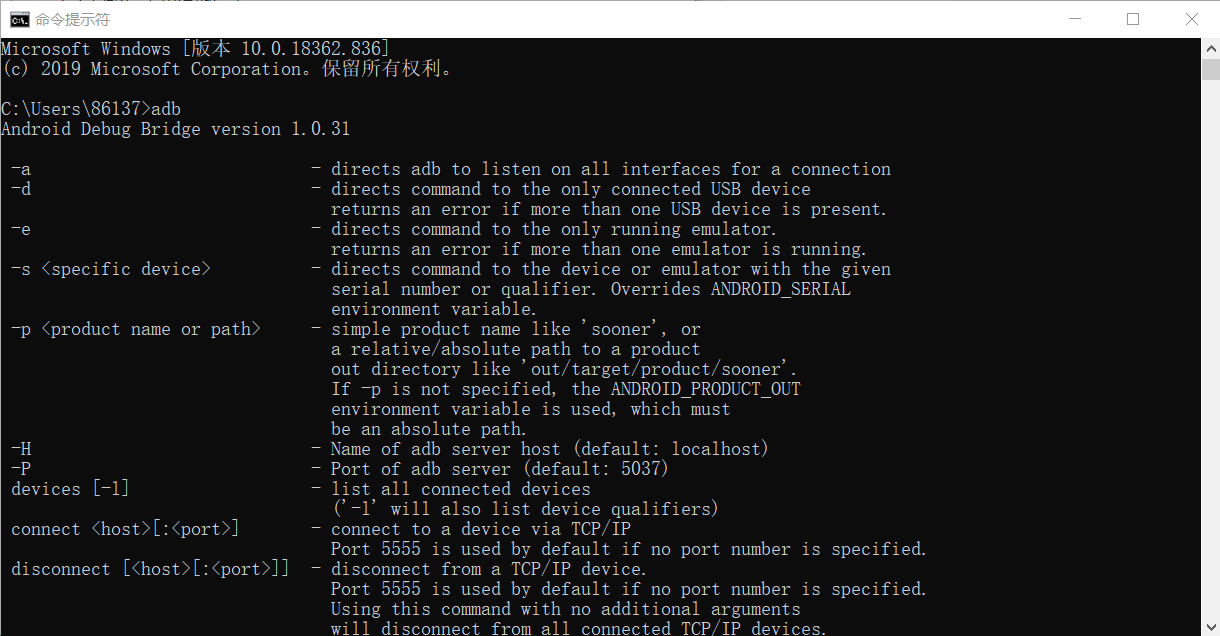
如果以上操作没有任何错误,那么在CMD控制台,执行命令 adb devices可显示当前手机连接的端口号。

六、运行跳一跳
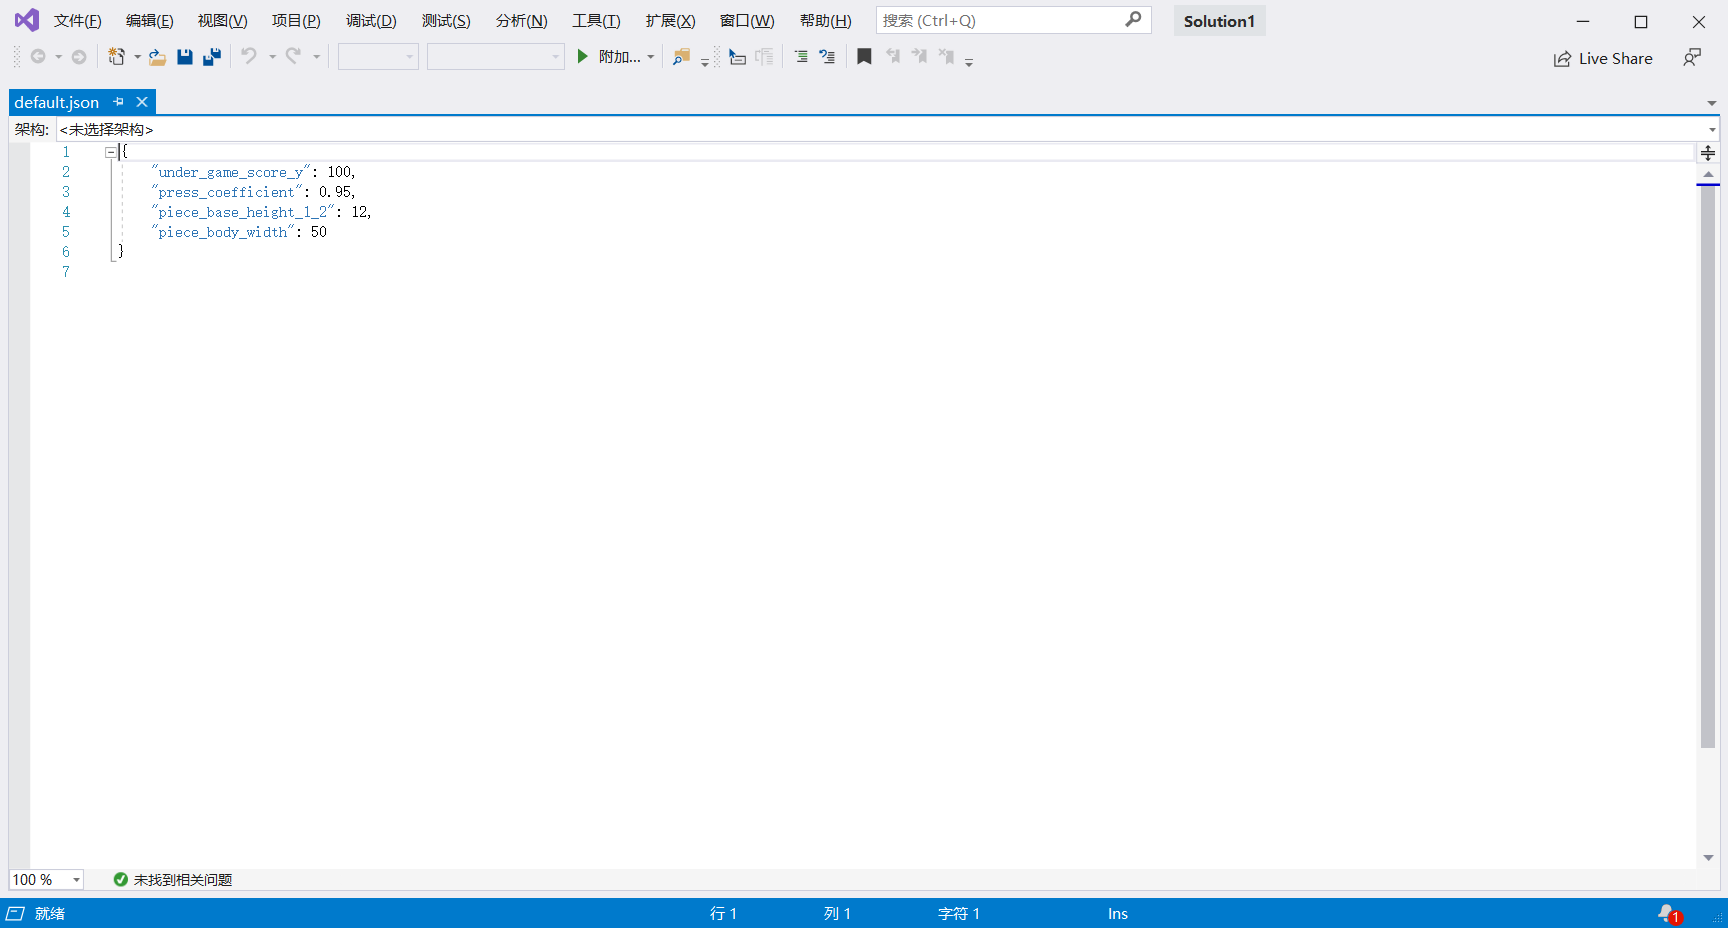
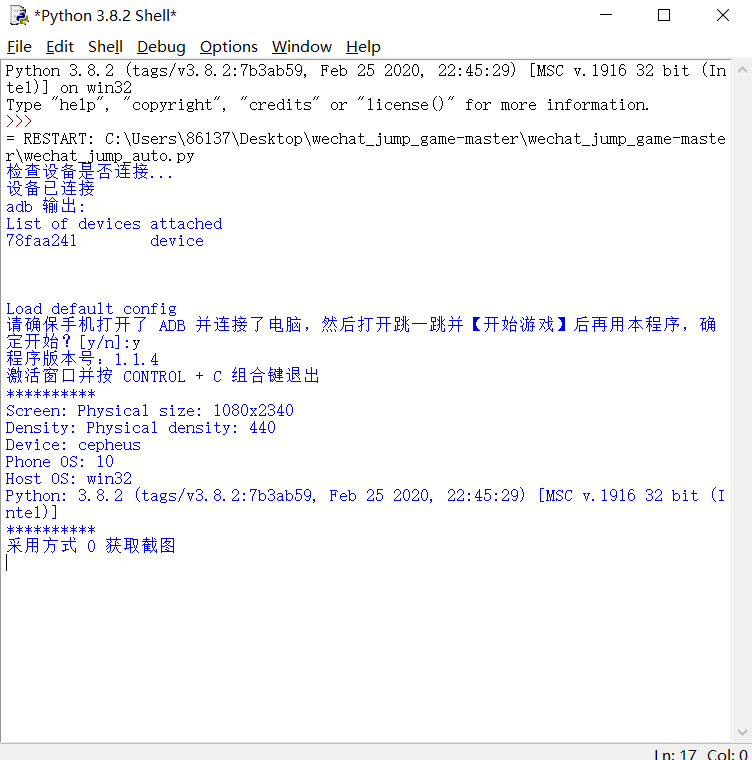
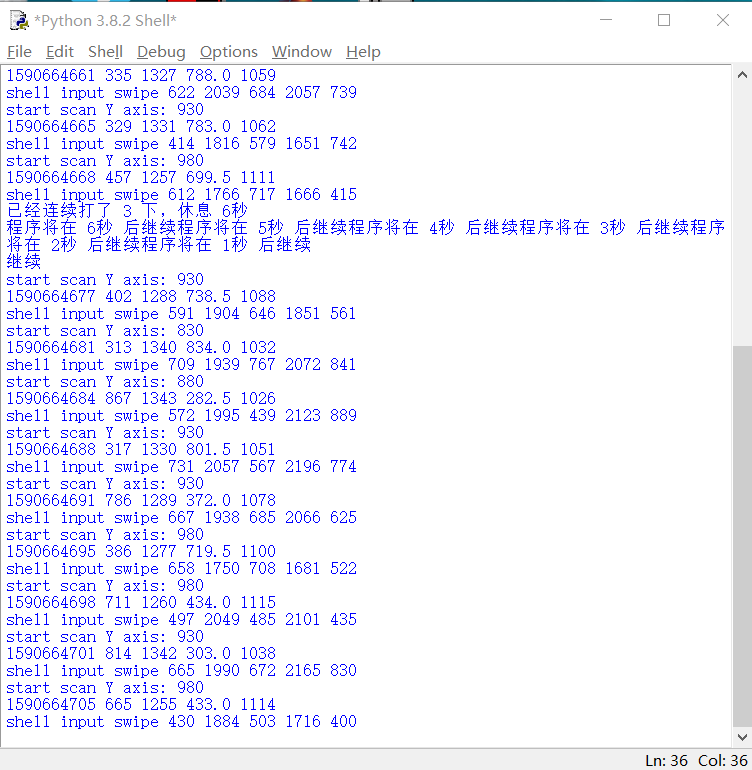
# -*- coding: utf-8 -*-

"""
=== 思路 ===
核心:每次落稳之后截图,根据截图算出棋子的坐标和下一个块顶面的中点坐标,
    根据两个点的距离乘以一个时间系数获得长按的时间
识别棋子:靠棋子的颜色来识别位置,通过截图发现最下面一行大概是一条
    直线,就从上往下一行一行遍历,比较颜色(颜色用了一个区间来比较)
    找到最下面的那一行的所有点,然后求个中点,求好之后再让 Y 轴坐标
    减小棋子底盘的一半高度从而得到中心点的坐标
识别棋盘:靠底色和方块的色差来做,从分数之下的位置开始,一行一行扫描,
    由于圆形的块最顶上是一条线,方形的上面大概是一个点,所以就
    用类似识别棋子的做法多识别了几个点求中点,这时候得到了块中点的 X
    轴坐标,这时候假设现在棋子在当前块的中心,根据一个通过截图获取的
    固定的角度来推出中点的 Y 坐标
最后:根据两点的坐标算距离乘以系数来获取长按时间(似乎可以直接用 X 轴距离)
"""

import math
import re
import random
import sys
import time
from PIL import Image
from six.moves import input

if sys.version_info.major != 3:
    print('请使用Python3')
    exit(1)
try:
    from common import debug, config, screenshot, UnicodeStreamFilter
    from common.auto_adb import auto_adb
except Exception as ex:
    print(ex)
    print('请将脚本放在项目根目录中运行')
    print('请检查项目根目录中的 common 文件夹是否存在')
    exit(1)
adb = auto_adb()
VERSION = "1.1.4"

# DEBUG 开关,需要调试的时候请改为 True,不需要调试的时候为 False
DEBUG_SWITCH = False
adb.test_device()
# Magic Number,不设置可能无法正常执行,请根据具体截图从上到下按需
# 设置,设置保存在 config 文件夹中
config = config.open_accordant_config()
under_game_score_y = config['under_game_score_y']
# 长按的时间系数,请自己根据实际情况调节
press_coefficient = config['press_coefficient']
# 二分之一的棋子底座高度,可能要调节
piece_base_height_1_2 = config['piece_base_height_1_2']
# 棋子的宽度,比截图中量到的稍微大一点比较安全,可能要调节
piece_body_width = config['piece_body_width']
# 图形中圆球的直径,可以利用系统自带画图工具,用直线测量像素,如果可以实现自动识别圆球直径,那么此处将可实现全自动。
head_diameter = config.get('head_diameter')
if head_diameter == None:
    density_str = adb.test_density()
    matches = re.search(r'\d+', density_str)
    density_val = int(matches.group(0))
    head_diameter = density_val / 8


def set_button_position(im):
    """
    将 swipe 设置为 `再来一局` 按钮的位置
    """
    global swipe_x1, swipe_y1, swipe_x2, swipe_y2
    w, h = im.size
    left = int(w / 2)
    top = int(1584 * (h / 1920.0))
    left = int(random.uniform(left - 200, left + 200))
    top = int(random.uniform(top - 200, top + 200))  # 随机防 ban
    after_top = int(random.uniform(top - 200, top + 200))
    after_left = int(random.uniform(left - 200, left + 200))
    swipe_x1, swipe_y1, swipe_x2, swipe_y2 = left, top, after_left, after_top


def jump(distance, delta_piece_y):
    """
    跳跃一定的距离
    """
    # 计算程序长度与截图测得的距离的比例
    scale = 0.945 * 2 / head_diameter
    actual_distance = distance * scale * (math.sqrt(6) / 2)
    press_time = (-945 + math.sqrt(945 ** 2 + 4 * 105 *
                                   36 * actual_distance)) / (2 * 105) * 1000
    press_time *= press_coefficient
    press_time = max(press_time, 200)  # 设置 200ms 是最小的按压时间
    press_time = int(press_time)

    cmd = 'shell input swipe {x1} {y1} {x2} {y2} {duration}'.format(
        x1=swipe_x1,
        y1=swipe_y1,
        x2=swipe_x2,
        y2=swipe_y2,
        duration=press_time + delta_piece_y
    )
    print(cmd)
    adb.run(cmd)
    return press_time


def find_piece_and_board(im):
    """
    寻找关键坐标
    """
    w, h = im.size
    points = []  # 所有满足色素的点集合
    piece_y_max = 0
    board_x = 0
    board_y = 0
    scan_x_border = int(w / 8)  # 扫描棋子时的左右边界
    scan_start_y = 0  # 扫描的起始 y 坐标
    im_pixel = im.load()
    # 以 50px 步长,尝试探测 scan_start_y
    for i in range(int(h / 3), int(h * 2 / 3), 50):
        last_pixel = im_pixel[0, i]
        for j in range(1, w):
            pixel = im_pixel[j, i]
            # 不是纯色的线,则记录 scan_start_y 的值,准备跳出循环
            if pixel != last_pixel:
                scan_start_y = i - 50
                break
        if scan_start_y:
            break
    print('start scan Y axis: {}'.format(scan_start_y))

    # 从 scan_start_y 开始往下扫描,棋子应位于屏幕上半部分,这里暂定不超过 2/3
    for i in range(scan_start_y, int(h * 2 / 3)):
        # 横坐标方面也减少了一部分扫描开销
        for j in range(scan_x_border, w - scan_x_border):
            pixel = im_pixel[j, i]
            # 根据棋子的最低行的颜色判断,找最后一行那些点的平均值,这个颜
            # 色这样应该 OK,暂时不提出来
            if (50 < pixel[0] < 60) \
                    and (53 < pixel[1] < 63) \
                    and (95 < pixel[2] < 110):
                points.append((j, i))
                piece_y_max = max(i, piece_y_max)

    bottom_x = [x for x, y in points if y == piece_y_max]  # 所有最底层的点的横坐标
    if not bottom_x:
        return 0, 0, 0, 0, 0

    piece_x = int(sum(bottom_x) / len(bottom_x))  # 中间值
    piece_y = piece_y_max - piece_base_height_1_2  # 上移棋子底盘高度的一半

    # 限制棋盘扫描的横坐标,避免音符 bug
    if piece_x < w / 2:
        board_x_start = piece_x
        board_x_end = w
    else:
        board_x_start = 0
        board_x_end = piece_x

    for i in range(int(h / 3), int(h * 2 / 3)):
        last_pixel = im_pixel[0, i]
        if board_x or board_y:
            break
        board_x_sum = 0
        board_x_c = 0

        for j in range(int(board_x_start), int(board_x_end)):
            pixel = im_pixel[j, i]
            # 修掉脑袋比下一个小格子还高的情况的 bug
            if abs(j - piece_x) < piece_body_width:
                continue

            # 检查Y轴下面5个像素, 和背景色相同, 那么是干扰
            ver_pixel = im_pixel[j, i + 5]
            if abs(pixel[0] - last_pixel[0]) \
                    + abs(pixel[1] - last_pixel[1]) \
                    + abs(pixel[2] - last_pixel[2]) > 10 \
                    and abs(ver_pixel[0] - last_pixel[0]) \
                    + abs(ver_pixel[1] - last_pixel[1]) \
                    + abs(ver_pixel[2] - last_pixel[2]) > 10:
                board_x_sum += j
                board_x_c += 1
        if board_x_sum:
            board_x = board_x_sum / board_x_c
    last_pixel = im_pixel[board_x, i]

    # 首先找到游戏的对称中心,由对称中心做辅助线与x=board_x直线的交点即为棋盘的中心位置
    # 有了对称中心,可以知道棋子在棋盘上面的相对位置(偏高或偏低,偏高的话测量值比实际值大,
    # 偏低相反。最后通过delta_piece_y来对跳跃时间进行微调
    center_x = w / 2 + (24 / 1080) * w
    center_y = h / 2 + (17 / 1920) * h
    if piece_x > center_x:
        board_y = round((25.5 / 43.5) * (board_x - center_x) + center_y)
        delta_piece_y = piece_y - round((25.5 / 43.5) * (piece_x - center_x) + center_y)
    else:
        board_y = round(-(25.5 / 43.5) * (board_x - center_x) + center_y)
        delta_piece_y = piece_y - round(-(25.5 / 43.5) * (piece_x - center_x) + center_y)

    if not all((board_x, board_y)):
        return 0, 0, 0, 0, 0
    return piece_x, piece_y, board_x, board_y, delta_piece_y


def yes_or_no():
    """
    检查是否已经为启动程序做好了准备
    """
    while True:
        yes_or_no = str(input('请确保手机打开了 ADB 并连接了电脑,'
                              '然后打开跳一跳并【开始游戏】后再用本程序,确定开始?[y/n]:'))
        if yes_or_no == 'y':
            break
        elif yes_or_no == 'n':
            print('谢谢使用', end='')
            exit(0)
        else:
            print('请重新输入')


def main():
    """
    主函数
    """
    print('程序版本号:{}'.format(VERSION))
    print('激活窗口并按 CONTROL + C 组合键退出')
    debug.dump_device_info()
    screenshot.check_screenshot()

    i, next_rest, next_rest_time = (0, random.randrange(3, 10),
                                    random.randrange(5, 10))
    while True:
        im = screenshot.pull_screenshot()
        # 获取棋子和 board 的位置
        piece_x, piece_y, board_x, board_y, delta_piece_y = find_piece_and_board(im)
        ts = int(time.time())
        print(ts, piece_x, piece_y, board_x, board_y)
        set_button_position(im)
        jump(math.sqrt((board_x - piece_x) ** 2 + (board_y - piece_y) ** 2), delta_piece_y)
        if DEBUG_SWITCH:
            debug.save_debug_screenshot(ts, im, piece_x,
                                        piece_y, board_x, board_y)
            debug.backup_screenshot(ts)
        im.close()
        i += 1
        if i == next_rest:
            print('已经连续打了 {} 下,休息 {}秒'.format(i, next_rest_time))
            for j in range(next_rest_time):
                sys.stdout.write('\r程序将在 {}秒 后继续'.format(next_rest_time - j))
                sys.stdout.flush()
                time.sleep(1)
            print('\n继续')
            i, next_rest, next_rest_time = (0, random.randrange(30, 100),
                                            random.randrange(10, 60))
        # 为了保证截图的时候应落稳了,多延迟一会儿,随机值防 ban
        time.sleep(random.uniform(1.2, 1.4))


if __name__ == '__main__':
    try:
        yes_or_no()
        main()
    except KeyboardInterrupt:
        adb.run('kill-server')
        print('\n谢谢使用', end='')
        exit(0)

七、根据截图得出实际数据调节参数
# -*- coding: utf-8 -*-
from __future__ import print_function, division
import os
import time
import datetime
import matplotlib.pyplot as plt
import matplotlib.animation as animation
import cv2

VERSION = "1.1.4"
scale = 0.25

template = cv2.imread('./resource/image/character.png')
template = cv2.resize(template, (0, 0), fx=scale, fy=scale)
template_size = template.shape[:2]


def search(img):
    result = cv2.matchTemplate(img, template, cv2.TM_SQDIFF)
    min_val, max_val, min_loc, max_loc = cv2.minMaxLoc(result)

    cv2.rectangle(
        img,
        (min_loc[0], min_loc[1]),
        (min_loc[0] + template_size[1], min_loc[1] + template_size[0]),
        (255, 0, 0),
        4)
    return img, min_loc[0] + template_size[1] / 2, min_loc[1] +  template_size[0]


def pull_screenshot():
    filename = datetime.datetime.now().strftime("%H%M%S") + '.png'
    os.system('mv autojump.png {}'.format(filename))
    os.system('adb shell screencap -p /sdcard/autojump.png')
    os.system('adb pull /sdcard/autojump.png ./autojump.png')


def jump(distance):
    press_time = distance * 1.35
    press_time = int(press_time)
    cmd = 'adb shell input swipe 320 410 320 410 ' + str(press_time)
    print(cmd)
    os.system(cmd)


def update_data():
    global src_x, src_y

    img = cv2.imread('./autojump.png')
    img = cv2.resize(img, (0, 0), fx=scale, fy=scale)
    img, src_x, src_y = search(img)
    return img


fig = plt.figure()
pull_screenshot()
img = update_data()
im = plt.imshow(img, animated=True)

update = True


def updatefig(*args):
    global update

    if update:
        time.sleep(1)
        pull_screenshot()
        im.set_array(update_data())
        update = False
    return im,


def on_click(event):
    global update
    global src_x, src_y

    dst_x, dst_y = event.xdata, event.ydata

    distance = (dst_x - src_x)**2 + (dst_y - src_y)**2
    distance = (distance ** 0.5) / scale
    print('distance = ', distance)
    jump(distance)
    update = True


fig.canvas.mpl_connect('button_press_event', on_click)
ani = animation.FuncAnimation(fig, updatefig, interval=5, blit=True)
plt.show()

调整后的参数为: