【引言】
Spring Cloud和Dubbo是当前微服务架构中主流技术选型方案。Spring Cloud为我们的微服务架构提供了整套的技术体系方案,所以被称作为“全家桶”。
关于dubbo的发展,曾经看到过停止维护的相关消息,使得很多公司转向Spring Cloud。然而从2017年9月开始,dubbo源码又开始维护了,并且做了升级,现在也在持续更新与维护中。
因此,在很多时候,若项目中不需要用到Spring Cloud全家桶中各种服务治理与管理的组件,则dubbo将会是更好的选择。
在本篇博客中将实践Spring Boot和Dubbo的集成。
【版本说明】
-
Java Version:1.8
-
Spring Boot Version:2.1.6.RELEASE
-
Dubbo Version:2.6.0
-
Dubbo-spring-boot-starter Version:2.0.0
-
Mybatis Plus Version:3.1.1
-
Mybatis-plus-boot-starter Version:3.1.1
【项目结构】
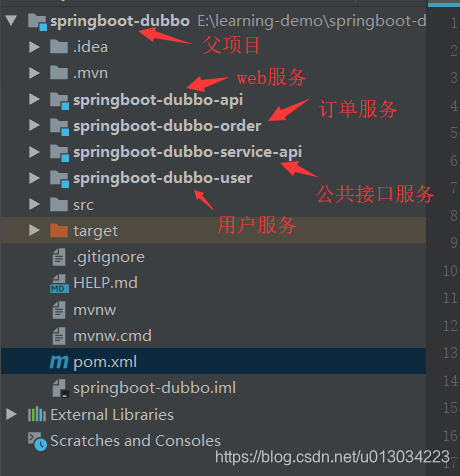
新建一个Maven父项目,其子模块包括上述的web服务、订单服务、公共接口服务及用户服务。
从系统的角度来说,订单服务及用户服务属于业务系统服务,公共接口服务是项目中需要共用的一些接口及实体的定义,而web服务则是对外暴露的接口,相当于Controller层。
从Dubbo的角度来说,web服务为消费者,消费各个业务服务;各个业务服务为生产者,提供各个服务。
【整合过程】
新建项目之前的一系列步骤就不在博客中一一写了,博客最后会将整合实例代码上传至github。
下面就写一些核心的步骤:
1.父项目maven核心依赖。
很多依赖是每个服务都需要添加的,所以我们直接写在父项目中即可:
<!-- Spring Boot -->
<dependency>
    <groupId>org.springframework.boot</groupId>
    <artifactId>spring-boot-starter</artifactId>
</dependency>

<!-- Spring MVC -->
<dependency>
    <groupId>org.springframework.boot</groupId>
    <artifactId>spring-boot-starter-web</artifactId>
    <exclusions>
        <!--排除slf4j-log4j12,解决Class path contains multiple SLF4J bindings.警告-->
        <exclusion>
            <groupId>org.slf4j</groupId>
            <artifactId>slf4j-log4j12</artifactId>
        </exclusion>
        <!--排除log4j,解决WARN No appenders could be found for logger.警告-->
        <exclusion>
            <groupId>log4j</groupId>
            <artifactId>log4j</artifactId>
        </exclusion>
    </exclusions>
</dependency>

<!-- MyBatis Plus Boot Starter -->
<dependency>
    <groupId>com.baomidou</groupId>
    <artifactId>mybatis-plus-boot-starter</artifactId>
    <version>3.1.1</version>
</dependency>

<!-- Dubbo -->
<dependency>
    <groupId>com.alibaba.spring.boot</groupId>
    <artifactId>dubbo-spring-boot-starter</artifactId>
    <version>2.0.0</version>
</dependency>

<!-- zookeeper client依赖 -->
<dependency>
    <groupId>com.101tec</groupId>
    <artifactId>zkclient</artifactId>
    <version>0.10</version>
    <exclusions>
        <!--排除slf4j-log4j12,解决Class path contains multiple SLF4J bindings.警告-->
        <exclusion>
            <groupId>org.slf4j</groupId>
            <artifactId>slf4j-log4j12</artifactId>
        </exclusion>
        <!--排除log4j,解决WARN No appenders could be found for logger.警告-->
        <exclusion>
            <groupId>log4j</groupId>
            <artifactId>log4j</artifactId>
        </exclusion>
    </exclusions>
</dependency>

<dependency>
    <groupId>com.fzph</groupId>
    <artifactId>bootdubbo-service-api</artifactId>
    <version>0.0.1-SNAPSHOT</version>
</dependency>
2.创建服务提供者,这里以user服务来说:
服务所需要的dubbo,mybatis-plus,zookeeper等引用已在父项目中添加,依赖就不必再添加了。关键在于以下三点:
- 配置文件
# 本服务的名称
spring.dubbo.application.name=user-provider
# ZooKeeper所在服务器的IP和端口号
spring.dubbo.registry=zookeeper://127.0.0.1:2181
# RPC通信所采用的协议
spring.dubbo.protocol.name=dubbo
# 本服务对外暴露的端口号
spring.dubbo.protocol.port=20883
# 服务实现类所在的路径
spring.dubbo.scan=com.fzph.bootdubbouser.service

# 配置mybatis-plus
# 配置扫描xml
mybatis-plus.mapper-locations=classpath:mapper/*.xml

# DataSource Config
spring.datasource.driver-class-name=com.mysql.jdbc.Driver
spring.datasource.url=jdbc:mysql://localhost:3306/user?useUnicode=true&characterEncoding=utf-8&allowMultiQueries=true&zeroDateTimeBehavior=convertToNull&serverTimezone=UTC
spring.datasource.username=root
spring.datasource.password=123456

server.port=9000
配置文件是核心,配置了dubbo相关的一些属性,数据库配置及mybatis-plus中xml文件扫描路径。
- Dubbo全局配置
@SpringBootApplication
@EnableDubboConfiguration
@MapperScan("com.fzph.bootdubbouser.mapper")
public class BootdubboUserApplication {

    public static void main(String[] args) {
        SpringApplication.run(BootdubboUserApplication.class, args);
    }

}
在启动类中添加@EnableDubboConfiguration注解,全局配置dubbo
- Service服务暴露
@Service(version = "1.0.0")
@Component
public class UserServiceImpl implements UserService {

    @Autowired
    private UserMapper userMapper;

    @Override
    public List<User> findAllUsers() {
        return userMapper.selectList(null);
    }
}
在Service业务实现层,我们不仅仅需要将Service作为Bean注入,还需要将Service作为服务暴露。
在Dubbo的依赖包中,提供了服务@Service注解,使用时必须标注版本号。为了与Spring中的@Service注解区分,所以使用Spring中的@Component注解替代了Spring的@Service注解。
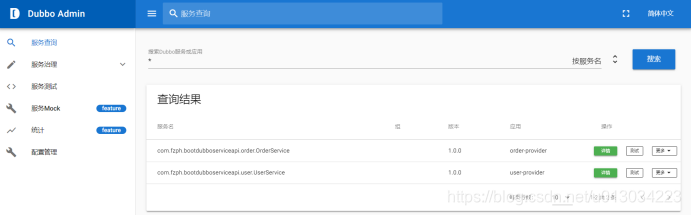
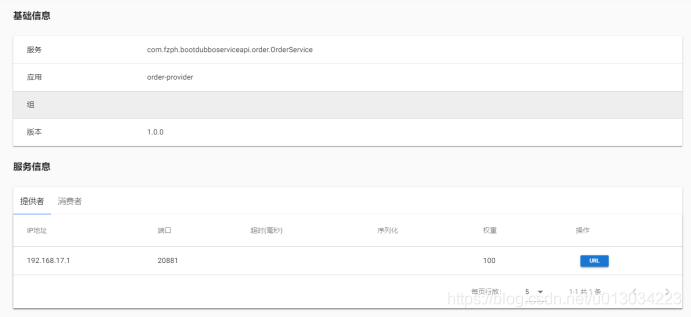
通过以上步骤,启动zookeeper 客户端,启动dubbo-admin应用,启动user应用,order服务也一样配置即可,服务注册成功的话,就可以在dubbo-admin管理页面中查询到服务生产者。
服务列表如下:
服务详情如下:
3.创建服务消费者,也就是我们的web层服务
- 配置文件
## Dubbo 服务消费者配置
# 本服务的名称
spring.dubbo.application.name=api-consumer
# ZooKeeper所在服务器的IP和端口号
spring.dubbo.registry=zookeeper://127.0.0.1:2181
# 服务实现类所在的路径
spring.dubbo.scan=com.fzph.bootdubboapi
# RPC通信所采用的协议
spring.dubbo.protocol.name=dubbo
# 本服务对外暴露的端口号
spring.dubbo.protocol.port=20889
- dubbo全局配置
@SpringBootApplication(exclude= {DataSourceAutoConfiguration.class})
@EnableDubboConfiguration
public class BootdubboapiApplication {

    public static void main(String[] args) {
        SpringApplication.run(BootdubboapiApplication.class, args);
    }

}
因为此服务不需要与数据库交互,而Spring Boot2.1.6中又默认加入了数据库的引用,不在配置文件中配置数据库url等相关属性,服务启动失败,所以加上了除去数据源配置。
- controller层实现
@RestController
@RequestMapping("/user")
public class UserApi {

    @Reference(version = "1.0.0")
    private UserService userService;

    /**
     * 查询所有用户
     * @return
     */
    @GetMapping("/all")
    public List<User> findAllUsers(){
        return userService.findAllUsers();
    }
}
使用dubbo提供的@Reference注解标记服务消费者角色,接口中直接调用公共服务模块提供的api接口即可。
启动成功,在管理页面会查询该消费者:

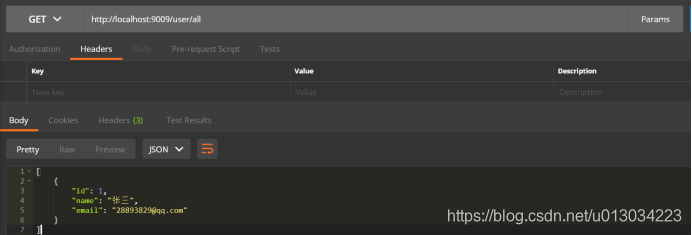
- 接口测试结果
查询所有用户:
分页查询所有订单:

【项目地址】
项目代码已上传至github,地址:
https://github.com/huzhiting/springboot-dubbo-Mybatis-Plus
【总结】
交流中,得知别人公司的项目架构是spring boot + dubbo,心血来潮,就想自己实践一把,搞了两天,过程中遇到了不少问题,最后也都一一解决了。
一直觉得技术对我来说,太过深奥,原理源码什么的实在难懂,唯一的动力就在于自己的实践可能在某个时刻给自己或给别人能提供帮助。