Android 如何自定义View?
在看这篇博客之前可以先看View的工作原理
1. 自定义View
1. 自定义View的分类
1. 继承View重写onDraw方法
这种方式需要通过绘制的方式来实现,即重写onDraw方法。采用这种方式需要自己支持wrap_content,并且padding也需自己处理。
2. 继承ViewGroup派生特殊的Layout
这种方法主要用于实现自定义布局,采用这种方式稍微复杂一些,需要合适的处理ViweGroup的测量,布局两个过程,并且同时处理子元素的测量和布局过程。
3. 继承特定的View
这种方式比较常见,一般是用于扩展某种已有的View的功能,这种方式不需要自己支持wrap_content和padding。
4. 继承特定的ViewGroup
这种方式不需要自己处理测量和布局这两个过程。
2. 自定义View须知
1. 让View支持wrap_content
这是因为直接继承View或者ViewGroup的控件,如果不在onMeasure中对wrap_content做特殊处理时,那么当外界在布局中使用wrap_content时就无法达到预期的效果。具体原因在View的工作原理
2. 如果有必要,让View支持padding
这是因为直接继承View的控件,如果不在draw方法中处理padding,那么padding属性是无法起作用的。另外,直接继承自ViewGroup的控件需要在onMeasure和onLayout中考虑padding和子元素的margin对其造成的影响。
3. 尽量不要在View中使用Handler,没必要
这是因为View的内部本身就提供了post系列的方法,完全可以替代Handler的作用。
4. View中如果有线程或者动画,需要及时停止
如果有线程或者动画需要停止时,那么onDetachedFromWindow是一个很好的时机。当包含此view的Activity退出或者当前View被remove时,View的onDetachedFromWindow方法会被调用,和此方法对应的是onAttachedToWindow,当包含此View的Activity启动时,View的onAttachedToWindow会被调用。
5. View带有滑动嵌套情形时,需要处理好滑动冲突
如果有滑动冲突的话,那么要合适的处理滑动冲突。
2. 示例
1. 继承现有控件
相对而言,这是一种较简单的方式。因为大部分核心工作,比如关于控件大小的测量,控件位置的摆放等相关的计算,在系统内部都已经实现并封装好,我们只需要在此基础上做一些扩展,并按照自己的意图显示相应的元素。
如:
public class CustomToolBar extends RelativeLayout {
    private ImageView leftImage,rightImage;
    private TextView titleTextView;
    public CustomToolBar(Context context) {
        this(context,null);
    }

    public CustomToolBar(Context context, AttributeSet attrs) {
        this(context, attrs,0);
    }

    public CustomToolBar(Context context, AttributeSet attrs, int defStyleAttr) {
        super(context, attrs, defStyleAttr);
        init(context);
    }

    private void init(Context context) {
        leftImage = new ImageView(context);
        leftImage.setPadding(12,12,12,12);
        rightImage = new ImageView(context);
        rightImage.setPadding(12,12,12,12);
        leftImage.setImageResource(R.mipmap.ic_launcher);
        rightImage.setImageResource(R.mipmap.ic_launcher);
        LayoutParams leftParams = new LayoutParams((int) TypedValue.applyDimension(TypedValue.COMPLEX_UNIT_DIP,48,getResources().getDisplayMetrics()),(int) TypedValue.applyDimension(TypedValue.COMPLEX_UNIT_DIP,48,getResources().getDisplayMetrics()));
        leftParams.addRule(ALIGN_PARENT_LEFT,TRUE);
        this.addView(leftImage,leftParams);
        titleTextView = new TextView(context);
        titleTextView.setText("CustomToolBar");
        titleTextView.setTextSize(20);
        titleTextView.setTextColor(Color.WHITE);
        LayoutParams titleParams  = new LayoutParams(LayoutParams.WRAP_CONTENT,LayoutParams.WRAP_CONTENT);
        titleParams.addRule(CENTER_IN_PARENT,TRUE);
        this.addView(titleTextView,titleParams);
        LayoutParams rightParams = new LayoutParams((int) TypedValue.applyDimension(TypedValue.COMPLEX_UNIT_DIP,48,getResources().getDisplayMetrics()),(int) TypedValue.applyDimension(TypedValue.COMPLEX_UNIT_DIP,48,getResources().getDisplayMetrics()));
        rightParams.addRule(ALIGN_PARENT_RIGHT,TRUE);
        addView(rightImage,rightParams);
    }
}

2. 自定义属性
有时候我们想在XML中使用CustomToolBar时,希望能在XML中直接指定Title的显示内容,字体颜色,leftImage和rightImage的显示图片等。这就需要自定义属性。
-
attrs.xml中声明自定义属性
在res目录下的attrs.xml文件中(没有就自己创建一个),使用标签自定义属性,如下所示:
<declare-styleable name="CustomToolBar">
        <attr name = "titleText" format="string|reference"/>
        <attr name="myTitleTextColor" format="color|reference"/>
        <attr name="titleTextSize" format="dimension|reference"/>
        <attr name="leftImageSrc" format="reference"/>
        <attr name="rightImageSrc" format="reference"/>
    </declare-styleable>
解释:
- declare-styleable标签代表一个自定义属性集合,一般会与自定义控件结合使用
- attr标签则代表一条具体的属性,name是属性名称,format代表属性的格式。
在XML布局中使用自定义属性
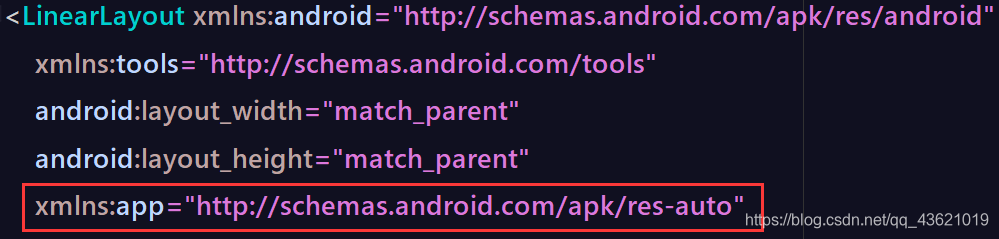
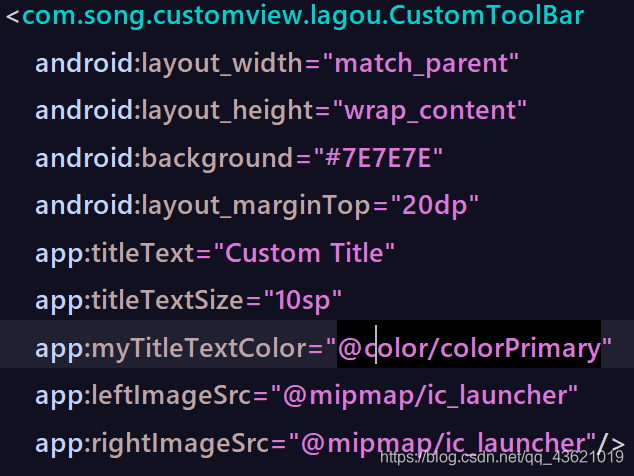
首先添加命名空间xmnls:app ,然后通过命名空间app引用自定义属性,并传入相应的图片资源和字符串内容。
在CustomToolBar中,获取自定义属性的引用值
private void initAttrs(Context context) {
        TypedArray ta = context.obtainStyledAttributes(R.styleable.CustomToolBar);
        titleText = ta.getString(R.styleable.CustomToolBar_titleText);
        textColor = ta.getColor(R.styleable.CustomToolBar_myTitleTextColor,Color.WHITE);
        titleTextSize = ta.getDimension(R.styleable.CustomToolBar_titleTextSize,12);
        leftImageId = ta.getResourceId(R.styleable.CustomToolBar_leftImageSrc,R.mipmap.ic_launcher);
        rightImageId = ta.getResourceId(R.styleable.CustomToolBar_rightImageSrc,R.mipmap.ic_launcher);
    }

3. 直接继承View或ViewGroup
这种方式相比第一种麻烦一些,但是更加灵活,也能实现更加复杂的UI界面。一般需要解决以下问题:
- 如何根据相应的属性将UI元素绘制到界面;
- 自定义控件的大小,也就是宽和高分别设置多少;
- 如果是ViewGroup,如何合理安排子元素的摆放位置。
以上三个问题依次在如下三个方法中解决:
- onDraw
- onMeasure
- onLayout
因此自定义View的工作重点其实就是复写并且合理的实现这三个方法。注意:并不是每个自定义View都需要实现这三个方法,大多数情况下只需要实现其中2个甚至1个方法也能满足需求。
onDraw
onDraw方法接收一个Canvas参数。Canvas可以理解为一个画布,在这块画布上可以绘制各种类型的UI元素。
系统提供了一系列Cnavas操作方法,如下:
void drawRect(RectF rect,Paint paint);//绘制矩形区域
void drawOval(RectF oval,Paint paint);//绘制椭圆
void drawCircle(float cx,float cy,float radius,Paint paint);//绘制圆形
void drawArc(RectF oval,float startAngle,float sweepAngle,boolean useCenter,Paint paint);//绘制弧形
void drawPath(Path path,Paint paint);//绘制path路径
void drawLine(float startX,float startY,float stopX,float stopY,Paint paint);//绘制连线
void drawOval(float x,float y,Paint paint);//绘制点
从上图中可以看出,Canvas中每一个绘制操作都需要传入一个Paint对象。Paint就相当于一个画笔,我们可以设置画笔的各种属性,实现不同的绘制效果。
setStyle(Style style);//设置绘制模式
setColor(int color);//设置颜色
setAlpha(int a);//设置透明度
setShader(Shader sahder);//设置Paint的填充效果
setStroke(float width);//设置线条宽度
setTextSize(float textSize);//设置文字大小
setAntiAlias(boolean aa);//设置抗锯齿开关
setDither(boolean dither);//设置防抖动开关
如下代码,定义PieImageView继承自View,然后在onDraw方法中,分别使用canvas的drawArc,和drawCircle来绘制弧度和圆形。这两个形状结合在一起就能表示一个简易的圆形进度条控件。
public class PieImageView extends View {

    private static final int MAX_PROGRESS = 100;
    private Paint mArcPaint;
    private RectF mBound;
    private Paint mCirclePaint;
    private int mProgress = 0;
    public PieImageView(Context context) {
        this(context,null);
    }

    public PieImageView(Context context, @Nullable AttributeSet attrs) {
        this(context, attrs,0);
    }

    public PieImageView(Context context, @Nullable AttributeSet attrs, int defStyleAttr) {
        super(context, attrs, defStyleAttr);
        init();
    }

    public void setProgress(@IntRange(from  = 0,to = MAX_PROGRESS) int mProgress){
        this.mProgress = mProgress;
        ViewCompat.postInvalidateOnAnimation(this);
    }

    private void init() {
        mArcPaint = new Paint(Paint.ANTI_ALIAS_FLAG);
        mArcPaint.setStyle(Paint.Style.FILL_AND_STROKE);
        mArcPaint.setStrokeWidth(dpToPixel(0.1f,getContext()));
        mArcPaint.setColor(Color.RED);

        mCirclePaint = new Paint(Paint.ANTI_ALIAS_FLAG);
        mCirclePaint.setStyle(Paint.Style.STROKE);
        mCirclePaint.setStrokeWidth(dpToPixel(2,getContext()));
        mCirclePaint.setColor(Color.argb(120,0xff,0xff,0xff));
        mBound = new RectF();
    }

    @Override
    protected void onMeasure(int widthMeasureSpec, int heightMeasureSpec) {
        int widthMode = MeasureSpec.getMode(widthMeasureSpec);
        int heightMode = MeasureSpec.getMode(heightMeasureSpec);
        int measureWidth = MeasureSpec.getSize(widthMeasureSpec);
        int measureHeight = MeasureSpec.getSize(heightMeasureSpec);
        //判断是wrap_content模式
        if (MeasureSpec.AT_MOST == widthMode||MeasureSpec.AT_MOST == heightMode){

            //将宽高设置为传入宽高的最小值
            int size = Math.min(measureWidth,measureHeight);
            setMeasuredDimension(size,size);
        }else{
            setMeasuredDimension(measureWidth,measureHeight);
        }

    }

    @Override
    protected void onSizeChanged(int w, int h, int oldw, int oldh) {
        super.onSizeChanged(w, h, oldw, oldh);
        int min = Math.min(w,h);
        int max = w + h - min;
        int r = Math.min(w,h)/3;
        mBound.set((max >> 1) - r,(min >> 1) -r,(max>>1)+r,(min>>1)+r);
    }

    @Override
    protected void onDraw(Canvas canvas) {
        super.onDraw(canvas);
        if (mProgress!=MAX_PROGRESS&&mProgress!=0){
            float mAngle = mProgress*360f/MAX_PROGRESS;
            canvas.drawArc(mBound,270,mAngle,true,mArcPaint);
            canvas.drawCircle(mBound.centerX(),mBound.centerY(),mBound.height()/2,mCirclePaint);
        }
    }

    private float scale = 0;
    private int dpToPixel(float dp, Context context) {
        if (scale == 0){
            scale = context.getResources().getDisplayMetrics().density;
        }
        return (int)(dp*scale);
    }
}
在Activity中设置进度为45
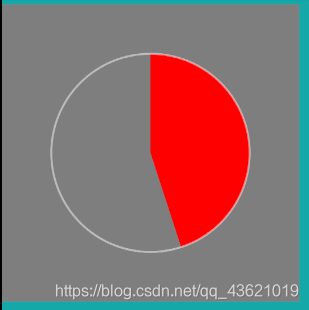
如果在上面代码中的布局文件中,将PieImageView的宽高设置为wrap_content(也就是自适应),显示效果如下:
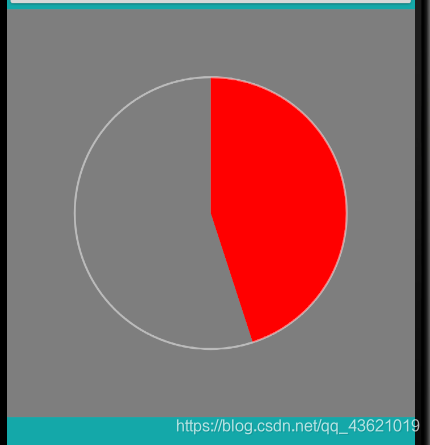
宽是父容器的宽,高等于宽,这是因为我们在onMeasure中处理了wrap_content的情况。
4. ViewGroup的onMeausre
如果我们自定义的控件是一个容器,onMeasure方法会更加复杂一些。因为ViewGroup在测量自己的宽高之前,需要先确定其内部子View的所占大小,然后才能确定自己的大小。
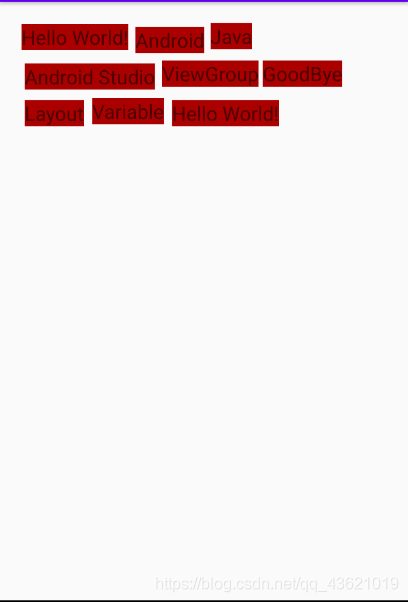
当我们要自己定义一个ViewGroup时,也需要在onMeaure方法中综合考虑子View的宽度。比如如果要实现一个流式布局FlowLayout,效果如下:

在大多数App的搜索界面经常会使用FlowLayout来展示历史搜索或者热门搜索项。FlowLayout的每一行中的item的个数不一定,当每行item累计宽度超过可用总宽度,则需要重启一行进行摆放。如下:
protected void onMeasure(int widthMeasureSpec, int heightMeasureSpec) {
        super.onMeasure(widthMeasureSpec, heightMeasureSpec);
        //获得宽高的测量模式和测量值
        int widthMode = MeasureSpec.getMode(widthMeasureSpec);
        int widthSize = MeasureSpec.getSize(widthMeasureSpec)-getPaddingLeft()-getPaddingRight();
        int heightSize = MeasureSpec.getSize(heightMeasureSpec)-getPaddingBottom()-getPaddingTop();
        int heightMode = MeasureSpec.getMode(heightMeasureSpec);

        //获得容器中子View的个数
        int childCount = getChildCount();
        //记录每一行View的总宽度
        int totalLineWidth = 0;
        //记录每一行最高view的高度
        int perLineMaxHeight = 0;
        //记录当前ViewGroup的总高度
        int totalHeight = 0;

        for (int i = 0; i < childCount; i++) {
            View childView = getChildAt(i);
            //对子view进行测量
            measureChild(childView,widthMeasureSpec,heightMeasureSpec);
            MarginLayoutParams lp = (MarginLayoutParams) childView.getLayoutParams();
            //获得子view的测量宽度
            int childWidth = childView.getMeasuredWidth()+lp.leftMargin+lp.rightMargin;
            //获得子view的测量高度
            int childHeight = childView.getMeasuredHeight()+lp.topMargin+lp.bottomMargin;
            if (totalLineWidth+childWidth>widthSize){
                //统计总高度
                totalHeight+=perLineMaxHeight;
                //开启新一行
                totalLineWidth=childWidth;
                perLineMaxHeight=childHeight;
            }else{
                //记录每一行的总宽度
                totalLineWidth+=childWidth;
                //比较每一行最高的view
                perLineMaxHeight = Math.max(perLineMaxHeight,childHeight);
            }

            //当前view已是最后一个view时,将改行最大高度添加到totalHeight中
            if (i == childCount-1){
                totalHeight+=perLineMaxHeight;
            }
        }

        //如果高度的测量模式是EXACTLY,则高度用测量值,否则用计算出来的总高度(这时的测量模式是AT_MOST)
        heightSize = heightMode == MeasureSpec.EXACTLY?heightSize:totalHeight;
        setMeasuredDimension(widthSize,heightSize);
    }
上述onMeasure方法的主要目的有2个:
- 通过measureChild方法递归测量子View
- 通过叠加每一行的高度,计算出最终FlowLayout的最终高度totalHeight
ViewGroup中的onLayout方法声明如下:
protected abstract void onLayout(boolean changed,int l,int t,int r,int b);
它是一个抽象方法 ,也就是每一个自定义ViewGroup都必须实现如何排布子View,具体就是遍历每一个子View,调用child.layout(l,t,r,b);为每个子View设置具体的布局位置。如下:
protected void onLayout(boolean changed, int l, int t, int r, int b) {
        Log.d("PADDING", "onLayout: viewgroup width--->"+getWidth());
        Log.d("PADDING", "onLayout: paddingLeft --->"+getPaddingLeft());
        mAllViews.clear();
        mPerLineMaxHeight.clear();

        //存放每一行的子view
        List<View> lineViews = new ArrayList<>();
        //记录每一行已存放view的总宽度
        int totalLineWidth = 0;
        //记录每一行最高View的高度
        int lineMaxHeight = 0;

        /**************************遍历所有View,将View添加到List<List<View>>集合中*************************/
        //获得View的总个数
        int childCount = getChildCount();
        for (int i = 0; i < childCount; i++) {
            View childView = getChildAt(i);
            MarginLayoutParams lp = (MarginLayoutParams) childView.getLayoutParams();
            int childWidth = childView.getMeasuredWidth()+lp.leftMargin+lp.rightMargin;
            int childHeight = childView.getMeasuredHeight()+lp.topMargin+lp.bottomMargin;
            if (totalLineWidth+childWidth>getWidth()){
                mAllViews.add(lineViews);
                mPerLineMaxHeight.add(lineMaxHeight);
                //开启新一行
                totalLineWidth = 0;
                lineMaxHeight = 0;
                lineViews = new ArrayList<>();
            }

            totalLineWidth+=childWidth;
            lineViews.add(childView);
            lineMaxHeight = Math.max(lineMaxHeight,childHeight);
        }
        //单独处理最后一行
        mAllViews.add(lineViews);
        mPerLineMaxHeight.add(lineMaxHeight);
        /***********************遍历集合中的所有view并显示出来***********************/
        //表示一个view和父容器左边的距离
        int mLeft = getPaddingLeft();
        //表示view和父容器顶部的距离
        int mTop = getPaddingTop();

        for (int i = 0; i < mAllViews.size(); i++) {
            //获得每一行的所有view
            lineViews = mAllViews.get(i);
            lineMaxHeight = mPerLineMaxHeight.get(i);
            for (int j = 0; j < lineViews.size(); j++) {
                View childView = lineViews.get(j);
                MarginLayoutParams lp = (MarginLayoutParams) childView.getLayoutParams();
                int leftChild = mLeft + lp.leftMargin;
                int topChild = mTop + lp.topMargin;
                int rightChild = leftChild + childView.getMeasuredWidth();
                int bottomChild = topChild+childView.getMeasuredHeight();
                //四个参数分别表示view的左上角和右下角
                childView.layout(leftChild,topChild,rightChild,bottomChild);
                mLeft+=lp.leftMargin+childView.getMeasuredWidth()+lp.rightMargin;
            }
            mLeft=getPaddingLeft();
            mTop+=lineMaxHeight;
        }
    }
最终使用效果:
<com.song.lagoucustomizedview.FlowLayout xmlns:android="http://schemas.android.com/apk/res/android"
    xmlns:app="http://schemas.android.com/apk/res-auto"
    xmlns:tools="http://schemas.android.com/tools"
    android:layout_width="match_parent"
    android:layout_height="match_parent"
    tools:context=".MainActivity"
    android:padding="20dp">

    <TextView
        android:layout_width="wrap_content"
        android:layout_height="wrap_content"
        android:layout_margin="2dp"
        android:background="#aa0000"
        android:text="Hello World!"
        android:textSize="20sp" />

    <TextView
        android:layout_width="wrap_content"
        android:layout_height="wrap_content"
        android:layout_margin="5dp"
        android:background="#aa0000"
        android:text="Android"
        android:textSize="20sp" />

    <TextView
        android:layout_width="wrap_content"
        android:layout_height="wrap_content"
        android:layout_margin="1dp"
        android:background="#aa0000"
        android:text="Java"
        android:textSize="20sp" />

    <TextView
        android:layout_width="wrap_content"
        android:layout_height="wrap_content"
        android:layout_margin="5dp"
        android:background="#aa0000"
        android:text="Android Studio"
        android:textSize="20sp" />

    <TextView
        android:layout_width="wrap_content"
        android:layout_height="wrap_content"
        android:layout_margin="2dp"
        android:background="#aa0000"
        android:text="ViewGroup"
        android:textSize="20sp" />

    <TextView
        android:layout_width="wrap_content"
        android:layout_height="wrap_content"
        android:layout_margin="2dp"
        android:background="#aa0000"
        android:text="GoodBye"
        android:textSize="20sp" />

    <TextView
        android:layout_width="wrap_content"
        android:layout_height="wrap_content"
        android:layout_margin="5dp"
        android:background="#aa0000"
        android:text="Layout"
        android:textSize="20sp" />

    <TextView
        android:layout_width="wrap_content"
        android:layout_height="wrap_content"
        android:layout_margin="3dp"
        android:background="#aa0000"
        android:text="Variable"
        android:textSize="20sp" />

    <TextView
        android:layout_width="wrap_content"
        android:layout_height="wrap_content"
        android:layout_margin="5dp"
        android:background="#aa0000"
        android:text="Hello World!"
        android:textSize="20sp" />

</com.song.lagoucustomizedview.FlowLayout>