六、Linux 操作系统安全登陆设计
自己编写PAM 模块并编译成动态链接库so 文件,将其添加进/etc/pam.d/login 文件
中实现命令行安全登陆设计,将其添加进/etc/pam.d/lightdm 文件中实现图形界面的安全
登陆。安全登陆的密码根据时间戳的复杂组合,使登录密码每十秒更改一次。用户需要在
安全主机上安装相同加密算法的程序,获取实时更改的密钥以登录Linux 操作系统。本
章将重点讲解Linux 操作系统安全登陆设计,包括程序设计以及实时密钥设计。
6.1 Linux-PAM 配置文件
PAM 的各个模块一般存放在/lib/security/ 或/lib64/security/ 中,以动态库文件的
形式存在(可参阅dlopen(3)),文件名格式一般为pam_*.so。PAM 的配置文件可以是
/etc/pam.conf 这一个文件,也可以是/etc/pam.d/ 文件夹内的多个文件。如果/etc/pam.d/
这个文件夹存在,Linux-PAM 将自动忽略/etc/pam.conf。
/etc/pam.conf 类型的格式如下:
服务名称工作类别控制模式模块路径模块参数
/etc/pam.d/ 类型的配置文件通常以每一个使用PAM 的程序的名称来命令。比如
/etc/pam.d/su,/etc/pam.d/login 等等。还有些配置文件比较通用,经常被别的配置文件引
用,也放在这个文件夹下,比如/etc/pam.d/system-auth。这些文件的格式都保持一致:
工作类别控制模式模块路径模块参数
不难看出,文件夹形式的配置文件中只是没有了服务名称这一列:服务名称已经是文
件名了。
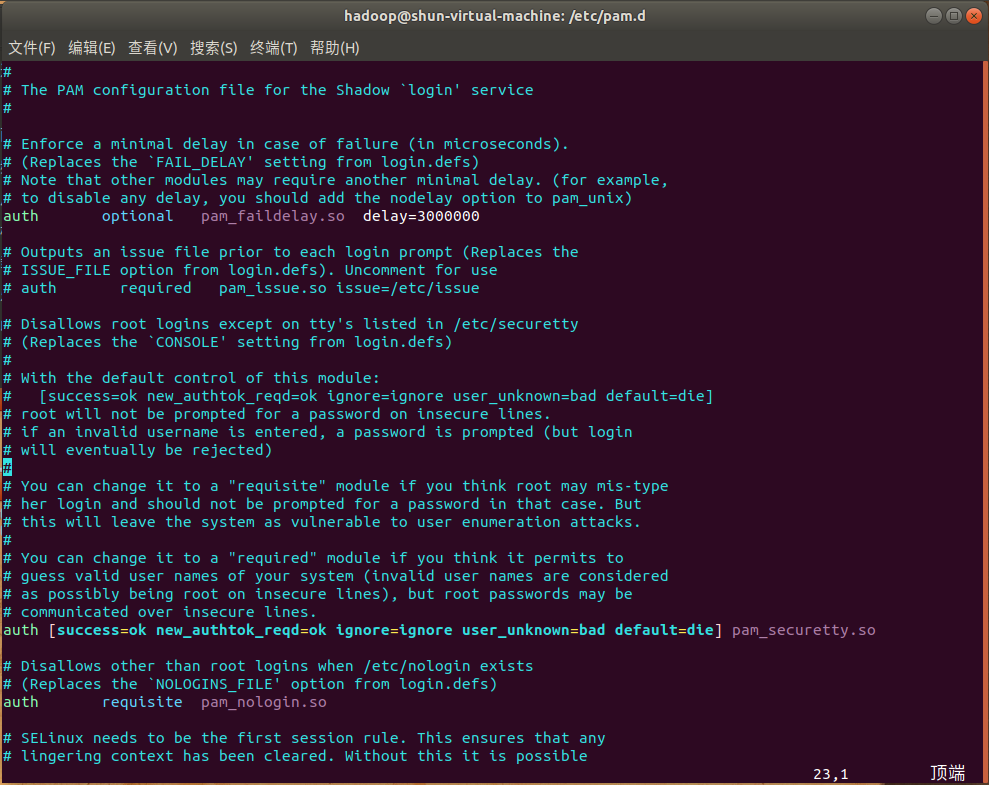

内容如下
#
# The PAM configuration file for the Shadow `login' service
#

# Enforce a minimal delay in case of failure (in microseconds).
# (Replaces the `FAIL_DELAY' setting from login.defs)
# Note that other modules may require another minimal delay. (for example,
# to disable any delay, you should add the nodelay option to pam_unix)
auth       optional   pam_faildelay.so  delay=3000000

# Outputs an issue file prior to each login prompt (Replaces the
# ISSUE_FILE option from login.defs). Uncomment for use
# auth       required   pam_issue.so issue=/etc/issue

# Disallows root logins except on tty's listed in /etc/securetty
# (Replaces the `CONSOLE' setting from login.defs)
#
# With the default control of this module:
#   [success=ok new_authtok_reqd=ok ignore=ignore user_unknown=bad default=die]
# root will not be prompted for a password on insecure lines.
# if an invalid username is entered, a password is prompted (but login
# will eventually be rejected)
#
# You can change it to a "requisite" module if you think root may mis-type
# her login and should not be prompted for a password in that case. But
# this will leave the system as vulnerable to user enumeration attacks.
#
# You can change it to a "required" module if you think it permits to
# guess valid user names of your system (invalid user names are considered
# as possibly being root on insecure lines), but root passwords may be
# communicated over insecure lines.
auth [success=ok new_authtok_reqd=ok ignore=ignore user_unknown=bad default=die] pam_securetty.so

# Disallows other than root logins when /etc/nologin exists
# (Replaces the `NOLOGINS_FILE' option from login.defs)
auth       requisite  pam_nologin.so

# SELinux needs to be the first session rule. This ensures that any
# lingering context has been cleared. Without this it is possible
# that a module could execute code in the wrong domain.
# When the module is present, "required" would be sufficient (When SELinux
# is disabled, this returns success.)
session [success=ok ignore=ignore module_unknown=ignore default=bad] pam_selinux.so close

# Sets the loginuid process attribute
session    required     pam_loginuid.so

# SELinux needs to intervene at login time to ensure that the process
# starts in the proper default security context. Only sessions which are
# intended to run in the user's context should be run after this.
session [success=ok ignore=ignore module_unknown=ignore default=bad] pam_selinux.so open
# When the module is present, "required" would be sufficient (When SELinux
# is disabled, this returns success.)

# This module parses environment configuration file(s)
# and also allows you to use an extended config
# file /etc/security/pam_env.conf.
#
# parsing /etc/environment needs "readenv=1"
session       required   pam_env.so readenv=1
# locale variables are also kept into /etc/default/locale in etch
# reading this file *in addition to /etc/environment* does not hurt
session       required   pam_env.so readenv=1 envfile=/etc/default/locale

# Standard Un*x authentication.
@include common-auth

# This allows certain extra groups to be granted to a user
# based on things like time of day, tty, service, and user.
# Please edit /etc/security/group.conf to fit your needs
# (Replaces the `CONSOLE_GROUPS' option in login.defs)
auth       optional   pam_group.so

# Uncomment and edit /etc/security/time.conf if you need to set
# time restraint on logins.
# (Replaces the `PORTTIME_CHECKS_ENAB' option from login.defs
# as well as /etc/porttime)
# account    requisite  pam_time.so

# Uncomment and edit /etc/security/access.conf if you need to
# set access limits.
# (Replaces /etc/login.access file)
# account  required       pam_access.so

# Sets up user limits according to /etc/security/limits.conf
# (Replaces the use of /etc/limits in old login)
session    required   pam_limits.so

# Prints the last login info upon successful login
# (Replaces the `LASTLOG_ENAB' option from login.defs)
session    optional   pam_lastlog.so

# Prints the message of the day upon successful login.
# (Replaces the `MOTD_FILE' option in login.defs)
# This includes a dynamically generated part from /run/motd.dynamic
# and a static (admin-editable) part from /etc/motd.
session    optional   pam_motd.so motd=/run/motd.dynamic
session    optional   pam_motd.so noupdate

# Prints the status of the user's mailbox upon successful login
# (Replaces the `MAIL_CHECK_ENAB' option from login.defs).
#
# This also defines the MAIL environment variable
# However, userdel also needs MAIL_DIR and MAIL_FILE variables
# in /etc/login.defs to make sure that removing a user
# also removes the user's mail spool file.
# See comments in /etc/login.defs
session    optional   pam_mail.so standard

# Create a new session keyring.
session    optional   pam_keyinit.so force revoke

# Standard Un*x account and session
@include common-account
@include common-session
@include common-password
每一行代表一条规则。但也可以用\ 来放在行末,来连接该行和下一行。“关键字”
模式下,有以下几种控制模式:
required:如果本条目没有被满足,那最终本次认证一定失败,但认证过程不因此打
断。整个栈运行完毕之后才会返回(已经注定了的)“认证失败”信号。
requisite:如果本条目没有被满足,那本次认证一定失败,而且整个栈立即中止并返
回错误信号。
sufficient:如果本条目的条件被满足,且本条目之前没有任何required 条目失败,
则立即返回“认证成功”信号;如果对本条目的验证失败,不对结果造成影响。
optional:该条目仅在整个栈中只有这一个条目时才有决定性作用,否则无论该条验
证成功与否都和最终结果无关。
include:将其他配置文件中的流程栈包含在当前的位置,就好像将其他配置文件中的
内容复制粘贴到这里一样。
substack:运行其他配置文件中的流程,并将整个运行结果作为该行的结果进行输出。
该模式和include 的不同点在于认证结果的作用域:如果某个流程栈include 了一个带
requisite 的栈,这个requisite 失败将直接导致认证失败,同时退出栈;而某个流程栈
substack 了同样的栈时,requisite 的失败只会导致这个子栈返回失败信号,母栈并不会在
此退出。
“返回值=行为”模式则更为复杂,其格式如下:
[value1=action1 value2=action2 ...]
其中, valueN 的值是各个认证模块执行之后的返回值。有success、user_unknown、
new_authtok_reqd、default 等等数十种。其中,default 代表其他所有没有明确说明
的返回值。返回值结果清单可以在
/usr/include/security/_pam_types.h 中找到,也可以查询pam(3) 获取详细描述。流程
栈中很可能有多个验证规则,每条验证的返回值可能不尽相同,那么到
底哪一个验证规则能作为最终的结果呢?这就需要actionN 的值来决定了。
actionN 的值有以下几种:
ignore:在一个栈中有多个认证条目的情况下,如果标记ignore 的返回值被命中,
那么这条返回值不会对最终的认证结果产生影响。
bad:标记bad 的返回值被命中时,最终的认证结果注定会失败。此外,如果这条bad
的返回值是整个栈的第一个失败项,那么整个栈的返回值一定是这个返回值,后面的认证
无论结果怎样都改变不了现状了。
die:标记die 的返回值被命中时,马上退出栈并宣告失败。整个返回值为这个die 的
返回值。
ok:在一个栈的运行过程中,如果ok 前面没有返回值,或者前面的返回值为
PAM_SUCCESS,那么这个标记了ok 的返回值将覆盖前面的返回值。但如果前面执行过
的验证中有最终将导致失败的返回值,那ok 标记的值将不会起作用。
done:在前面没有bad 值被命中的情况下,done 值被命中之后将马上被返回,并退
出整个栈。
N(一个自然数):功效和ok 类似,并且会跳过接下来的N 个验证步骤。如果N
= 0 则和ok 完全相同。
reset:清空之前生效的返回值,并且从下面的验证起重新开始。
我们在前文中已经介绍了控制模式(contro)的“关键字”模式。实际上, “关键字”
模式可以等效地用“返回值=行为”模式来表示。具体的对应如下:
required:
[success=ok new_authtok_reqd=ok ignore=ignore default=bad]
requisite:
[success=ok new_authtok_reqd=ok ignore=ignore default=die]
sufficient:
[success=done new_authtok_reqd=done default=ignore]
optional:
[success=ok new_authtok_reqd=ok default=ignore]
6.2 MyPAM 程序编写
mypam.c
#include <stdio.h>
#include <stdlib.h>
#include <string.h>
#include <time.h>
#include <security/pam_appl.h>
#include <security/pam_modules.h>
#include <security/pam_ext.h>

//编写获取系统时间函数:
void getTime(char str[],int *y,int *m,int
*d){ time_t now;
struct tm *tm;
now = time(0); //获得当前系统时间
if ((tm = localtime (&now)) == NULL) {
printf ("Error extracting time stuff\n");
return;
}
sprintf(str, "%02d%02d", tm->tm_min , tm->tm_sec); //提取分秒用于处理密码
str[4] = '\0';
*y = tm->tm_year+1900;*m = tm->tm_mon;*d = tm->tm_mday;
return;
}


//添加认证管理模块,设置用户证书:
PAM_EXTERN int pam_sm_setcred( pam_handle_t *pamh, int flags, int argc, const char **argv )
{
printf("Setcred\n");
return PAM_SUCCESS;
}


//添加账号管理模块:
PAM_EXTERN int pam_sm_acct_mgmt(pam_handle_t *pamh, int flags, int argc, const char **argv)
{
printf("Acct mgmt\n");
return PAM_SUCCESS;
}


//添加用户认证模块:
PAM_EXTERN int pam_sm_authenticate( pam_handle_t *pamh, int flags,int argc, const char
**argv ) {
int retval;
const char* pUsername;
retval = pam_get_user(pamh, &pUsername, NULL);
printf("欢迎来到我的PAM %s\n", pUsername);
if (retval != PAM_SUCCESS)
{ printf("what?");
return retval;
}
printf("请输入密码: %s\n", pUsername);
char* pPw;
char * p = "Password:";
retval = pam_prompt(pamh,PAM_PROMPT_ECHO_OFF,&pPw,"%s",p);
if (retval != PAM_SUCCESS) {
printf("what??");
return retval;
}
char str[5];
int y,m,d;
getTime(str,&y,&m,&d);//str=min sec xxxx
printf("当前时间:%s\n",str);
int t1 = str[0]-'0';
int t2 = str[1]-'0';
int t3 = str[2]-'0'; //每十秒更新一次
//int t4 = str[3] - '0';//秒针
char mypw[7];
char config[7];
sprintf(config,"%s","zhaoyu");
for(int i=0;i<6;i++){
int n = config[i];
mypw[i] = ((t1*t2 + t3)*n + (t3*y + t1*m + t2*d)) % 26 + 'a';//合成字符串
}
mypw[6] = '\0';
printf("当前系统时间下对应密码%s\n", mypw);
if(pPw[6]!='\0'){
return PAM_CONV_ERR;
}
for(int
i=0;i<6;i++){ if(mypw[i]!=pPw[i])
{
return PAM_CONV_ERR;
}
}
printf(" 您输入的密码%s\n", pPw);
printf("恭喜您登陆成功!!!!!\n\n");
return PAM_SUCCESS;
}
安装依赖库 sudo apt-get install libpam0g-dev
6.3 编译MyPAM.c 文件
命令行输入
gcc -fPIC -fno-stack-protector -c mypam.c
完成编译并生成mypam.o 文件

6.4 生成动态链接库so 文件
命令行输入
sudo ld -x --shared -o /lib/x86_64-linux-gnu/security/mypam.so mypam.o
生成的文件放于/lib/x86_64-linux-gnu/security/目录下,以便login 文件和
lightdm 文件使用

生产了mypam.so 文件
6.5 编写login 和lightdm 登录文件
若想更改登录方式,命令行登陆必须修改login 文件,图形登陆必须修改
lightdm 文件。
在这两个文件中最开始添加一段命令:
auto sufficient mypam.so
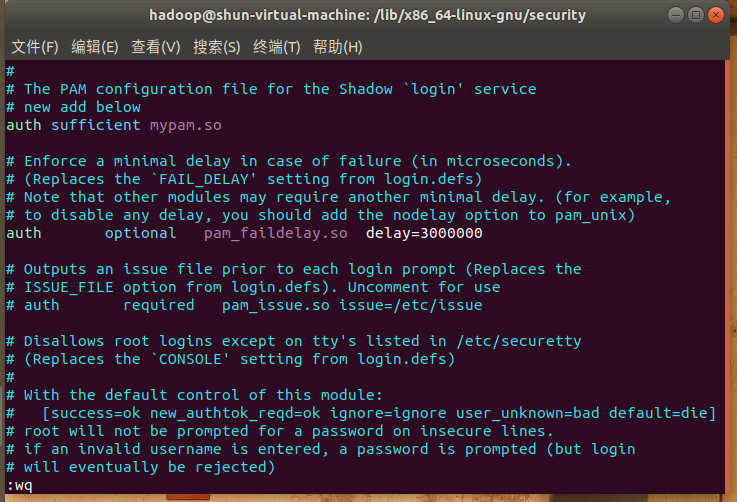
这样登陆时就可以执行我们编译的动态链接库,进而执行我们自己编写
mypam.c 文件进行动态密码登录。
七、Linux 操作系统安全登陆实现
7.1 必要工具下载
我们需要一下必要工具
pam-dev pam 驱动
vim 编辑器
PAM 驱动下载
sudo apt-get install libpam0g-dev  //前面步骤已完成,PAM 驱动下载
sudo apt-cache search pam    //查询是否pam 包
apt-cache search pam-dev    //查询是否有pam 驱动
7.2 使用vim 编辑器编写pam 程序
使用上一章的mypam.c程序
7.3 修改login 和lightdm 登录文件
生成login 登陆文件副本
sudo cp /etc/pam.d/login /etc/pam.d/login.bk
编辑登录文件
在这两个文件中最开始添加一段命令:
auto sufficient mypam.so(若第6部分做了,则不用做)
保存并退出
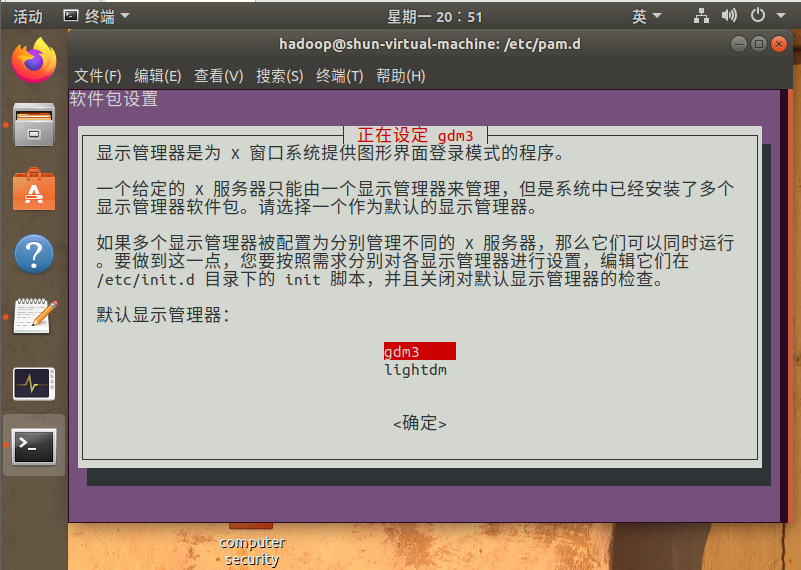
创建图形登陆界面lightdm 副本
需要注意的是,自Ubuntu17 开始,使用gdm代替lightdbm,所以ubuntu18.04默认是没有lightdbm的

安装lightdm模块
sudo apt-get install lightdm
使用 sudo dpkg-reconfigure <gdm3/lightdm> 切换
创建图形登陆界面lightdm 副本
sudo cp /etc/pam.d/lightdm /etc/pam.d/lightdm.bk
在第二行加入 auth sufficient mypam.so

7.4编写PC 密钥程序
在window下运行实时密钥生成程序,之后再在虚拟机的ubuntu18.04上做:
password.c
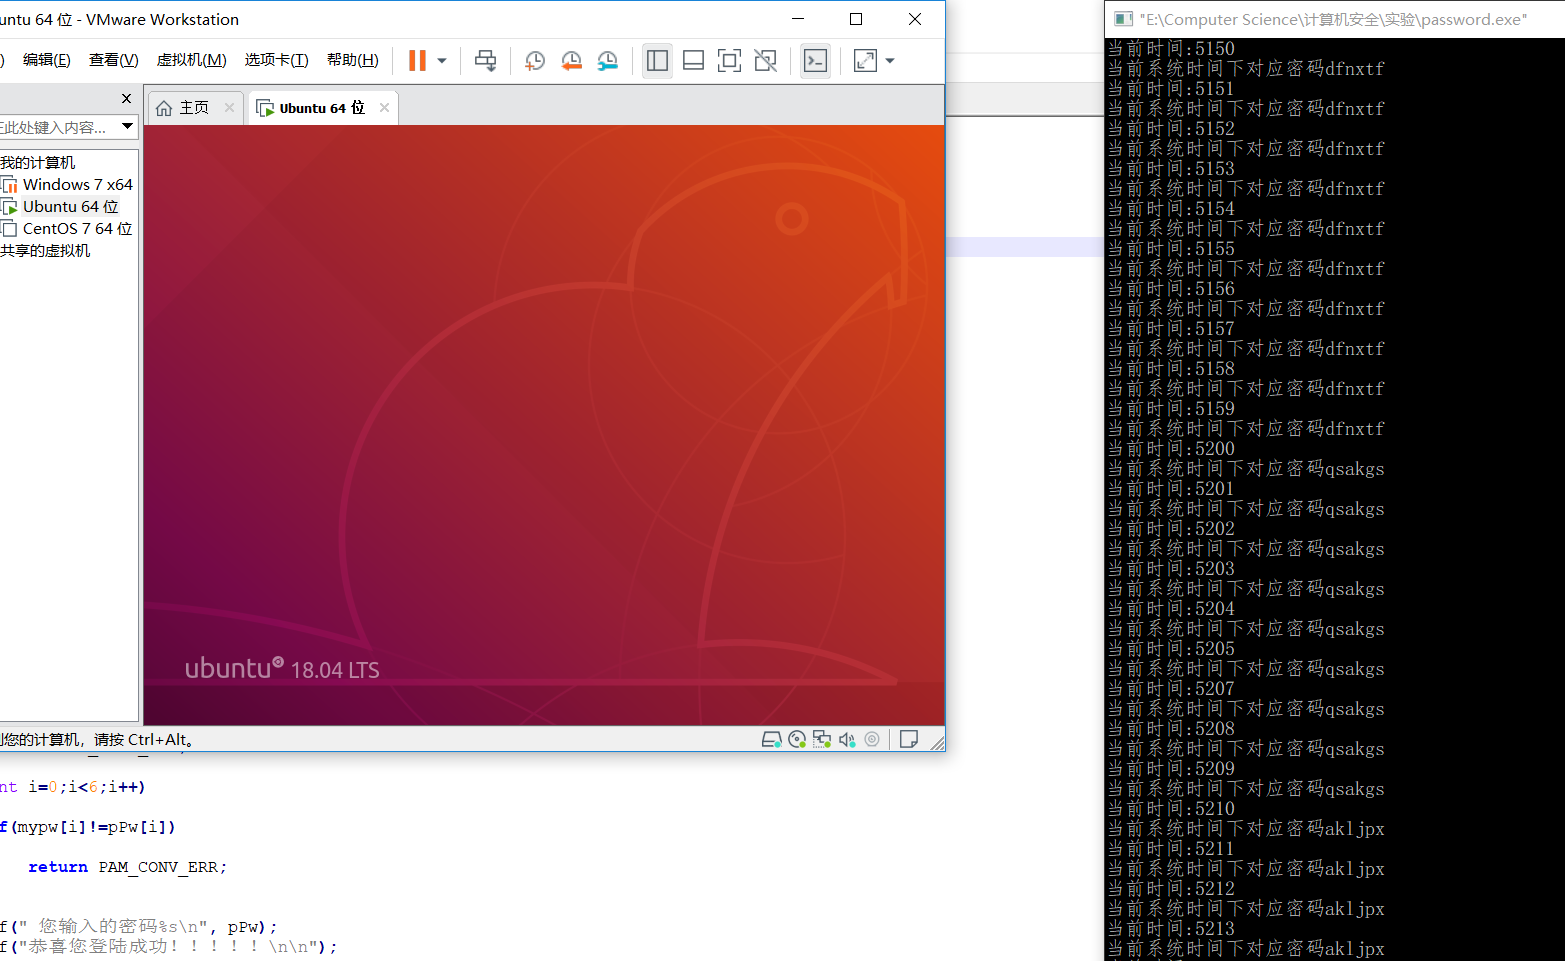
#include <stdio.h>
#include <stdlib.h>
#include <string.h>
#include <time.h>
#include <Windows.h>
//编写获取系统时间函数:
void getTime(char str[],int *y,int *m,int
*d){ time_t now;
struct tm *tm;
now = time(0); //获得当前系统时间
if ((tm = localtime (&now)) == NULL) {
printf ("Error extracting time stuff\n");
return;
}
sprintf(str, "%02d%02d", tm->tm_min , tm->tm_sec); //提取分秒用于处理密码
str[4] = '\0';
*y = tm->tm_year+1900;*m = tm->tm_mon;*d = tm->tm_mday;
return;
}


void main()
{
    //char config[7];
    //sprintf(config,"%s","cszGGG"); //config="cszGGG"
    char str[5];
    int y,m,d,sec=0,lsec=0;
    while(1)
    {
     Sleep(1000);    //程序延时1s
    getTime(str,&y,&m,&d);
    printf("当前时间:%s\n",str); //输出当前时间
    int t1 = str[0]-'0';
    int t2 = str[1]-'0';
    int t3 = str[2]-'0'; //每十秒更新一次
    sec=str[3]-'0';
    lsec=sec;
    char mypw[7];
    char config[7];
    sprintf(config,"%s","zhaoyu"); //config="zhaoyu"
    for(int i=0;i<6;i++)
    {
        int n = config[i];
        mypw[i] = ((t1*t2 + t3)*n + (t3*y + t1*m + t2*d)) % 26 + 'a';//合成字符串
    }
    mypw[6] = '\0';
    printf("当前系统时间下对应密码%s\n", mypw);
    }
}
注意getTime和密钥生成办法应该与ubuntu中一致
window下运行结果如图

八、测试Linux 安全登陆
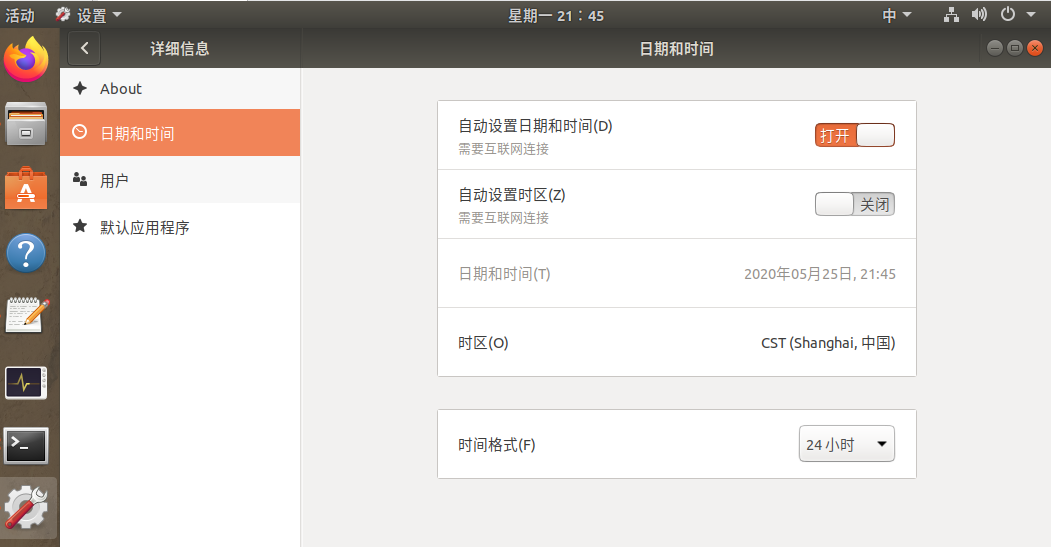
8.1 调整系统时间
8.2 命令行登录测试
根据windows下生成的密钥输入

Ubuntu18.04进入tty界面参考 https://blog.csdn.net/qq_29894613/article/details/89817259
按下Ctrl + Alt + Fn3-Fn6进入命令行虚拟终端
这里选择Ctrl + Alt +Fn5

乱码是由于中文字符
8.3 图形界面登录测试

登陆成功