1 # Activity概述
一个 Acvtivity 对应着一个界面,多界面,多 Activity
Android中的Activity的使用基本上分为以下三大类问题:
–如何创建多屏幕(如何创建多个Activity )?
–屏幕与屏幕之间如何切换(Activity之间的跳转)?
–屏幕是何时产生何时消亡的(Activity的生命周期)?
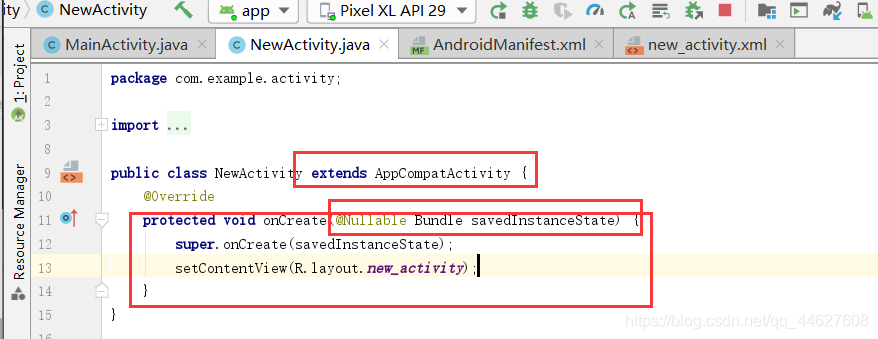
2 # 创建新的Activity
## 创建新的Activity的基本流程是:
–1. 创建新的类继承Activity 类(src/指定包/目录下) 。
–2. 为该Activity类绑定布局(res/layout/目录下)。
–3. 在AndroidManifest.xml文件中注册该Activity
### 创建新的类继承Activity 类
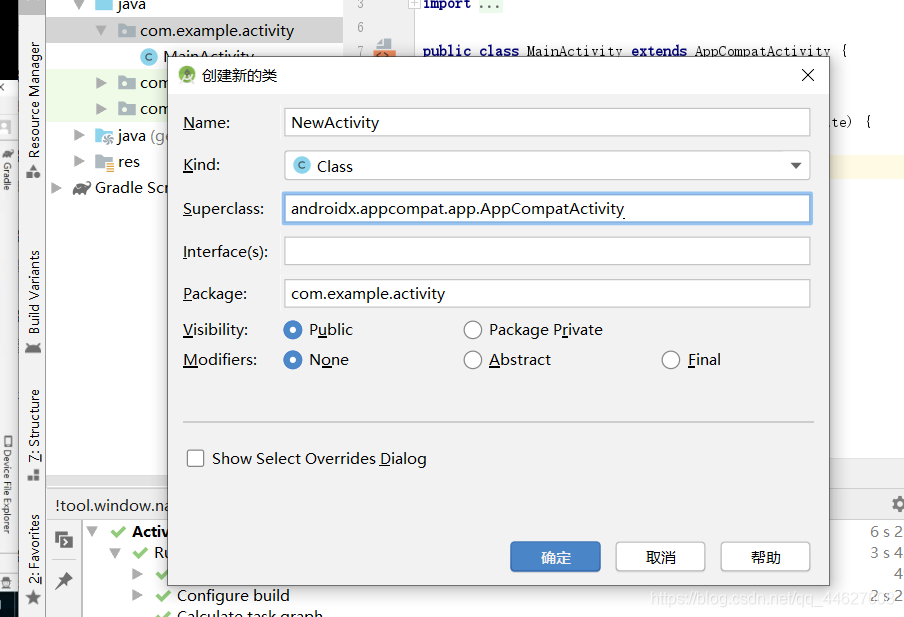
新的Activity类必须继承Activity类。
必须实现onCreate( )回调方法(创建Activity时自动调用,相当于构造方法)。
### 为该Activity类绑定布局
在res/layout/目录下建立新的xml布局文件
–为Activity绑定该视图文

### 在AndroidManifest.xml文件中注册该Activity
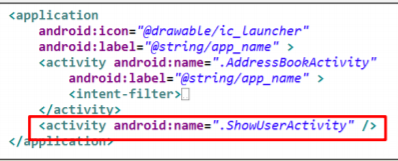
创建一个新的Activity,必须在AndroidManifest.xml文件中注册,否则此Activity不可使用
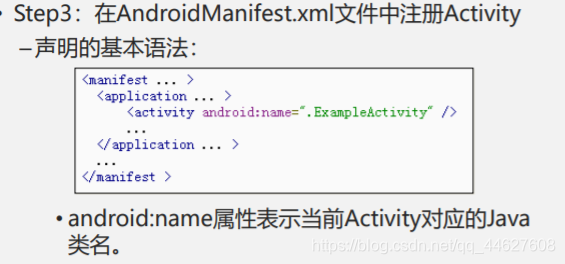
• android:name属性表示当前Activity对应的Java类名
• 在<activity>元素之间,经常需要添加<intent-filter>元素,以确保其它Activity是否可以启动当前Activity(具体内容在第5章中涉及)。

• <activity>元素的常用属性及其子元素详细说明,参考:https://developer.android.com/reference/android/R.styleable.html
<?xml version="1.0" encoding="utf-8"?>
<manifest xmlns:android="http://schemas.android.com/apk/res/android"
    package="com.example.activity">


    application控件里面的是全程序的设置

    <application
        android:allowBackup="true"
        android:icon="@mipmap/ic_launcher"
        android:label="@string/app_name"
        android:roundIcon="@mipmap/ic_launcher_round"
        android:supportsRtl="true"
        android:theme="@style/AppTheme">

        <activity android:name=".MainActivity">
        </activity>

		        开始注册新的Activity,name属性指定类名
		        因为新注册的Activity类就在上面的package包里面,所以省略包名
        <activity android:name=".NewActivity">

            <intent-filter>
                <action android:name="android.intent.action.MAIN" />
                <category android:name="android.intent.category.LAUNCHER" />
            </intent-filter>

        </activity>
		        想要成为初始界面的话,吧上面的inter-fiflter四行标签放到目标Activity里面就行了

    </application>

</manifest>
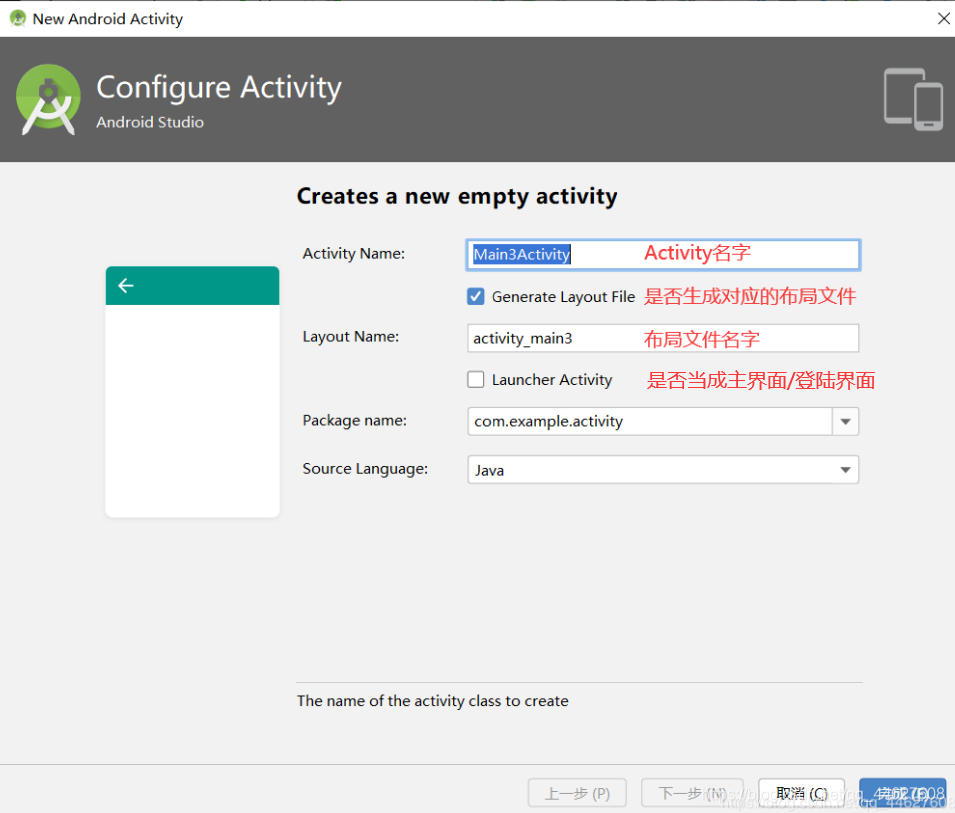
包上右键新建Activity
3 Activity与Activity之间的跳转
## Activity跳转的基本原理
回顾Web应用中,页面与页面之间的跳转是通过HTTP协议进行的。
‐ 请求页面会向目的地页面发送一个HTTP请求(借助请求对象实现)。
✓ 请求对象中内容包括(请求目的地、提交数据等)
‐ 目的地页面会反馈给请求页面一个HTTP响应(借助响应对象实现)。
✓ 响应对象中包括(响应消息内容)
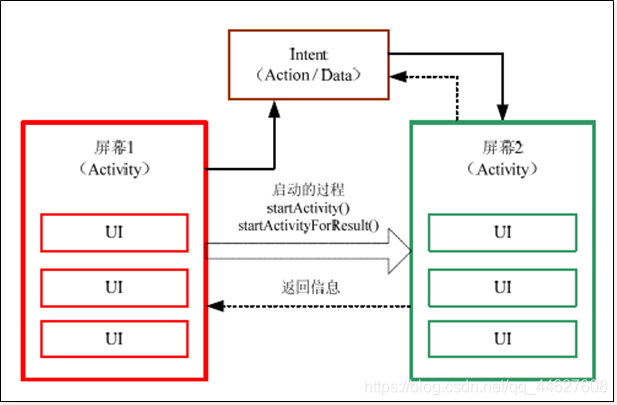
在Android中,Activity与Activity之间的跳转是借助Intent对象来实现的。
‐ Intent对象用来在Activity与Activity之间传递请求消息和响应消息。
‐ 也就是说,Intent对象充当了HTTP协议中的请求对象和 响应对象双重作用
## Intent对象简介
Intent:意图对象,Activity与Activity之间跳转的中介。
• 如何实现由一个Activity跳转到下一个Activity?
	– 跳转目的地?是否携带参数?
• 目的Activity如何实现向上一个Activity返回数据?
## Activity跳转
发送请求的Activity页面

1. 创建Intent对象:
	– Intent i = new Intent( );

2. 设置请求目的地:
	– i.setClass( 上下文, 待启动的Activity.class);
	– i.setAction( 目的Activity字符串 );

3. 携带数据(可选)
	– 1.直接添加基本类型参数:i.putExtra( key, value );
	– 传递类的对象(需要序列化对象后才可传递)

	– 2.创建复杂数据对象:借助Bundle对象实现
		» 创建Bundle对象:Bundle b = new Bundle( );
		» 为Bundle对象添加数据:b.putString( );、
		b.putSerializable( );、……
		» 把Bundle对象添加到Intent对象中:i.putExtra(Bundle对象);

		http://developer.android.com/reference/android/os/Bundle.html

4. 发送请求(启动新的Activity):
	– startActivity( Intent对象 );
	– startActivityForResult( Intent对象, 请求码 );
## Activity跳转(被请求页面处理请求)
被请求的Activity页面
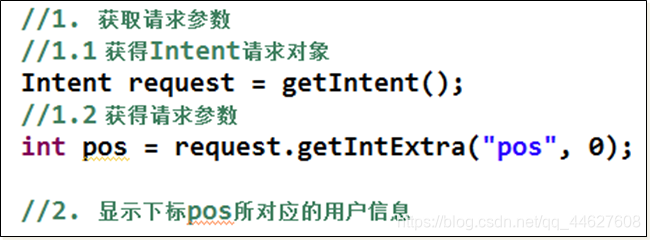
• 获得Intent对象(请求对象):
– Intent request = getIntent( );
• 获得请求参数:
– request.getIntExtra( );:返回基本int类型数据
– request.getExtras( );:返回Bundle对象
http://developer.android.com/reference/android/content/Intent.html
## Activity跳转(无响应)
完成Activity的跳转的步骤:
– 注册跳转的触发事件;
– 构造跳转Intent,加入参数;
– 进行activity的跳转;
– 在跳转到的activity中接受传入的参数。
## Activity跳转(被请求页面设置响应)
• 被请求的Activity页面
	• 获得Intent对象(响应对象):
		– Intent response = new Intent( );
	• 添加响应消息:
		– response.putIntExtra( );:添加基本int类型数据
		– response.putExtras( );:添加Bundle对象
	• 实现响应:
		– this.setResult( int resoponseCode, Intent 响应对象)
## Activity跳转(请求页获取响应消息)
请求的Activity页面
## ## ## 实现页面跳转与信息修改的全部代码
package com.example.createactivity20200523;

public class MainActivity extends AppCompatActivity {

    private String[] names = {"张三","李四","王五"};//数据源
    private ArrayAdapter adapter;
    private  final int LOGIN_REQUEST=100; //定义接受参数的请求码,确定参数的身份
    private int currentPosition;//返回事件触发的的位置
-----------------------------------------------------

    @Override
    protected void onCreate(Bundle savedInstanceState) {
        super.onCreate(savedInstanceState);
        setContentView(R.layout.activity_main);
-----------------------------------------------------------
		//绑定Adapter
        ListView nameListView = findViewById(R.id.lv);
        adapter = new ArrayAdapter(this, android.R.layout.simple_list_item_1,
                names);
        nameListView.setAdapter(adapter);
-----------------------------------------------------------
        //设置跳转触发事件
        nameListView.setOnItemClickListener(new AdapterView.OnItemClickListener() {
            @Override
            public void onItemClick(AdapterView<?> parent, View view, int position, long id) {
                //1. Activity跳转
                Intent intent = new Intent();

                //2. 设置目的地Activity类
                intent.setClass(MainActivity.this,
                        NewActivity.class);

                    //3. 1.跳转时需要直接携带数据(基本数据类型)
                    intent.putExtra("name", names[position]);
                    intent.putExtra("phone", "1234565");
                    intent.putExtra("email", "123132ees");

                    //3. 2. 将数据先封装到Bundle对象,再添加到Intent对象
                    Bundle bundle = new Bundle();
                    bundle.putString("name",names[position]);
                    bundle.putString("phone","123231121212");
                    bundle.putString("email","adadasda");
                    //bundle传入intent
                    intent.putExtra("bundle",bundle);

                    //3. 3. 传递自定义类型的对象
                    Student student = new Student("张三","121312312","123121");
                    intent.putExtra("stu",student);

//                //4. 1. 跳转到新的Activity
//                startActivity(intent);//不传递数据,并且不需要返回响应

                //4. 2.跳转到新的Activity,并且返回响应,参数2是请求码
                startActivityForResult(intent,LOGIN_REQUEST);
                currentPosition = position;
            }
        });
    }
----------------------------------------------------------------------------------------------------
    //接收返回的响应数据,并且刷新界面
    @Override//这是回调方法,一般会自动执行
    protected void onActivityResult(int requestCode, int resultCode, @Nullable Intent data) {
        //requestCode跳转时的请求码,resultCode返回响应的结果码,data返回响应的Intent对象
        super.onActivityResult(requestCode, resultCode, data);
        if (requestCode == LOGIN_REQUEST && resultCode == 200){
            //获得从NewActivity响应的数据
            String name = data.getStringExtra("name");
            //修改数据源
            names[currentPosition]=name;
            //刷新ListView
            adapter.notifyDataSetChanged();
        }
    }
}
package com.example.createactivity20200523;

import java.io.Serializable;

//使用Intent传递该类型对象时,需要让该类实现Serializable接口
//用实例化的对象来传递数据
public class Student implements Serializable {
    private String name;
    private String phone;
    private String email;

    public Student() {
    }

    public Student(String name, String phone, String email) {
        this.name = name;
        this.phone = phone;
        this.email = email;
    }

    public String getName() {
        return name;
    }

    public void setName(String name) {
        this.name = name;
    }

    public String getPhone() {
        return phone;
    }

    public void setPhone(String phone) {
        this.phone = phone;
    }

    public String getEmail() {
        return email;
    }

    public void setEmail(String email) {
        this.email = email;
    }
}
package com.example.createactivity20200523;

public class NewActivity extends AppCompatActivity {
    private EditText nameET ;//定义数据共两个方法使用
    private int position;

    @Override
    protected void onCreate(@Nullable Bundle savedInstanceState) {
        super.onCreate(savedInstanceState);
        setContentView(R.layout.activity_new);
        //接收从MainActivity传递的数据
        Intent request = getIntent();
        //获取不使用Bundle封装的数据
        String name = request.getStringExtra("name");
        String phone = request.getStringExtra("phone");
        String email = request.getStringExtra("email");
        position = request.getIntExtra("position",0);//参数2是position获取不到时候的默认值

        //获取使用Bundle封装的数据
//        Bundle bundle = request.getBundleExtra("bundle");
//        String name = bundle.getString("name");
//        String phone = bundle.getString("phone");
//        String email = bundle.getString("email");

        //获取自定义类型的数据
//        Student stu = (Student) request.getSerializableExtra("stu");
//        String name = stu.getName();
//        String phone = stu.getPhone();
//        String email = stu.getEmail();

        nameET = findViewById(R.id.et_name);
        EditText phoneET = findViewById(R.id.et_phone);
        EditText emailET = findViewById(R.id.et_email);

        nameET.setText(name);
        phoneET.setText(phone);
        emailET.setText(email);
    }

    public void buttonClicked(View v){
        //返回数据
        Intent response = new Intent();
        response.putExtra("name",nameET.getText().toString());
        //响应
        setResult(200,response);
        //结束当前的NewActivity
        finish();
    }
}
普通布局页面

<?xml version="1.0" encoding="utf-8"?>
<LinearLayout xmlns:android="http://schemas.android.com/apk/res/android"
    android:orientation="vertical" android:layout_width="match_parent"
    android:layout_height="match_parent">

    <TextView
        android:layout_width="wrap_content"
        android:layout_height="wrap_content"
        android:text="新的Activity"/>

    <LinearLayout
        android:layout_width="match_parent"
        android:layout_height="wrap_content"
        android:orientation="horizontal">

        <TextView
            android:layout_width="wrap_content"
            android:layout_height="wrap_content"
            android:text="姓名"
            android:textSize="25sp"/>
        <EditText
            android:id="@+id/et_name"
            android:layout_width="match_parent"
            android:layout_height="wrap_content"
            android:textSize="25sp"/>
    </LinearLayout>
    <LinearLayout
        android:layout_width="match_parent"
        android:layout_height="wrap_content"
        android:orientation="horizontal">

        <TextView
            android:layout_width="wrap_content"
            android:layout_height="wrap_content"
            android:text="电话"
            android:textSize="25sp"/>
        <EditText
            android:id="@+id/et_phone"
            android:layout_width="match_parent"
            android:layout_height="wrap_content"
            android:textSize="25sp"/>
    </LinearLayout>
    <LinearLayout
        android:layout_width="match_parent"
        android:layout_height="wrap_content"
        android:orientation="horizontal">

        <TextView
            android:layout_width="wrap_content"
            android:layout_height="wrap_content"
            android:text="邮箱"
            android:textSize="25sp"/>
        <EditText
            android:id="@+id/et_email"
            android:layout_width="match_parent"
            android:layout_height="wrap_content"
            android:textSize="25sp"/>
    </LinearLayout>
    <Button
        android:id="@+id/btn_save"
        android:layout_width="match_parent"
        android:layout_height="wrap_content"
        android:onClick="buttonClicked"
        android:text="保存"/>
</LinearLayout>