前言
猿猿们都知道,IOC和AOP很重要,事务也很重要,事务其实和AOP差不多,技术和代码有很多相似之处,为防止没有看AOP源码解析的看官,这篇解析事务源码的博文,不会因为跟AOP代码重复就跳过解析。
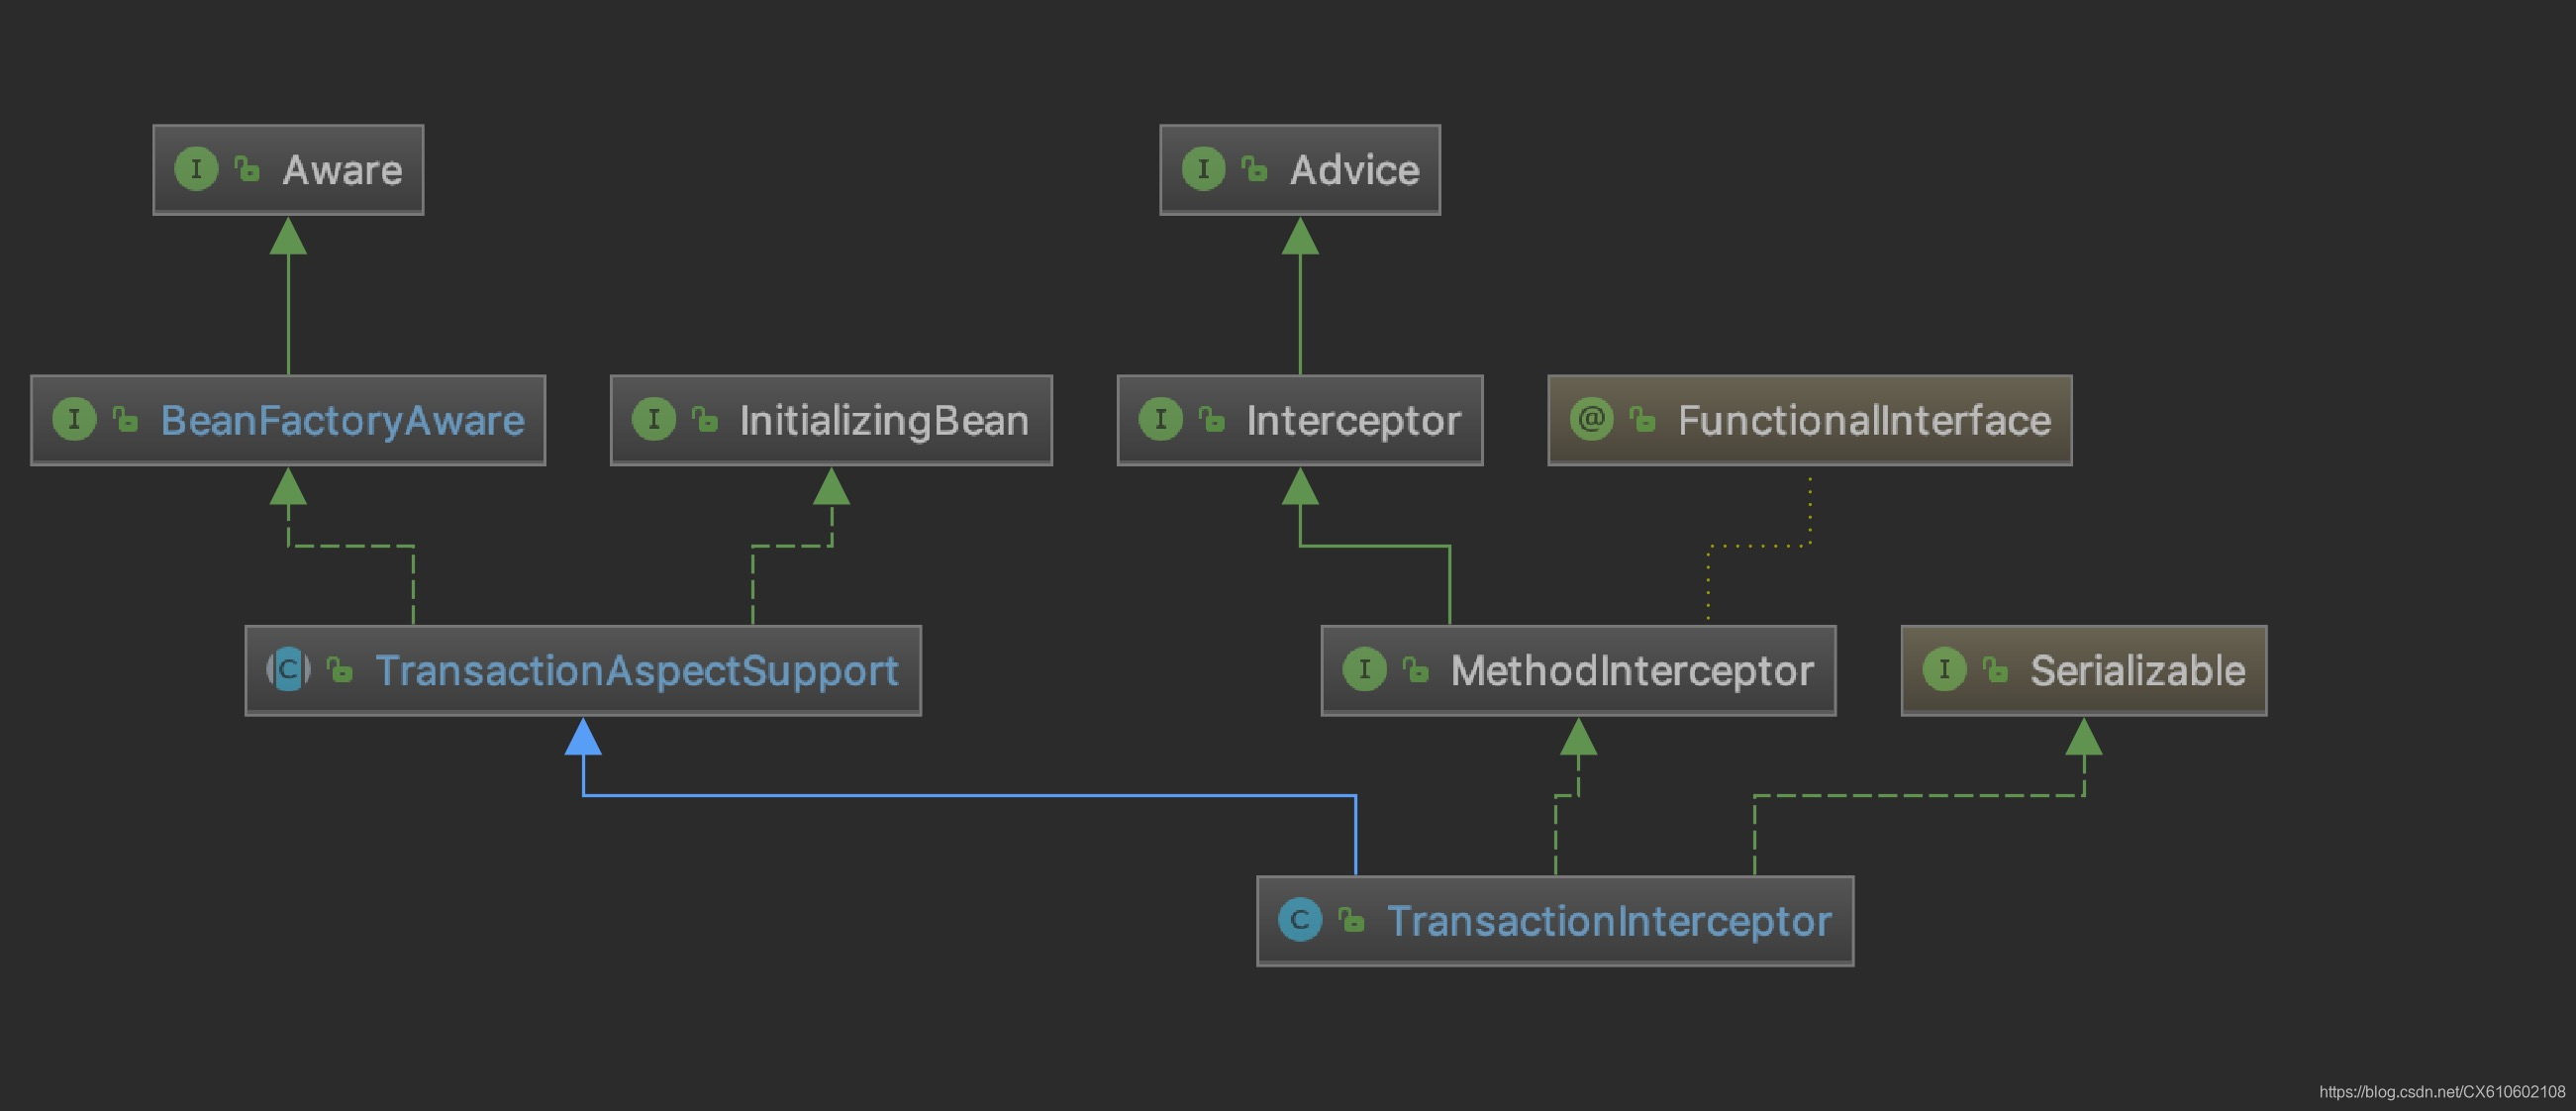
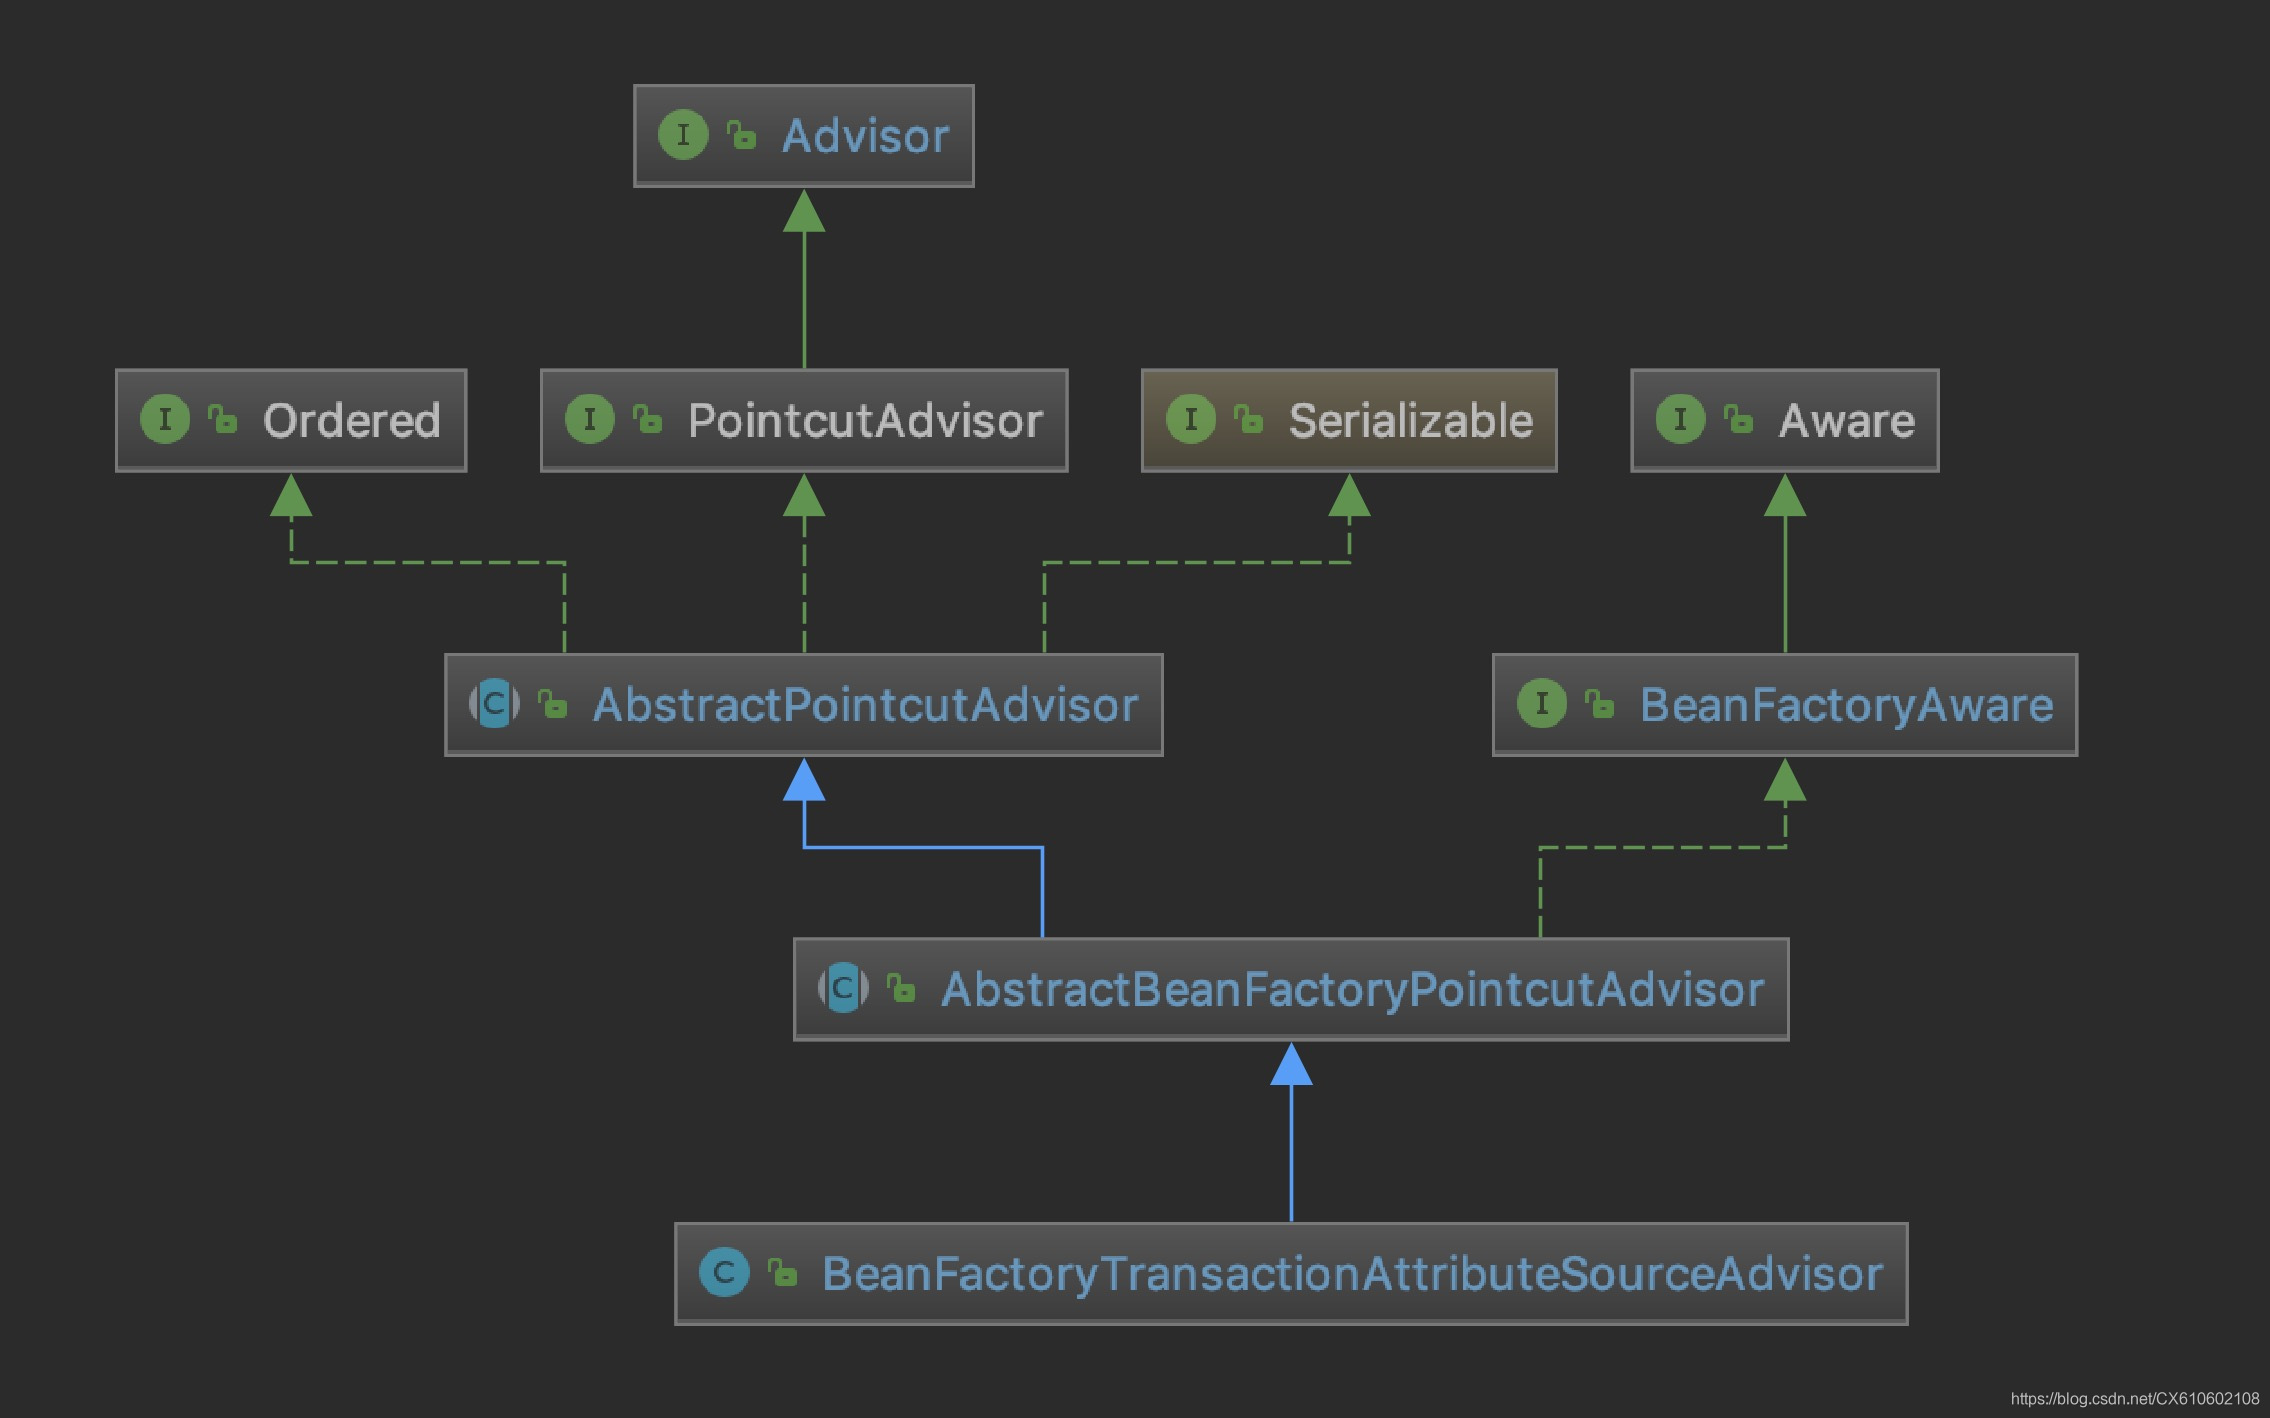
类结构体系

示例代码
配置类
@Configurable
@ComponentScan(value = "com.ambition")
@EnableTransactionManagement
@EnableAspectJAutoProxy(exposeProxy = true)
public class TransactionConfig {

	@Bean
	public DataSource dataSource() {
		DruidDataSource dataSource = new DruidDataSource();
		dataSource.setUsername("root");
		dataSource.setPassword("123456");
		dataSource.setUrl("jdbc:mysql://localhost:3306/test");
		dataSource.setDriverClassName("com.mysql.jdbc.Driver");
		return dataSource;
	}

	@Bean
	public JdbcTemplate jdbcTemplate(DataSource dataSource) {
		JdbcTemplate jdbcTemplate = new JdbcTemplate(dataSource);
		return jdbcTemplate;
	}

	@Bean
	public PlatformTransactionManager transactionManager(DataSource dataSource) {
		return new DataSourceTransactionManager(dataSource);
	}

}
接口和实现类
public interface PayService {

	void pay();

	void deduction();

}

@Service
public class PayServiceImpl implements PayService {

	@Transactional(rollbackFor = Exception.class)
	@Override
	public void pay() {

		System.out.println("准备支付");

		((PayService) AopContext.currentProxy()).deduction();

		System.out.println(1 / 0);

		System.out.println("支付完成");
	}

	@Transactional(rollbackFor = Exception.class, propagation = Propagation.REQUIRES_NEW)
	@Override
	public void deduction() {

		System.out.println("准备扣减");

		System.out.println(1 / 0);

		System.out.println("扣减完成");
	}

}
测试类
public class TransactionTest {

	public static void main(String[] args) {

		AnnotationConfigApplicationContext context =
				new AnnotationConfigApplicationContext();
		context.register(TransactionConfig.class);
		context.refresh();

		PayService pay = context.getBean(PayService.class);
		pay.pay();
	}
}
产生过程
老规矩,先来看一下Spring IOC容器是怎么对它进行初始化的,再看它的创建过程,最后看执行过程。
@Target(ElementType.TYPE)
@Retention(RetentionPolicy.RUNTIME)
@Documented
@Import(TransactionManagementConfigurationSelector.class)
public @interface EnableTransactionManagement {

	// 指示是否要创建基于子类的(CGLIB)代理,而不是标准的基于 Java 接口的代理
	boolean proxyTargetClass() default false;

	// 指出如何应用事务通知
	AdviceMode mode() default AdviceMode.PROXY;

	// 当在特定的连接点上应用多个通知时,指示事务增强器的执行顺序
	int order() default Ordered.LOWEST_PRECEDENCE;

}
可以看到这个注解上面还有一个@Import注解,导入了一个TransactionManagementConfigurationSelector类,它是ImportSelector类型,解析IOC源码的时候,可以看到Spring会调用它的selectImports()方法,获取类的全限定名数组,然后进行递归解析。
public class TransactionManagementConfigurationSelector
		extends AdviceModeImportSelector<EnableTransactionManagement> {

	@Override
	protected String[] selectImports(AdviceMode adviceMode) {
		switch (adviceMode) {
			// 默认是基于 JDK 代理的通知
			case PROXY:
				return new String[]{AutoProxyRegistrar.class.getName(),
						ProxyTransactionManagementConfiguration.class.getName()};
			// 基于 AspectJ 编织的通知
			case ASPECTJ:
				return new String[]{determineTransactionAspectClass()};
			default:
				return null;
		}
	}

	private String determineTransactionAspectClass() {
		return (ClassUtils.isPresent("javax.transaction.Transactional", getClass().getClassLoader()) ?
				TransactionManagementConfigUtils.JTA_TRANSACTION_ASPECT_CONFIGURATION_CLASS_NAME :
				TransactionManagementConfigUtils.TRANSACTION_ASPECT_CONFIGURATION_CLASS_NAME);
	}

}
可以看到这个方法会注册两个BeanDefinition,一个是AutoProxyRegistrar,类型是ImportBeanDefinitionRegistrar,另一个是ProxyTransactionManagementConfiguration,它是一个加了@Configuration注解的配置类。
@Configuration
public class ProxyTransactionManagementConfiguration extends AbstractTransactionManagementConfiguration {

	/**
	 * beanName 为 org.springframework.transaction.config.internalTransactionAdvisor
	 *
	 * @see BeanFactoryAdvisorRetrievalHelper#findAdvisorBeans()
	 **/
	@Bean(name = TransactionManagementConfigUtils.TRANSACTION_ADVISOR_BEAN_NAME)
	@Role(BeanDefinition.ROLE_INFRASTRUCTURE)
	public BeanFactoryTransactionAttributeSourceAdvisor transactionAdvisor() {
		BeanFactoryTransactionAttributeSourceAdvisor advisor = new BeanFactoryTransactionAttributeSourceAdvisor();
		advisor.setTransactionAttributeSource(transactionAttributeSource());
		advisor.setAdvice(transactionInterceptor());
		if (this.enableTx != null) {
			advisor.setOrder(this.enableTx.<Integer>getNumber("order"));
		}
		return advisor;
	}

	@Bean
	@Role(BeanDefinition.ROLE_INFRASTRUCTURE)
	public TransactionAttributeSource transactionAttributeSource() {
		return new AnnotationTransactionAttributeSource();
	}

	@Bean
	@Role(BeanDefinition.ROLE_INFRASTRUCTURE)
	public TransactionInterceptor transactionInterceptor() {
		TransactionInterceptor interceptor = new TransactionInterceptor();
		interceptor.setTransactionAttributeSource(transactionAttributeSource());
		if (this.txManager != null) {
			interceptor.setTransactionManager(this.txManager);
		}
		return interceptor;
	}

}
这个配置类又会往容器中注册BeanFactoryTransactionAttributeSourceAdvisor,AnnotationTransactionAttributeSource和TransactionInterceptor三个类。
看一下各个组件的注入:

public class AutoProxyRegistrar implements ImportBeanDefinitionRegistrar {

	@Override
	public void registerBeanDefinitions(AnnotationMetadata importingClassMetadata,
										BeanDefinitionRegistry registry) {
		boolean candidateFound = false;
		Set<String> annTypes = importingClassMetadata.getAnnotationTypes();
		for (String annType : annTypes) {
			// 获取注解
			AnnotationAttributes candidate = AnnotationConfigUtils.attributesFor(importingClassMetadata, annType);
			if (candidate == null) {
				continue;
			}
			// 解析 mode 注解值
			Object mode = candidate.get("mode");
			// 解析 proxyTargetClass 注解值
			Object proxyTargetClass = candidate.get("proxyTargetClass");
			// 校验
			if (mode != null && proxyTargetClass != null && AdviceMode.class == mode.getClass()
					&& Boolean.class == proxyTargetClass.getClass()) {
				candidateFound = true;
				// 基于 JDK 代理的通知,不指定则默认
				if (mode == AdviceMode.PROXY) {
					// 注册 InfrastructureAdvisorAutoProxyCreator 组件
					AopConfigUtils.registerAutoProxyCreatorIfNecessary(registry);
					// 默认是 False
					if ((Boolean) proxyTargetClass) {
						AopConfigUtils.forceAutoProxyCreatorToUseClassProxying(registry);
						return;
					}
				}
			}
		}

		......
	}

}
这个类又往IOC容器中注册了一个InfrastructureAdvisorAutoProxyCreator类。看类结构图,发现跟AOP很相似,也会利用Spring的回调进行必要组件的初始化,利用后置处理器的调用进行一些逻辑处理。

需要的组件都注册到IOC容器中了,只需要借助IOC容器的初始化过程进行初始化就行了。
总结一下就是:IOC容器初始化时会去找事务相关的信息,先做缓存和创建增强器的操作,初始化目标类的时候再将可用的增强器织入到目标类中生成代理对象。
代码从AbstractAutowireCapableBeanFactory的createBean()方法开始:
protected Object createBean(String beanName,
							RootBeanDefinition mbd,
							@Nullable Object[] args) throws BeanCreationException {

	RootBeanDefinition mbdToUse = mbd;

	......

	try {
		/**
		 * 给 BeanPostProcessors 一个返回代理而不是目标 Bean 实例的机会【重要】
		 * 但此时还没有创建代理对象,此时没有对象,只有 BeanDefinition
		 *
		 * 第一次调用后置处理器【跟 AOP 有关】
		 * @see org.springframework.aop.framework.autoproxy.AbstractAutoProxyCreator#postProcessAfterInitialization(java.lang.Object, java.lang.String)
		 *
		 * InstantiationAwareBeanPostProcessor ibp = (InstantiationAwareBeanPostProcessor) bp;
		 * Object result = ibp.postProcessBeforeInstantiation(beanClass, beanName);
		 *
		 * 此时对象还没有实例化,只有 BeanDefinition
		 * 无法进行代理,只是将切面找出来进行缓存
		 */
		Object bean = resolveBeforeInstantiation(beanName, mbdToUse);
		if (bean != null) {
			return bean;
		}
	}
	catch (Throwable ex) {
		throw new BeanCreationException();
	}

	try {
		/**
		 * 实例化 Bean
		 **/
		Object beanInstance = doCreateBean(beanName, mbdToUse, args);

		......

		return beanInstance;
	}
	catch (BeanCreationException | ImplicitlyAppearedSingletonException ex) {
		throw ex;
	}
	catch (Throwable ex) {
		throw new BeanCreationException();
	}
}
还是resolveBeforeInstantiation()这个方法,将事务相关的信息进行缓存,这个方法进去调用的是InstantiationAwareBeanPostProcessor类型的postProcessBeforeInstantiation()方法,如果返回值为空,就不会调用applyBeanPostProcessorsAfterInitialization()方法了。
从上面的类结构图中可以看到,AbstractAutoProxyCreator是InstantiationAwareBeanPostProcessor类型,所以会进到它的postProcessBeforeInstantiation()方法:
public Object postProcessBeforeInstantiation(Class<?> beanClass, String beanName) {
	// 生成缓存建
	Object cacheKey = getCacheKey(beanClass, beanName);
	// beanName 为空 或者 目标源缓存中不存在
	if (!StringUtils.hasLength(beanName) || !this.targetSourcedBeans.contains(beanName)) {
		if (this.advisedBeans.containsKey(cacheKey)) {
			return null;
		}
		/**
		 * 是基础结构类 或者 beanName 表示"原始实例"
		 *
		 * 【Advice,Pointcut,Advisor 和 AopInfrastructureBeans 视为基础结构类】
		 * 【beanName 以 beanClass 名称开头,以 ".ORIGINAL" 结尾代表"原始实例"】
		 **/
		if (isInfrastructureClass(beanClass) || shouldSkip(beanClass, beanName)) {
			this.advisedBeans.put(cacheKey, Boolean.FALSE);
			return null;
		}
	}

	/**
	 * 如果有自定义的 TargetSource,在此处创建代理
	 * 抑制目标 Bean 的不必要的默认实例化:TargetSource 将以自定义方式处理目标实例
	 *
	 * 如果没有为 AbstractAutoProxyCreator 注入 TargetSourceCreator,则结果都为 null
	 * @see AbstractAutoProxyCreator#setCustomTargetSourceCreators(org.springframework.aop.framework.autoproxy.TargetSourceCreator...)
	 **/
	TargetSource targetSource = getCustomTargetSource(beanClass, beanName);
	if (targetSource != null) {
		// 存入目标源缓存
		if (StringUtils.hasLength(beanName)) {
			this.targetSourcedBeans.add(beanName);
		}
		// 获取所有合格的增强器
		Object[] specificInterceptors = getAdvicesAndAdvisorsForBean(beanClass, beanName, targetSource);
		// 创建 AOP 代理
		Object proxy = createProxy(beanClass, beanName, specificInterceptors, targetSource);
		// 存入缓存
		this.proxyTypes.put(cacheKey, proxy.getClass());
		return proxy;
	}

	return null;
}
然后看一下AbstractAutowireCapableBeanFactory的initializeBean()方法,在调用applyBeanPostProcessorsAfterInitialization()方法进行包装的时候,调用了BeanPostProcessor类型的后置处理器的postProcessAfterInitialization()方法,这里就会进到AbstractAutoProxyCreator的postProcessAfterInitialization()方法:
public Object postProcessAfterInitialization(@Nullable Object bean,
											 String beanName) {
	if (bean != null) {
		Object cacheKey = getCacheKey(bean.getClass(), beanName);
		if (this.earlyProxyReferences.remove(cacheKey) != bean) {
			// 如果需要则进行包装
			return wrapIfNecessary(bean, beanName, cacheKey);
		}
	}
	return bean;
}
protected Object wrapIfNecessary(Object bean, String beanName, Object cacheKey) {
	// beanName不为空 并且 存在于目标源缓存中【后者一般不满足】
	if (StringUtils.hasLength(beanName) && this.targetSourcedBeans.contains(beanName)) {
		return bean;
	}
	// 存在缓存中 且 没有代理过
	if (Boolean.FALSE.equals(this.advisedBeans.get(cacheKey))) {
		return bean;
	}
	/**
	 * 是基础结构类 或者 beanName 表示"原始实例"
	 *
	 * 【Advice,Pointcut,Advisor 和 AopInfrastructureBeans 视为基础结构类】
	 * 【beanName 以 beanClass 名称开头,以 ".ORIGINAL" 结尾代表"原始实例"】
	 **/
	if (isInfrastructureClass(bean.getClass()) || shouldSkip(bean.getClass(), beanName)) {
		this.advisedBeans.put(cacheKey, Boolean.FALSE);
		return bean;
	}

	// Create proxy if we have advice.

	/**
	 * 获取所有合格的增强器
	 *
	 * 通过注解方式和 XML【<aop:advisor>】 方式配置的增强器
	 **/
	Object[] specificInterceptors = getAdvicesAndAdvisorsForBean(bean.getClass(), beanName, null);
	// 不为空,需要代理
	if (specificInterceptors != DO_NOT_PROXY) {
		// 标记为代理过
		this.advisedBeans.put(cacheKey, Boolean.TRUE);
		// 创建代理对象
		Object proxy = createProxy(
				bean.getClass(),
				beanName,
				specificInterceptors,
				new SingletonTargetSource(bean)
		);
		// 存入代理类型缓存中
		this.proxyTypes.put(cacheKey, proxy.getClass());
		return proxy;
	}

	// 否则标记为未代理
	this.advisedBeans.put(cacheKey, Boolean.FALSE);
	return bean;
}
getAdvicesAndAdvisorsForBean()方法就是缓存和获取的过程:
protected Object[] getAdvicesAndAdvisorsForBean(Class<?> beanClass,
												String beanName,
												@Nullable TargetSource targetSource) {
	// 获取所有合格的增强器
	List<Advisor> advisors = findEligibleAdvisors(beanClass, beanName);
	// 没找到则认为不需要代理
	if (advisors.isEmpty()) {
		return DO_NOT_PROXY;
	}

	return advisors.toArray();
}
protected List<Advisor> findEligibleAdvisors(Class<?> beanClass, String beanName) {
	// 获取所有候选增强器
	List<Advisor> candidateAdvisors = findCandidateAdvisors();
	// 查找可以应用于指定 bean 的所有增强器
	List<Advisor> eligibleAdvisors = findAdvisorsThatCanApply(candidateAdvisors, beanClass, beanName);
	// 扩展增强器【空方法】
	extendAdvisors(eligibleAdvisors);
	// 有则排序
	if (!eligibleAdvisors.isEmpty()) {
		eligibleAdvisors = sortAdvisors(eligibleAdvisors);
	}

	return eligibleAdvisors;
}
这里的findAdvisorsThatCanApply()方法包含了查找可以应用的增强器的过程,这个后面再说,先看findCandidateAdvisors()方法
protected List<Advisor> findCandidateAdvisors() {
	// 用回调时生成的 BeanFactoryAdvisorRetrievalHelperAdapter 组件进行查找
	return this.advisorRetrievalHelper.findAdvisorBeans();
}
这里就使用到了IOC容器回调AbstractAdvisorAutoProxyCreator时实例化的BeanFactoryAdvisorRetrievalHelperAdapter组件进行查找操作:
public List<Advisor> findAdvisorBeans() {
	/**
	 * 确定通知器程序 beanName 列表(如果尚未缓存)
	 **/
	String[] advisorNames = this.cachedAdvisorBeanNames;
	// 没有则解析
	if (advisorNames == null) {
		/**
		 * 从容器中获取所有实现 Advisor 的 beanName
		 *
		 * 这里会有一个 org.springframework.transaction.config.internalTransactionAdvisor
		 * 类为 BeanFactoryTransactionAttributeSourceAdvisor
		 **/
		advisorNames = BeanFactoryUtils.beanNamesForTypeIncludingAncestors(
				this.beanFactory, Advisor.class, true, false);
		// 存入缓存
		this.cachedAdvisorBeanNames = advisorNames;
	}
	// 没找到直接返回空集合
	if (advisorNames.length == 0) {
		return new ArrayList<>();
	}

	List<Advisor> advisors = new ArrayList<>();
	// 遍历找到的通知器
	for (String name : advisorNames) {
		// beanName 是合格的通知
		if (isEligibleBean(name)) {
			/**
			 * 下面调用 this.beanFactory.getBean(name, Advisor.class) 方法时,会将 name 标记为当前正在创建
			 * 之后除非创建完成,否则不会走 else 分支
			 **/
			if (this.beanFactory.isCurrentlyInCreation(name)) {
				if (logger.isTraceEnabled()) {
					logger.trace("Skipping currently created advisor '" + name + "'");
				}
			}
			else {
				try {
					/**
					 * 创建 Advisor 实例
					 *
					 * 这里会创建 BeanFactoryTransactionAttributeSourceAdvisor
					 **/
					advisors.add(this.beanFactory.getBean(name, Advisor.class));
				}
				catch (BeanCreationException ex) {
					Throwable rootCause = ex.getMostSpecificCause();
					if (rootCause instanceof BeanCurrentlyInCreationException) {
						BeanCreationException bce = (BeanCreationException) rootCause;
						String bceBeanName = bce.getBeanName();
						if (bceBeanName != null && this.beanFactory.isCurrentlyInCreation(bceBeanName)) {
							continue;
						}
					}
					throw ex;
				}
			}
		}
	}
	return advisors;
}
找到候选的增强器之后,再去筛选可以用的,看一下findAdvisorsThatCanApply()方法,最后调用的是AopUtils的findAdvisorsThatCanApply()方法:
public static List<Advisor> findAdvisorsThatCanApply(List<Advisor> candidateAdvisors,
														 Class<?> clazz) {
	if (candidateAdvisors.isEmpty()) {
		return candidateAdvisors;
	}

	List<Advisor> eligibleAdvisors = new ArrayList<>();
	// 先找 IntroductionAdvisor 类型的可用增强器
	for (Advisor candidate : candidateAdvisors) {
		/**
		 * 是 IntroductionAdvisor 类型 且 可以应用于目标方法
		 *
		 * BeanFactoryTransactionAttributeSourceAdvisor 不是 IntroductionAdvisor 类型
		 **/
		if (candidate instanceof IntroductionAdvisor && canApply(candidate, clazz)) {
			eligibleAdvisors.add(candidate);
		}
	}

	// 有合格的增强器
	boolean hasIntroductions = !eligibleAdvisors.isEmpty();

	for (Advisor candidate : candidateAdvisors) {
		if (candidate instanceof IntroductionAdvisor) {
			// already processed
			continue;
		}
		// 从候选的增强器中查找适用的
		if (canApply(candidate, clazz, hasIntroductions)) {
			eligibleAdvisors.add(candidate);
		}
	}

	return eligibleAdvisors;
}
因为BeanFactoryTransactionAttributeSourceAdvisor不是 IntroductionAdvisor类型,所以会调用第二个canApply()方法:
public static boolean canApply(Advisor advisor,
								   Class<?> targetClass,
								   boolean hasIntroductions) {
	// 先处理 IntroductionAdvisor 类型
	if (advisor instanceof IntroductionAdvisor) {
		return ((IntroductionAdvisor) advisor).getClassFilter().matches(targetClass);
	}
	/**
	 * 再处理 PointcutAdvisor 类型
	 *
	 * 之前创建的 InstantiationModelAwarePointcutAdvisor 是 PointcutAdvisor 的子类
	 * 之前创建的 BeanFactoryTransactionAttributeSourceAdvisor 是 PointcutAdvisor 的子类
	 **/
	else if (advisor instanceof PointcutAdvisor) {
		PointcutAdvisor pca = (PointcutAdvisor) advisor;
		return canApply(pca.getPointcut(), targetClass, hasIntroductions);
	}
	else {
		/**
		 * 没有切入点,因此假设它适用
		 **/
		return true;
	}
}
又封装了一层,再进到canApply()方法:
public static boolean canApply(Pointcut pc, Class<?> targetClass, boolean hasIntroductions) {
	// 过滤器不匹配
	if (!pc.getClassFilter().matches(targetClass)) {
		return false;
	}
	// 方法匹配器,这里是 BeanFactoryTransactionAttributeSourceAdvisor
	MethodMatcher methodMatcher = pc.getMethodMatcher();
	// 是 TrueMethodMatcher 则直接返回适用
	if (methodMatcher == MethodMatcher.TRUE) {
		return true;
	}

	IntroductionAwareMethodMatcher introductionAwareMethodMatcher = null;
	// 是 IntroductionAwareMethodMatcher 类型,这里不是
	if (methodMatcher instanceof IntroductionAwareMethodMatcher) {
		introductionAwareMethodMatcher = (IntroductionAwareMethodMatcher) methodMatcher;
	}

	Set<Class<?>> classes = new LinkedHashSet<>();
	// 不是代理类,现在还没有创建代理类
	if (!Proxy.isProxyClass(targetClass)) {
		// 获取使用的原始类
		classes.add(ClassUtils.getUserClass(targetClass));
	}
	// 获取给定类实现的所有接口
	classes.addAll(ClassUtils.getAllInterfacesForClassAsSet(targetClass));

	for (Class<?> clazz : classes) {
		// 获取类定义的方法,包括父类 Object 的方法
		Method[] methods = ReflectionUtils.getAllDeclaredMethods(clazz);
		for (Method method : methods) {
			/**
			 * 是否匹配
			 *
			 * introductionAwareMethodMatcher 为空,调用的是 TransactionAttributeSourcePointcut 的 matches() 方法
			 * @see org.springframework.transaction.interceptor.TransactionAttributeSourcePointcut#matches(java.lang.reflect.Method, java.lang.Class)
			 **/
			if (introductionAwareMethodMatcher != null ?
					introductionAwareMethodMatcher.matches(method, targetClass, hasIntroductions) :
					methodMatcher.matches(method, targetClass)) {
				return true;
			}
		}
	}

	return false;
}
这里主要是想带大家看一下解析事务注解的代码,过程很曲折坎坷,但是也要耐下心来先看TransactionAttributeSourcePointcut的matches()方法:
public boolean matches(Method method, Class<?> targetClass) {
	// 获取 AnnotationTransactionAttributeSource
	TransactionAttributeSource tas = getTransactionAttributeSource();
	/**
	 * 调用的是父类 AbstractFallbackTransactionAttributeSource 的方法
	 * @see AbstractFallbackTransactionAttributeSource#getTransactionAttribute(java.lang.reflect.Method, java.lang.Class)
	 **/
	return (tas == null || tas.getTransactionAttribute(method, targetClass) != null);
}
再跟到AbstractFallbackTransactionAttributeSource的getTransactionAttribute()方法:
public TransactionAttribute getTransactionAttribute(Method method, @Nullable Class<?> targetClass) {
	// Object 类的方法直接返回空
	if (method.getDeclaringClass() == Object.class) {
		return null;
	}

	Object cacheKey = getCacheKey(method, targetClass);
	// 尝试从缓存中获取
	TransactionAttribute cached = this.attributeCache.get(cacheKey);
	if (cached != null) {
		/**
		 * 值可以是表示没有事务属性的规范值,也可以是实际事务属性
		 *
		 * 如果是默认值【DefaultTransactionAttribute】则返回空
		 **/
		if (cached == NULL_TRANSACTION_ATTRIBUTE) {
			return null;
		}
		else {
			return cached;
		}
	}
	// 缓存中没有,则进行解析
	else {
		// 获取 @Transactional 注解的属性
		TransactionAttribute txAttr = computeTransactionAttribute(method, targetClass);
		// 空对象则向缓存中加入一个默认值【DefaultTransactionAttribute】
		if (txAttr == null) {
			this.attributeCache.put(cacheKey, NULL_TRANSACTION_ATTRIBUTE);
		}
		else {
			// 获取实际的方法名
			String methodIdentification = ClassUtils.getQualifiedMethodName(method, targetClass);
			if (txAttr instanceof DefaultTransactionAttribute) {
				/**
				 * 为事务属性设置一个方法描述符,以后遇到这个方法则可以直接使用
				 * 仅限于 TransactionAttribute 是 DefaultTransactionAttribute 类型
				 *
				 * @see TransactionAspectSupport#methodIdentification(java.lang.reflect.Method, java.lang.Class, org.springframework.transaction.interceptor.TransactionAttribute)
				 **/
				((DefaultTransactionAttribute) txAttr).setDescriptor(methodIdentification);
			}
			// 加入缓存
			this.attributeCache.put(cacheKey, txAttr);
		}

		return txAttr;
	}
}
终于要到了,看一下computeTransactionAttribute()方法:
protected TransactionAttribute computeTransactionAttribute(Method method,
														   @Nullable Class<?> targetClass) {
	/**
	 * 不允许使用非公开方法
	 **/
	if (allowPublicMethodsOnly() && !Modifier.isPublic(method.getModifiers())) {
		return null;
	}

	/**
	 * 该方法可能在接口上,但是需要目标类的属性
	 * 如果目标类为空,则该方法将保持不变
	 **/
	Method specificMethod = AopUtils.getMostSpecificMethod(method, targetClass);

	/**
	 * 获取 @Transactional 注解的属性
	 *
	 * 先从目标方法上获取
	 * 再从目标方法的类上获取
	 * 再从目标类实现的接口方法上获取
	 * 再从目标类实现的接口方法的类上获取
	 **/

	/**
	 * 首先尝试的是目标类中的方法
	 **/
	TransactionAttribute txAttr = findTransactionAttribute(specificMethod);
	if (txAttr != null) {
		return txAttr;
	}

	/**
	 * 再尝试目标类上的 @Transactional 属性
	 **/
	txAttr = findTransactionAttribute(specificMethod.getDeclaringClass());
	if (txAttr != null && ClassUtils.isUserLevelMethod(method)) {
		return txAttr;
	}

	if (specificMethod != method) {
		/**
		 * 后备是看原始方法
		 **/
		txAttr = findTransactionAttribute(method);
		if (txAttr != null) {
			return txAttr;
		}
		/**
		 * 最后一个后备是原始方法的类
		 **/
		txAttr = findTransactionAttribute(method.getDeclaringClass());
		if (txAttr != null && ClassUtils.isUserLevelMethod(method)) {
			return txAttr;
		}
	}

	return null;
}
这里的代码就解释了,为什么@Transactional注解加在实现类的方法上、实现类上、接口的方法上和接口类上都能起到事务的作用,因为这里会按顺序去查找,查找的findTransactionAttribute()很重要,最后调用的是SpringTransactionAnnotationParser的parseTransactionAnnotation()方法:
public TransactionAttribute parseTransactionAnnotation(AnnotatedElement element) {
	// 获取合并的注解属性
	AnnotationAttributes attributes = AnnotatedElementUtils.findMergedAnnotationAttributes(
			element,
			Transactional.class,
			false,
			false
	);

	// 解析事务注解
	if (attributes != null) {
		return parseTransactionAnnotation(attributes);
	}
	else {
		return null;
	}
}
protected TransactionAttribute parseTransactionAnnotation(AnnotationAttributes attributes) {
	RuleBasedTransactionAttribute rbta = new RuleBasedTransactionAttribute();
	// 处理传播行为
	Propagation propagation = attributes.getEnum("propagation");
	rbta.setPropagationBehavior(propagation.value());
	// 处理隔离级别
	Isolation isolation = attributes.getEnum("isolation");
	rbta.setIsolationLevel(isolation.value());
	rbta.setTimeout(attributes.getNumber("timeout").intValue());
	rbta.setReadOnly(attributes.getBoolean("readOnly"));
	rbta.setQualifier(attributes.getString("value"));
	// 处理回滚策略
	List<RollbackRuleAttribute> rollbackRules = new ArrayList<>();
	for (Class<?> rbRule : attributes.getClassArray("rollbackFor")) {
		rollbackRules.add(new RollbackRuleAttribute(rbRule));
	}
	for (String rbRule : attributes.getStringArray("rollbackForClassName")) {
		rollbackRules.add(new RollbackRuleAttribute(rbRule));
	}
	for (Class<?> rbRule : attributes.getClassArray("noRollbackFor")) {
		rollbackRules.add(new NoRollbackRuleAttribute(rbRule));
	}
	for (String rbRule : attributes.getStringArray("noRollbackForClassName")) {
		rollbackRules.add(new NoRollbackRuleAttribute(rbRule));
	}
	rbta.setRollbackRules(rollbackRules);

	return rbta;
}
这些属性是不是很熟悉呢,这就是我想带大家看的。之后IOC容器创建目标类的时候,就会把事务通知器织入到目标类中,创建代理对象。
创建过程
创建工作还是从AbstractAutowireCapableBeanFactory的initializeBean()开始,当解析带有事务注解的类时,就会将事务增强器织入到目标类,创建一个代理对象。
protected Object initializeBean(final String beanName,
								final Object bean,
								@Nullable RootBeanDefinition mbd) {
	// 回调 Aware 及其实现类的方法
	if (System.getSecurityManager() != null) {
		AccessController.doPrivileged(
				(PrivilegedAction<Object>) () -> {
					invokeAwareMethods(beanName, bean);
					return null;
				},
				getAccessControlContext());
	}
	else {
		invokeAwareMethods(beanName, bean);
	}

	Object wrappedBean = bean;
	if (mbd == null || !mbd.isSynthetic()) {
		/**
		 * 关键字:执行
		 * 执行 BeanPostProcessor 直接实现类的 postProcessBeforeInitialization() 方法
		 *
		 * @PostConstruct 注解是在这里面进行处理的
		 */
		wrappedBean = applyBeanPostProcessorsBeforeInitialization(wrappedBean, beanName);
	}

	try {
		/**
		 * 执行 Bean 生命周期回调中的 init 方法
		 *
		 * 实现 InitializingBean 接口并重写 afterPropertiesSet() 方法是在这里面进行处理的
		 */
		invokeInitMethods(beanName, wrappedBean, mbd);
	}
	catch (Throwable ex) {
		throw new BeanCreationException();
	}
	if (mbd == null || !mbd.isSynthetic()) {
		/**
		 * 关键字:改变
		 * 执行 BeanPostProcessor 直接实现类的 postProcessAfterInitialization() 方法
		 *
		 * 产生 AOP 代理,事务的代理等
		 */
		wrappedBean = applyBeanPostProcessorsAfterInitialization(wrappedBean, beanName);
	}

	return wrappedBean;
}
applyBeanPostProcessorsAfterInitialization()方法跟进去,发现其调用了BeanPostProcessor类型的后置处理器的postProcessAfterInitialization()方法,这里就会进到AbstractAutoProxyCreatorpostProcessAfterInitialization()方法。
public Object postProcessAfterInitialization(@Nullable Object bean,
											 String beanName) {
	if (bean != null) {
		Object cacheKey = getCacheKey(bean.getClass(), beanName);
		if (this.earlyProxyReferences.remove(cacheKey) != bean) {
			// 如果需要则进行包装
			return wrapIfNecessary(bean, beanName, cacheKey);
		}
	}
	return bean;
}
代码上面已经看过,只是上面主要是缓存和创建事务增强器的过程,这里是创建目标代理对象的过程。因为IOC容器创建每个Bean都会经历这个过程,会重复调用后置处理器,所以贴代码不能很好的区分。
protected Object wrapIfNecessary(Object bean, String beanName, Object cacheKey) {
	// beanName不为空 并且 存在于目标源缓存中【后者一般不满足】
	if (StringUtils.hasLength(beanName) && this.targetSourcedBeans.contains(beanName)) {
		return bean;
	}
	// 存在缓存中 且 没有代理过
	if (Boolean.FALSE.equals(this.advisedBeans.get(cacheKey))) {
		return bean;
	}
	/**
	 * 是基础结构类 或者 beanName 表示"原始实例"
	 *
	 * 【Advice,Pointcut,Advisor 和 AopInfrastructureBeans 视为基础结构类】
	 * 【beanName 以 beanClass 名称开头,以 ".ORIGINAL" 结尾代表"原始实例"】
	 **/
	if (isInfrastructureClass(bean.getClass()) || shouldSkip(bean.getClass(), beanName)) {
		this.advisedBeans.put(cacheKey, Boolean.FALSE);
		return bean;
	}

	// Create proxy if we have advice.

	/**
	 * 获取所有合格的增强器
	 *
	 * 通过注解方式和 XML【<aop:advisor>】 方式配置的增强器
	 **/
	Object[] specificInterceptors = getAdvicesAndAdvisorsForBean(bean.getClass(), beanName, null);
	// 不为空,需要代理
	if (specificInterceptors != DO_NOT_PROXY) {
		// 标记为代理过
		this.advisedBeans.put(cacheKey, Boolean.TRUE);
		// 创建代理对象
		Object proxy = createProxy(
				bean.getClass(),
				beanName,
				specificInterceptors,
				new SingletonTargetSource(bean)
		);
		// 存入代理类型缓存中
		this.proxyTypes.put(cacheKey, proxy.getClass());
		return proxy;
	}

	// 否则标记为未代理
	this.advisedBeans.put(cacheKey, Boolean.FALSE);
	return bean;
}
这里执行完,就可以看到目标类被织入了事务增强器,变成了一个代理对象。

执行过程
现在我们有了一个带有事务增强器的代理对象,可以调用它的事务方法了,会进到JdkDynamicAopProxyinvoke()方法中:
public Object invoke(Object proxy, Method method, Object[] args) throws Throwable {
	MethodInvocation invocation;
	Object oldProxy = null;
	boolean setProxyContext = false;

	TargetSource targetSource = this.advised.targetSource;
	Object target = null;

	try {
		// 代理接口没有定义 equals 方法 且 调用的是目标对象的 equals 方法
		if (!this.equalsDefined && AopUtils.isEqualsMethod(method)) {
			return equals(args[0]);
		}
		// 代理接口没有定义 hashCode 方法 且 调用的是目标对象的 hashCode 方法
		else if (!this.hashCodeDefined && AopUtils.isHashCodeMethod(method)) {
			return hashCode();
		}
		// 声明类型是 DecoratingProxy
		else if (method.getDeclaringClass() == DecoratingProxy.class) {
			return AopProxyUtils.ultimateTargetClass(this.advised);
		}
		// 透明 且 声明类型是个接口 且 声明类型是 Advised
		else if (!this.advised.opaque && method.getDeclaringClass().isInterface()
				&& method.getDeclaringClass().isAssignableFrom(Advised.class)) {
			return AopUtils.invokeJoinpointUsingReflection(this.advised, method, args);
		}

		Object retVal;
		/**
		 * 如果设置了 exposeProxy = true 则将代理对象设置到线程本地变量中
		 *
		 * @see org.springframework.context.annotation.EnableAspectJAutoProxy#exposeProxy()
		 **/
		if (this.advised.exposeProxy) {
			oldProxy = AopContext.setCurrentProxy(proxy);
			setProxyContext = true;
		}

		target = targetSource.getTarget();
		Class<?> targetClass = (target != null ? target.getClass() : null);

		/**
		 * 获取此方法的拦截链
		 **/
		List<Object> chain = this.advised.getInterceptorsAndDynamicInterceptionAdvice(method, targetClass);

		/**
		 * 检查是否有其他通知
		 * 如果没有,可以依靠目标直接反射调用,并避免创建 MethodInvocation
		 **/
		if (chain.isEmpty()) {
			/**
			 * 我们可以跳过创建 MethodInvocation 的操作:仅直接调用目标
			 * 请注意,最终的调用者必须是 InvokerInterceptor,因此我们知道它仅对目标执行反射操作,并且不执行热插拔或花哨代理
			 **/
			// 使给定参数适应给定方法中的目标签名
			Object[] argsToUse = AopProxyUtils.adaptArgumentsIfNecessary(method, args);
			// 通过反射调用给定目标
			retVal = AopUtils.invokeJoinpointUsingReflection(target, method, argsToUse);
		}
		else {
			/**
			 * 创建一个 ReflectiveMethodInvocation
			 **/
			invocation = new ReflectiveMethodInvocation(proxy, target, method, args, targetClass, chain);
			/**
			 * 通过拦截器链进入连接点【责任链模式】
			 **/
			retVal = invocation.proceed();
		}

		Class<?> returnType = method.getReturnType();
		if (retVal != null && retVal == target && returnType != Object.class
				&& returnType.isInstance(proxy)
				&& !RawTargetAccess.class.isAssignableFrom(method.getDeclaringClass())) {
			retVal = proxy;
		}
		else if (retVal == null && returnType != Void.TYPE && returnType.isPrimitive()) {
			throw new AopInvocationException();
		}

		return retVal;
	}
	finally {
		if (target != null && !targetSource.isStatic()) {
			targetSource.releaseTarget(target);
		}
		if (setProxyContext) {
			AopContext.setCurrentProxy(oldProxy);
		}
	}
}
和AOP的调用过程一样,先去AdvisedSupport的getInterceptorsAndDynamicInterceptionAdvice()获取拦截器链,没有则直接反射调用目标方法。
public List<Object> getInterceptorsAndDynamicInterceptionAdvice(Method method,
															    @Nullable Class<?> targetClass) {
	/**
	 * 目标对象方法的缓存键
	 *
	 * public abstract void com.ambition.service.PayService.pay()
	 **/
	MethodCacheKey cacheKey = new MethodCacheKey(method);
	// 先去缓存中获取
	List<Object> cached = this.methodCache.get(cacheKey);
	if (cached == null) {
		// 缓存中没有,则进行逻辑解析
		cached = this.advisorChainFactory.getInterceptorsAndDynamicInterceptionAdvice(
				this, method, targetClass);
		// 放入缓存中
		this.methodCache.put(cacheKey, cached);
	}

	return cached;
}
DefaultAdvisorChainFactory的getInterceptorsAndDynamicInterceptionAdvice()方法将增强器转换为拦截器,而TransactionInterceptor本身就是一个拦截器:
public List<Object> getInterceptorsAndDynamicInterceptionAdvice(Advised config,
															    Method method,
															    @Nullable Class<?> targetClass) {

	// 获取 DefaultAdvisorAdapterRegistry 实例
	AdvisorAdapterRegistry registry = GlobalAdvisorAdapterRegistry.getInstance();
	// 获取通知
	Advisor[] advisors = config.getAdvisors();
	// 拦截器集合
	List<Object> interceptorList = new ArrayList<>(advisors.length);
	// 目标类
	Class<?> actualClass = (targetClass != null ? targetClass : method.getDeclaringClass());

	Boolean hasIntroductions = null;

	for (Advisor advisor : advisors) {
		/**
		 * 是 PointcutAdvisor 切点通知类
		 * BeanFactoryTransactionAttributeSourceAdvisor 符合条件
		 * DefaultPointcutAdvisor 符合条件
		 * InstantiationModelAwarePointcutAdvisorImpl 符合条件
		 **/
		if (advisor instanceof PointcutAdvisor) {
			PointcutAdvisor pointcutAdvisor = (PointcutAdvisor) advisor;
			/**
			 * 代理配置以预先过【默认为False】 或者 切面与目标类匹配
			 *
			 * 事务的类过滤器是 TransactionAttributeSourceClassFilter
			 **/
			if (config.isPreFiltered() || pointcutAdvisor.getPointcut().getClassFilter().matches(actualClass)) {
				/**
				 * 获取方法匹配器
				 *
				 * 事务的是
				 * 		TransactionAttributeSourcePointcut
				 *
				 * AOP 的是
				 * 		TrueMethodMatcher
				 * 		AspectJExpressionPointcut
				 **/
				MethodMatcher mm = pointcutAdvisor.getPointcut().getMethodMatcher();
				boolean match;
				/**
				 * TrueMethodMatcher 不是 IntroductionAwareMethodMatcher 的子类
				 * AspectJExpressionPointcut 是 IntroductionAwareMethodMatcher 的子类
				 * TransactionAttributeSourcePointcut 不是 IntroductionAwareMethodMatcher 的子类
				 **/
				if (mm instanceof IntroductionAwareMethodMatcher) {
					if (hasIntroductions == null) {
						hasIntroductions = hasMatchingIntroductions(advisors, actualClass);
					}
					match = ((IntroductionAwareMethodMatcher) mm).matches(method, actualClass, hasIntroductions);
				}
				else {
					match = mm.matches(method, actualClass);
				}

				// 匹配
				if (match) {
					// 转换为拦截器
					MethodInterceptor[] interceptors = registry.getInterceptors(advisor);
					if (mm.isRuntime()) {
						for (MethodInterceptor interceptor : interceptors) {
							// 封装为 InterceptorAndDynamicMethodMatcher
							interceptorList.add(new InterceptorAndDynamicMethodMatcher(interceptor, mm));
						}
					}
					else {
						interceptorList.addAll(Arrays.asList(interceptors));
					}
				}
			}
		}
		// 是 IntroductionAdvisor 类型
		else if (advisor instanceof IntroductionAdvisor) {
			IntroductionAdvisor ia = (IntroductionAdvisor) advisor;
			if (config.isPreFiltered() || ia.getClassFilter().matches(actualClass)) {
				Interceptor[] interceptors = registry.getInterceptors(advisor);
				interceptorList.addAll(Arrays.asList(interceptors));
			}
		}
		else {
			Interceptor[] interceptors = registry.getInterceptors(advisor);
			interceptorList.addAll(Arrays.asList(interceptors));
		}
	}

	return interceptorList;
}
看过上一篇AOP源码解析的客官一定知道主要看的还是getInterceptors()方法,matches()方法上面我们已经看过了,重复代码就不看了。
public MethodInterceptor[] getInterceptors(Advisor advisor) throws UnknownAdviceTypeException {
	List<MethodInterceptor> interceptors = new ArrayList<>(3);
	Advice advice = advisor.getAdvice();
	/**
	 * ExposeInvocationInterceptor 是 MethodInterceptor
	 * AspectJAfterThrowingAdvice 是 MethodInterceptor
	 * AspectJAfterAdvice 是 MethodInterceptor
	 * AspectJAroundAdvice 是 MethodInterceptor
	 * AspectJAroundAdvice 是 MethodInterceptor
	 *
	 * TransactionInterceptor 是 MethodInterceptor
	 **/
	if (advice instanceof MethodInterceptor) {
		interceptors.add((MethodInterceptor) advice);
	}
	for (AdvisorAdapter adapter : this.adapters) {
		if (adapter.supportsAdvice(advice)) {
			interceptors.add(adapter.getInterceptor(advisor));
		}
	}
	if (interceptors.isEmpty()) {
		throw new UnknownAdviceTypeException(advisor.getAdvice());
	}
	return interceptors.toArray(new MethodInterceptor[0]);
}

有拦截器链就封装ReflectiveMethodInvocation,调用proceed()方法:
public Object proceed() throws Throwable {
	/**
	 * 从索引 -1 开始并提前增加【通过递归调用】
	 * 确保所有的责任者都完成处理逻辑
	 **/
	// 是最后一个拦截器
	if (this.currentInterceptorIndex == this.interceptorsAndDynamicMethodMatchers.size() - 1) {
		// 直接通过反射调用目标方法
		return invokeJoinpoint();
	}

	/**
	 * 获取下一个责任者
	 *
	 * AOP的拦截器
	 * 		ExposeInvocationInterceptor
	 * 		AspectJAfterThrowingAdvice
	 * 		AfterReturningAdviceInterceptor
	 * 		AspectJAfterAdvice
	 * 		AspectJAroundAdvice
	 * 		MethodBeforeAdviceInterceptor
	 *
	 * 事务的拦截器
	 * 		TransactionInterceptor
	 **/
	Object interceptorOrInterceptionAdvice =
			this.interceptorsAndDynamicMethodMatchers.get(++this.currentInterceptorIndex);
	/**
	 * 是 InterceptorAndDynamicMethodMatcher 类型
	 * 这里都不是这个类型
	 **/
	if (interceptorOrInterceptionAdvice instanceof InterceptorAndDynamicMethodMatcher) {
		/**
		 * 动态评估方法匹配,静态部分都已经进行了评估并发现已匹配
		 **/
		InterceptorAndDynamicMethodMatcher dm =
				(InterceptorAndDynamicMethodMatcher) interceptorOrInterceptionAdvice;
		Class<?> targetClass = (this.targetClass != null ? this.targetClass : this.method.getDeclaringClass());
		if (dm.methodMatcher.matches(this.method, targetClass, this.arguments)) {
			return dm.interceptor.invoke(this);
		}
		else {
			/**
			 * Dynamic matching failed. Skip this interceptor and invoke the next in the chain.
			 *
			 * 动态匹配失败,跳过此拦截器并调用链中的下一个拦截器
			 **/
			return proceed();
		}
	}
	else {
		/**

		 * 它是一个拦截器,因此只需要调用它,切入点将在构造此对象之前进行静态评估
		 **/
		return ((MethodInterceptor) interceptorOrInterceptionAdvice).invoke(this);
	}
}
然后就进入到TransactionInterceptor的invoke()方法中:
public Object invoke(MethodInvocation invocation) throws Throwable {
	/**
	 * 处理目标方法,可能为空
	 * 应该将 TransactionAttributeSource 和目标类以及方法(可能来自接口)传递给它
	 *
	 * class com.ambition.service.PayServiceImpl
	 **/
	Class<?> targetClass =
			(invocation.getThis() != null ? AopUtils.getTargetClass(invocation.getThis()) : null);

	return invokeWithinTransaction(
			// 目标方法
			invocation.getMethod(),
			// 目标类
			targetClass,
			// 返回
			invocation::proceed
	);
}
前方高能,事务比AOP复杂的地方就在于执行流程上
protected Object invokeWithinTransaction(Method method,
										 @Nullable Class<?> targetClass,
										 final InvocationCallback invocation) throws Throwable {
	// reactiveAdapterRegistry 为空
	if (this.reactiveAdapterRegistry != null) {
		ReactiveAdapter adapter = this.reactiveAdapterRegistry.getAdapter(method.getReturnType());
		if (adapter != null) {
			return new ReactiveTransactionSupport(adapter).invokeWithinTransaction(method, targetClass, invocation);
		}
	}

	/**
	 * 如果 transaction 属性为 null,则该方法为非事务处理
	 *
	 * 获取事务属性源【AnnotationTransactionAttributeSource】
	 **/
	TransactionAttributeSource tas = getTransactionAttributeSource();
	// 获取事务属性值【RuleBasedTransactionAttribute】
	final TransactionAttribute txAttr = (tas != null ? tas.getTransactionAttribute(method, targetClass) : null);
	// 确定事务管理器【配置文件注入的DataSourceTransactionManager】
	final PlatformTransactionManager tm = determineTransactionManager(txAttr);
	/**
	 * 获取连接点标识
	 * 仅限于 TransactionAttribute 是 DefaultTransactionAttribute 类型
	 * 这里是 RuleBasedTransactionAttribute
	 * @see AbstractFallbackTransactionAttributeSource#getTransactionAttribute(java.lang.reflect.Method, java.lang.Class)
	 **/
	final String joinpointIdentification = methodIdentification(method, targetClass, txAttr);
	// DataSourceTransactionManager 不是 CallbackPreferringPlatformTransactionManager 类型
	if (txAttr == null || !(tm instanceof CallbackPreferringPlatformTransactionManager)) {
		/**
		 * 使用 getTransaction 和 commit / rollback 调用进行标准事务划分
		 *
		 * 如果需要则创建事务【DefaultTransactionStatus】
		 **/
		TransactionInfo txInfo = createTransactionIfNecessary(tm, txAttr, joinpointIdentification);

		Object retVal;
		try {
			/**
			 * 这是一个环绕通知:调用链中的下一个拦截器
			 * 这通常会导致目标对象被调用
			 **/
			retVal = invocation.proceedWithInvocation();
		}
		catch (Throwable ex) {
			/**
			 * 目标调用异常,需要则进行回滚
			 **/
			completeTransactionAfterThrowing(txInfo, ex);
			throw ex;
		}
		finally {
			/**
			 * 不管是否发生异常,都要还原旧事物的 TransactionInfo
			 **/
			cleanupTransactionInfo(txInfo);
		}

		......

		/**
		 * 提交事务
		 **/
		commitTransactionAfterReturning(txInfo);
		return retVal;
	}

	......
}
先来看一下第一个比较重要的createTransactionIfNecessary()方法:
protected TransactionInfo createTransactionIfNecessary(@Nullable PlatformTransactionManager tm,
														   @Nullable TransactionAttribute txAttr,
														   final String joinpointIdentification) {

	/**
	 * 如果未指定名称,则将方法标识用作事务名称
	 **/
	if (txAttr != null && txAttr.getName() == null) {
		txAttr = new DelegatingTransactionAttribute(txAttr) {
			@Override
			public String getName() {
				return joinpointIdentification;
			}
		};
	}

	TransactionStatus status = null;
	if (txAttr != null) {
		if (tm != null) {
			// 获取 TransactionStatus
			status = tm.getTransaction(txAttr);
		}
		......
	}

	// 将给定属性和状态对象封装为 TransactionInfo 对象
	return prepareTransactionInfo(tm, txAttr, joinpointIdentification, status);
}
其实就是将事务管理器和事务属性值封装为TransactionInfo对象,再将事务状态设置进去,比较重要的是getTransaction()获取事务状态方法:
public final TransactionStatus getTransaction(@Nullable TransactionDefinition definition)
			throws TransactionException {

	/**
	 * 如果未提供 TransactionDefinition,则使用默认 StaticTransactionDefinition
	 **/
	TransactionDefinition def = (definition != null ? definition : TransactionDefinition.withDefaults());
	// 获取事务对象【DataSourceTransactionObject】
	Object transaction = doGetTransaction();
	boolean debugEnabled = logger.isDebugEnabled();
	// 是已存在的事务【事务方法嵌套调用事务方法时才成立】
	if (isExistingTransaction(transaction)) {
		/**
		 * 找到现有事务,则检查传播行为以了解行为
		 **/
		return handleExistingTransaction(def, transaction, debugEnabled);
	}

	/**
	 * 检查新事务的定义设置【超时时间是否有效】
	 **/
	if (def.getTimeout() < TransactionDefinition.TIMEOUT_DEFAULT) {
		throw new InvalidTimeoutException("Invalid transaction timeout", def.getTimeout());
	}

	/**
	 * 找不到现有事务,检查传播行为以查找如何进行
	 **/

	/**
	 * 支持当前事务,但是当前事务传播行为不存在,则引发异常
	 *
	 * 这里是 PROPAGATION_REQUIRED 或者 PROPAGATION_REQUIRES_NEW
	 **/
	if (def.getPropagationBehavior() == TransactionDefinition.PROPAGATION_MANDATORY) {
		throw new IllegalTransactionStateException();
	}
	// 判断事务的传播行为
	else if (def.getPropagationBehavior() == TransactionDefinition.PROPAGATION_REQUIRED
			|| def.getPropagationBehavior() == TransactionDefinition.PROPAGATION_REQUIRES_NEW
			|| def.getPropagationBehavior() == TransactionDefinition.PROPAGATION_NESTED) {
		/**
		* 挂起给定的事务
		 *
		 * 现在还不需要挂起,此时为空
		 **/
		SuspendedResourcesHolder suspendedResources = suspend(null);
		try {
			/**
			 * 是否需要激活同步
			 *
			 * transactionSynchronization 为 SYNCHRONIZATION_ALWAYS 值为0
			 * SYNCHRONIZATION_NEVER 值为2
			 **/
			boolean newSynchronization = (getTransactionSynchronization() != SYNCHRONIZATION_NEVER);
			// 创建 DefaultTransactionStatus 事务状态对象
			DefaultTransactionStatus status = newTransactionStatus(
					def,
					transaction,
					true,
					newSynchronization,
					debugEnabled,
					suspendedResources
			);
			// 开启事务准备工作
			doBegin(transaction, def);
			// 初始化事务同步
			prepareSynchronization(status, def);
			return status;
		}
		catch (RuntimeException | Error ex) {
			// 异常则恢复挂起的事务
			resume(null, suspendedResources);
			throw ex;
		}
	}

	......
}
如果事务的传播行为符合条件,会先根据需要挂起事务,Spring这里用了很多线程安全的ThreadLocal缓存来保存事务同步、当前事务名称、当前事务只读状态、当前事务隔离级别等属性值。
我理解的所谓准备工作,其实就是将连接持有器绑定到线程上,挂起就是创建一个SuspendedResourcesHolder挂起资源持有器保存一下当前的属性值,然后去执行另一个事务方法,然后再解除资源绑定,获取之前的挂起资源持有器,恢复使其继续执行,如果另一个事务发生异常会传播到上一个事务中。
来看一下doBegin()方法:
protected void doBegin(Object transaction, TransactionDefinition definition) {

	DataSourceTransactionObject txObject = (DataSourceTransactionObject) transaction;

	Connection con = null;

	try {
		// 没有连接持有器 或者 持有器与事务同步
		if (!txObject.hasConnectionHolder()
				|| txObject.getConnectionHolder().isSynchronizedWithTransaction()) {
			// 获取当前使用的数据源的连接【JDBC4Connection】
			Connection newCon = obtainDataSource().getConnection();
			// 设置一个新的连接持有器
			txObject.setConnectionHolder(new ConnectionHolder(newCon), true);
		}

		// 设置持有器与事务同步
		txObject.getConnectionHolder().setSynchronizedWithTransaction(true);
		// 获取连接
		con = txObject.getConnectionHolder().getConnection();

		// 使用给定的事务处理连接,获取之前的隔离级别,此时为空
		Integer previousIsolationLevel = DataSourceUtils.prepareConnectionForTransaction(con, definition);
		txObject.setPreviousIsolationLevel(previousIsolationLevel);

		/**
		 * 如有必要,请切换为手动提交
		 * 在某些 JDBC 驱动程序中,这是非常昂贵的,因此不必要的时候我们不想这样做
		 * (例如,如果我们已经明确配置了连接池以进行设置)
		 **/
		// 如果是自动提交
		if (con.getAutoCommit()) {
			// 必须还原自动提交
			txObject.setMustRestoreAutoCommit(true);
			// 设置为手动提交
			con.setAutoCommit(false);
		}

		// 准备事务连接
		prepareTransactionalConnection(con, definition);
		// 设置连接持有者的事务为活动的且由 JDBC 管理的事务
		txObject.getConnectionHolder().setTransactionActive(true);
		// 确定超时时间【默认超时时间】
		int timeout = determineTimeout(definition);
		// 如果不是默认超时,则设置超时时间【单位秒】
		if (timeout != TransactionDefinition.TIMEOUT_DEFAULT) {
			txObject.getConnectionHolder().setTimeoutInSeconds(timeout);
		}

		// 是新的连接持有器
		if (txObject.isNewConnectionHolder()) {
			// 绑定连接持有器到线程上
			TransactionSynchronizationManager.bindResource(obtainDataSource(), txObject.getConnectionHolder());
		}
	}
	catch (Throwable ex) {
		if (txObject.isNewConnectionHolder()) {
			DataSourceUtils.releaseConnection(con, obtainDataSource());
			txObject.setConnectionHolder(null, false);
		}
		throw new CannotCreateTransactionException();
	}
}
可以看到基本上的逻辑就是我上面所说的,那么createTransactionIfNecessary()方法就说这么多了,具体的还有很多代码,我觉得不是特别重要,大家自己跟进去看一下。
proceedWithInvocation()方法就是调用拦截器链中的下一个拦截器方法,异常回滚的completeTransactionAfterThrowing()方法最后调用的就是ConnectionImpl的rollback()方法,
提交事务的commitTransactionAfterReturning()方法最后调用的就是ConnectionImpl的commit()方法,这些都太底层了,不是Spring的源码, 有兴趣的可以自己看一下。
现在是晚上十一点多,肝了几天终于肝完了,原创不易,喜欢的大佬可以点赞收藏,咱们下一篇再见。