在Kubernetes环境中使用Helm来管理应用颇为方便,在使用第三方的Chart时,不论学习还是修改都会更加得心应手;
环境信息
实战环境的版本信息如下,请确保以下软件都已运行正常:
操作系统 :CentOS Linux release 7.6.1810
Kubernetes:1.13
Helm:2.12.3
创建Chart
执行命令helm create tomcat,会创建一个tomcat目录,里面的内容如下:
[root@master ~]# tree tomcat
tomcat
├── charts
├── Chart.yaml
├── templates
│ ├── deployment.yaml
│ ├── _helpers.tpl
│ ├── ingress.yaml
│ ├── NOTES.txt
│ ├── service.yaml
│ └── tests
│ └── test-connection.yaml
└── values.yaml
3 directories, 8 files
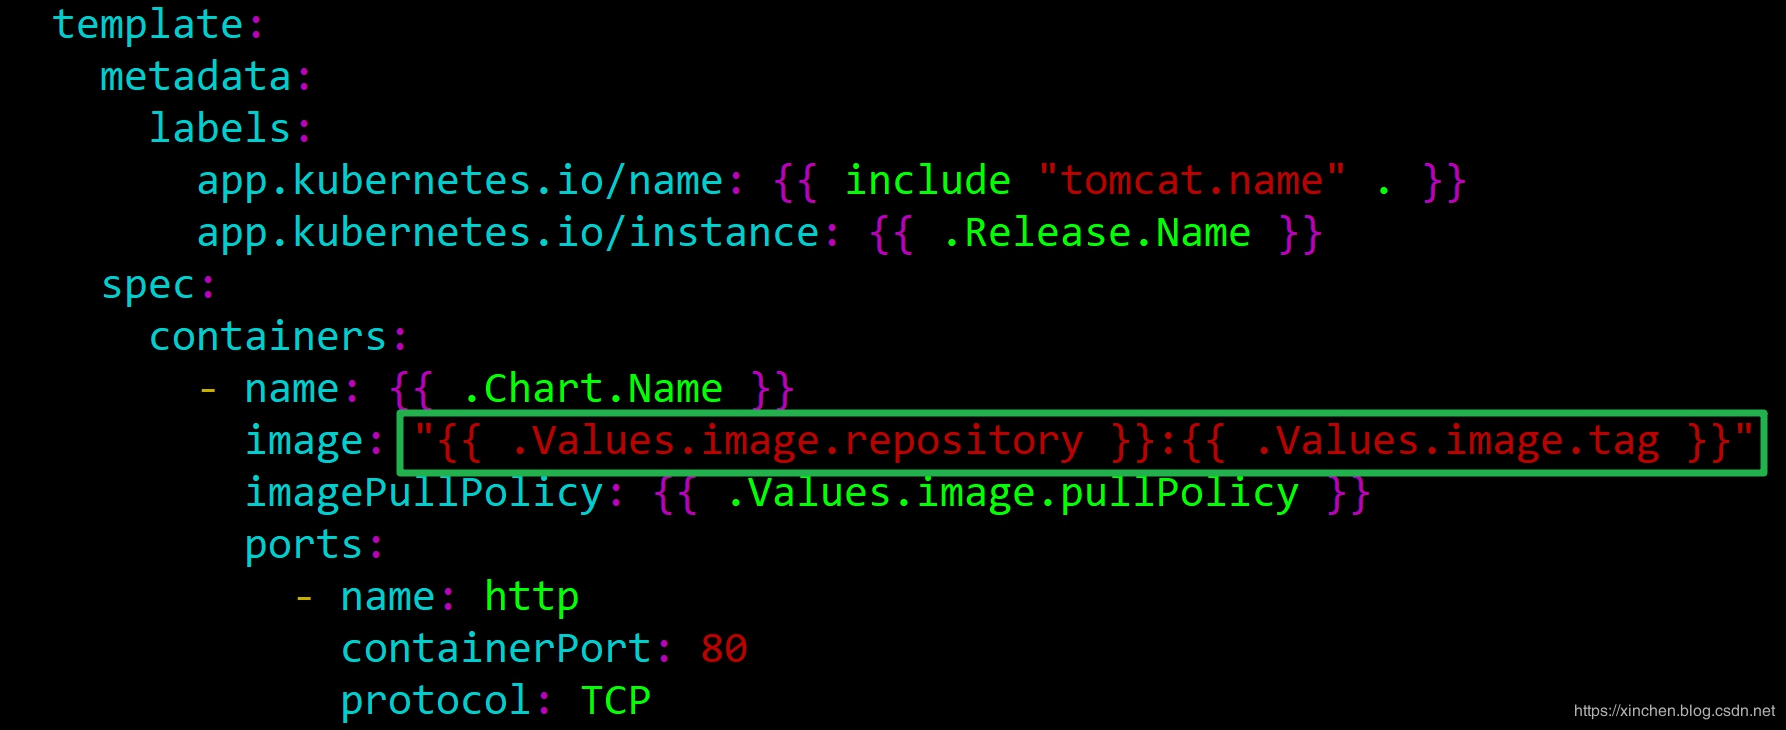
template目录中的deployment.yaml、service.yaml这些文件的内容,和我们平时创建pod和service时编写的yaml文件类似,不同之处在于很多配置的值并非固定,而是用变量代替了,以deployment.yaml中的镜像名称为例,如下图绿框所示:
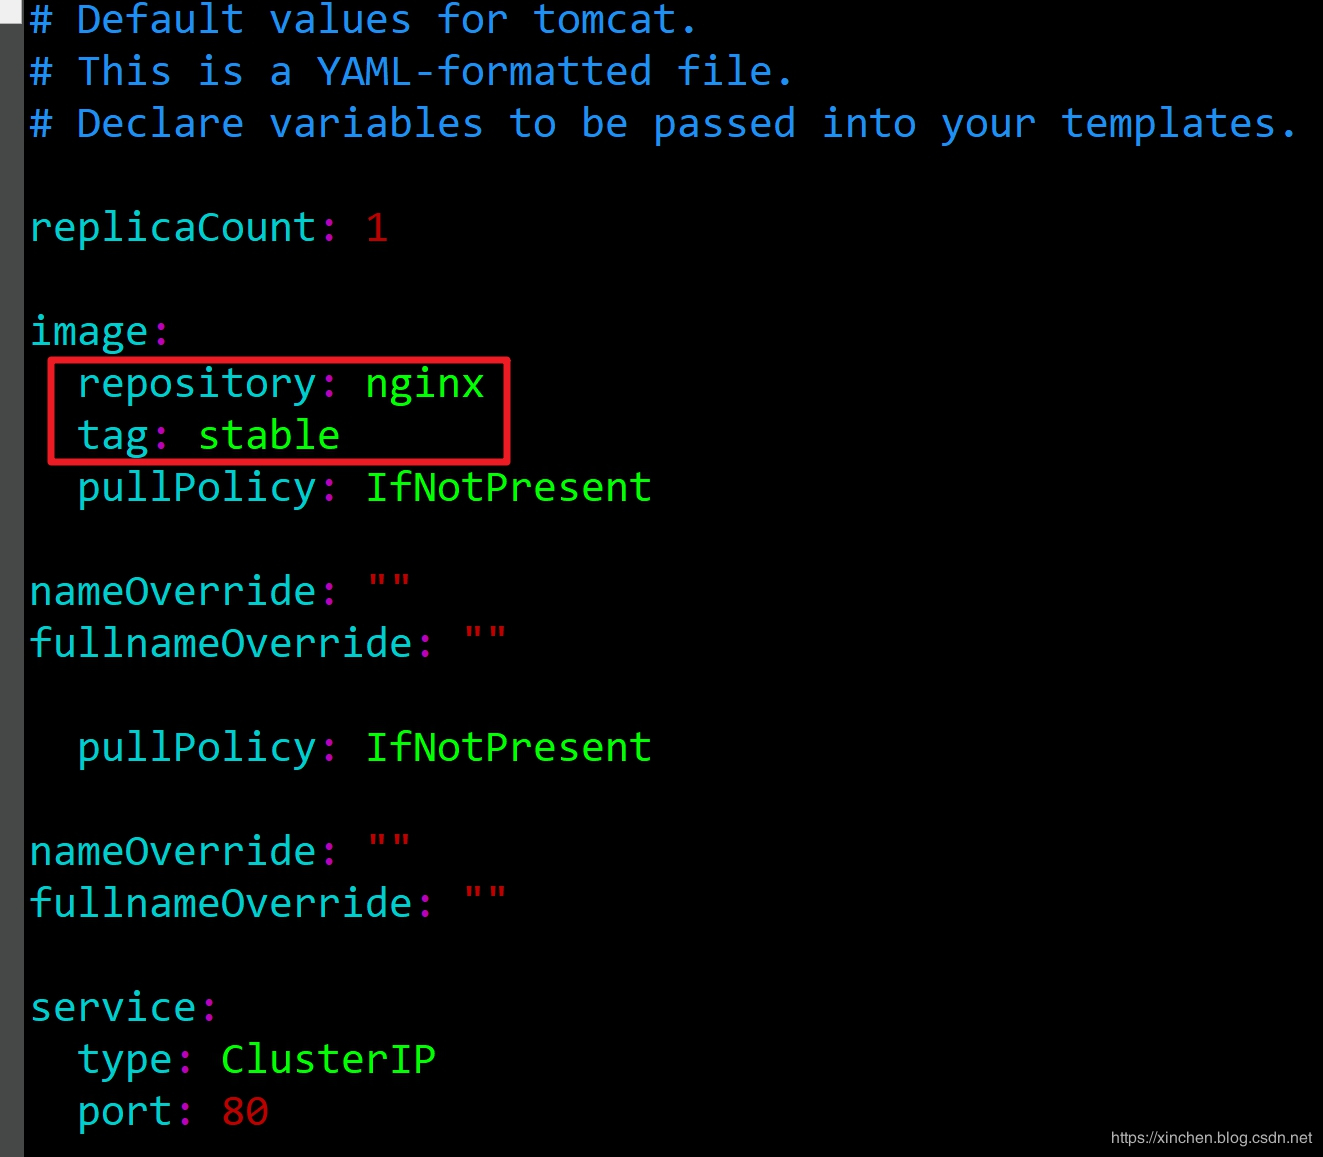
上图绿框中的变量是在tomcat/values.yaml中定义的,如下图红框所示,只要我们修改了其中的内容,也就完成了depoloyment.yaml中镜像的设置:

目前创建Chart已经成功,接下来就是修改deployment.yaml和vlues.yaml,改成tomcat所需的内容;
修改配置
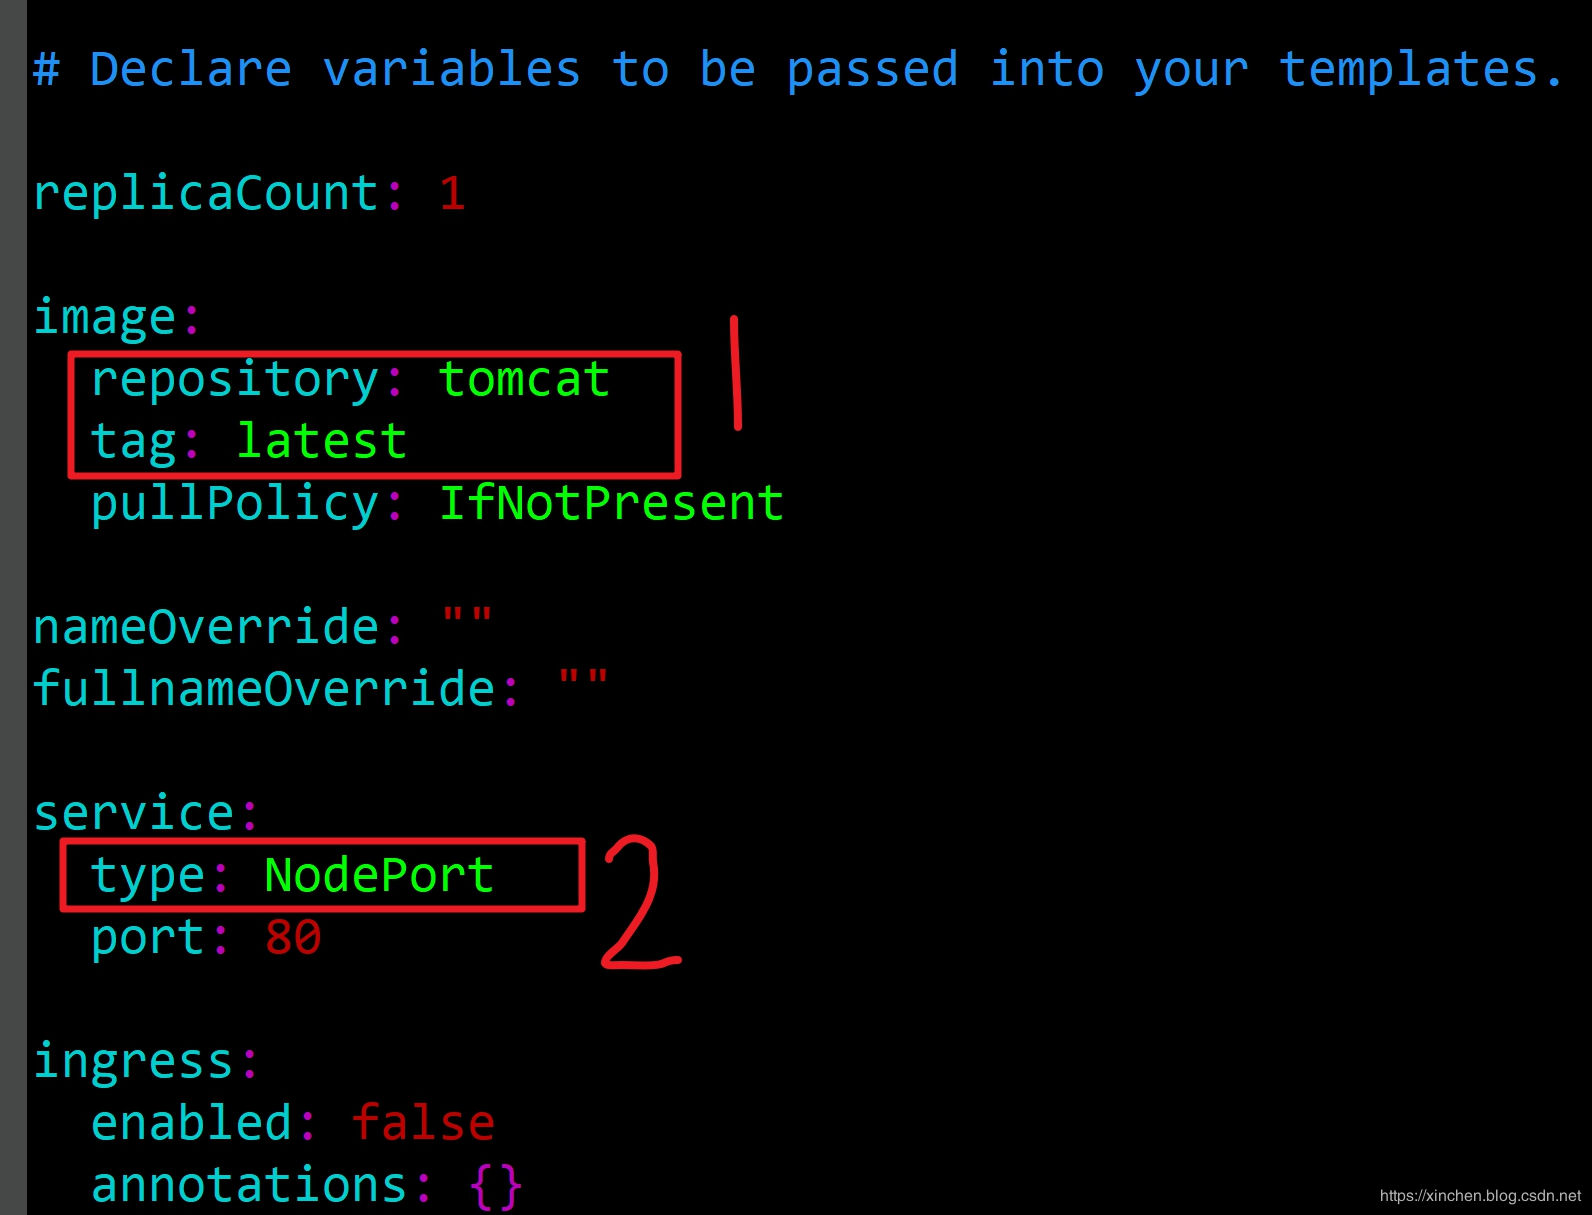
修改tomcat/values.yaml的内容,包括Pod镜像和版本、Service的类型,如下图的两个红框中的内容:
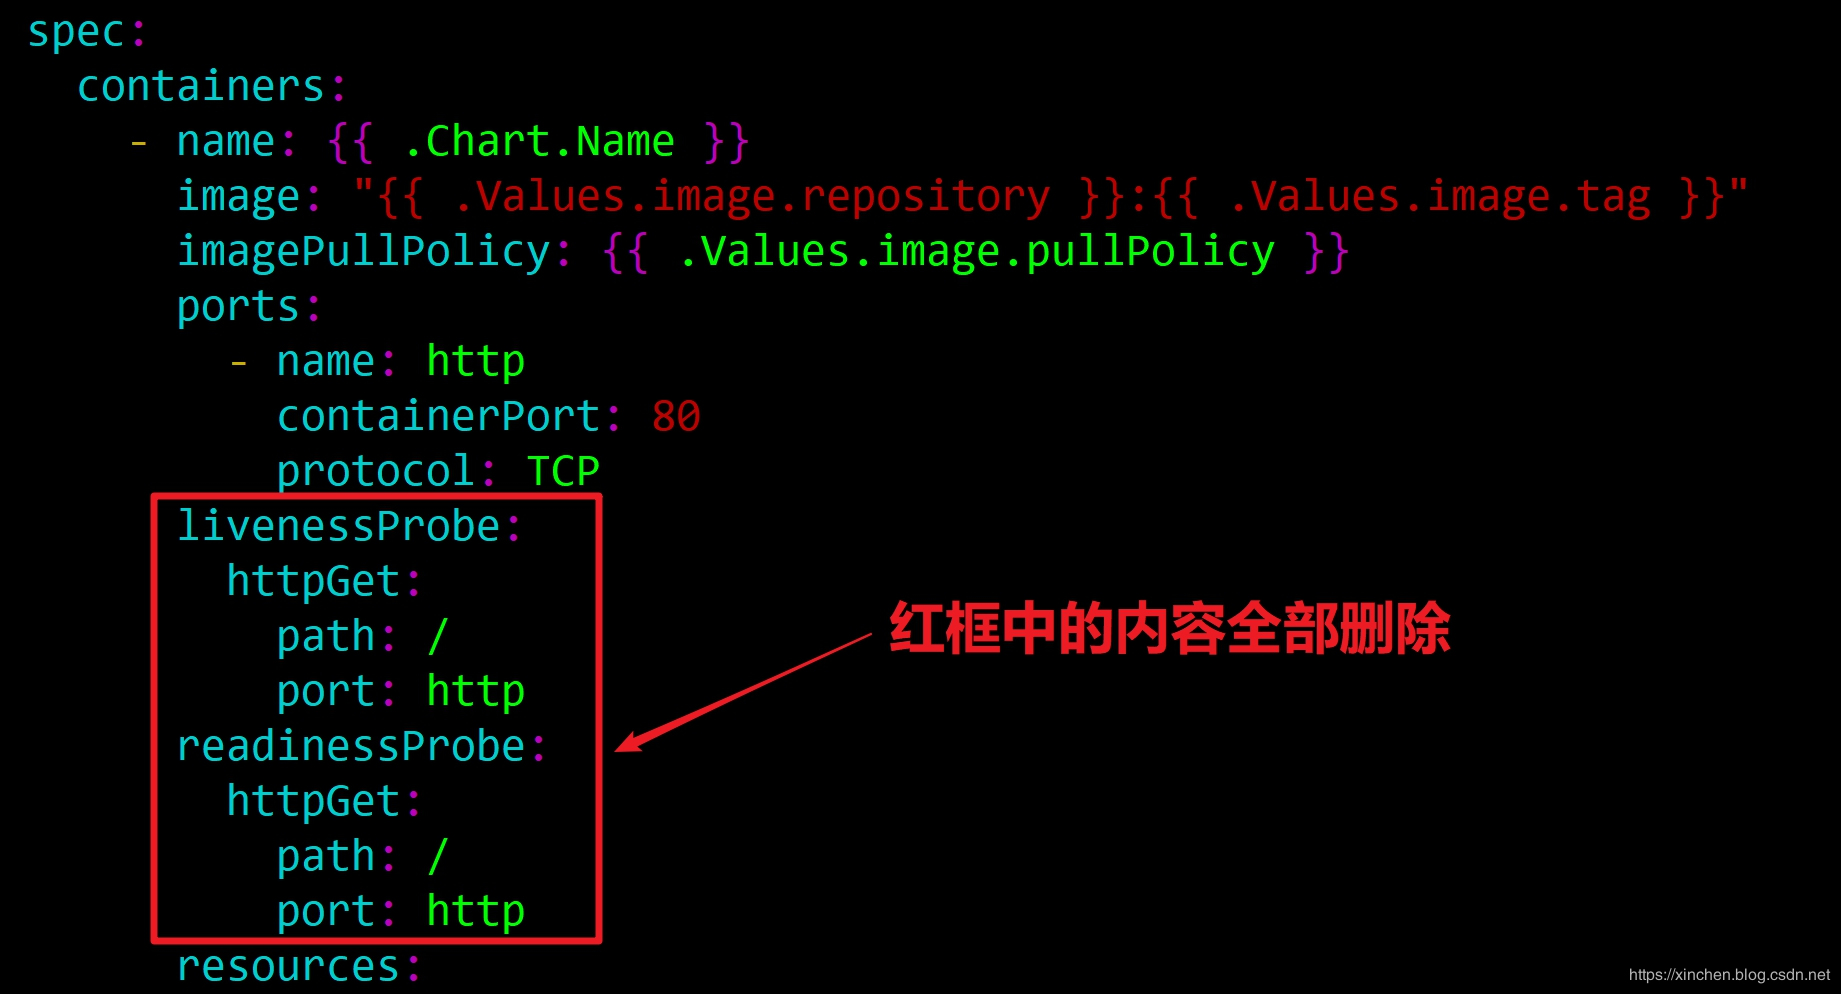
此次实战并没有准备好存活探针和就绪探针,所以这两个配置也要去掉,否则会导致创建Kubernetes判定创建Pod失败,修改方法是将deployment.yaml中如下图红框中的内容全部删除:
修改template/deployment.yaml中的内容,将端口从80改为8080,如下图红框所示:

至此,修改完毕,接下来尝试部署到Kubernetes环境;
检查和部署
在tomcat文件夹所在目录,输入以下命令,可以看到将values.yaml的值填写到deployment.yaml、service.yaml后的最终效果:
helm install --dry-run --debug tomcat
得到输出如下:
[root@master ~]# helm install --dry-run --debug tomcat
[debug] Created tunnel using local port: '42163'
[debug] SERVER: "127.0.0.1:42163"
[debug] Original chart version: ""
[debug] CHART PATH: /root/tomcat
NAME: virtuous-gorilla
REVISION: 1
RELEASED: Sat Mar 23 14:52:35 2019
CHART: tomcat-0.1.0
USER-SUPPLIED VALUES:
{}
COMPUTED VALUES:
affinity: {}
fullnameOverride: ""
image:
pullPolicy: IfNotPresent
repository: tomcat
tag: latest
ingress:
annotations: {}
enabled: false
hosts:
- chart-example.local
paths: []
tls: []
nameOverride: ""
nodeSelector: {}
replicaCount: 1
resources: {}
service:
port: 80
type: NodePort
tolerations: []
...
篇幅所限只展示了一部分输出,可见设置的值已经生效;
2. 执行命令helm install tomcat,即可部署当前的Chart到Kubernetes环境,控制台输出如下:
[root@master ~]# helm install tomcat
NAME: wistful-condor
LAST DEPLOYED: Sat Mar 23 14:54:27 2019
NAMESPACE: default
STATUS: DEPLOYED
RESOURCES:
==> v1/Service
NAME TYPE CLUSTER-IP EXTERNAL-IP PORT(S) AGE
wistful-condor-tomcat NodePort 10.108.155.239 <none> 80:32190/TCP 0s
==> v1/Deployment
NAME DESIRED CURRENT UP-TO-DATE AVAILABLE AGE
wistful-condor-tomcat 1 1 1 0 0s
==> v1/Pod(related)
NAME READY STATUS RESTARTS AGE
wistful-condor-tomcat-7c784699b8-zl7mm 0/1 ContainerCreating 0 0s
NOTES:
1. Get the application URL by running these commands:
export NODE_PORT=$(kubectl get --namespace default -o jsonpath="{.spec.ports[0].nodePort}" services wistful-condor-tomcat)
export NODE_IP=$(kubectl get nodes --namespace default -o jsonpath="{.items[0].status.addresses[0].address}")
echo http://$NODE_IP:$NODE_PORT
根据控制台的提示,我们输入以下命令,即可获取到外部访问此服务的地址:
export NODE_PORT=$(kubectl get --namespace default -o jsonpath="{.spec.ports[0].nodePort}" services wistful-condor-tomcat)
export NODE_IP=$(kubectl get nodes --namespace default -o jsonpath="{.items[0].status.addresses[0].address}")
echo http://$NODE_IP:$NODE_PORT
我这里得到的地址是:http://192.168.182.130:31768/
3. 在浏览器输入上述地址,可见访问tomcat服务成功,如下图:

4. 自定义Chart开发和验证都完成了,执行命令helm package tomcat即可将整个Chart的配置文件打包,方便在其他环境安装部署;
至此helm开发Chart实战就全部完成了,经历了此番实战,今后学习中如遇到公共仓库有不错的Chart,可用helm fetch xxx
将Chart包下载到本地来研究学习源码和配置,也可自己修改后再在本地install;