什么是SAMBA
Samba是在Linux和UNIX系统上实现SMB协议的一个免费软件,由服务器及客户端程序构成。SMB(Server Messages Block,信息服务块)是一种在局域网上共享文件和打印机的一种通信协议,它为局域网内的不同计算机之间提供文件及打印机等资源的共享服务。
SMB协议是客户机/服务器型协议,客户机通过该协议可以访问服务器上的共享文件系统、打印机及其他资源。通过设置“NetBIOS overTCP/IP”使得Samba不但能与局域网络主机分享资源,还能与全世界的电脑分享资源。
SAMBA的产生
在NetBIOS 出现之后,Microsoft就使用NetBIOS实现了一个网络文件/打印服务系统,这个系统基于NetBIOS设定了一套文件共享协议, Microsoft称之为SMB(Server Message Block)协议。这个协议被Microsoft用于它们Lan Manager和Windows NT服务器系统中,实现不同计算机之间共享打印机、串行口和通讯抽象(如命名管道、邮件插槽等)。
随着 Internet的流行,Microsoft希望将这个协议扩展到Internet上去,成为Inter net上计算机之间相互共享数据的一种标准。因此它将原有的几乎没有多少技术文档的SMB协议进行整理,重新命名为
CIFS(Common Internet File System),并打算将它与NetBIOS相脱离,试图使它成为Internet上的一个标准协议。
因此,为了让Windows和Unix计算机相集成,最好的办法即是在Unix计算机中安装支持SMB/CIFS协议的软件,这样Windows客户就不需要更改设置,就能如同使用Windows NT服务器一样,使用Unix计算机上的资源了。
Samba是用来实现SMB的一种软件,它的工作原理是,
让NETBIOS(Windows95网络邻居的通讯协议)和SMB(Server Message Block)这两个协议运行于TCP/IP通信协议之上,并且使用Windows的NETBEUI协议让Unix计算机可以在网络邻居上被Windows 计算机看到。
它的功能
1.共享Linux磁盘给Win95/NT
2.共享Win95/NT磁盘给Linux机器
3.共享Linux打印机给win95/NT
4.共享win95/NT打印机给Linux机器。
在windows当中我们最常见的就是网上邻居可以看到同一互联网上连接的所有用户,
在服务器端,linux与window Server相比的稳定性,安全性执行效率以及性价比都是较高的。所以好多window Server下跑的一些服务都会切换到运行在linux服务上,但是对于一些桌面用户来说用到的较多的就是文件共享协议。而在linux中我们可以使用 FTP NFS这类型文件共享协议,但是对于window上比较简单的直接打开的服务在linux中的nfs协议来说是不能在window上使用的这种直接将文件系统共享出来的协议为SMB。
与ftp的区别是不用将文件下载下来在使用,是直接可以在共享中打开使用的,所以说这种共享方式在使用当中是非常方便的,但是SMB是window当中的一种私有协议。即使如此在linux当也提供对SMB协议的一种支持。(虽然是window下的私有协议但是我们的开源技术团队为我们的linux也提供了这种服务称为samba服务,在开发过程中也是相当的艰苦 ,由于在window下是闭源的所以开发者是通过抓包分析window下所产生的数据包来实现的。弄清楚它的一个原理。)
SMB(Server Message block)协议是window下所使用的文件共享协议,我们在linux系统或者其类unix系统当中可以通过samba服务来实现SMB功能。
linux下的实现
Samba服务是SMB的一个开源实现,而smb的一些主要功能如下:
1. 通过SMB协议进行文件共享
2. 通过SMB协议进行打印共享(我们可以通过在linux上通过smb配置打印服务器,为window提供打印服务)
3. 加入一个windows2000/2003/2008域环境
(在企业环境当中应用最多,目前smb是支持这三种主流的window服务操作系统的,好多企业当中整个的企业环境当中是使用window的域环境进行管理的,而所有的用户组,权限,组策略信息都是在window域环境进行配置的,那么但是我们的企业又想把一些应用服务和需要用到的一些域环境进行认证或者是做权限控制的这些应用服务去切换到linux系统当中,那在这种情况下就涉及到我如何和window下的这些域环境进行兼容,那么smb是可以加入window域环境当中,并且是可以和window下的这些域环境进行认证操作的。所以smb这个协议是相当强大的不仅限于只是实现文件共享)
4. 通过windows域环境进行认证操作。
SMB协议又称为CIFS(Common Internet File System)协议
SAMBA
安装samba
Yum install samba -y
Samba拥有两个主服务(相关服务),对于一般使用的服务他只有一个主服务
smbd (提供samba核心功能也是使用最多的一种功能) 提供文件及打印共享服务功能,使用139/445端口
nmbd 提供Netbios(解析协议慢慢的被淘汰)支持,使用137/138端口,而对于这种协议使用较少,现在都是dns进行解析
一般作为文件共享使用samba,则只需要smbd服务
SAMBA配置文件
Samba的配置文件为/etc/samba/smb.conf
配置文件分为三个部分:
[global] 定义全局性配置(配置samba服务的相关参数)

[homes] 定义对用户家目录的共享配置(其实在默认情况下不做任何设置,直接启用服务我们就可以通过smb协议访问所有用户的家目录)
[printers] 定义打印机共享配置

独立环境下(不和任何域环境有关系)的samba常用的global配置如下:
SAMBA

服务:
	smbd
	nmbd

使用的端口:
Port 137	Used for NetBIOS network browsing
Port 138	Used for NetBIOS name service
Port 139	Used for file and printer sharing and other operations
Port 445	Used by Windows 2000/XP when NetBIOS over TCP/IP is disabled
[global]
	workgroup = MYGROUP   定义该Samba服务器所在的工作组或者域(如果下面的security=domain的话)
	server string = Samba Server Version %v
	设定机器的描述,当我们通过网络邻居访问的时候可以在备注里面看见这个内容,而且还可以使用%v = Samba服务的版本号。
	log file = /var/log/samba/log.%m   定义记录文件的位置LogFileName
	max log size = 50
	定义记录文件的大小size(单位是KB,如果是0的话就不限大小)
	security = user
	定义Samba的安全级别,按从低到高分为四级:share,user,server,domain。它们对应的验证方式如下:
	* share:没有安全性的级别,任何用户都可以不要用户名和口令访问服务器上的资源。
	* user:samba的默认配置,要求用户在访问共享资源之前资源必须先提供用户名和密码进行验证。
	* server:和user安全级别类似,但用户名和密码是递交到另外一个服务器去验证,比如递交给一台NT服务器。如果递交失败,就退到user安全级。
	* domain:这个安全级别要求网络上存在一台Windows的主域控制器,samba把用户名和密码递交给它去验证。
	后面三种安全级都要求用户在本Linux机器上也要系统帐户。否则是不能访问的。
	load printers = yes
[homes]
在smb.conf文件中一般没有对这个目录的设定特定内容比如路径等。当客户机发出服务请求时,就在smb.conf文件的其它部分查找友特定内容的服务。如果没有发现这些服务,并且提供了homes段时,那么就搜索密码文件得到用户的Home目录。通过Homes段,Samba可以得到用户的Home目录并使之共享。下面是这个段的最基本的几个设置。
	comment = Home Directories
	browseable = no
	writable = yes
[printers]
	comment = All Printers
	path = /var/spool/samba
	browseable = no
	guest ok = no
	writable = no
	printable = yes
	write list = +staff   @用来指定可以在该共享下写入文件的用户
这里printable指明该打印机可以打印, guest ok说明游客也能打印,path指明打印的文件队列暂时放到/var/spool/samba目录下。
samba的使用
yum install samba -y  ##安装服务
systemctl stop firewalld.service  #关闭防火墙
systemctl restart smb nmb  #启动samba
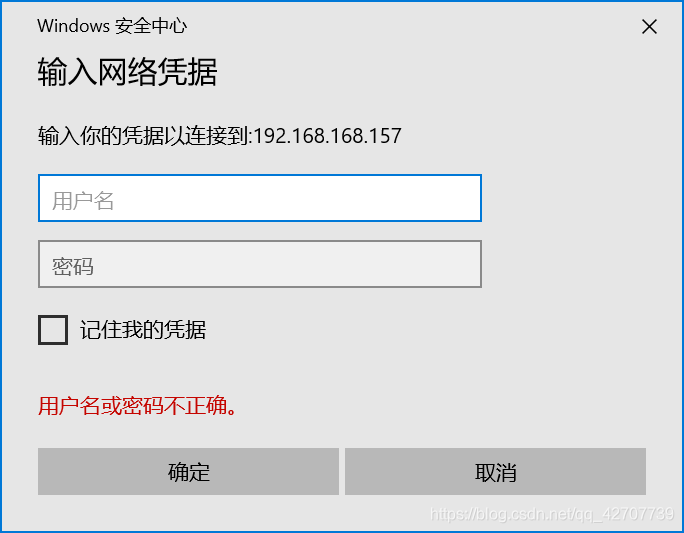
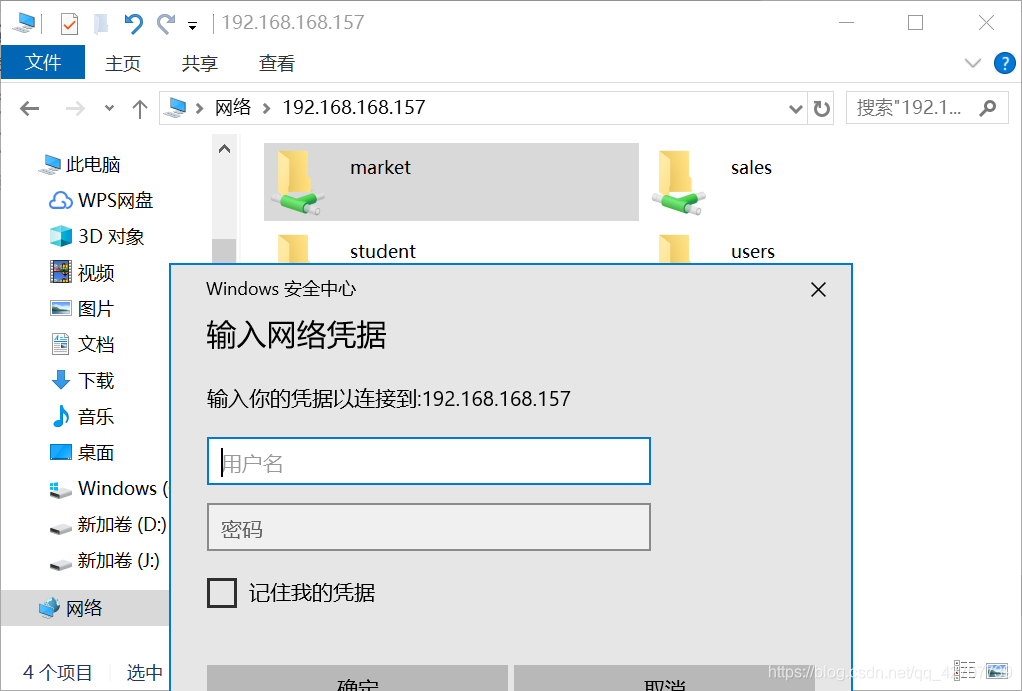
此时可以进行测试:资源栏输入\ip
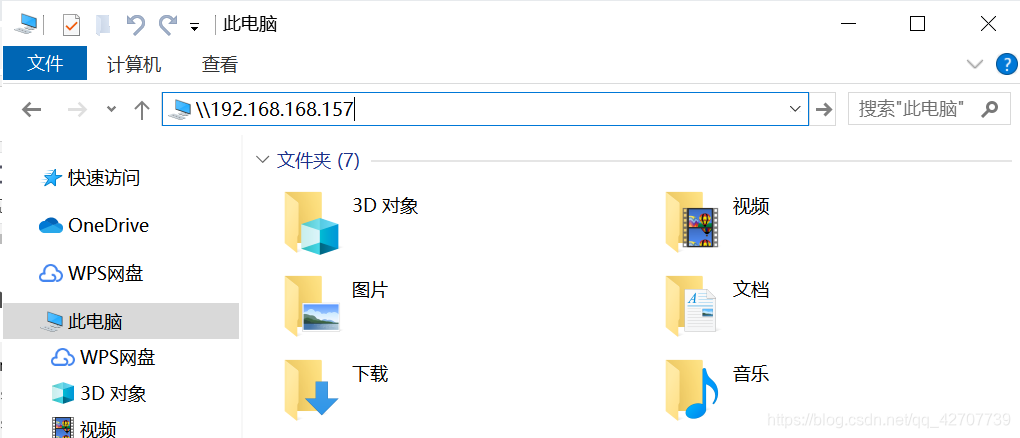
可以看到需要使用凭证登录上去,此时是无凭证的,没有创建可以连接的用户,下面进行用户的创建。
需要有用户,才能有可以访问的用户,故先创建用户:
 useradd user1 --password redhat  ##创建三个用户
 useradd user2 --password redhat
 useradd user3 --password redhat
[root@localhost ~]# smbpasswd -a user1  ##将用户添加为smb用户
New SMB password:
Retype new SMB password:
Added user user1.
[root@localhost ~]# smbpasswd -a user2
New SMB password:
Retype new SMB password:
Added user user2.
[root@localhost ~]# pdbedit -L    ##查看smb用户
user1:1001:
user2:1002:
此时进行测试,使用smb用户进行登录:

案例1
要求:
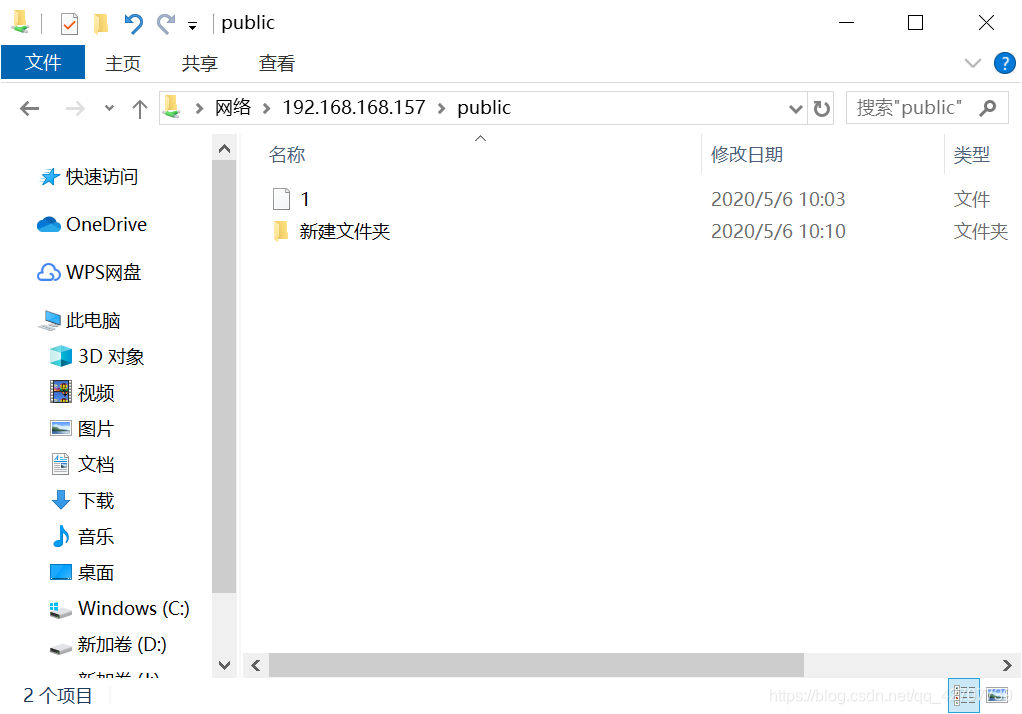
1、通过samba实现公司的文件交换服务器,
2、实现/public 目录让所有人访问,所有人都可以写入文件
配置示例:
[root@localhost samba]# cat smb.conf
[global]
workgroup =MYGROUP
Server string =
Security = user
[public]
path = /public
public = yes
comment = file
writable = yes
注意:selinux开启的状态下,需要执行:chcon -t samba_share_t /public -R
用户控制:本地用户
1. public =所有用户都可以访问 /guest ok=yes/no
2. map to guest = Bad User 匿名访问
3. browseable = 可浏览(设置共享是否可游览,如果是no表示隐藏,通过ip+共享名进行访问)
4. writable = yes 可写,还要看目录权限 rw
5. write list = maomao,@GROUPNAME,+GROUPNAME
6. read only = yes 只读设置 ro
7. create mask = 0644 客户机创建文件权限
8. directory mask = 0755 客户机创建目录的权限
9. valid user = //允许
invalid = user1,user2,@group1//禁止登录用户,用户用逗号隔开,组用@ //禁止
访问控制
10. max connections = 最大连接数目
11. deadtime = 断掉连接时间(分钟,0为不限制)
12. hosts allow = 允许主机
13. hosts deny = 拒绝主机 允许优先
查看目录权限:没有写权限
修改权限:[root@localhost /]# chmod 777 /public
清空主机连接。
重新连接进行测试

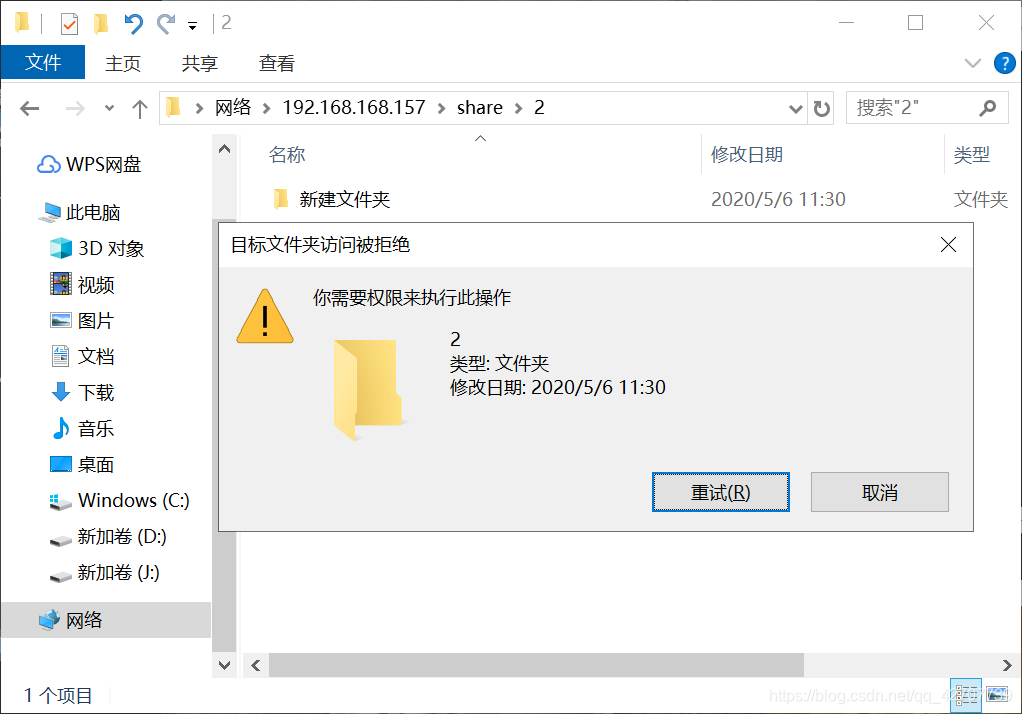
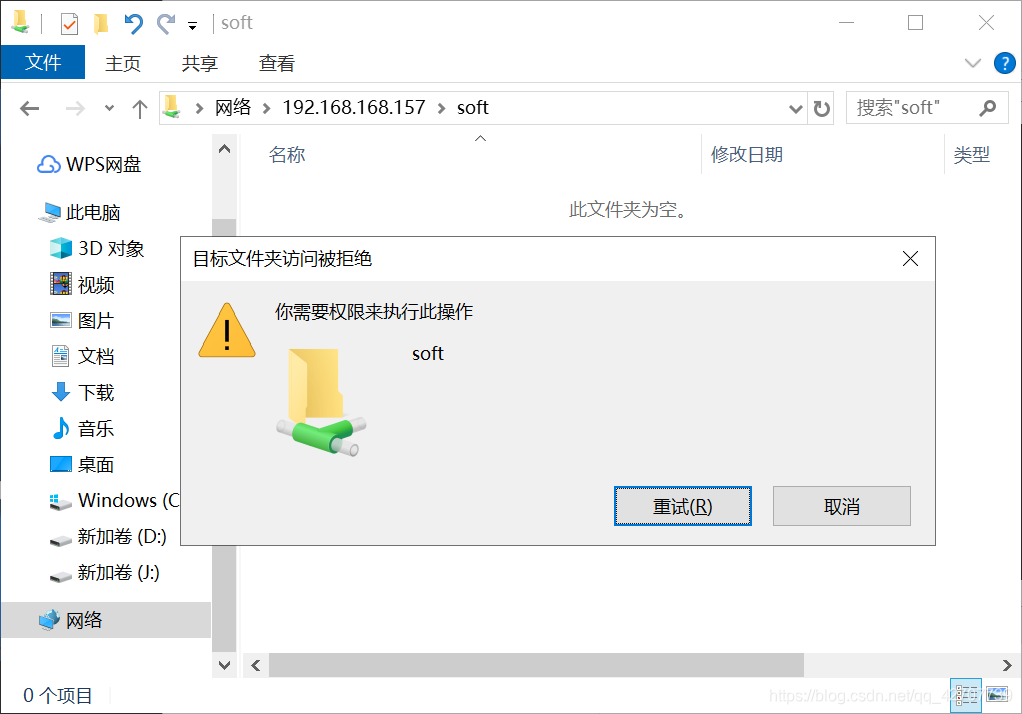
案例2
要求:
1、通过samba提供一个公共文件服务器,所有人都可以访问并写入,但是当前用户不可以删除和修改他人的文件。
2、技术部需要一个文件服务器,用于存放常用的软件工具,所有人都可以访问,但是只有技术部可以写入
配置文件中添加share目录进行共享
[share]
        path = /share
        public = yes
        comment = file
        writable = yes
        Create mask = 0644
        directory mask = 755

[root@localhost /]# mkdir /share  #创建文件,修改文件权限
[root@localhost /]# vim /etc/samba/smb.conf
[root@localhost /]# ll -d /share
drwxr-xr-x. 2 root root 6 May  6 11:24 /share
[root@localhost /]# chmod 777 /share
[root@localhost /]# chmod o+t /share
[root@localhost /]# ll -d /share
drwxrwxrwt. 2 root root 6 May  6 11:24 /share

[root@localhost /]# systemctl restart nmb smb  # 测试
不同的用户登录后可以创建文件,不通用户不能修改其他用户创建的文件:其中2代表user2,1代表user1.

2.
修改配置文件,添加如下内容:
[soft]
path = /soft
public = yes
comment = soft
writable = no
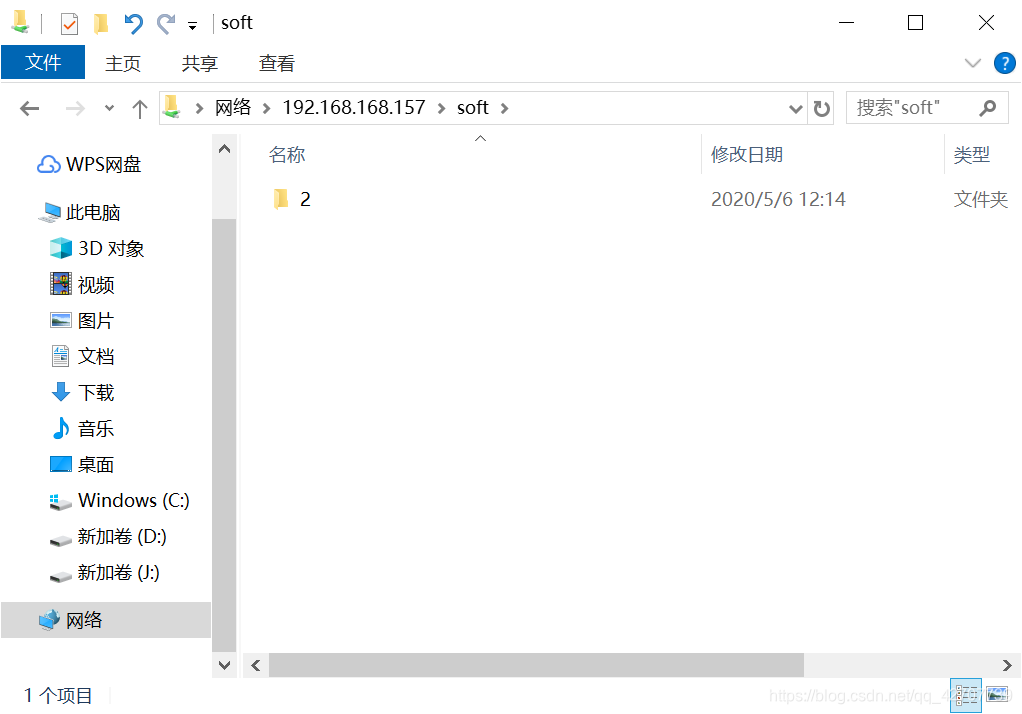
write list = @jishubu
[root@localhost ~]# mkdir /soft 创建文件
[root@localhost ~]# ll -d /soft
drwxr-xr-x. 2 root root 6 May 6 12:10 /soft 文件权限
[root@localhost ~]# groupadd jishubu 创建技术部组
[root@localhost ~]# gpasswd -M user2,redhat jishubu 将用户添加到组内
[root@localhost ~]# setfacl -m g:jishubu:rwx /soft 修改文件权限
[root@localhost ~]# ll -d /soft
drwxrwxr-x+ 3 root root 15 May 6 12:14 /soft
[root@localhost ~]# systemctl restart nmb smb 重启测试
这里记得清理缓存
用户1:
user2:具有权限,在组技术部当中。
基于Linux可以访问,在linux中测试:
访问会询问是否用户登录或者匿名登录。
根据设置的文件权限
在linux命令行下访问:
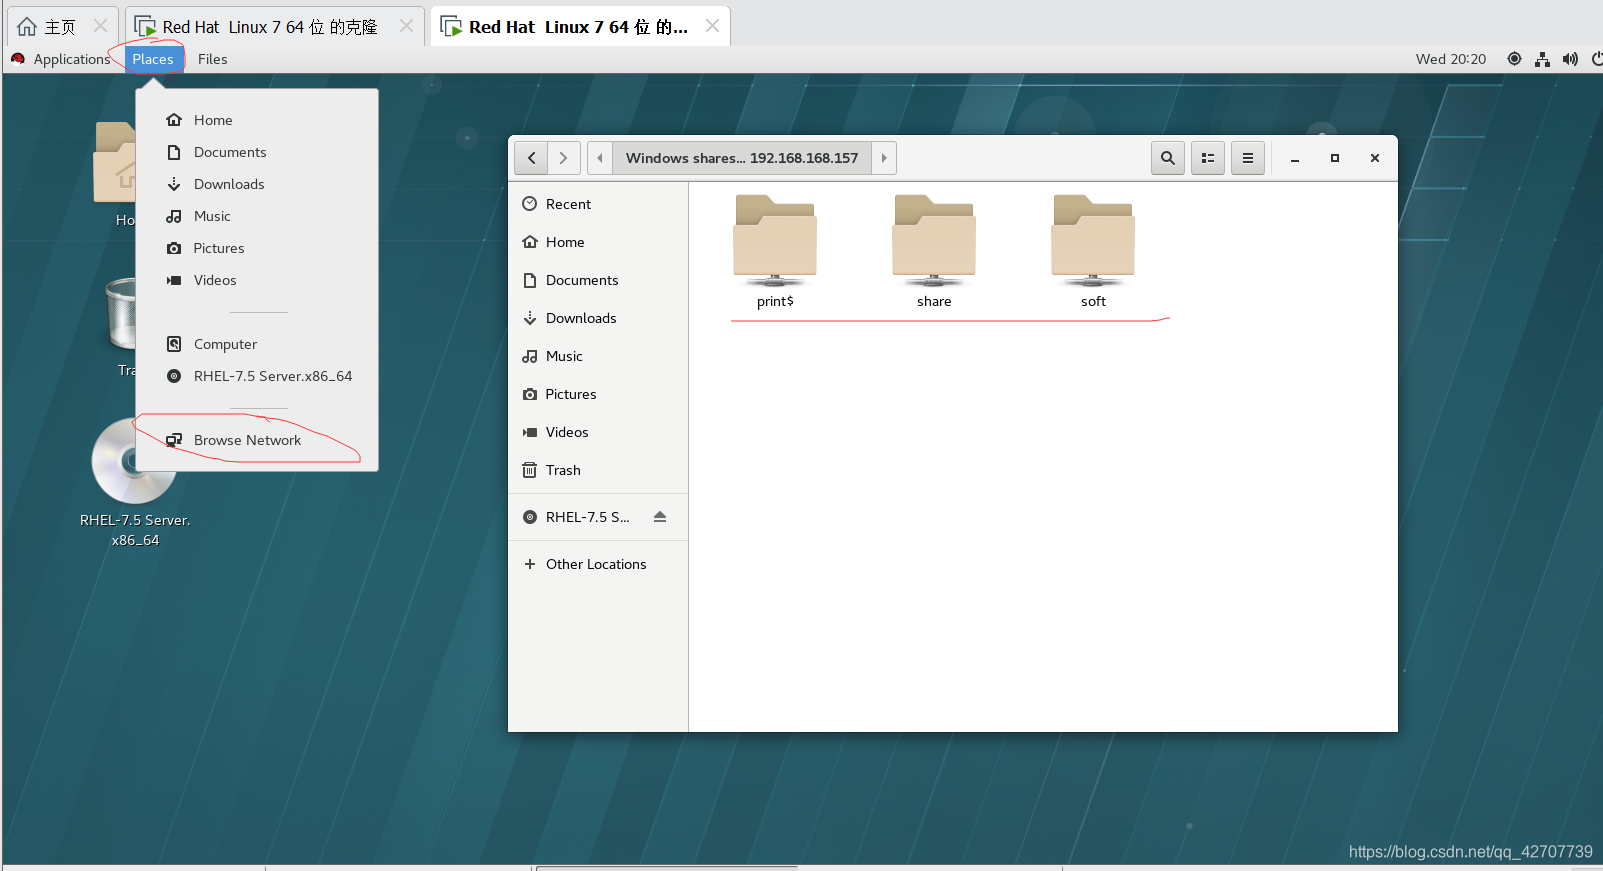
[root@localhost ~]# yum install samba-client -y 安装客户端
[root@localhost ~]# smbclient -L //192.168.168.157 查看共享的目录
Enter SAMBA\root's password:
Anonymous login successful
Sharename Type Comment
--------- ---- -------
print$ Disk Printer Drivers
share Disk file
soft Disk soft
IPC$ IPC IPC Service (Samba Server Version 4.7.1)
Reconnecting with SMB1 for workgroup listing.
Anonymous login successful
Server Comment
--------- -------
Workgroup Master
--------- -------
MYGROUP LOCALHOST
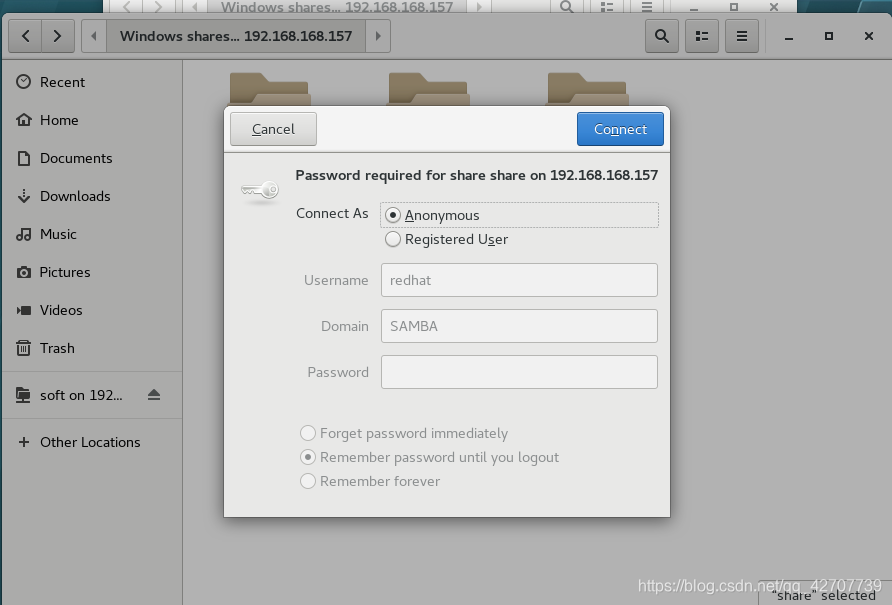
[root@localhost ~]# smbclient //192.168.168.157/share -U user1 ##去掉-L,ip后指定目录,接用户
Enter SAMBA\user1's password:
Try "help" to get a list of possible commands.
smb: \> ls
. D 0 Wed May 6 11:32:02 2020
.. DR 0 Wed May 6 12:10:55 2020
2 D 0 Wed May 6 11:30:18 2020
1 D 0 Wed May 6 11:32:00 2020
36805060 blocks of size 1024. 32572008 blocks available
smb: \> exit
#挂载使用资源
mount //192.168.168.157/share /share -o username=user1,password=redhat
#开机自动挂载
//192.168.168.157/share /pub cifs defaults,username=user1,password=redhat 0 0
挂载后:在目录下操作和前面没有区别。
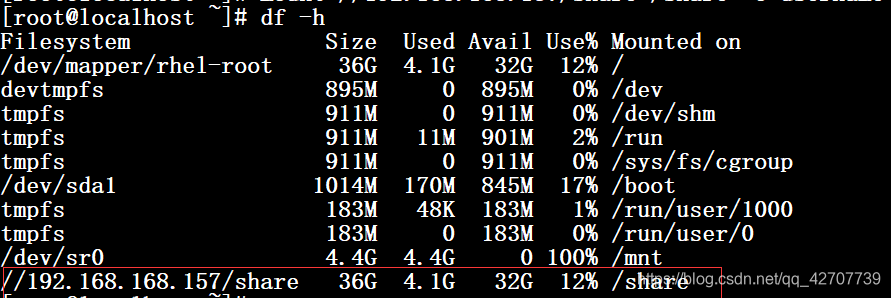
在服务端可以清楚的看到登陆者创建的文件

实例
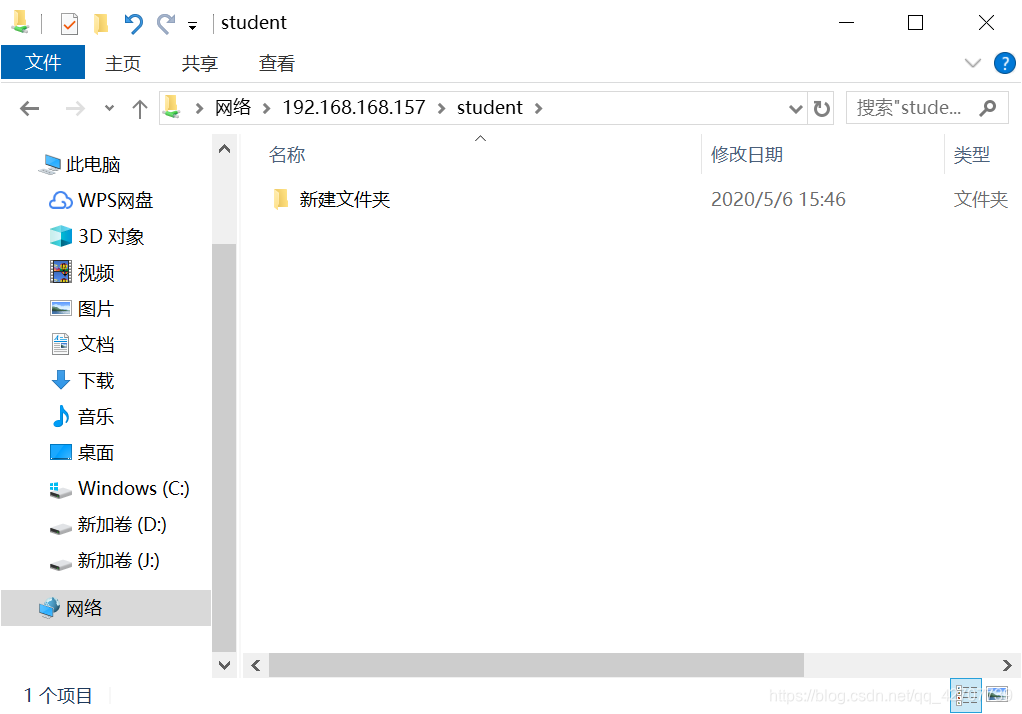
- 建立共享目录student,它的本机路径为/home/student,只有teacher组的用户可以读写该目录,student用户只能读取。
[root@localhost ~]# mkdir /home/student   #创建文件
[root@localhost ~]# groupadd students   ##创建组
[root@localhost ~]# groupadd teacher
[root@localhost ~]# useradd -g students user11   组中添加用户
[root@localhost ~]# useradd -g teacher user22
[root@localhost ~]# smbpasswd -a user11  # 添加为samba用户
New SMB password:
Retype new SMB password:
Added user user11.
[root@localhost ~]# smbpasswd -a user22
New SMB password:
Retype new SMB password:
Added user user22.

[root@localhost ~]# chmod 757 /home/student    ##修改文档访问权限
[root@localhost ~]# chmod g+s /home/student
[root@localhost ~]# ll -d /home/student/
drwxr-srwx. 2 root root 6 May  6 15:36 /home/student/
[root@localhost ~]# vim /etc/samba/smb.conf
###添加如下内容
[student]
        path = /home/student
        comment = student
        write list = @teacher
        valid users = @teacher @students
#####
[root@localhost ~]# systemctl restart smb nmb
测试:students组
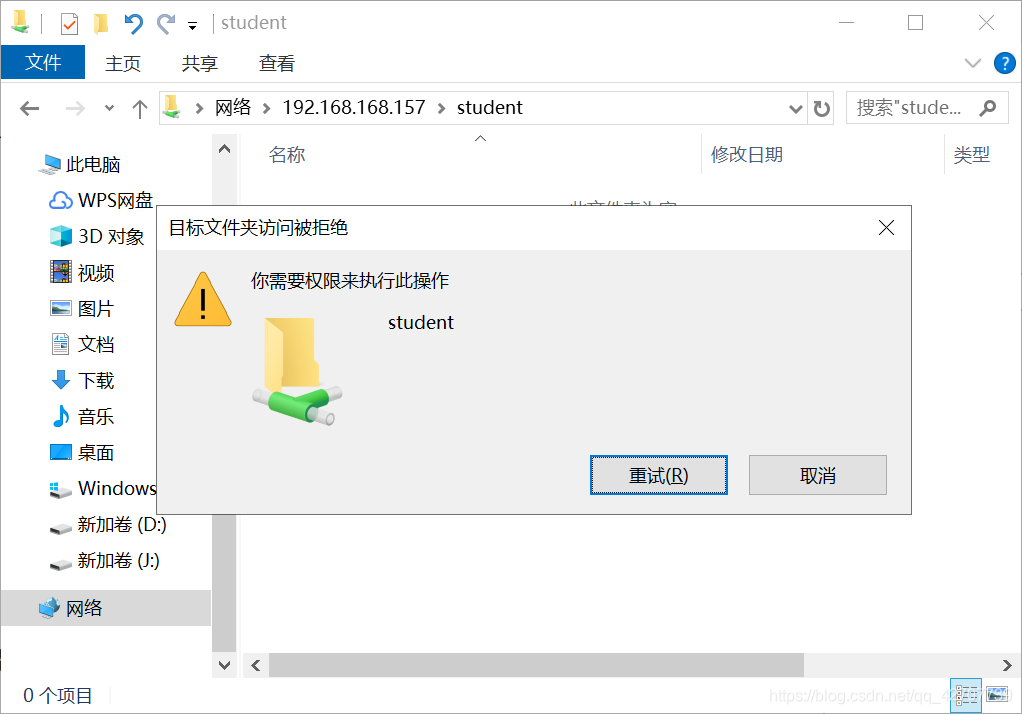
teacher组,
- 公司有两个部门,sales和market,两个部门都有单独的共享目录,只可以总经理和相应部门员工访问,并且公司员工禁止访问非本部门的共享目录。
[root@localhost ~]# mkdir /home/sales ##创建部门共享目录
[root@localhost ~]# mkdir /home/market
[root@localhost ~]# groupadd sales ##创建组
[root@localhost ~]# groupadd market
[root@localhost ~]# useradd -g sales users ##组内添加用户
[root@localhost ~]# useradd -g market userm
[root@localhost ~]# useradd ceo ##添加部门经理
[root@localhost ~]# passwd ceo
Changing password for user ceo.
New password:
BAD PASSWORD: The password is shorter than 8 characters
Retype new password:
passwd: all authentication tokens updated successfully.
[root@localhost ~]# smbpasswd -a users ##
New SMB password:
Retype new SMB password:
Mismatch - password unchanged.
Unable to get new password.
[root@localhost ~]# chgrp sales /home/sales/ ##修改目录权限
[root@localhost ~]# chgrp market /home/market/
[root@localhost ~]# chown ceo /home/sales/
[root@localhost ~]# chown ceo /home/market/
[root@localhost ~]# chmod 770 /home/sales/
[root@localhost ~]# chmod 770 /home/market/
[root@localhost ~]# chmod g+s /home/sales/
[root@localhost ~]# chmod g+s /home/market/
在配置文件中添加如下内容:
[sales]
path = /home/sales
comment = sales
write list = @sales ceo
valid users = @sales ceo
create mask = 0770
directory mask = 0770
[market]
path = /home/market
comment = market
write list = @market ceo
valid users = @market ceo
create mask = 0770
directory mask = 0770
[root@localhost ~]# smbpasswd -a users ##将用户添加为samba用户
New SMB password:
Retype new SMB password:
Added user users.
[root@localhost ~]# smbpasswd -a userm
New SMB password:
Retype new SMB password:
Added user userm.
[root@localhost ~]# smbpasswd -a ceo
New SMB password:
Retype new SMB password:
Added user ceo.
[root@localhost ~]# systemctl restart smb nmb
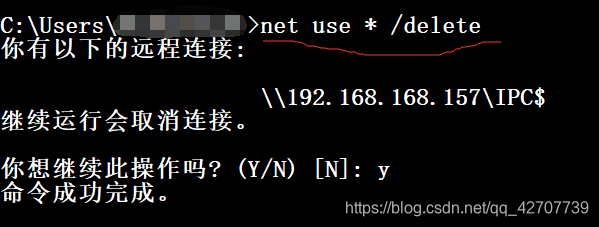
重启进行测试。记得清理缓存。
sales下:
sales下的部门员工:
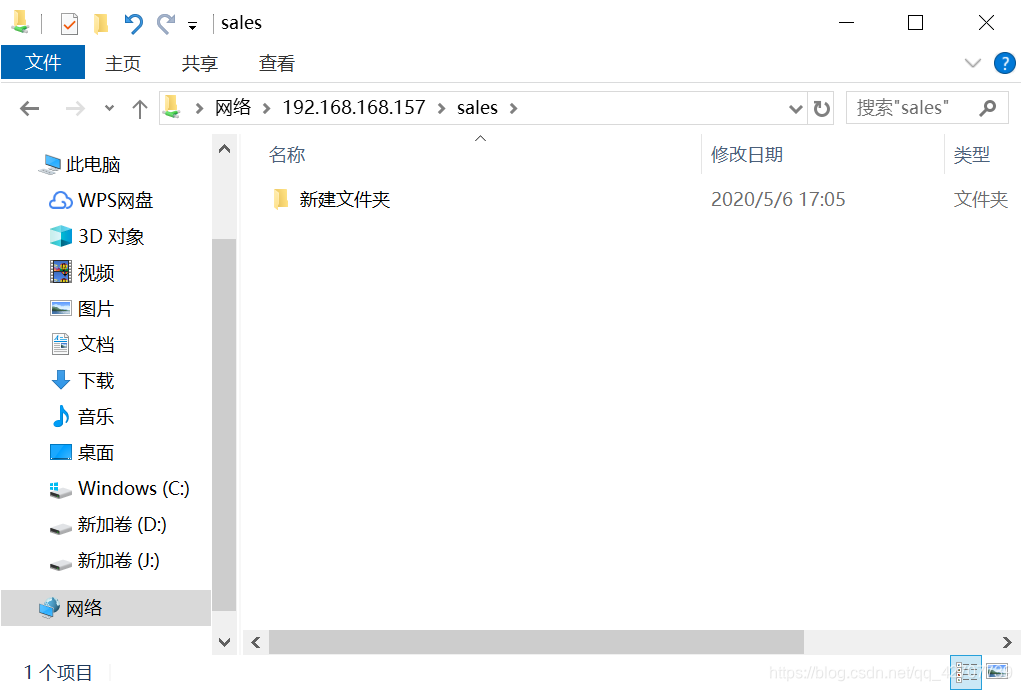
可以登录到自己目录下,不能去其他部门目录
market下:
使用market下的用户进行登录:
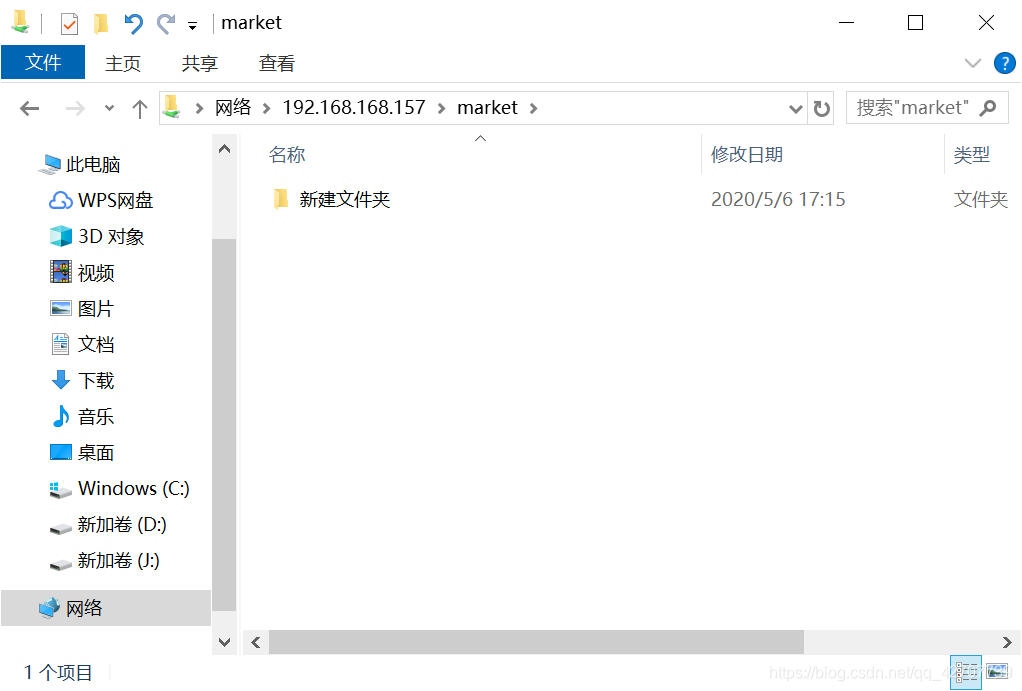
同样只能访问自己所在部门目录:
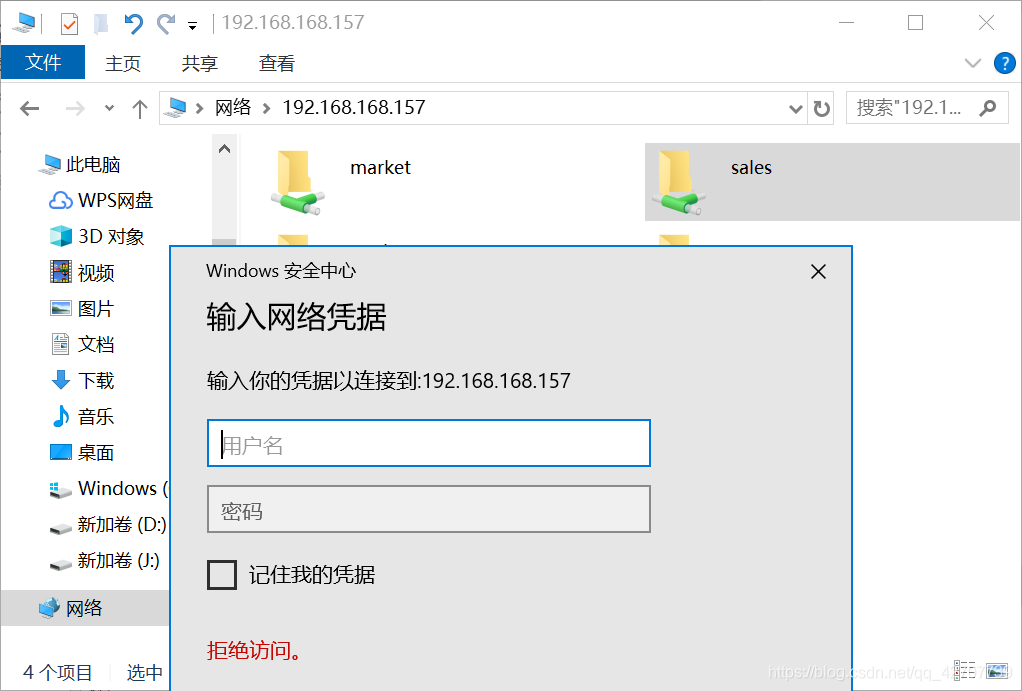
部门经理ceo:
部门经理ceo可以随时访问两个部门的内容:

贪安稳就没有自由,要自由就要历些危险。只有这两条路。
如果你也喜欢这篇博客,给他点个赞吧!