目录
代码块1:createWebApplicationContext
代码块3:configureAndRefreshWebApplicationContext
代码块8:new StandardServletEnvironment()
代码块10:customizePropertySources
代码块13:determineContextInitializerClasses
Spring IoC源码学习全系列
Spring IoC源码学习:ApplicationContext 刷新前的配置
Spring IoC源码学习:obtainFreshBeanFactory详解
Spring IoC源码学习:parseDefaultElement详解
Spring IoC源码学习:parseCustomElement详解
Spring IoC源码学习:obtainFreshBeanFactory详解
Spring IoC源码学习:invokeBeanFactoryPostProcessors详解
Spring IoC源码学习:registerBeanPostProcessors详解
Spring IoC源码学习:finishBeanFactoryInitialization详解
Spring IoC源码学习:createBean详解(上)
Spring IoC源码学习:createBean详解(下)
Spring IoC源码学习:finishRefresh 详解
前言
在 Spring IoC:源码学习总览 中,我们简单介绍了 IoC 过程最重要的一个方法,也就是 AbstractApplicationContext#refresh() 方法,在正式学习 refresh 方法之前,还有一些刷新前的操作比较重要,本文将对这部分内容进行介绍。
正文
web.xml 配置
<?xml version="1.0" encoding="UTF-8"?>
<web-app version="2.5" xmlns="http://java.sun.com/xml/ns/javaee"
         xmlns:xsi="http://www.w3.org/2001/XMLSchema-instance"
         xsi:schemaLocation="http://java.sun.com/xml/ns/javaee
         http://java.sun.com/xml/ns/javaee/web-app_2_5.xsd">
    <display-name>open-joonwhee-service WAR</display-name>

    <context-param>
        <param-name>contextConfigLocation</param-name>
        <param-value>
            classpath*:config/spring/appcontext-*.xml
        </param-value>
    </context-param>

    <listener>
        <listener-class>org.springframework.web.context.ContextLoaderListener</listener-class>
    </listener>
</web-app>
该 web.xml 是一个使用了 Spring 框架的项目的最基本的配置,配置了 ContextLoaderListener 和 contextConfigLocation。其中 ContextLoaderListener 是 Spring 的入口,而 contextConfigLocation 是 Spring 配置文件的路径。
接下来,让我们从 ContextLoaderListener#contextInitialized 开始 IoC 的构建。
进入 ContextLoaderListener#contextInitialized 方法之前,由于 ContextLoaderListener 继承了 ContextLoader,需要先将 ContextLoader 的成员变量初始化。在 ContextLoader 的成员变量中,defaultStrategies 属性的初始化比较重要,下面拿出来单独介绍。
defaultStrategies 属性初始化
private static final String DEFAULT_STRATEGIES_PATH = "ContextLoader.properties";


private static final Properties defaultStrategies;

static {
    // Load default strategy implementations from properties file.
    // This is currently strictly internal and not meant to be customized
    // by application developers.
    try {
        // 1.根据 DEFAULT_STRATEGIES_PATH(ContextLoader.properties) 和 ContextLoader.class 构建 ClassPathResource,
        // path在这边为相对路径,全路径为:org.springframework.web.context.ContextLoader.properties
        ClassPathResource resource = new ClassPathResource(DEFAULT_STRATEGIES_PATH, ContextLoader.class);
        // 2.加载resource的属性,在这边我们拿到了默认的WebApplicationContext,即:XmlWebApplicationContext
        defaultStrategies = PropertiesLoaderUtils.loadProperties(resource);
    } catch (IOException ex) {
        throw new IllegalStateException("Could not load 'ContextLoader.properties': " + ex.getMessage());
    }
}
1.根据 DEFAULT_STRATEGIES_PATH 和 ContextLoader.class 构建 ClassPathResource。ClassPathResource 的 path 属性可以是绝对路径也可以是相对路径,在这边为相对路径(相对于加载资源的类 ContextLoader),指向的绝对路径为:org.springframework.web.context.ContextLoader.properties。

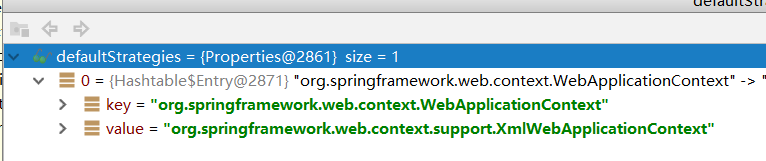
2.加载 resource 属性,并赋值给 defaultStrategies。根据 org.springframework.web.context.ContextLoader.properties 路径找到对应的文件,如下图。在这边我们拿到了默认的 WebApplicationContext,即:XmlWebApplicationContext,如下图所示。
。

接着,我们正式进入 ContextLoaderListener#contextInitialized 方法。
contextInitialized方法
@Override
public void contextInitialized(ServletContextEvent event) {
    initWebApplicationContext(event.getServletContext());
}

public WebApplicationContext initWebApplicationContext(ServletContext servletContext) {
    // 1.校验WebApplicationContext 是否已经初始化过,如果已经初始化,则抛出异常
    if (servletContext.getAttribute(WebApplicationContext.ROOT_WEB_APPLICATION_CONTEXT_ATTRIBUTE) != null) {
        throw new IllegalStateException(
                "Cannot initialize context because there is already a root application context present - " +
                        "check whether you have multiple ContextLoader* definitions in your web.xml!");
    }

    Log logger = LogFactory.getLog(ContextLoader.class);
    servletContext.log("Initializing Spring root WebApplicationContext");
    if (logger.isInfoEnabled()) {
        logger.info("Root WebApplicationContext: initialization started");
    }
    long startTime = System.currentTimeMillis();

    try {
        // Store context in local instance variable, to guarantee that
        // it is available on ServletContext shutdown.
        if (this.context == null) {
            // 2.创建一个WebApplicationContext并保存到context属性
            this.context = createWebApplicationContext(servletContext);
        }
        if (this.context instanceof ConfigurableWebApplicationContext) {
            ConfigurableWebApplicationContext cwac = (ConfigurableWebApplicationContext) this.context;
            if (!cwac.isActive()) {
                // The context has not yet been refreshed -> provide services such as
                // setting the parent context, setting the application context id, etc
                if (cwac.getParent() == null) {
                    // The context instance was injected without an explicit parent ->
                    // determine parent for root web application context, if any.
                    ApplicationContext parent = loadParentContext(servletContext);
                    cwac.setParent(parent);
                }
                // 3.配置和刷新web应用上下文
                configureAndRefreshWebApplicationContext(cwac, servletContext);
            }
        }
        // 4.设置WebApplicationContext属性
        servletContext.setAttribute(WebApplicationContext.ROOT_WEB_APPLICATION_CONTEXT_ATTRIBUTE, this.context);

        ClassLoader ccl = Thread.currentThread().getContextClassLoader();
        if (ccl == ContextLoader.class.getClassLoader()) {
            currentContext = this.context;
        } else if (ccl != null) {
            currentContextPerThread.put(ccl, this.context);
        }

        if (logger.isDebugEnabled()) {
            logger.debug("Published root WebApplicationContext as ServletContext attribute with name [" +
                    WebApplicationContext.ROOT_WEB_APPLICATION_CONTEXT_ATTRIBUTE + "]");
        }
        if (logger.isInfoEnabled()) {
            long elapsedTime = System.currentTimeMillis() - startTime;
            logger.info("Root WebApplicationContext: initialization completed in " + elapsedTime + " ms");
        }

        return this.context;
    } catch (RuntimeException ex) {
        logger.error("Context initialization failed", ex);
        servletContext.setAttribute(WebApplicationContext.ROOT_WEB_APPLICATION_CONTEXT_ATTRIBUTE, ex);
        throw ex;
    } catch (Error err) {
        logger.error("Context initialization failed", err);
        servletContext.setAttribute(WebApplicationContext.ROOT_WEB_APPLICATION_CONTEXT_ATTRIBUTE, err);
        throw err;
    }
}
2.创建一个 WebApplicationContext,见代码块1详解。
3.配置和刷新 web 应用上下文,见代码块3详解。
代码块1:createWebApplicationContext
protected WebApplicationContext createWebApplicationContext(ServletContext sc) {
    // 1.确定要创建的应用上下文的Class
    Class<?> contextClass = determineContextClass(sc);
    // 2.校验contextClass是否为ConfigurableWebApplicationContext或其子类、子接口
    if (!ConfigurableWebApplicationContext.class.isAssignableFrom(contextClass)) {
        throw new ApplicationContextException("Custom context class [" + contextClass.getName() +
                "] is not of type [" + ConfigurableWebApplicationContext.class.getName() + "]");
    }
    // 3.实例化contextClass,并强转成ConfigurableWebApplicationContext返回
    return (ConfigurableWebApplicationContext) BeanUtils.instantiateClass(contextClass);
}
1.确定要创建的应用上下文的 Class,见代码块2详解。
代码块2:determineContextClass
protected Class<?> determineContextClass(ServletContext servletContext) {
    // 1.从servletContext中解析初始化参数contextClass(web.xml可以配置该参数)
    String contextClassName = servletContext.getInitParameter(CONTEXT_CLASS_PARAM);
    if (contextClassName != null) {
        try {
            // 2.contextClassName不为空,则使用工具类构建出contextClassName的实例
            return ClassUtils.forName(contextClassName, ClassUtils.getDefaultClassLoader());
        } catch (ClassNotFoundException ex) {
            throw new ApplicationContextException(
                    "Failed to load custom context class [" + contextClassName + "]", ex);
        }
    } else {
        // 3.如果没有配置contextClass参数,则从defaultStrategies缓存中拿到默认的WerApplicationContext对应的ClassName,
        // 即:org.springframework.web.context.support.XmlWebApplicationContext
        contextClassName = defaultStrategies.getProperty(WebApplicationContext.class.getName());
        try {
            // 4.使用工具类构建出contextClassName的实例
            return ClassUtils.forName(contextClassName, ContextLoader.class.getClassLoader());
        } catch (ClassNotFoundException ex) {
            throw new ApplicationContextException(
                    "Failed to load default context class [" + contextClassName + "]", ex);
        }
    }
}
3.如果没有配置 contextClass 参数,从 defaultStrategies 缓存中拿到默认的 WerApplicationContext 对应的 ClassName,这边拿到的就是我们在本文开头解析到的默认 WebApplicationContext 的 ClassName,也就是 org.springframework.web.context.support.XmlWebApplicationContext。
代码块3:configureAndRefreshWebApplicationContext
protected void configureAndRefreshWebApplicationContext(ConfigurableWebApplicationContext wac, ServletContext sc) {
    // 1.如果应用上下文id是原始默认值,则根据相关信息生成一个更有用的
    if (ObjectUtils.identityToString(wac).equals(wac.getId())) {
        // The application context id is still set to its original default value
        // -> assign a more useful id based on available information
        // 1.1 从servletContext中解析初始化参数contextId(可以在web.xml中配置)
        String idParam = sc.getInitParameter(CONTEXT_ID_PARAM);
        if (idParam != null) {
            // 1.1.1 如果idParam不为空, 则设置为wac的Id属性
            wac.setId(idParam);
        } else {
            // Generate default id...
            // 1.1.2 如果idParam为空, 则生成默认的id, 例如: org.springframework.web.context.WebApplicationContext:
            wac.setId(ConfigurableWebApplicationContext.APPLICATION_CONTEXT_ID_PREFIX +
                    ObjectUtils.getDisplayString(sc.getContextPath()));
        }
    }

    // 2.为应用上下文设置servletContext
    wac.setServletContext(sc);
    // 3.从servletContext中解析初始化参数contextConfigLocation(可以在web.xml中配置, 这个参数一般我们都会设置)
    String configLocationParam = sc.getInitParameter(CONFIG_LOCATION_PARAM);
    if (configLocationParam != null) {
        // 4.设置wac的configLocations属性值为configLocationParam
        wac.setConfigLocation(configLocationParam);
    }

    // The wac environment's #initPropertySources will be called in any case when the context
    // is refreshed; do it eagerly here to ensure servlet property sources are in place for
    // use in any post-processing or initialization that occurs below prior to #refresh
    ConfigurableEnvironment env = wac.getEnvironment();
    if (env instanceof ConfigurableWebEnvironment) {
        // 5.初始化属性源(主要是将servletContextInitParams的占位类替换成sc)
        ((ConfigurableWebEnvironment) env).initPropertySources(sc, null);
    }

    // 6.自定义上下文
    customizeContext(sc, wac);
    // 7.应用上下文的刷新
    wac.refresh();
}
4.设置 wac 的 configLocations 属性值为 configLocationParam,见代码块4详解。
5.初始化属性源,见代码块11详解。
6.自定义上下文,见代码块12详解。
7.应用上下文的刷新,IoC 核心内容,本文不介绍,之后通过一系列文章介绍。
代码块4:wac.setConfigLocation
// AbstractRefreshableConfigApplicationContext.java
public void setConfigLocation(String location) {
    // tokenizeToStringArray: 将location通过分割符(,;\t\n)分割成String数组
    // setConfigLocations: 将分割后的路径赋值给configLocations
    setConfigLocations(StringUtils.tokenizeToStringArray(location, CONFIG_LOCATION_DELIMITERS));
}

public void setConfigLocations(String... locations) {
    if (locations != null) {
        Assert.noNullElements(locations, "Config locations must not be null");
        this.configLocations = new String[locations.length];
        // 1.遍历解析locations
        for (int i = 0; i < locations.length; i++) {
            // 2.解析给定路径,必要时用相应的环境属性值替换占位符
            this.configLocations[i] = resolvePath(locations[i]).trim();
        }
    }
    else {
        this.configLocations = null;
    }
}2.解析给定路径,必要时用相应的环境属性值替换占位符,见代码块5详解。
代码块5:resolvePath
protected String resolvePath(String path) {
    // 1.getEnvironment:获取环境属性
    // 2.resolveRequiredPlaceholders: 解析给定路径,必要时用相应的环境属性值替换占位符,例如${path}
    return getEnvironment().resolveRequiredPlaceholders(path);
}1.获取环境属性,见代码块6详解。
代码块6:getEnvironment
@Override
public ConfigurableEnvironment getEnvironment() {
    if (this.environment == null) {
        // 1.创建Environment
        this.environment = createEnvironment();
    }
    return this.environment;
}
1.创建 Environment,见代码块7详解。
代码块7:createEnvironment
protected ConfigurableEnvironment createEnvironment() {
    return new StandardEnvironment();
}此时,如果我们通过鼠标直接点击代码块6的 createEnvironment() 代码,会跳到该代码。
但是,实际上我们此时并不是走该方法(通过 debug 也可以发现)。我们注意到,该方法是通过 protected 修饰的,是允许重写的,上面这个代码是 AbstractApplicationContext 的默认实现。而此时,我们知道,我们拿到的应用上下文具体实现类是 XmlWebApplicationContext,XmlWebApplicationContext 前面几层的继承关系如下图。

createEnvironment() 方法的所有重写如下图:
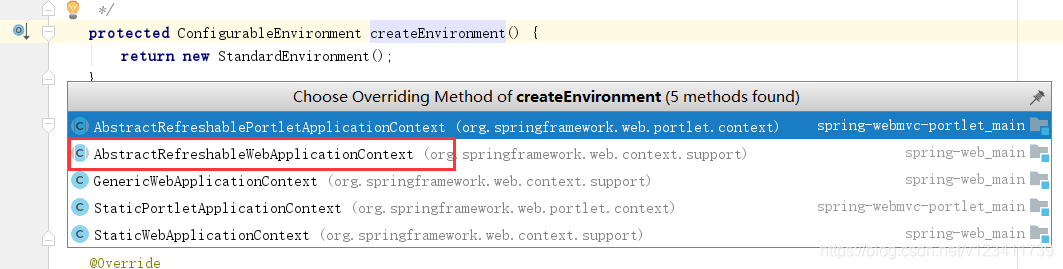
此时,我们看到 createEnvironment() 有5个重写,其中就包含 AbstractRefreshableWebApplicationContext,而通过上面的继承图,我们可以看到 XmlWebApplicationContext 直接继承自 AbstractRefreshableWebApplicationContext。因此,此时会走到 AbstractRefreshableWebApplicationContext 的重写方法中去,也就是以下代码。
@Override
protected ConfigurableEnvironment createEnvironment() {
    // 新建StandardServletEnvironment
    return new StandardServletEnvironment();
}
这边会新建 StandardServletEnvironment,这里面还包含了几个重要操作,因此单独在拿出来讲,见代码块8详解。
代码块8:new StandardServletEnvironment()
StandardServletEnvironment 的继承关系图

我们知道,初始化时,必须先初始化父类。因此,此时会先初始化 AbstractEnvironment,AbstractEnvironment 的构造函数如下。
public AbstractEnvironment() {
    // 1.自定义属性源
    customizePropertySources(this.propertySources);
    if (logger.isDebugEnabled()) {
        logger.debug("Initialized " + getClass().getSimpleName() + " with PropertySources " + this.propertySources);
    }
}1.自定义数据源,见代码块9详解。
代码块9:customizePropertySources
protected void customizePropertySources(MutablePropertySources propertySources) {
}
AbstractEnvironment 中的 customizePropertySources 方法为空方法,通过 protected 修饰,用于给子类进行重写。因此,此时我们会走到 StandardServletEnvironment 中的重写方法。
@Override
protected void customizePropertySources(MutablePropertySources propertySources) {
    // 1.添加servletConfigInitParams属性源(作为占位符, 之后会被替换)
    propertySources.addLast(new StubPropertySource(SERVLET_CONFIG_PROPERTY_SOURCE_NAME));
    // 2.添加servletContextInitParams属性源(作为占位符, 之后会被替换)
    propertySources.addLast(new StubPropertySource(SERVLET_CONTEXT_PROPERTY_SOURCE_NAME));
    if (JndiLocatorDelegate.isDefaultJndiEnvironmentAvailable()) {
        // 3.添加jndiProperties属性源
        propertySources.addLast(new JndiPropertySource(JNDI_PROPERTY_SOURCE_NAME));
    }
    // 4.调用父类中的customizePropertySources方法
    super.customizePropertySources(propertySources);
}
1.添加 servletConfigInitParams 属性源(作为占位符,之后会被替换)
2.添加 servletContextInitParams 属性源(作为占位符,之后会被替换)
4.调用父类中的 customizePropertySources 方法,见代码块10详解。
代码块10:customizePropertySources
@Override
protected void customizePropertySources(MutablePropertySources propertySources) {
    // 添加systemProperties属性源
    propertySources.addLast(new MapPropertySource(SYSTEM_PROPERTIES_PROPERTY_SOURCE_NAME, getSystemProperties()));
    // 添加systemEnvironment属性源
    propertySources.addLast(new SystemEnvironmentPropertySource(SYSTEM_ENVIRONMENT_PROPERTY_SOURCE_NAME, getSystemEnvironment()));
}至此,代码块6的 createEnvironment() 方法执行结束,此时的 environment 如下。

代码块11:initPropertySources
public static void initServletPropertySources(
        MutablePropertySources propertySources, ServletContext servletContext, ServletConfig servletConfig) {

    Assert.notNull(propertySources, "'propertySources' must not be null");
    if (servletContext != null && propertySources.contains(StandardServletEnvironment.SERVLET_CONTEXT_PROPERTY_SOURCE_NAME) &&
            propertySources.get(StandardServletEnvironment.SERVLET_CONTEXT_PROPERTY_SOURCE_NAME) instanceof StubPropertySource) {
        // 1.如果servletContext不为null && propertySources中包含servletContextInitParams数据源 && 该数据源的类型为StubPropertySource,
        // 则将servletContextInitParams的数据源替换成servletContext
        propertySources.replace(StandardServletEnvironment.SERVLET_CONTEXT_PROPERTY_SOURCE_NAME,
                new ServletContextPropertySource(StandardServletEnvironment.SERVLET_CONTEXT_PROPERTY_SOURCE_NAME, servletContext));
    }
    if (servletConfig != null && propertySources.contains(StandardServletEnvironment.SERVLET_CONFIG_PROPERTY_SOURCE_NAME) &&
            propertySources.get(StandardServletEnvironment.SERVLET_CONFIG_PROPERTY_SOURCE_NAME) instanceof StubPropertySource) {
        // 2.如果servletConfig不为null && propertySources中包含servletConfigInitParams数据源 && 该数据源的类型为StubPropertySource,
        // 则将servletConfigInitParams的数据源替换成servletConfig
        propertySources.replace(StandardServletEnvironment.SERVLET_CONFIG_PROPERTY_SOURCE_NAME,
                new ServletConfigPropertySource(StandardServletEnvironment.SERVLET_CONFIG_PROPERTY_SOURCE_NAME, servletConfig));
    }
}将代码块9中设置的占位符数据源,替换成真正的数据源。
代码块12:customizeContext
protected void customizeContext(ServletContext sc, ConfigurableWebApplicationContext wac) {
    // 1.确定应用上下文的初始化类
    List<Class<ApplicationContextInitializer<ConfigurableApplicationContext>>> initializerClasses =
            determineContextInitializerClasses(sc);

    // 2.如果initializerClasses不为空, 遍历处理initializerClasses
    for (Class<ApplicationContextInitializer<ConfigurableApplicationContext>> initializerClass : initializerClasses) {
        Class<?> initializerContextClass =
                GenericTypeResolver.resolveTypeArgument(initializerClass, ApplicationContextInitializer.class);
        if (initializerContextClass != null && !initializerContextClass.isInstance(wac)) {
            throw new ApplicationContextException(String.format(
                    "Could not apply context initializer [%s] since its generic parameter [%s] " +
                            "is not assignable from the type of application context used by this " +
                            "context loader: [%s]", initializerClass.getName(), initializerContextClass.getName(),
                    wac.getClass().getName()));
        }
        // 3.实例化initializerClass, 并添加到contextInitializers中
        this.contextInitializers.add(BeanUtils.instantiateClass(initializerClass));
    }

    AnnotationAwareOrderComparator.sort(this.contextInitializers);
    // 4.遍历实例化后的contextInitializers
    for (ApplicationContextInitializer<ConfigurableApplicationContext> initializer : this.contextInitializers) {
        // 5.调用initializer的initialize方法,进行自定义初始化wac操作
        initializer.initialize(wac);
    }
}1.确定应用上下文的初始化类,见代码块13详解。
代码块13:determineContextInitializerClasses
protected List<Class<ApplicationContextInitializer<ConfigurableApplicationContext>>>
determineContextInitializerClasses(ServletContext servletContext) {

    List<Class<ApplicationContextInitializer<ConfigurableApplicationContext>>> classes =
            new ArrayList<Class<ApplicationContextInitializer<ConfigurableApplicationContext>>>();

    // 1.从servletContext中解析初始化参数globalInitializerClasses(可在web.xml中配置)
    String globalClassNames = servletContext.getInitParameter(GLOBAL_INITIALIZER_CLASSES_PARAM);
    if (globalClassNames != null) {
        // 1.1 如果globalClassNames不为空, 则使用分割符分割, 然后进行遍历
        for (String className : StringUtils.tokenizeToStringArray(globalClassNames, INIT_PARAM_DELIMITERS)) {
            // 1.2 实例化className,获得className对应的类实例
            classes.add(loadInitializerClass(className));
        }
    }

    // 2.解析初始化参数contextInitializerClasses(可在web.xml中配置)
    String localClassNames = servletContext.getInitParameter(CONTEXT_INITIALIZER_CLASSES_PARAM);
    if (localClassNames != null) {
        // 2.1 如果localClassNames不为空, 则使用分割符分割, 然后进行遍历
        for (String className : StringUtils.tokenizeToStringArray(localClassNames, INIT_PARAM_DELIMITERS)) {
            // 2.2 实例化className,获得className对应的类实例
            classes.add(loadInitializerClass(className));
        }
    }

    return classes;
}
1.2 实例化 className,见代码块14详解。
代码块14:loadInitializerClass
@SuppressWarnings("unchecked")
private Class<ApplicationContextInitializer<ConfigurableApplicationContext>> loadInitializerClass(String className) {
    try {
        // 1.实例化className
        Class<?> clazz = ClassUtils.forName(className, ClassUtils.getDefaultClassLoader());
        if (!ApplicationContextInitializer.class.isAssignableFrom(clazz)) {
            // 2.校验clazz是否实现了ApplicationContextInitializer接口, 如果没有则抛异常
            throw new ApplicationContextException(
                    "Initializer class does not implement ApplicationContextInitializer interface: " + clazz);
        }
        // 3.clazz强转成ApplicationContextInitializer, 并返回
        return (Class<ApplicationContextInitializer<ConfigurableApplicationContext>>) clazz;
    } catch (ClassNotFoundException ex) {
        throw new ApplicationContextException("Failed to load context initializer class [" + className + "]", ex);
    }
}
customizeContext方法扩展
从代码块12到代码块14,可以很明显的看出 customizeContext 方法是 Spring 提供给开发者的一个扩展点,我们可以通过此方法对 ConfigurableApplicationContext 进行一些自定义操作,具体使用如下。
1.创建一个 ApplicationContextInitializer 接口的实现类,例如下面的 SpringApplicationContextInitializer,并在 initialize 方法中进行自己的逻辑操作,例如:添加监听器、添加 BeanFactoryPostProcessor。
package com.joonwhee.open.spring;

import com.joonwhee.open.listener.EarlyListener;
import com.joonwhee.open.processor.MyBeanFactoryPostProcessor;
import org.springframework.context.ApplicationContextInitializer;
import org.springframework.context.ConfigurableApplicationContext;

/**
 * @author joonwhee
 * @date 2019/1/19
 */
public class SpringApplicationContextInitializer implements ApplicationContextInitializer<ConfigurableApplicationContext> {
    @Override
    public void initialize(ConfigurableApplicationContext applicationContext) {
        // 自己的逻辑实现

        // 例子1:通过硬编码的方式添加监听器
        EarlyListener earlyListener = new EarlyListener();
        applicationContext.addApplicationListener(earlyListener);

        // 例子2:通过硬编码的方式添加BeanFactoryPostProcessor
        MyBeanFactoryPostProcessor myBeanFactoryPostProcessor = new MyBeanFactoryPostProcessor();
        applicationContext.addBeanFactoryPostProcessor(myBeanFactoryPostProcessor);
    }
}
2.在web.xml中,定义 contextInitializerClasses 或 globalInitializerClasses 参数,参数值为 SpringApplicationContextInitializer 的全路径。

配置完后,当项目启动走到 customizeContext 方法时,会找到 SpringApplicationContextInitializer,初始化该类,最后调用该类的 initialize 方法。
总结
至此,refresh 方法之前的操作都进行完毕,比较重要的操作有:
- 获取默认的 WebApplicationContext:XmlWebApplicationContext。
- 获取 Spring 配置文件的路径(参数 contextConfigLocation),并赋值给 AbstractRefreshableConfigApplicationContext 类的 configLocations 属性。
- 提供自定义应用上下文 ConfigurableApplicationContext 的扩展点。